vmware 安装 Mac OS X 10.9 Mavericks
This guide shows how to install fresh OS X 10.9 Mavericks on VMware workstation with Windows 7 or Windows 8. Mavericks is the latest desktop & laptop OS from Apple with full of new features. After it has been release officially, it can be download from Apple site (or from any torrent sites).
By any chance you like to try latest OS X 10.9 on VMware virtual machine with Windows 7 or Windows 8 host, you can follow these steps. Basically the OS is available as an app. So, it has to be used with existing Mac OS X and installed on different partition with dual boot. This way doesn’t work in virtual environment due to boot loader and disk issues with VMware and VirtualBox.
Update: If you like to use OS X 10.9 Mavericks with pre-installed VMware image without trying fresh installation as shown below, you can click here to see our simple guide.
To continue our normal steps, we will be making a virtual bootable hard disk from OS X 10.9 DMG, and boot the new virtual machine from it. Creating bootable VMDK file is slightly a lengthy processor and I’m sure the below each steps will be good enough to explain it.
Earlier this guide was made with DP version of Mavericks, but you can follow the same steps to do the installation of final retail version.
What you Need to Make Bootable OS X 10.9 VMDK in VMware
1) Running OS X (10.8 or 10.7) in VMware
2) OS X 10.9 Mavericks DMG file
Part 1 – How to Make Bootable Hard disk (VMDK)
1) Make sure to have a running Mac OS X virtual machine in VMware workstation.
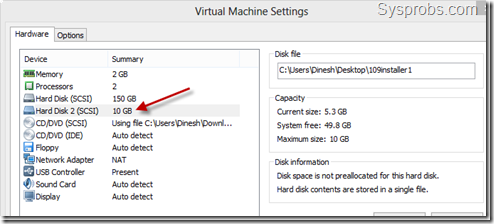
2) Attach a new hard disk VMDK file (single file, no split) size of 10GB. The virtual machine should be powered off to add new virtual hard disk.
3) Transfer (copy) the OS X 10.9 Mavericks DMG file inside virtual machine. I have used USB disk for this.
4) Once you have started virtual machine with newly added hard disk, you need to initiate the disk and create a partition.
Name the partition, and select correct format and type.
- Name – 109installer
- Format: Mac OS X Extended
- Partitions: Single partition – Apple Partition Map
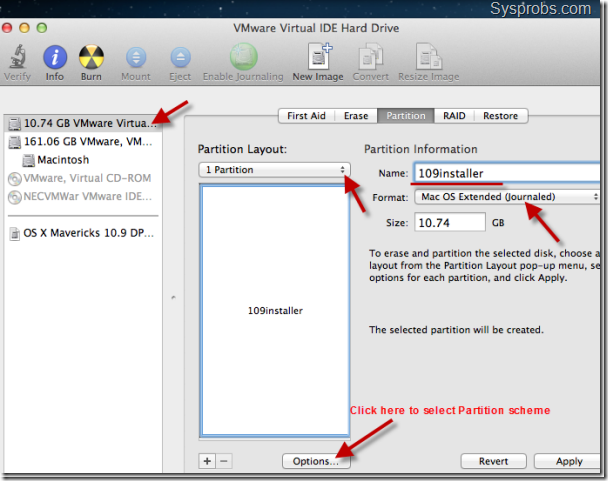

Press apply to create partition and format.
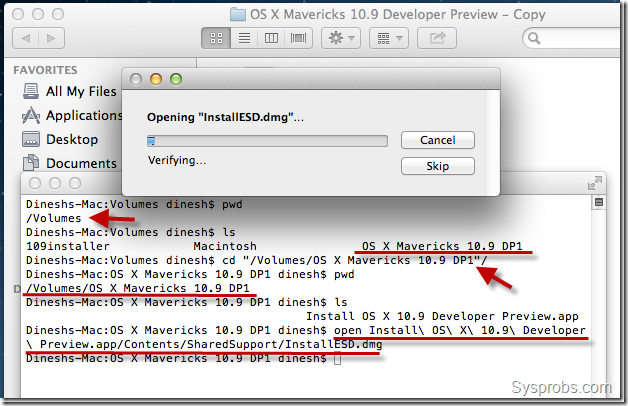
5) Double click OS X 10.9 Mavericks DMG file and let it mount. A new volume ( ‘OS X Mavericks 10.9 DP1” as of now) will appear under volumes once it’s mounted.
We need to open (mount) InstallESD.dmg file now. You can run the following terminal command from inside OS X Mavericks 10.9 DP1.
6) Mount BaseSystem.dmg which is inside the volume mounted in previous step.
Run following command from inside newly mounted volume called ‘OS X Install ESD’.

Wait for some time to get over of mounting BaseSystem.
7) It’s time to restore BaseSystem content to newly created partition (VMDK disk).
Open Disk Utility under utilities. Set the source and destination correctly as shown below. Press Restore button to start the process.
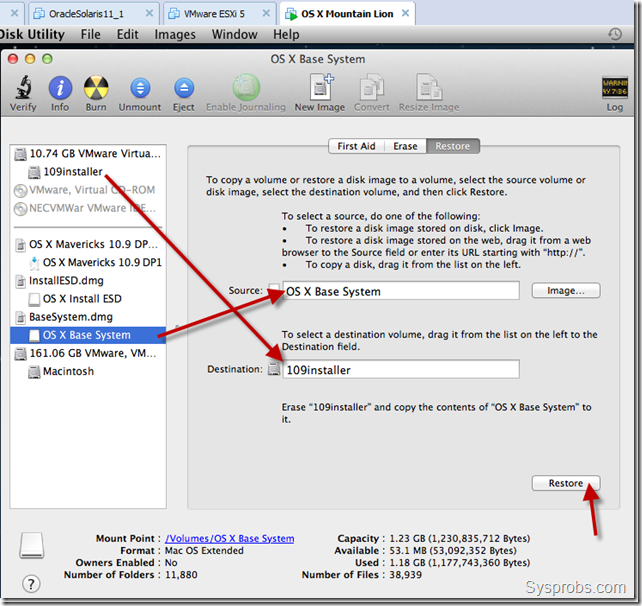
Remember: The above process will overwrite destination volume and it’s name. So, to get the same name (‘109installer’ in this example), you need to rename the volume again after above restore process had been completed.
8.) Let’s copy the packages from original location to new installer disk.

Make sure to follow correct volume names in your scenario.
9) I’m not sure whether this step is required, but still I’m following it to mark as OS X server version.

That’s it, we have completed major part of installing OS X 10.9 on VMware workstation, which is preparing bootable disk.
Shutdown the existing Mac OS X virtual machine and safely remove the second 10GB VMDK file. I recommend to take a copy of this file.
Part 2 – How to Boot OS X 10.9 Mavericks on VMware workstation with Windows 8 or Windows 7
10) Better to have latest version of VMware workstation.
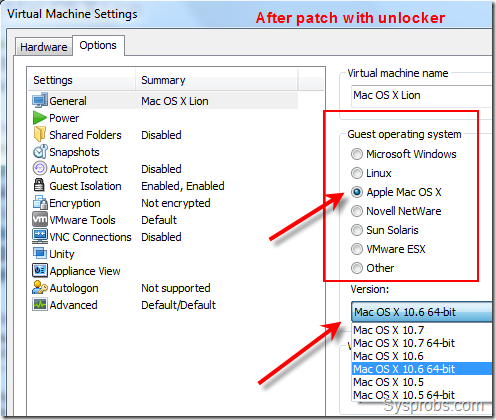
Unlock VMware workstation for Mac OS X guest support in Windows host. Check our earlier guide how to use VMware workstation 8 or 9 unlocker.
You must see Apple Mac OS X support in guest OS area after applying the patch,
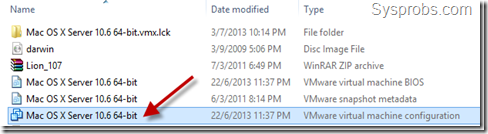
11) Download Sysprobs lion files from here and extract it where you have enough disk space for 10.9 installation.
Open pre configured virtual machine VMX file from extracted location, it will be opened by VMware workstation by default.
Modify the hardware settings as you like depending on the physical computer hardware resources.
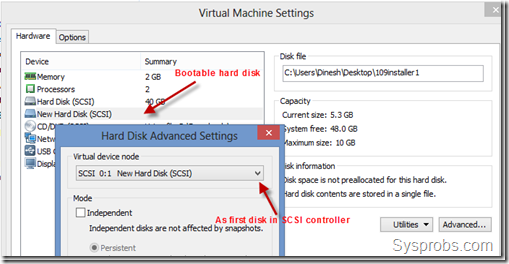
12) Attach the bootable VMDK file which we created in earlier steps. Make sure to add it as first disk of SCSI controller of virtual machine.
13) Power on Mavericks OS X 10.9 virtual machine now. If the unlocker patch and bootable hard disk (VMDK) worked fine, then you will be seeing the installation screen.
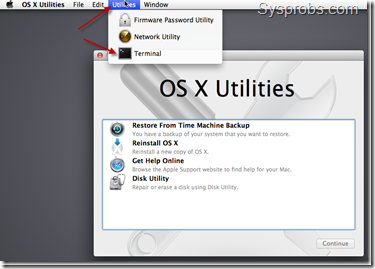
As you could see in above screen, there is no install button to start installation straightaway. No worries, start the terminal as mentioned.
14) Use installer command to start installation by specifying destination volume. By default the new disk (destination disk) will be named ‘Macintosh’. If you are not sure about disk name, you can use ‘Disk Utility’ to see the correct name.
Use below command to start.
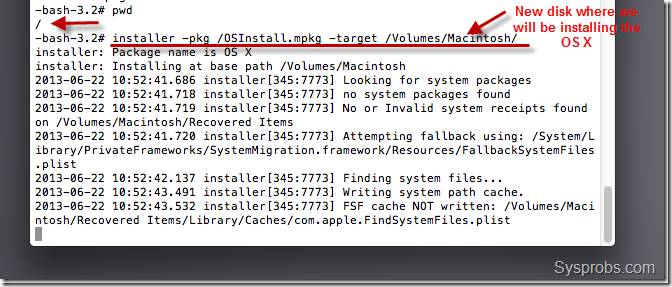
Installation process will take some time. Nothing may appear on screen for some time, do not worry and let it run until you see the final message.
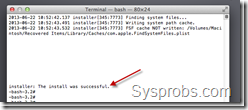
15) Once installation completed, shut down the virtual machine and remove bootable VMDK file. Start up the Mavericks virtual machine and I’m sure you will be landing on initial configuration and personalization screens. Complete them and enjoy.
This method is completely for testing and learning purpose only. You can’t use OS X on VMware workstation for full utilization of all features.
Install VMware Tools on OS X 10.9 Mavericks
16) Download latest darwin.iso from here. The correct available version as of now is here.
Attach darwin.iso to virtual machine’s CD drive. Once it’s mounted, run install VMware tools to start installation.
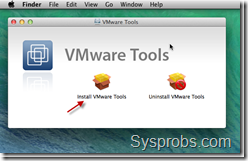
VMware tools will slightly improve the video performance and mouse integration. Even full screen option will be enabled.
But the overall display performance is very poor as OS X machine can’t access the physical hardware resources directly.
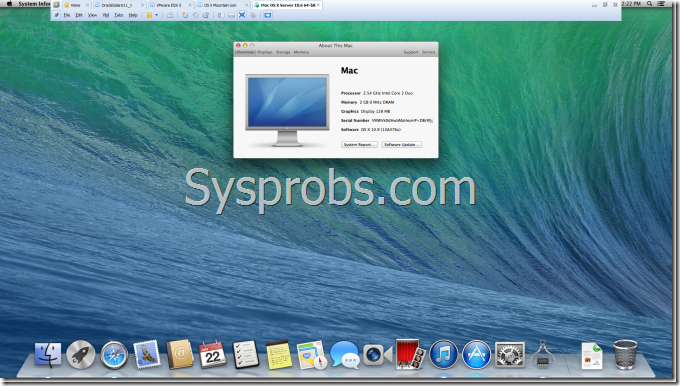
Here is the working OS X 10.9 Mavericks on VMware workstation with Windows 8 ( full screen view enabled).
vmware 安装 Mac OS X 10.9 Mavericks的更多相关文章
- VMWare 安装 Mac OS X10.10 Yosemite
OS X Yosemite 新功能特性 Mac OS X10.10 GM3|OS X 10.10 Yosemite 正式版下载 如何在虚拟机中安装苹果mac系统图示说明 vm10虚拟机安装Mac OS ...
- VMware 11完全安装Mac OS X 10.10
本文已迁移到我的个人网站 http://www.wshunli.com 文章地址: http://www.wshunli.com/2016/03/17/VMware-12安装Mac-OS-X-10-1 ...
- VMware Workstation 11 安装MAC OS X 10.10 Yosemite(14B25)图解 2015-01-13 12:26:01|
VMware Workstation 11 安装MAC OS X 10.10 Yosemite(14B25)图解 2015-01-13 12:26:01| 分类: 网络互联 | 标签:10.10 ...
- 【转】VMware 11安装Mac OS X 10.10
VM11安装Mac OS X 10.10 网上竟没有搜到相似的内容,所以拿出来大家分享 工具/原料 1.VMware Workstation 11 2.unlocker 203(for OS X 插件 ...
- 在VMware Workstation 9中安装Mac OS X 10.8 Mountain Lion
本文环境: CPU:Intel Core i7 920: OS:Windows 7: 内存:8G: 玩Hackintosh各有各的理由,不管什么理由,利用虚拟机安装Mac OS X都是一个可行的办法. ...
- [看图说话]在VMware Workstation 9中安装Mac OS X 10.8 Mountain Lion
本文环境: CPU:Intel Core i7 920: OS:Windows 7: 内存:8G: 玩Hackintosh各有各的理由,不管什么理由,利用虚拟机安装Mac OS X都是一个可行的办法. ...
- VMware 8安装Mac OS X 10.7
(Windows 7 X64环境下,VMware 8.0正式版)虚拟机首尝MAC OS X 10.7 Lion系统成功,特将此好消息分享.2年了,终于我也装上了Mac,我也成功的尝到了苹果味道,看着那 ...
- VMware 12安装Mac OS X 10.11
去年写了一篇安装Mac OS X 10.10的文章,看到大家都想体验OS X,大多数都能成功,但也在其中发现了一些问题,所以更新一下,希望对大家有所帮助. 1048VMware 11安装Mac O ...
- VMware 12安装Mac OS X 10.11&解决上网的问题
近日想在Win10上安装Mac OS 玩玩,于是上网搜了相关资源,查看了相关经验分享,开始着手安装.系统很快成功安装,但最大问题是虚拟机中的Mac OS无法上网.费了很长时间,最终看到Ping通结果, ...
随机推荐
- SparkR(R on Spark)编程指南 含 dataframe操作 2.0
SparkR(R on Spark)编程指南 Spark 2015-06-09 28155 1评论 下载为PDF 为什么不允许复制 关注iteblog_hadoop公众号,并在这里评论区留言 ...
- CSS弹出背景半透明窗口
<script type="text/javascript" src="<ww:url value='/js/jquery-1.8.3.min.js'/> ...
- Linux之查看切换Shell
1.查看存在的shell cat /etc/shells 2.查看使用的shell echo $SHELL 3.切换shell 切换bash chsh -s /bin/bash 切换zsh chsh ...
- ecmall数据库表详解 二次开发必备
文章分类表ecm_acategory 字段 类型 Null 默认 注释 cate_id int(10) 否 自增ID号,分类ID号 cate_name varchar(100) 否 分类的名称 ...
- (笔记)Linux内核中内存相关的操作函数
linux内核中内存相关的操作函数 1.kmalloc()/kfree() static __always_inline void *kmalloc(size_t size, gfp_t flags) ...
- Unity如何内置Visual Studio
一.问题的起源 软件环境:Unity 2017.3.0f3,Visual Studio 2013 问题描述:在Unity中创建C#脚本后,准备双击打开进行编辑时,出现了Fatal Error. 二.问 ...
- JDBC流ASCII和二进制数据
PreparedStatement对象可以使用输入和输出流来提供参数数据.能够将整个文件放入可以容纳大值的数据库列,例如CLOB和BLOB数据类型. 有以下方法可用于流式传输数据 - setAscii ...
- 为什么运行PHP就会出现404错误?
2007-05-09 12:40Googfox | 分类:浏览器 | 浏览8146次 我在IIS中安装了Zend Core 2.0,IIS中用主机头值设置了许多80端口的网站,但是不管在这些网站中的哪 ...
- (转)DSound开发常用的几个结构
WAVEFORMATEX WAVEFORMATEX { WORD wFormatTag; WORD nChannels; DWORD nSamplesPerSec; DWORD nAvgBytesPe ...
- 使用Camera功能 AREA的理解
转至 http://blog.csdn.net/think_soft/article/details/7998478 使用Camera功能 大多数的Camera功能都是使用Camera.Paramet ...