解压版MySQL安装说明
一、复制my.ini到MySQL解压的目录
例如:E:\MySQL
二、修改my.ini第39~40行
basedir = "E:\\MySQL"
datadir = "E:\\MySQL\\data"
三、检查电脑上是否安装过MySQL服务
我的电脑-->管理-->服务和应用程序-->服务,查看是否有MySQL
四、开始菜单-->附件-->命令提示符-->右键,一管理员身份运行
五、cd /d E:\MySQL\bin
mysqld -install MySQL --defaults-file="E:\MySQL\my.ini"
提示成功安装MySQL服务
六、我的电脑-->管理-->服务和应用程序-->服务,右键MySQL,点击启动。
如果启动不成,请删除E:\MySQL\data目录下的对应文件
ib_logfile0
ib_logfile1
***.err
***.pid
32位MySQL:my.ini
 # Example MySQL config file for small systems.

 #

 # This is for a system with little memory (<= 64M) where MySQL is only used

 # from time to time and it's important that the mysqld daemon

 # doesn't use much resources.

 #

 # MySQL programs look for option files in a set of

 # locations which depend on the deployment platform.

 # You can copy this option file to one of those

 # locations. For information about these locations, see:

 # http://dev.mysql.com/doc/mysql/en/option-files.html

 #

 # In this file, you can use all long options that a program supports.

 # If you want to know which options a program supports, run the program

 # with the "--help" option.

 # The following options will be passed to all MySQL clients

 [client]

 #password    = your_password

 port        = 3306

 socket        = /tmp/mysql.sock

 default-character-set = utf8

 # Here follows entries for some specific programs

 # The MySQL server

 [mysqld]

 port        = 3306

 socket        = /tmp/mysql.sock

 skip-external-locking

 key_buffer_size = 16K

 max_allowed_packet = 1M

 table_open_cache = 4

 sort_buffer_size = 64K

 read_buffer_size = 256K

 read_rnd_buffer_size = 256K

 net_buffer_length = 2K

 thread_stack = 128K

 basedir = "E:\\MySQL"

 datadir = "E:\\MySQL\\data"

 character-set-server = utf8

 # Don't listen on a TCP/IP port at all. This can be a security enhancement,

 # if all processes that need to connect to mysqld run on the same host.

 # All interaction with mysqld must be made via Unix sockets or named pipes.

 # Note that using this option without enabling named pipes on Windows

 # (using the "enable-named-pipe" option) will render mysqld useless!

 #

 #skip-networking

 server-id    = 1

 # Uncomment the following if you want to log updates

 #log-bin=mysql-bin

 # binary logging format - mixed recommended

 #binlog_format=mixed

 # Causes updates to non-transactional engines using statement format to be

 # written directly to binary log. Before using this option make sure that

 # there are no dependencies between transactional and non-transactional

 # tables such as in the statement INSERT INTO t_myisam SELECT * FROM

 # t_innodb; otherwise, slaves may diverge from the master.

 #binlog_direct_non_transactional_updates=TRUE

 # Uncomment the following if you are using InnoDB tables

 #innodb_data_home_dir = C:\\mysql\\data\\

 #innodb_data_file_path = ibdata1:10M:autoextend

 #innodb_log_group_home_dir = C:\\mysql\\data\\

 # You can set .._buffer_pool_size up to 50 - 80 %

 # of RAM but beware of setting memory usage too high

 #innodb_buffer_pool_size = 16M

 #innodb_additional_mem_pool_size = 2M

 # Set .._log_file_size to 25 % of buffer pool size

 #innodb_log_file_size = 5M

 #innodb_log_buffer_size = 8M

 #innodb_flush_log_at_trx_commit = 1

 #innodb_lock_wait_timeout = 50

 [mysqldump]

 quick

 max_allowed_packet = 16M

 [mysql]

 no-auto-rehash

 # Remove the next comment character if you are not familiar with SQL

 #safe-updates

 [myisamchk]

 key_buffer_size = 8M

 sort_buffer_size = 8M

 [mysqlhotcopy]

 interactive-timeout
64位MySQL:my.ini
 # For advice on how to change settings please see

 # http://dev.mysql.com/doc/refman/5.6/en/server-configuration-defaults.html

 # *** DO NOT EDIT THIS FILE. It's a template which will be copied to the

 # *** default location during install, and will be replaced if you

 # *** upgrade to a newer version of MySQL.

 [mysqld]

 # Remove leading # and set to the amount of RAM for the most important data

 # cache in MySQL. Start at 70% of total RAM for dedicated server, else 10%.

 # innodb_buffer_pool_size = 128M

 # Remove leading # to turn on a very important data integrity option: logging

 # changes to the binary log between backups.

 # log_bin

 # These are commonly set, remove the # and set as required.

 # basedir = .....

 # datadir = .....

 # port = .....

 # server_id = .....

 basedir = D:/MySQL-5.6.20-X64

 datadir = D:/MySQL-5.6.20-X64/data

 port = 3306

 #server_id = .....

 character-set-server = utf8

 default-storage-engine = INNODB

 # Remove leading # to set options mainly useful for reporting servers.

 # The server defaults are faster for transactions and fast SELECTs.

 # Adjust sizes as needed, experiment to find the optimal values.

 # join_buffer_size = 128M

 # sort_buffer_size = 2M

 # read_rnd_buffer_size = 2M

 sql_mode=NO_ENGINE_SUBSTITUTION,STRICT_TRANS_TABLES

 [client]

 default-character-set=utf8
四个windows的脚本:
OneKeyInstallMySQL.bat

@echo off

%cd%/bin/mysqld -install MySQL --defaults-file="D:\MySQL-5.6.24\my.ini"

pause

OneKeyUninstallMySQL.bat

@echo off

%cd%/bin/mysqld -remove MySQL

pause

OneKeyStartMySQL.bat

@echo off

net start mysql

pause

OneKeyStopMySQL.bat

@echo off

net stop mysql

pause
MySQL-5.6.38的my.ini
# For advice on how to change settings please see

# http://dev.mysql.com/doc/refman/5.6/en/server-configuration-defaults.html

# *** DO NOT EDIT THIS FILE. It's a template which will be copied to the

# *** default location during install, and will be replaced if you

# *** upgrade to a newer version of MySQL.

[client]

default-character-set=utf8

[mysqld]

# Remove leading # and set to the amount of RAM for the most important data

# cache in MySQL. Start at 70% of total RAM for dedicated server, else 10%.

# innodb_buffer_pool_size = 128M

# Remove leading # to turn on a very important data integrity option: logging

# changes to the binary log between backups.

# log_bin

# These are commonly set, remove the # and set as required.

basedir = D:\MySQL-5.6.38

datadir = D:\MySQL-5.6.38\data

character-set-server=utf8

# port = .....

# server_id = .....

# Remove leading # to set options mainly useful for reporting servers.

# The server defaults are faster for transactions and fast SELECTs.

# Adjust sizes as needed, experiment to find the optimal values.

# join_buffer_size = 128M

# sort_buffer_size = 2M

# read_rnd_buffer_size = 2M

sql_mode=NO_ENGINE_SUBSTITUTION,STRICT_TRANS_TABLES
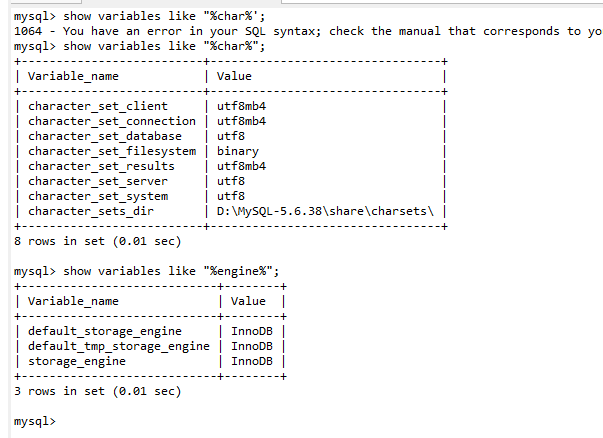
命令行查看编码和存储引擎的命令:
解压版MySQL安装说明的更多相关文章
- 解压版mysql安装--windows系统
1 解压到某个目录 2 配置配置文件 3 执行命令:安装目录/bin/mysqld --install mysql5.6 --defaults-file=指定配置文件位置 "安装目录/bin ...
- mysql-5.7.20-winx64.zip Zip版、解压版MySQL安装
1. zip下载地址: https://dev.mysql.com/get/Downloads/MySQL-5.7/mysql-5.7.20-winx64.zip 2.官方文档位置: http:// ...
- 解压版mysql安装步骤
第一步:解压mysql,例如解压后的目录在C:\Program Files\mysql-5.6.36-winx64 第二步:配置mysql环境变量,类似配置java的环境变量 计算机右键===> ...
- 解压版mysql安装
步骤如下: 1.下载安装包 2.在环境变量中配置安装包的bin路径 3.修改安装包下的my-default.ini. 修改basedir和datadir的值为解压文件对应的路径,port和 serve ...
- 解压版MySQL安装后初始化root密码
1: C:\Users\gechong>mysql
- 解压版mysql+免破解版Navicat,好用!
解压版mysql安装流程 获取mysql压缩包 获取地址: 链接:https://pan.baidu.com/s/1HqdFDQn_6ccPM0gOftApIg 提取码:n19t 获取压缩包后可安装压 ...
- Windows 7安装解压版MySQL 5.6(不包含配置文件优化)
到官网下载MySQL5.6 下载地址:http://dev.mysql.com/downloads/mysql/5.6.html, 提供了 .exe版本 和 .zip解压版,因为我的操作系统是64位的 ...
- Mysql解压版的安装
Mysql解压版的安装 ——@梁WP 1.解压mysql到合适的地方 2.右击计算机-属性-高级系统设置-高级-环境变量,弹出“环境变量”对话框,修改下面的系统变量 3.新建MYSQL_HOME变量, ...
- Windows下安装zip包解压版mysql
Windows下安装zip包解压版mysql 虽然官方提供了非常好的安装文件,但是有的时候不想每次再重装系统之后都要安装一遍MySQL,需要使用zip包版本的MySQL.在安装时需如下三步: 1. 新 ...
随机推荐
- 把ISO文件加载到虚拟光驱
1. 下载迅雷 2. 介绍一个下载微软产品的网站(I tell you),里面的下载程序都是破解好的罗.http://www.itellyou.cn/ 3. 在"I tell you&q ...
- Repeater 获取数据值
<input id="btn_fld_PRD_UM" class="btn" type="button" value="选择 ...
- 阻塞式socket例子学习
/************************************************************************* > File Name: Win_Serve ...
- Spring MVC学习笔记——用户增删该查和服务器端验证
建立一个动态web项目,起名为SpringMVC_crud 导包,其中包括jstl的一些包等 1.先写一个User.java,是用户类 文件User.java文件 package org.common ...
- R树空间索引及其变种
1.R树及其变种:百度百科 2.R树详介:http://blog.csdn.net/jazywoo123/article/details/7792745 3.R树及变种小结 R树:叶子节点或中间节点都 ...
- 关于MarshalByRefObject的解释
http://www.cnblogs.com/webfpc/archive/2010/03/10/1667101.html 首先了解一下不同应用程序域中的对象的通信方式有两种: 一种是跨应用程序域边界 ...
- Python之路【第十四篇】前端补充回顾
布局和事件 1.布局 首先看下下面的图片: 上面的内容都是居中的,怎么实现这个效果呢,第一种方法是通过float的方式,第二种是通过“div居中的方式” 第一种方式不在复述了,直接看第二种方式: 1. ...
- C# 对象 序列化 XML
using System; using System.Collections.Generic; using System.Linq; using System.Text; using System.I ...
- Junit使用
eclipse Junit的简单使用: eclipse自带了Junit插件. 安装Junit,如下图所示,右键项目-->Properties-->Add Library 选择Junit 选 ...
- Emoji表情符号录入MySQL数据库报错的解决方案(MySQL utf8与utf8mb4区别)
本文转自:http://blog.itpub.net/26230597/viewspace-1243233/前言:手机app应用评论的时候,恢复表情符号,提示失败. 1,查看tomcat后台日志,核心 ...