Spring AOP 五大通知类型
1.前置通知
在目标方法执行之前执行执行的通知。
前置通知方法,可以没有参数,也可以额外接收一个JoinPoint,Spring会自动将该对象传入,代表当前的连接点,通过该对象可以获取目标对象 和 目标方法相关的信息。
注意,如果接收JoinPoint,必须保证其为方法的第一个参数,否则报错。
配置方式:

<?xml version="1.0" encoding="UTF-8"?>

<beans xmlns="http://www.springframework.org/schema/beans"

    xmlns:context="http://www.springframework.org/schema/context"

    xmlns:aop="http://www.springframework.org/schema/aop"

    xmlns:xsi="http://www.w3.org/2001/XMLSchema-instance"

    xsi:schemaLocation="

    http://www.springframework.org/schema/beans

    http://www.springframework.org/schema/beans/spring-beans-3.2.xsd

    http://www.springframework.org/schema/context

    http://www.springframework.org/schema/context/spring-context-3.2.xsd

    http://www.springframework.org/schema/aop

    http://www.springframework.org/schema/aop/spring-aop-3.2.xsd

    ">

    <context:annotation-config></context:annotation-config>

    <context:component-scan base-package="cn.tedu.service,cn.tedu.aop"></context:component-scan>

    <aop:config proxy-target-class="true">

        <!-- 配置切入点  -->

        <aop:pointcut

            expression="execution(* cn.tedu.service.UserServiceImpl.addUser(..))"

            id="pc01"/>

        <!-- 配置切面 -->

        <aop:aspect ref="firstAspect">
       <<!-- 前置通知 -->

            <aop:before method="before" pointcut-ref="pc01"/>

        </aop:aspect>

    </aop:config>

</beans>
package cn.tedu.service;

import org.springframework.stereotype.Service;

/**

 * UserServiceImple:目标对象

 */

@Service("userService")

public class UserServiceImple implements UserService {

    @Override

    public void addUser(String name) {

        System.out.println("增加用户。。");

    }

    @Override

    public void updateUser() {

        System.out.println("修改用户。。");

    }

    @Override

    public void deleteUser() {

        System.out.println("删除用户。。");

    }

    @Override

    public void query() {

        System.out.println("查询用户。。");

    }

}
package cn.tedu.aop;

import org.aspectj.lang.JoinPoint;

import org.aspectj.lang.Signature;

import org.springframework.stereotype.Component;

/**

 * FirstAspect:切面代码

 */

@Component

public class FirstAspect {

    public void before(JoinPoint jp){ // 可以选择额外的传入一个JoinPoint连接点对象,必须用方法的第一个参数接收。

        Class clz = jp.getTarget().getClass();

        Signature signature = jp.getSignature(); // 通过JoinPoint对象获取更多信息

        String name = signature.getName();

        System.out.println("1 -- before...["+clz+"]...["+name+"]...");

    }

}
package cn.tedu.test;

import org.junit.Test;

import org.springframework.context.ApplicationContext;

import org.springframework.context.support.ClassPathXmlApplicationContext;

import cn.tedu.service.UserService;

/**

 * AOPTest:测试代码

 */

public class AOPTest {

    @Test

    public void test01(){

        ApplicationContext context = new ClassPathXmlApplicationContext("applicationContext.xml");

        UserService userService = (UserService) context.getBean("userService");

        userService.addUser("cjj"); // 一个连接点

    }

}
执行结果:
1 -- before...[class cn.tedu.service.UserServiceImple]...[addUser]...

增加用户。。
2.环绕通知
在目标方法执行之前和之后都可以执行额外代码的通知。
在环绕通知中必须显式的调用目标方法,目标方法才会执行,这个显式调用时通过ProceedingJoinPoint来实现的,可以在环绕通知中接收一个此类型的形参,spring容器会自动将该对象传入,注意这个参数必须处在环绕通知的第一个形参位置。
**要注意,只有环绕通知可以接收ProceedingJoinPoint,而其他通知只能接收JoinPoint。
环绕通知需要返回返回值,否则真正调用者将拿不到返回值,只能得到一个null。
环绕通知有控制目标方法是否执行、有控制是否返回值、有改变返回值的能力。
环绕通知虽然有这样的能力,但一定要慎用,不是技术上不可行,而是要小心不要破坏了软件分层的“高内聚 低耦合”的目标。
配置方式:
 <!-- 环绕通知 -->

 <aop:around method="around" pointcut-ref="pc1"/>
    public Object around(ProceedingJoinPoint jp) throws Throwable{

        System.out.println("1 -- around before...");

        Object obj = jp.proceed(); //--显式的调用目标方法

        System.out.println("1 -- around after...");

        return obj;

    }
运行结果:
1 -- around before...

增加用户。。

1 -- around after...
3.后置通知
在目标方法执行之后执行的通知。
在后置通知中也可以选择性的接收一个JoinPoint来获取连接点的额外信息,但是这个参数必须处在参数列表的第一个。
配置方式:
<!-- 后置通知 -->

<aop:after-returning method="afterReturn" pointcut-ref="pc1"/>
    public void afterReturn(JoinPoint jp){

        Class clz = jp.getTarget().getClass();

        Signature signature = jp.getSignature();

        String name = signature.getName();

        System.out.println("1 -- afterReturn...["+clz+"]...["+name+"]...");

    }
执行结果:
1 -- before...[class cn.tedu.service.UserServiceImple]...[addUser]...

1 -- around before...

增加用户。。

1 -- around after...

1 -- afterReturn...[class cn.tedu.service.UserServiceImple]...[addUser]...
在后置通知中,还可以通过配置获取返回值
一定要保证JoinPoint处在参数列表的第一位,否则抛异常
配置方式:
<!-- 后置通知 -->

<aop:after-returning method="afterReturn" pointcut-ref="pc1" returning="msg"/>
    public void afterReturn(JoinPoint jp, Object msg){

        Class clz = jp.getTarget().getClass();

        Signature signature = jp.getSignature();

        String name = signature.getName();

        System.out.println("1 -- afterReturn...["+clz+"]...["+name+"]...["+msg+"]...");

    }
执行结果:
1 -- before...[class cn.tedu.service.UserServiceImple]...[addUser]...

1 -- around before...

增加用户。。

1 -- around after...

1 -- afterReturn...[class cn.tedu.service.UserServiceImple]...[addUser]...[cjj]...
4.异常通知
在目标方法抛出异常时执行的通知
可以配置传入JoinPoint获取目标对象和目标方法相关信息,但必须处在参数列表第一位
另外,还可以配置参数,让异常通知可以接收到目标方法抛出的异常对象。
配置方法:
<!-- 异常通知 -->

<aop:after-throwing method="afterThrow" pointcut-ref="pc1" throwing="e"/>
    public void afterThrow(JoinPoint jp,Throwable e){

        Class clz = jp.getTarget().getClass();

        String name = jp.getSignature().getName();

        System.out.println("1afterThrow..["+clz+"]..["+name+"].."+e.getMessage());

    }
代码报异常后
执行结果:
1 -- before...[class cn.tedu.service.UserServiceImple]...[addUser]...

1 -- around before...

1 -- afterThrow..[class cn.tedu.service.UserServiceImple]..[addUser]../ by zero
5.最终通知
是在目标方法执行之后执行的通知。
和后置通知不同之处在于,后置通知是在方法正常返回后执行的通知,如果方法没有正常返-例如抛出异常,则后置通知不会执行。
而最终通知无论如何都会在目标方法调用过后执行,即使目标方法没有正常的执行完成。
另外,后置通知可以通过配置得到返回值,而最终通知无法得到。
最终通知也可以额外接收一个JoinPoint参数,来获取目标对象和目标方法相关信息,但一定要保证必须是第一个参数。
配置方式:
<!-- 最终通知 -->

<aop:after method="after" pointcut-ref="pc1" />
    public void after(JoinPoint jp){

        Class clz = jp.getTarget().getClass();

        String name = jp.getSignature().getName();

        System.out.println("1 -- after..["+clz+"]..["+name+"]...");

    }
执行结果:
1 -- before...[class cn.tedu.service.UserServiceImple]...[addUser]...

1 -- around before...

增加用户。。

1 -- around after...

1 -- afterReturn...[class cn.tedu.service.UserServiceImple]...[addUser]...[cjj]...

1 -- after..[class cn.tedu.service.UserServiceImple]..[addUser]...

cjj
源码
<?xml version="1.0" encoding="UTF-8"?>

<beans

    xmlns="http://www.springframework.org/schema/beans"

    xmlns:context="http://www.springframework.org/schema/context"

    xmlns:aop="http://www.springframework.org/schema/aop"

    xmlns:xsi="http://www.w3.org/2001/XMLSchema-instance"

    xsi:schemaLocation="http://www.springframework.org/schema/beans

    http://www.springframework.org/schema/beans/spring-beans-3.2.xsd

    http://www.springframework.org/schema/context

    http://www.springframework.org/schema/context/spring-context-3.2.xsd

    http://www.springframework.org/schema/aop

    http://www.springframework.org/schema/aop/spring-aop-3.2.xsd "

    >

    <context:annotation-config></context:annotation-config>

    <context:component-scan base-package="cn.tedu.service,cn.tedu.aop"></context:component-scan>

    <!-- proxy-target-class属性值决定是基于接口的还是基于类的代理被创建 -->

    <aop:config proxy-target-class="true">

        <!-- 配置切入点 -->

        <aop:pointcut expression="execution(* cn.tedu.service.UserServiceImple.addUser(..))" id="pc1"/>

        <!-- 配置切入面 -->

        <aop:aspect ref="firstAspect">

            <!-- 前置通知 -->

            <aop:before method="before" pointcut-ref="pc1"/>

            <!-- 环绕通知 -->

            <aop:around method="around" pointcut-ref="pc1"/>

            <!-- 后置通知 -->

            <!-- <aop:after-returning method="afterReturn" pointcut-ref="pc1"/> -->

            <aop:after-returning method="afterReturn" pointcut-ref="pc1" returning="msg"/>

            <!-- 异常通知 -->

            <aop:after-throwing method="afterThrow" pointcut-ref="pc1" throwing="e"/>

            <!-- 最终通知 -->

            <aop:after method="after" pointcut-ref="pc1" />

        </aop:aspect>

    </aop:config>

</beans>
package cn.tedu.service;

/**

 * 接口

 */

public interface UserService {

    public String addUser(String name);

    public void updateUser();

    public void deleteUser();

    public void query();

}
package cn.tedu.service;

/**

 * 接口

 */

public interface UserService {

    public String addUser(String name);

    public void updateUser();

    public void deleteUser();

    public void query();

}
package cn.tedu.service;

import org.springframework.stereotype.Service;

/**

 * UserServiceImple:目标对象

 */

@Service("userService")

public class UserServiceImple implements UserService {

    @Override

    public  String addUser(String name) {

        // int i = 1/0;

        System.out.println("增加用户。。");

        return "cjj";

    }

    @Override

    public void updateUser() {

        System.out.println("修改用户。。");

    }

    @Override

    public void deleteUser() {

        System.out.println("删除用户。。");

    }

    @Override

    public void query() {

        System.out.println("查询用户。。");

    }

}
package cn.tedu.aop;

import org.aspectj.lang.JoinPoint;

import org.aspectj.lang.ProceedingJoinPoint;

import org.aspectj.lang.Signature;

import org.springframework.stereotype.Component;

/**

 * FirstAspect:切面代码

 */

@Component

public class FirstAspect {

    public void before(JoinPoint jp){ // 可以选择额外的传入一个JoinPoint连接点对象,必须用方法的第一个参数接收。

        Class clz = jp.getTarget().getClass();

        Signature signature = jp.getSignature(); // 通过JoinPoint对象获取更多信息

        String name = signature.getName();

        System.out.println("1 -- before...["+clz+"]...["+name+"]...");

    }

    public Object around(ProceedingJoinPoint jp) throws Throwable{

        System.out.println("1 -- around before...");

        Object obj = jp.proceed(); //--显式的调用目标方法

        System.out.println("1 -- around after...");

        return obj;

    }

    public void afterReturn(JoinPoint jp, Object msg){

        Class clz = jp.getTarget().getClass();

        Signature signature = jp.getSignature();

        String name = signature.getName();

        System.out.println("1 -- afterReturn...["+clz+"]...["+name+"]...["+msg+"]...");

    }

    public void afterThrow(JoinPoint jp,Throwable e){

        Class clz = jp.getTarget().getClass();

        String name = jp.getSignature().getName();

        System.out.println("1 -- afterThrow..["+clz+"]..["+name+"].."+e.getMessage());

    }

    public void after(JoinPoint jp){

        Class clz = jp.getTarget().getClass();

        String name = jp.getSignature().getName();

        System.out.println("1 -- after..["+clz+"]..["+name+"]...");

    }

}
package cn.tedu.test;

import org.junit.Test;

import org.springframework.context.ApplicationContext;

import org.springframework.context.support.ClassPathXmlApplicationContext;

import cn.tedu.service.UserService;

/**

 * AOPTest:测试代码

 */

public class AOPTest {

    @Test

    public void test01(){

        ApplicationContext context = new ClassPathXmlApplicationContext("applicationContext.xml");

        UserService userService = (UserService) context.getBean("userService");

        String result = userService.addUser("cjj"); // 一个连接点

        System.out.println(result);

    }

}
五种通知的执行顺序
1.在目标方法没有抛出异常的情况下
前置通知
环绕通知的调用目标方法之前的代码
目标方法
环绕通知的调用目标方法之后的代码
后置通知
最终通知
2.在目标方法抛出异常的情况下
前置通知
环绕通知的调用目标方法之前的代码
目标方法 抛出异常 异常通知
最终通知
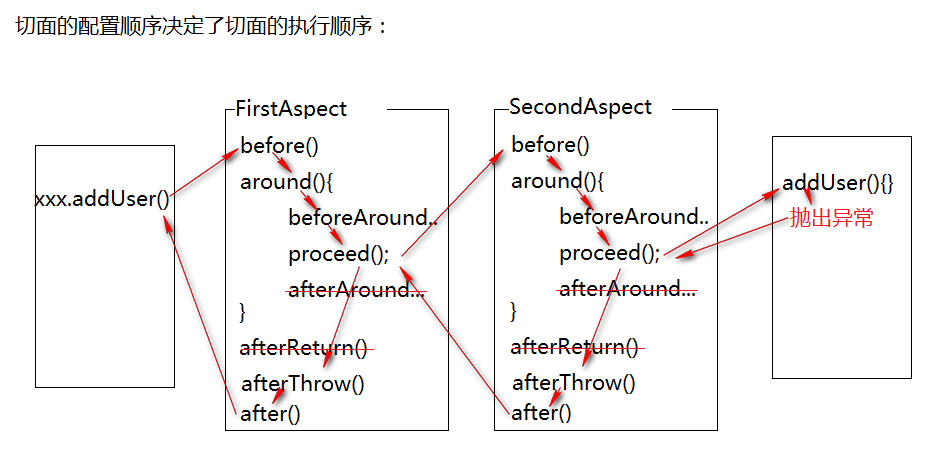
3.如果存在多个切面
多切面执行时,采用了责任链设计模式。
切面的配置顺序决定了切面的执行顺序,多个切面执行的过程,类似于方法调用的过程,在环绕通知的proceed()执行时,去执行下一个切面或如果没有下一个切面执行目标方法,从而达成了如下的执行过程:

如果目标方法抛出异常:
五种通知的常见使用场景
|
环绕通知 |
控制事务 权限控制 |
|
后置通知 |
记录日志(方法已经成功调用) |
|
异常通知 |
异常处理 控制事务 |
|
最终通知 |
记录日志(方法已经调用,但不一定成功) |
Spring AOP 五大通知类型的更多相关文章
- 利用Spring AOP的通知类型以及创建通知
写在最前端 1.SpringAOP中共有六种通知类型,只要我们自定义一个类实现对应的接口,它们全都是org.springframework.aop包中的. 2.AOP的连接点可以是方法调用.方法调用本 ...
- JAVA-Spring AOP五大通知类型
一.前置通知 在目标方法执行之前执行的通知 在前置通知方法,可以没有参数,也可以额外接收一个JoinPoint,Spring会自动将该对象传入,代表当前的连接点,通过该对象可以获取目标对象和目标方法相 ...
- Spring AOP 四大通知
Spring AOP 四大通知 Spring 3.X 以前 1.前置通知,实现 MethodBeforeAdvice 接口,重写 public void before(Method metho ...
- Spring笔记07(Spring AOP的通知advice和顾问advisor)
1.Spring AOP的通知advice 01.接口代码: package cn.pb.dao; public interface UserDao { //主业务 String add(); //主 ...
- Spring AOP前置通知和后置通知
Spring AOP AspectJ:Java社区里最完整最流行的AOP框架 在Spring2.0以上的版本中,可以使用基于AspectJ注解或基于XML配置的AOP 在Spring中启用Aspect ...
- 【Spring AOP】通知(五)
一.通知介绍 1. 前置通知(Before) 在目标方法执行之前执行的通知. 前置通知方法,可以没有参数,也可以额外接收一个JoinPoint,Spring会自动将该对象传入,代表当前的连接点,通过该 ...
- Spring AOP(通知、连接点、切点、切面)
一.AOP术语 通知(Advice) 切面的工作被称为通知.通知定义了切面是什么以及何时使用.除了描述切面要完成的工作,通知还解决了何时执行这个工作的问题.5种通知类型: 前置通知(Before): ...
- spring aop 环绕通知around和其他通知的区别
前言: spring 的环绕通知和前置通知,后置通知有着很大的区别,主要有两个重要的区别: 1) 目标方法的调用由环绕通知决定,即你可以决定是否调用目标方法,而前置和后置通知 是不能决定的,他们只 ...
- spring aop环绕通知
[Spring实战]—— 9 AOP环绕通知 假如有这么一个场景,需要统计某个方法执行的时间,如何做呢? 典型的会想到在方法执行前记录时间,方法执行后再次记录,得出运行的时间. 如果采用Sprin ...
随机推荐
- 模型转换[yolov3模型在keras与darknet之间转换]
首先借助qqwweee/keras-yolo3中的convert.py和tensorrt例子yolov3_onnx,并重新编写了代码,实现将darknet格式的yolov3的yolov3.cfg和yo ...
- 微信小程序中转义字符的处理
在微信小程序开发过程中,有时候会用到常用的一些特殊字符如:‘<’.‘>’.‘&’.‘空格’等,微信小程序同样支持对转义字符的处理,下面提供两种方法用来处理微信小程序中转义字符的处理 ...
- 入门PHP你需要了解些什么?
1.[PHP]PHP(外文名:PHP: Hypertext Preprocessor,中文名:“超文本预处理器”)是一种通用开源脚本语言.语法吸收了C语言.Java和Perl的特点,利于学习,使用广泛 ...
- 从一道面试题探究 Integer 的实现
记得有次面试,面试官问我: 如何写一个方法交换两个 Integer 类型的值? 当时心里一惊,这是把我当小白了呀!交换两个数的值还不容易么,最简单的直接搞一个中间变量,然后就可以交换了… … 面试官随 ...
- CAS、原子操作类的应用与浅析及Java8对其的优化
前几天刷朋友圈的时候,看到一段话:如果现在我是傻逼,那么我现在不管怎么努力,也还是傻逼,因为我现在的傻逼是由以前决定的,现在努力,是为了让以后的自己不再傻逼.话糙理不糙,如果妄想现在努力一下,马上就不 ...
- 【神经网络篇】--基于数据集cifa10的经典模型实例
一.前述 本文分享一篇基于数据集cifa10的经典模型架构和代码. 二.代码 import tensorflow as tf import numpy as np import math import ...
- springboot~如何去掌握它(新手可以看看)
springboot~如何去掌握它 主讲:仓储大叔 每讲40分钟 架构图 graph LR App-->A Web-->A A(zuul proxy)-->B(eureka serv ...
- 详解mybatis配置文件
在前面两篇文章中,大致与大家分享了基于Java的ORM框架,Mybatis基本架构和Mybatis实现CRUD的基本原理与流程,在本篇文章中,继续与大家分享Mybatis配置文件. 通过研究Mybat ...
- dotnet core 微服务教程
这个教程主要是对于第一次使用dotnet core开发的同学. 运行环境是在centos 7 , 使用了docker容器. 即这是一篇运行在linux的docker容器上的微服务的简单应用. 一. 安 ...
- DSAPI 短域名服务
有时,需要将长域名转换为短域名,或是为了减少字符量,或是为了隐藏真实网址.在DSAPI中,集成了EPS-GS的短域名接口.该功能需要联接互联网,从EPS服务器获取. 代码 DSAPI.网络.短域名服务 ...