Spring Cloud03: Eureka Client 服务提供者
一、创建一个子工程并引入配置如下:
    <dependency>

    	<groupId>org.springframework.cloud</groupId>

    	<artifactId>spring-cloud-starter-netflix-eureka-client</artifactId>

    	<version>2.0.2.RELEASE</version>

    </dependency>
二、创建application.yml,添加相关配置如下:
server:

  port: 8010

spring:

  application:

    name: provider

eureka:

  client:

    service-url:

      defaultZone: http://localhost:8761/eureka/

  instance:

    prefer-ip-address:  true
属性说明
* spring.application.name : 当前服务注册在 Eureka Server 上的名称。
* eureka.client.service-url.defaultZone : 注册中⼼的访问地址。
* eureka.instance.prefer-ip-address : 是否将当前服务的 IP 注册到 Eureka Server。
三、创建启动类,代码如下
package com.frr;

import org.springframework.boot.SpringApplication;

import org.springframework.boot.autoconfigure.SpringBootApplication;

@SpringBootApplication

public class EurekaClientApplication {

	public static void main(String[] args) throws Exception {

		SpringApplication.run(EurekaClientApplication.class, args);

	}

}
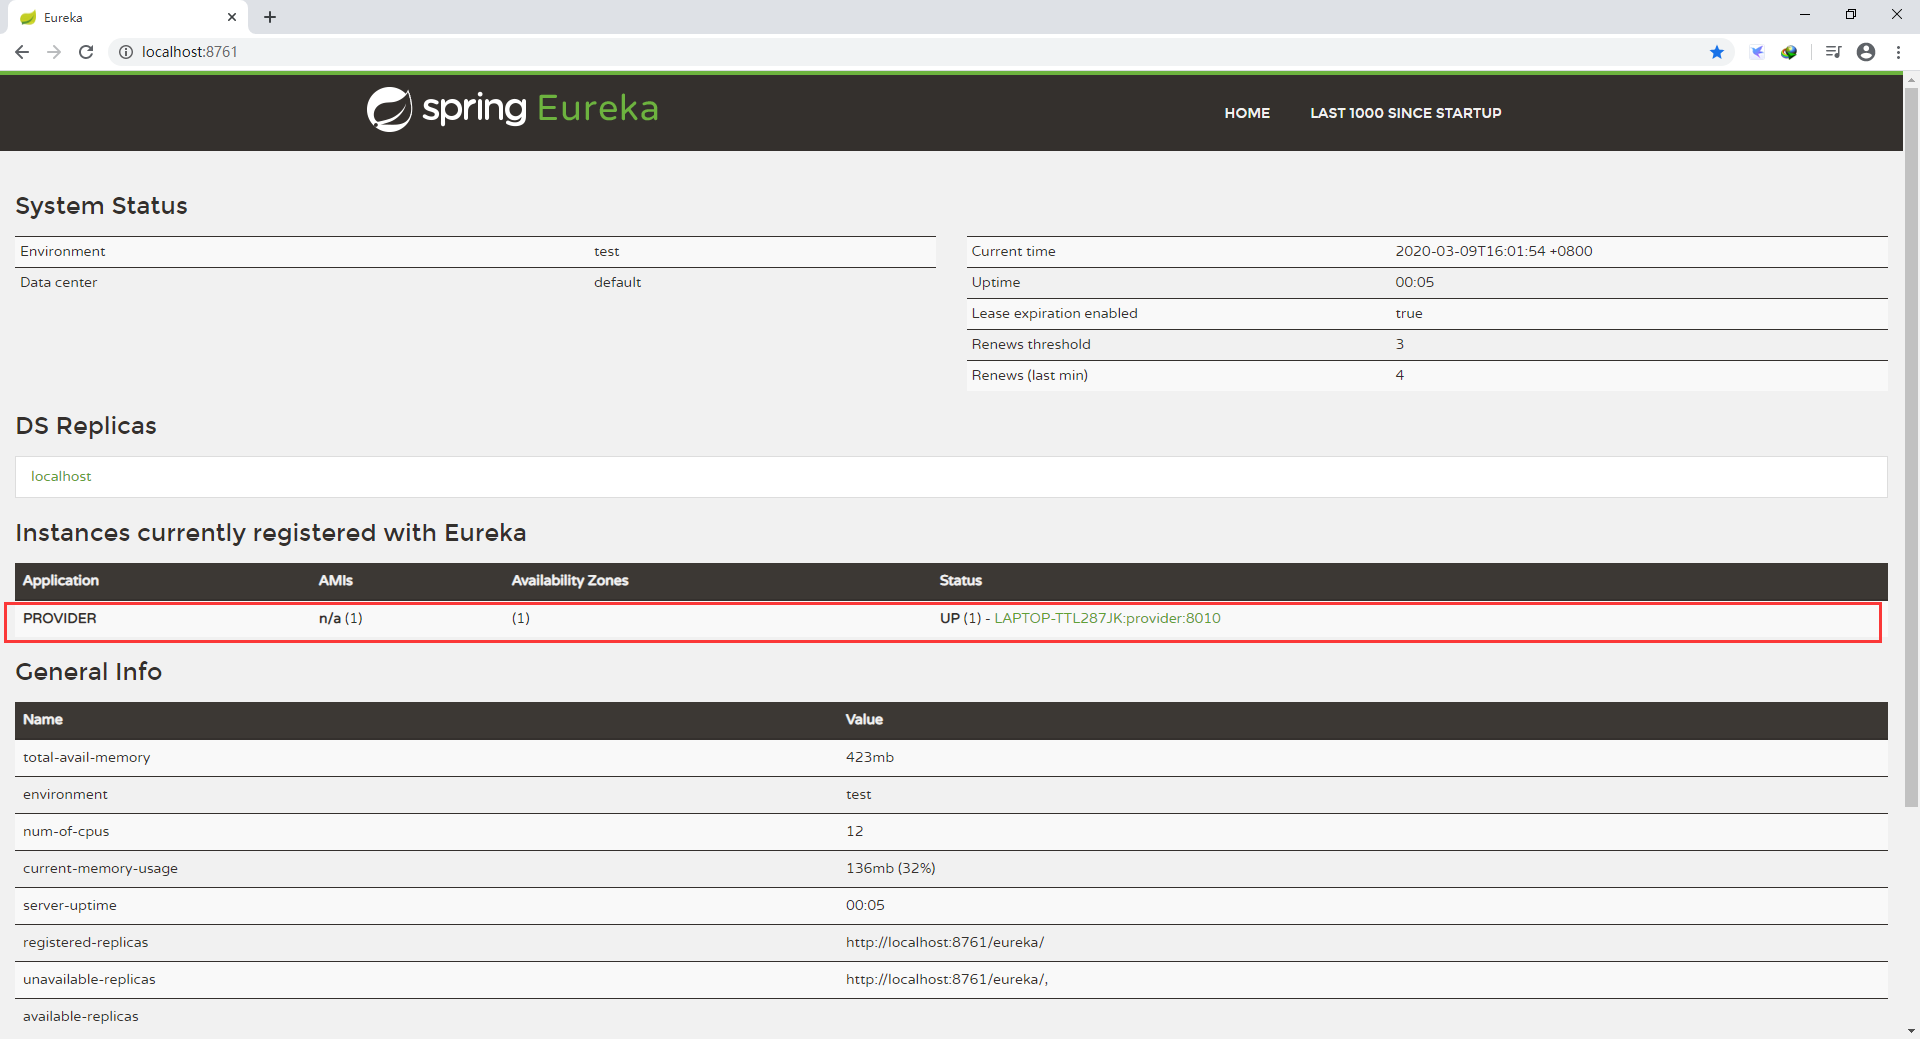
四、启动注册中心,然后再启动刚刚写的服务提供者,访问注册中心的地址可看到以下界面,多出了刚刚注册成功的provider服务
五、实战!模拟学生的增删改查
1.创建student实体类如下:
package com.frr.entity;

import lombok.AllArgsConstructor;

import lombok.Data;

import lombok.NoArgsConstructor;

@Data //生成Getter,Setter,equals,canEqual,hasCode,toString等方法

@AllArgsConstructor //添加一个构造函数,该构造函数含有所有已声明字段属性参数

@NoArgsConstructor //创建一个无参构造函数

public class Student {

	private long id;

	private String name;

	private int age;

}
注解说明
*@Data 生成Getter,Setter,equals,canEqual,hasCode,toString等方法
*@AllArgsConstructor 添加一个构造函数,该构造函数含有所有已声明字段属性参数
*@NoArgsConstructor 创建一个无参构造函数
2.创建接口,代码如下:
package com.frr.repository;

import java.util.Collection;

import com.frr.entity.Student;

public interface StudentRepository {

	public Collection<Student> findAll();

	public Student findById(long id);

	public void saveOrUpdate(Student s);

	public void deleteById(long id);

}
3.创建实现类,采用静态代码块实现数据初始化,代码如下:
package com.frr.repository.impl;

import java.util.Collection;

import java.util.HashMap;

import java.util.Map;

import org.springframework.stereotype.Repository;

import com.frr.entity.Student;

import com.frr.repository.StudentRepository;

@Repository

public class StudentRepositoryImpl implements StudentRepository{

	private static Map<Long,Student> studentMap;

	static {

		studentMap = new HashMap<>();

		studentMap.put(1L, new Student(1L, "张三", 11));

		studentMap.put(2L, new Student(1L, "李四", 11));

		studentMap.put(3L, new Student(1L, "王五", 11));

	}

	@Override

	public Collection<Student> findAll() {

		return studentMap.values();

	}

	@Override

	public Student findById(long id) {

		return studentMap.get(id);

	}

	@Override

	public void saveOrUpdate(Student s) {

		studentMap.put(s.getId(), s);

	}

	@Override

	public void deleteById(long id) {

		studentMap.remove(id);

	}

}
4.创建controller,代码如下:
package com.frr.controller;

import java.util.Collection;

import org.springframework.beans.factory.annotation.Autowired;

import org.springframework.web.bind.annotation.DeleteMapping;

import org.springframework.web.bind.annotation.GetMapping;

import org.springframework.web.bind.annotation.PathVariable;

import org.springframework.web.bind.annotation.PostMapping;

import org.springframework.web.bind.annotation.PutMapping;

import org.springframework.web.bind.annotation.RequestBody;

import org.springframework.web.bind.annotation.RequestMapping;

import org.springframework.web.bind.annotation.RestController;

import com.frr.entity.Student;

import com.frr.repository.StudentRepository;

@RestController //在Spring中@RestController的作用等同于@Controller + @ResponseBody。

@RequestMapping("/student")

public class StudentHandler {

	@Autowired

	private StudentRepository studentRepository;

	@GetMapping("/findAll")

	public Collection<Student> findAll(){

		return studentRepository.findAll();

	}

	@GetMapping("/findById/{id}")

	public Student findById(@PathVariable("id") long id) {

		return studentRepository.findById(id);

	}

	@PostMapping("/save")

	public void save(@RequestBody Student s) {

		studentRepository.saveOrUpdate(s);

	}

	@PutMapping("/Update")

	public void Update(@RequestBody Student s) {

		studentRepository.saveOrUpdate(s);

	}

	@DeleteMapping("/deleteById/{id}")

	public void deleteById(@PathVariable("id") long id) {

		studentRepository.deleteById(id);

	}

}
5.重新启动上文创建的启动类
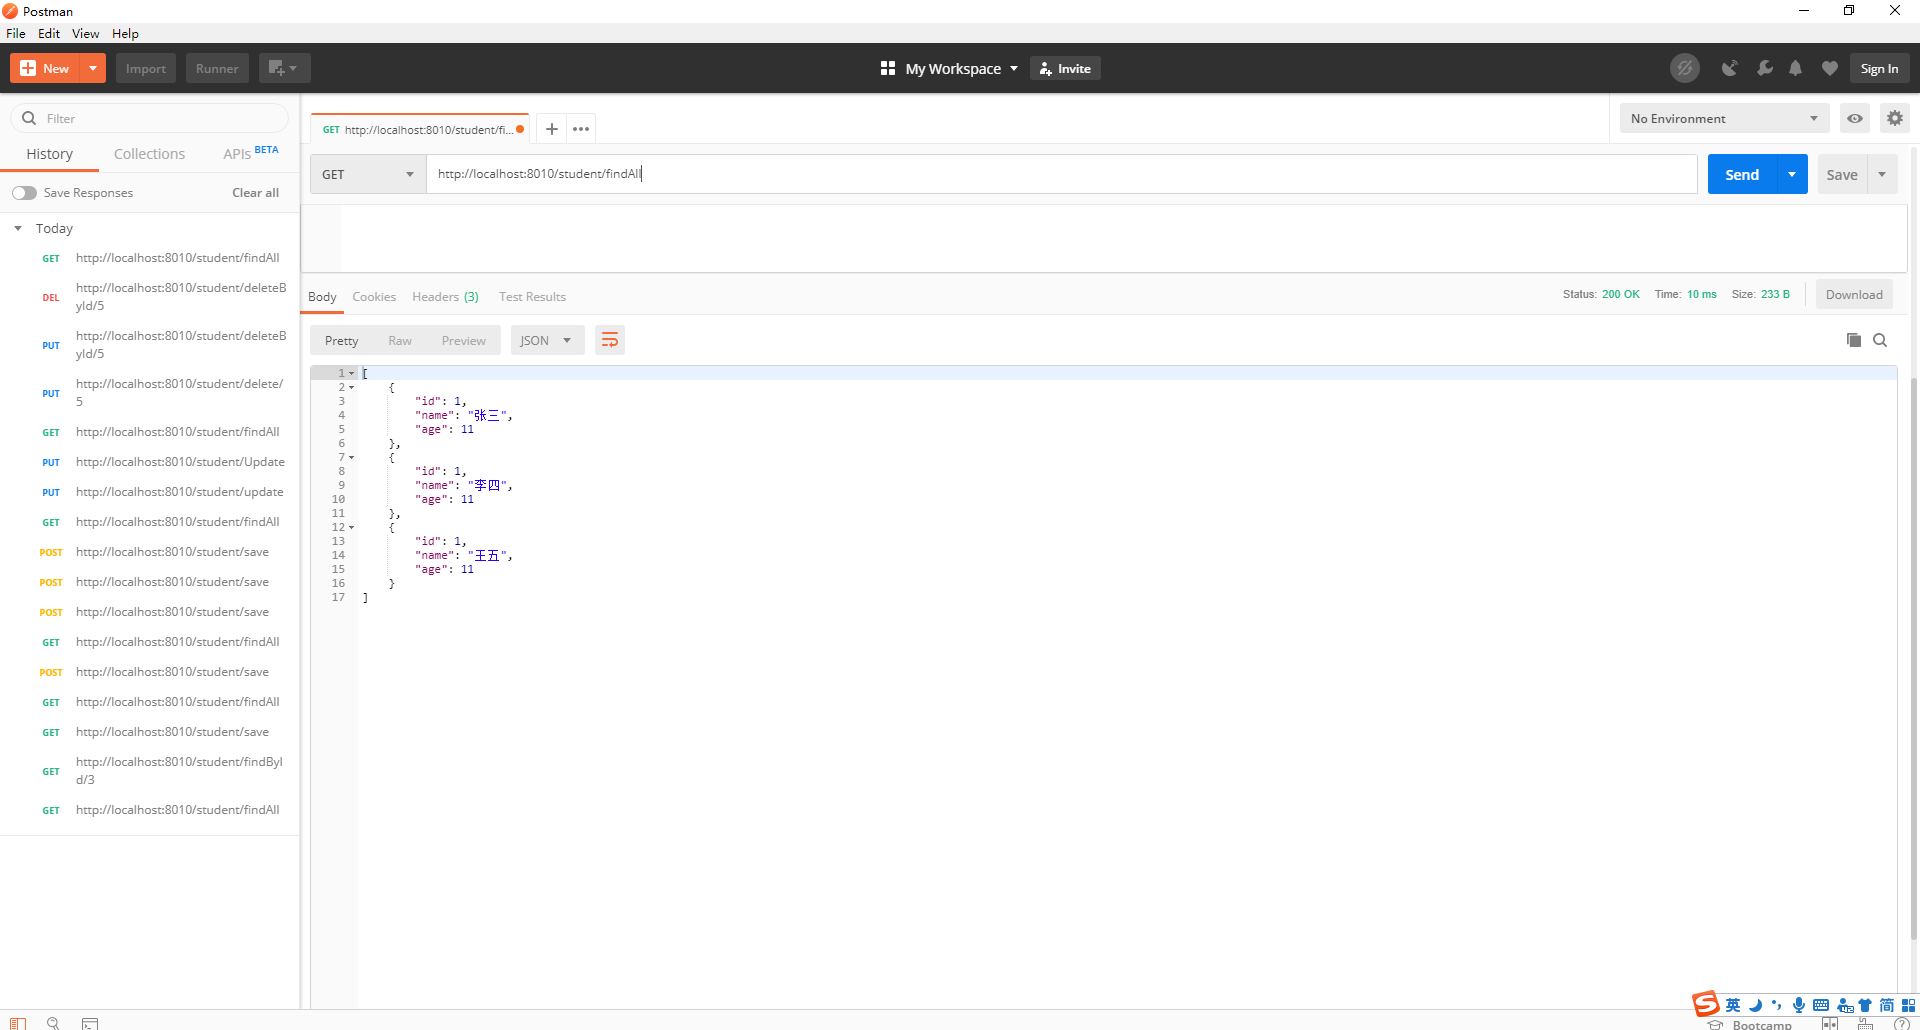
6.使用Postman工具测试各个方法,数据一致表示成功!
Spring Cloud03: Eureka Client 服务提供者的更多相关文章
- spring cloud 2.x版本 Eureka Client服务提供者教程
本文采用Spring cloud本文为2.1.8RELEASE,version=Greenwich.SR3 1 创建eureka client 1.1 新建Srping boot工程:eureka-c ...
- spring cloud Eureka client配置(consumer通过Eureka发起对provider的调用)
参考:http://www.ityouknow.com/springcloud/2017/05/12/eureka-provider-constomer.html springboot版本:2.0.3 ...
- 2.spring cloud eureka client配置
红色加粗内容表示修改部分 1.把server项目打成jar包并启动 在项目根目录cmd执行 mvn clean package -Dmaven.test.skip=true mavne仓库地址建议 ...
- spring boot eureka client
eureka client @EnableDiscoveryClient @SpringBootApplication public class DemoApplication { public st ...
- 【转载】一起来学Spring Cloud | Eureka Client注册到Eureka Server的秘密
LZ看到这篇文章感觉写得比较详细,理解以后,便转载到自己博客中,留作以后回顾学习用,喝水不忘挖井人,内容来自于李刚的博客:http://www.spring4all.com/article/180 一 ...
- Spring Cloud Eureka(三):认识Eureka Server 与 Eureka Client
Spring Cloud Netflix 是什么 This project provides Netflix OSS integrations for Spring Boot apps through ...
- SpringCloud2.0 Eureka Client 服务注册 基础教程(三)
1.创建[服务提供者],即 Eureka Client 1.1.新建 Spring Boot 工程,工程名称:springcloud-eureka-client 1.2.工程 pom.xml 文件添加 ...
- Spring Cloud Eureka 3 (Eureka client注册服务提供者)
在完成服务注册中心的搭建后我们来尝试下将一个既有的spring boot应用加入eureka的服务治理体系中 新建一个spring boot项目加入eureka client依赖 这里加入的eurek ...
- Spring cloud Eureka 服务治理(注册服务提供者)
搭建完成服务注册中心,下一步可以创建服务提供者并向注册中心注册服务. 接下来我们创建Spring Boot 应用将其加入Eureka服务治理体系中去. 直接使用签名章节创建hello服务项目改造: 1 ...
随机推荐
- Windows核心编程 第2 4章 异常处理程序和软件异常
异常处理程序和软件异常 C P U引发的异常,就是所谓的硬件异常(hardware exception).操作系统和应用程序 也可以引发相应的异常,称为软件异常(software exception) ...
- Python练习1-文档格式化成html
文档格式化成HTML 把文档格式化成了THML,并没有处理所有thml规则,只是处理了一部分,功能不重要,重要的是复习熟悉下Python对文档的处理细节.毕竟Python大多数给我的印象都是处理文档. ...
- Ubuntu Linux 学习篇 配置DNS服务器
BIND9 DNS(Domain Name Server,域名服务器)是进行域名(domain name)和与之相对应的IP地址 (IP address)转换的服务器.DNS中保存了一张域名(doma ...
- Github + Picgo + Typora 让笔记远走高飞
Github设置 登录 2.新建仓库 设置token 打开设置 然后点击,按钮生成Generate token Picgo设置 下载PicGo 参考视频 PicGo设置 设置Server 图床设置 上 ...
- mysql 连表不要用varchar和int这两种不相同的类型做比较
他会默认你123abc等于123 说多了都是泪啊
- 在Visual Studio 中使用git——文件管理-下(六)
在Visual Studio 中使用git--什么是Git(一) 在Visual Studio 中使用git--给Visual Studio安装 git插件(二) 在Visual Studio 中使用 ...
- C++ primer plus读书笔记——第6章 分支语句和逻辑运算符
第6章 分支语句和逻辑运算符 1. 逻辑运算符的优先级比关系运算符的优先级低. 2. &&的优先级高于||. 3. cctype中的函数P179. 4. switch(integer- ...
- Duplicate entry '' for key 'PRIMARY'
今天在在mysql中插入数据 因为直接插入查询出来的表格,insert into 表(student_id,class_id) 直接插入了这两个字段对应的查询出来的表 没有留意到该表的主键没有设置自增 ...
- [bug] IDEA编译时出现 Information:java: javacTask: 源发行版 1.8 需要目标发行版 1.8
原因 jdk版本选低了 解决 将以下几处jdk版本修改为1.8 Project Structure(File->Project Structure...)>Sources>Langu ...
- vmware安装ubuntu ,一直处于end kernel panic - not syncing : corrupted stack end detected inside scheduler
vmware安装ubuntu ,一直处于end kernel panic - not syncing : corrupted stack end detected inside scheduler y ...