Python开发篇——如何在Flask下编写JWT登录
首先,HTTP 是无状态的协议(对于事务处理没有记忆能力,每次客户端和服务端会话完成时,服务端不会保存任何会话信息)——每个请求都是完全独立的,服务端无法确认当前访问者的身份信息,无法分辨上一次的请求发送者和这一次的发送者是不是同一个人。所以服务器与浏览器为了进行会话跟踪(知道是谁在访问自己),就必须主动的去维护一个状态,这个状态用于告知服务端前后两个请求是否来自同一浏览器。为此,前端开发者便加入了Cookie来实现有状态的HTTP连接。而后实现授权的方式就有cookie、session、token和JWT。
什么是 JWT?
JWT.IO 解释:JSON Web Token (JWT) 是一个开放标准 ( RFC 7519 ),它定义了一种紧凑且自包含的方式,用于在各方之间作为 JSON 对象安全地传输信息。该信息可以被验证和信任,因为它是经过数字签名的。JWT 可以使用秘密(使用HMAC算法)或使用RSA或ECDSA的公钥/私钥对进行签名。
案例
由于网上许多案例都为HS256(对称加密),所以这里我使用RSA256(非对称加密)作为补充。
首先需要生成私钥和公钥
查阅《Generate OpenSSL RSA Key Pair using genpkey》得到了带密码的pem文件, 但是在使用中会出现
TypeError: Password was not given but private key is encrypted的错误。从《How to generate JWT RS256 key》找到了解决办法
  ssh-keygen -t rsa -b 4096 -m PEM -f jwtRS256.key

  # Don't add passphrase

  openssl rsa -in jwtRS256.key -pubout -outform PEM -out jwtRS256.key.pub

  cat jwtRS256.key

  cat jwtRS256.key.pub
选择Python的JWT库,我这里选择了两个库
PyJWT(需要cryptography库)
  >>> import jwt

  >>> with open('jwtRS256.key', 'rb') as f:

  ...    private_key = f.read()

  ...

  >>> with open('jwtRS256.key.pub', 'rb') as f:

  ...    public_key = f.read()

  ...

  >>> print(encoded)

  eyJhbGciOiJIUzI1NiIsInR5cCI6IkpXVCJ9.eyJzb21lIjoicGF5bG9hZCJ9.4twFt5NiznN84AWoo1d7KO1T_yoc0Z6XOpOVswacPZg

  >>> decoded = jwt.decode(encoded, public_key, algorithms=["RS256"])

  {'some': 'payload'}
-
  >>> from authlib.jose import jwt

  >>> header = {'alg': 'RS256'}

  >>> payload = {'iss': 'Authlib', 'sub': '123', ...}

  >>> with open('jwtRS256.key', 'rb') as f:

  ...    private_key = f.read()

  ...

  >>> s = jwt.encode(header, payload, private_key)

  >>> with open('jwtRS256.key.pub', 'rb') as f:

  ...    public_key = f.read()

  ...

  >>> claims = jwt.decode(s, public_key)

  >>> print(claims)

  {'iss': 'Authlib', 'sub': '123', ...}

  >>> print(claims.header)

  {'alg': 'RS256', 'typ': 'JWT'}

  >>> claims.validate()
工作原理
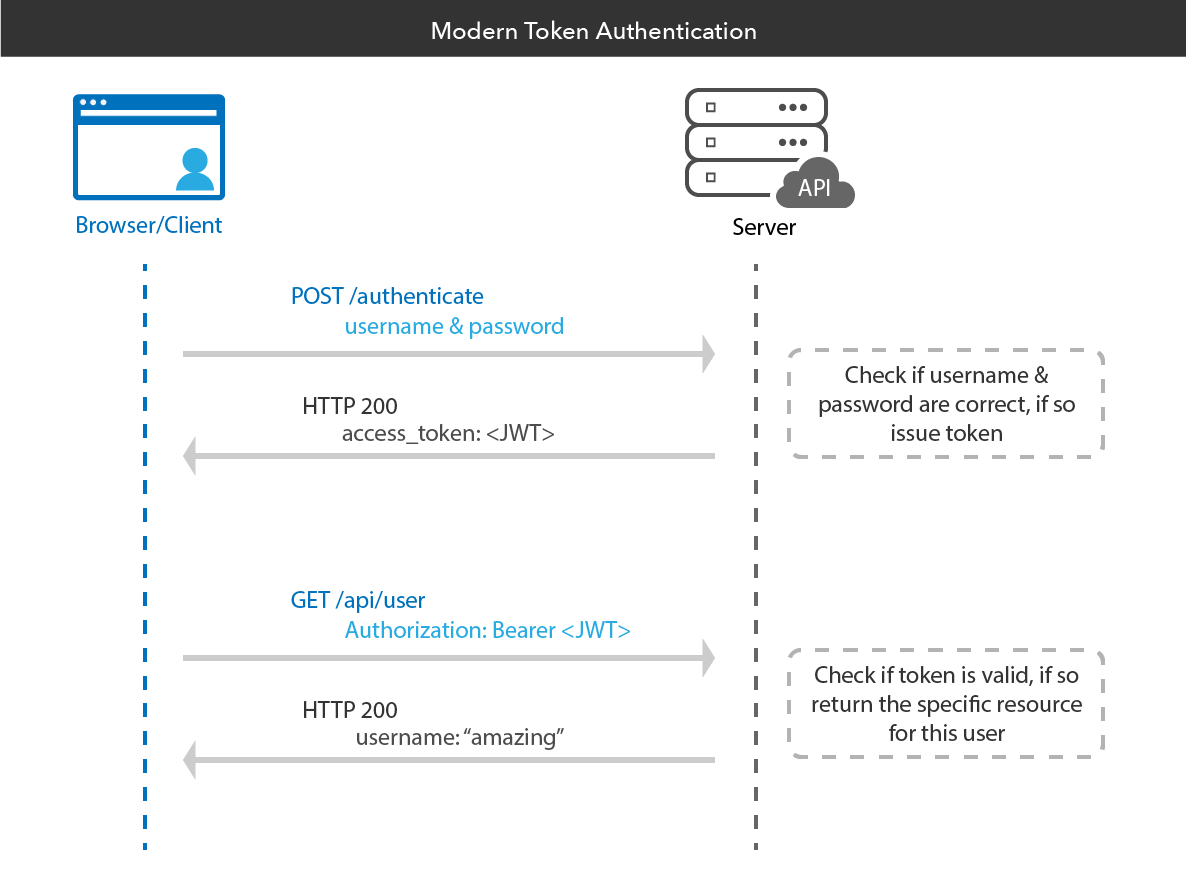
《Using JWT for user authentication in Flask》中的代码参考:
# flask imports

from flask import Flask, request, jsonify, make_response

from flask_sqlalchemy import SQLAlchemy

import uuid # for public id

from  werkzeug.security import generate_password_hash, check_password_hash

# imports for PyJWT authentication

import jwt

from datetime import datetime, timedelta

from functools import wraps

# creates Flask object

app = Flask(__name__)

# configuration

# NEVER HARDCODE YOUR CONFIGURATION IN YOUR CODE

# INSTEAD CREATE A .env FILE AND STORE IN IT

app.config['SECRET_KEY'] = 'your secret key'

# database name

app.config['SQLALCHEMY_DATABASE_URI'] = 'sqlite:///Database.db'

app.config['SQLALCHEMY_TRACK_MODIFICATIONS'] = True

# creates SQLALCHEMY object

db = SQLAlchemy(app)

# Database ORMs

class User(db.Model):

    id = db.Column(db.Integer, primary_key = True)

    public_id = db.Column(db.String(50), unique = True)

    name = db.Column(db.String(100))

    email = db.Column(db.String(70), unique = True)

    password = db.Column(db.String(80))

# decorator for verifying the JWT

def token_required(f):

    @wraps(f)

    def decorated(*args, **kwargs):

        token = None

        # jwt is passed in the request header

        if 'x-access-token' in request.headers:

            token = request.headers['x-access-token']

        # return 401 if token is not passed

        if not token:

            return jsonify({'message' : 'Token is missing !!'}), 401

        try:

            # decoding the payload to fetch the stored details

            data = jwt.decode(token, app.config['SECRET_KEY'])

            current_user = User.query\

                .filter_by(public_id = data['public_id'])\

                .first()

        except:

            return jsonify({

                'message' : 'Token is invalid !!'

            }), 401

        # returns the current logged in users contex to the routes

        return  f(current_user, *args, **kwargs)

    return decorated

# User Database Route

# this route sends back list of users users

@app.route('/user', methods =['GET'])

@token_required

def get_all_users(current_user):

    # querying the database

    # for all the entries in it

    users = User.query.all()

    # converting the query objects

    # to list of jsons

    output = []

    for user in users:

        # appending the user data json

        # to the response list

        output.append({

            'public_id': user.public_id,

            'name' : user.name,

            'email' : user.email

        })

    return jsonify({'users': output})

# route for loging user in

@app.route('/login', methods =['POST'])

def login():

    # creates dictionary of form data

    auth = request.form

    if not auth or not auth.get('email') or not auth.get('password'):

        # returns 401 if any email or / and password is missing

        return make_response(

            'Could not verify',

            401,

            {'WWW-Authenticate' : 'Basic realm ="Login required !!"'}

        )

    user = User.query\

        .filter_by(email = auth.get('email'))\

        .first()

    if not user:

        # returns 401 if user does not exist

        return make_response(

            'Could not verify',

            401,

            {'WWW-Authenticate' : 'Basic realm ="User does not exist !!"'}

        )

    if check_password_hash(user.password, auth.get('password')):

        # generates the JWT Token

        token = jwt.encode({

            'public_id': user.public_id,

            'exp' : datetime.utcnow() + timedelta(minutes = 30)

        }, app.config['SECRET_KEY'])

        return make_response(jsonify({'token' : token.decode('UTF-8')}), 201)

    # returns 403 if password is wrong

    return make_response(

        'Could not verify',

        403,

        {'WWW-Authenticate' : 'Basic realm ="Wrong Password !!"'}

    )

# signup route

@app.route('/signup', methods =['POST'])

def signup():

    # creates a dictionary of the form data

    data = request.form

    # gets name, email and password

    name, email = data.get('name'), data.get('email')

    password = data.get('password')

    # checking for existing user

    user = User.query\

        .filter_by(email = email)\

        .first()

    if not user:

        # database ORM object

        user = User(

            public_id = str(uuid.uuid4()),

            name = name,

            email = email,

            password = generate_password_hash(password)

        )

        # insert user

        db.session.add(user)

        db.session.commit()

        return make_response('Successfully registered.', 201)

    else:

        # returns 202 if user already exists

        return make_response('User already exists. Please Log in.', 202)

if __name__ == "__main__":

    # setting debug to True enables hot reload

    # and also provides a debuger shell

    # if you hit an error while running the server

    app.run(debug = True)
总结
大部分语言都已经支持了JWT,这里可以从jwt.io的类库中可以看出。目前JWT主要运用于OAuth1、OAuth2和OpenID等单点登录功能,而且将来会有更多的企业和系统开发需要使用JWT技术。而且我也非常感谢本文中引用的原作者提供了相关的材料,便于我们学习。
Python开发篇——如何在Flask下编写JWT登录的更多相关文章
- Python开发篇——构建虚拟Python开发环境(Conda+Poetry)
前言 之前虽略有提及Python,但是没有实际地写点料.惭愧,惭愧,所以这次先起个头,讲讲如何构建虚拟Python开发环境.相信之前看过我博客的人可能会想:博主不会又要聊聊Docker吧?放心,不会. ...
- Python开发程序:生产环境下实时统计网站访问日志信息
日志实时分析系统 生产环境下有需求:要每搁五分钟统计下这段时间内的网站访问量.UV.独立IP等信息,用直观的数据表格表现出来 环境描述: 网站为Nginx服务,系统每日凌晨会对日志进行分割,拷贝到其他 ...
- Python开发篇——基于React-Dropzone开发上传组件
这次我要讲述的是在React-Flask框架上开发上传组件的技巧.我目前主要以React开发前端,在这个过程中认识到了许多有趣的前端UI框架--React-Bootstrap.Ant Design.M ...
- 如何在linux下编写一个简单的Shell脚本程序
在了解了linux终端和其搭配的基本Shell(默认为bash)的基础下,我们就可以在终端中用vi/vim编辑器编写一个shell的脚本程序了 Shell既为一种命令解释解释工具,又是一种脚本编程语言 ...
- 【神经网络与深度学习】【Python开发】Caffe配置 windows下怎么安装protobuf for python
首先从google上下载protobuf-2.5.0.zip和protoc-2.5.0-win32.zip,然后把protoc-2.5.0-win32.zip里的protoc.exe放到protobu ...
- 用python开发调试器——起始篇
首先,你得准备一套python开发环境,正常情况下,一般是在windows下开发的,因为win系统应用广泛,再则就是要有个IDE,这里我选择我熟悉的Eclipse.环境搭建,网上都有,比如:http: ...
- Python轻量Web框架Flask使用
http://blog.csdn.net/jacman/article/details/49098819 目录(?)[+] Flask安装 Python开发工具EclipsePyDev准备 Flask ...
- linux一句话问答(网络无关篇+网络相关篇+程序开发篇+经典图书)
一句话问答(网络无关篇+网络相关篇+程序开发篇+经典图书) --------------------------目录-网络无关篇-目录-------------------------- 0001 修 ...
- python开发接口
享一段代码,开发了3个接口: 1.上传文件 2.查看所有文件 3.下载文件 使用python开发,需要安装flask模块,使用pip ...
随机推荐
- 一文带你了解 Redis 的发布与订阅的底层原理
01.前言 发布订阅系统在我们日常的工作中经常会使用到,这种场景大部分情况我们都是使用消息队列的,常用的消息队列有 Kafka,RocketMQ,RabbitMQ,每一种消息队列都有其特性,关于 Ka ...
- 【题解】Luogu P2327 [SCOI2005]扫雷
Luogu P2327 [SCOI2005]扫雷 Description 相信大家都玩过扫雷的游戏.那是在一个n*m的矩阵里面有一些雷,要你根据一些信息找出雷来.万圣节到了,"余" ...
- noip2008 总结
noip 2008题解 笨小猴 原题 笨小猴的词汇量很小,所以每次做英语选择题的时候都很头疼.但是他找到了一种方法,经试验证明,用这种方法去选择选项的时候选对的几率非常大!这种方法的具体描述如下:假设 ...
- c#json将字符串反序列化成对象时不新建类的做法
在服务端代码文件中加上struct结构体就能解决 struct LocationInfo { public string LocationID { get; set; } public string ...
- 学习Qt Charts-创建一个简单的折线图
一.Qt Charts Qt Charts是基于Qt Graphics View实现的一个图表的组件,可以用来在QT GUI程序中添加现在风格的.可交互的.以数据为中心的图表,可以用作QWidget或 ...
- Kubernetes Pod中容器的Liveness、Readiness和Startup探针
我最新最全的文章都在南瓜慢说 www.pkslow.com,欢迎大家来喝茶! 1 探针的作用 在Kubernetes的容器生命周期管理中,有三种探针,首先要知道,这探针是属于容器的,而不是Pod: 存 ...
- Redis客户端管理
1.客户端管理 Redis提供了客户端相关API对其状态进行监控和管理,本节将深入介绍各个API的使用方法以及在开发运维中可能遇到的问题. 1.1 客户端API 1.client list clien ...
- Python的字符串和编码
1. 字符编码 字符串也是一种数据类型,但是,字符串比较特殊的是还有一个编码问题. 因为计算机只能处理数字,如果要处理文本,就必须先把文本转换为数字才能处理.最早的计算机在设计时采用8个比特(bit) ...
- 试着给VuePress添加全局禁止爬取支持,基于vuepress-plugin-robots
背景 有时候,我们有些内部网站希望不被外部抓取,那么我们可以借助vuepress-plugin-robots来生成robots.txt文件,来告诉爬虫不要抓取页面. 安装 npm install vu ...
- release模式下打断点调试 配置选项
最近调试一个离职的同事留下的工程,DEBUG模式下顺利,RELEASE的时候就崩溃了,显示为"帧不在模块中"--简直一头雾水 于是我修改配置,为了能够在Release模式中打断点调 ...