SuperPixel
Gonzalez R. C. and Woods R. E. Digital Image Processing (Forth Edition).
单个像素的意义其实很小, 于是有了superpixel的概念, 即一簇pixels的集合(且这堆pixels共用一个值), 这会导致图片有非常有趣的艺术风格(下图便是取不同的superpixel大小形成的效果, 有种抽象画的感觉?):
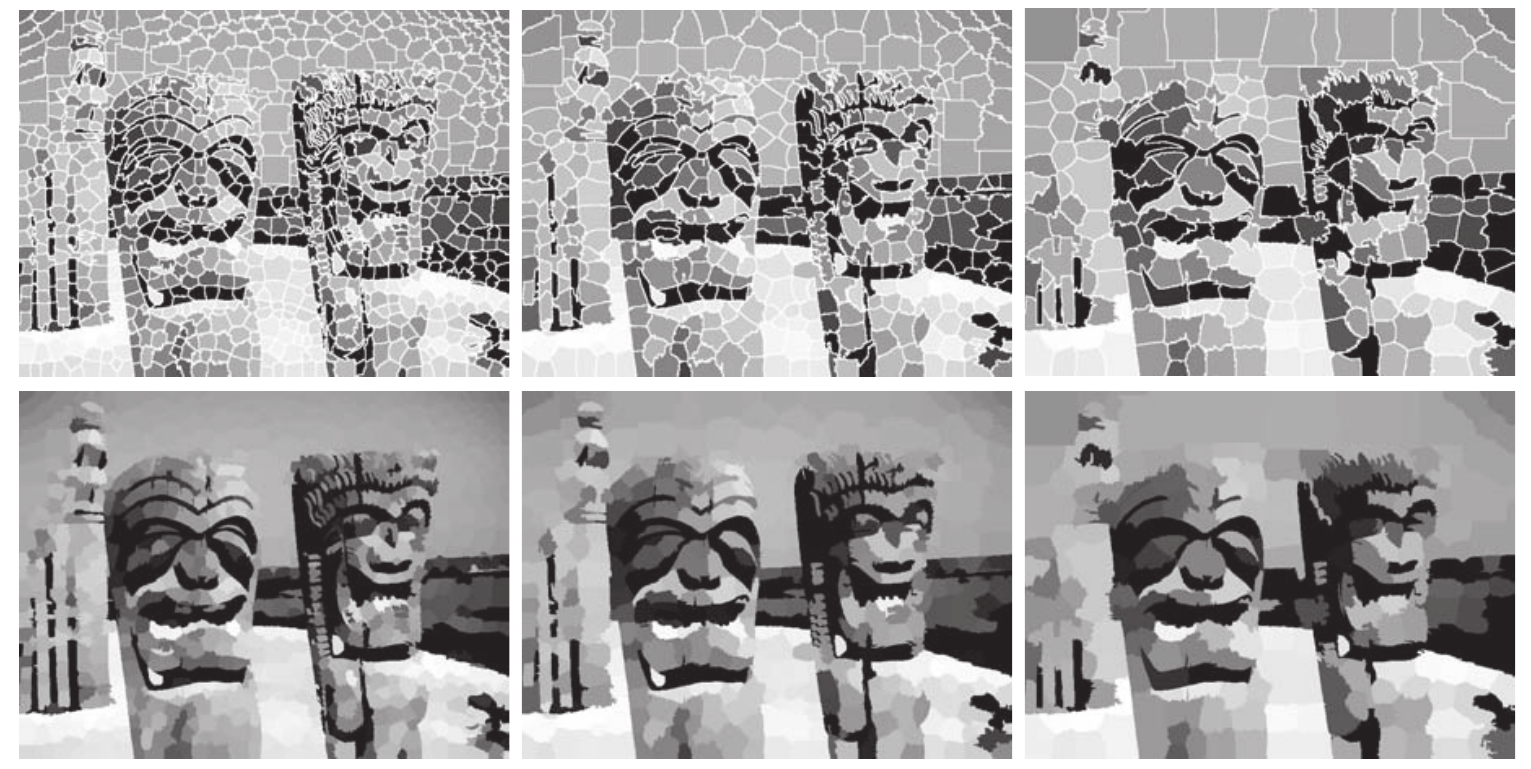
经过superpixel的预处理后, 图片可以变得更加容易提取edge, region, 毕竟superpixel已经率先提取过一次了.
SLIC Superpixel algorithm
SLIC (simple linear iterative clustering) 算法是基于k-means的一种聚类算法.
Given: 需要superpixels的个数\(n_{sp}\); 图片\(f(x, y) = (r, g, b), x = 1,2,\cdots M, y = 1, 2, \cdots, N\);
根据图片以及其位置信息生成数据:
\[\bm{z} = [r, g, b, x, y]^T,
\]其中\(r, g, b\)是颜色编码, \(x, y\)是位置信息.
令\(n_{tp} = MN\)表示pixels的个数, 并计算网格大小:
\[s = [n_{tp} / n_{sp}]^{1/2}.
\]将图片均匀分割为大小\(s\)的网格, 初始化superpixels的中心:
\[\bm{m}_i = [r_i, g_i, b_i, x_i, y_i]^T, i=1,2,\cdots, n_{sp},
\]为网格的中心. 或者, 为了防止噪声的影响, 选择中心\(3 \times 3\)领域内梯度最小的点.
将图片的每个pixel的类别标记为\(L(p) = -1\), 距离\(d(p) = \infty\);
重复下列步骤直到收敛:
对于每个像素点\(p\), 计算其与\(2s \times 2s\)邻域内的中心点\(\bm{m}_i\)之间的距离\(D_i(p)\), 倘若\(D_i(p) < d(p)\):
\[d(p) = D_i, L(p) = i.
\]令\(C_i\)表示\(L(p) = i\)的像素点的集合, 更新superpixels的中心:
\[\bm{m}_i = \frac{1}{|C_i|} \sum_{\bm{z} \in C_i} \bm{z}, i=1, 2, \cdots, n_{sp}.
\]
将以\(\bm{m}_i\)为中心的区域中的点的(r, g, b)设定为与\(\bm{m}_i\)一致.
距离函数的选择
倘若\(D\)采用的是和普通K-means一样的\(\|\cdot\|_2\)显然是不合适的, 因为\((r, g, b)\)和\((x, y)\)显然不是一个尺度的. 故采用如下的距离函数:
d_c = [(r_j - r_i)^2 + (g_j - g_i)^2 + (b_j - b_i)^2]^{1/2}, \\
d_s = [(x_j - x_i)^2 + (y_j - y_i)^2]^{1/2},
\]
其中\(d_{cm}, d_{sm}\)分别是\(d_c, d_s\)可能取到的最大值, 相当于标准化了.
代码
import numpy as np

def _generate_data(img):

    img = img.astype(np.float64)

    if len(img.shape) == 2:

        img = img[..., None]

    M, N = img.shape[0], img.shape[1]

    loc = np.stack(np.meshgrid(range(M), range(N), indexing='ij'), axis=-1)

    classes = -np.ones((M, N))

    distances = np.ones((M, N)) * np.float('inf')

    data = np.concatenate((img, loc), axis=-1)

    return data, classes, distances

def _generate_means(data, size: int):

    M, N = data.shape[0], data.shape[1]

    x_splits = np.arange(0, M + size, size)

    y_splits = np.arange(0, N + size, size)

    means = []

    for i in range(len(x_splits) - 1):

        for j in range(len(y_splits) - 1):

            r1, r2 = x_splits[i:i+2]

            c1, c2 = y_splits[j:j+2]

            region = data[r1:r2, c1:c2]

            means.append(region.mean(axis=(0, 1)))

    return np.array(means)

def _unit_step(data, means, classes, distances, size, dis_fn):

    M, N = data.shape[0], data.shape[1]

    size = 2 * size

    for i, m in enumerate(means):

        # ..., x, y

        x, y = np.round(m[-2:])

        x, y = int(x), int(y)

        xl, xr = max(0, x - size), min(x + size, M)

        yb, yt = max(0, y - size), min(y + size, N)

        p = data[xl:xr, yb:yt]

        _dis = dis_fn(p, m)

        indices = _dis < distances[xl:xr, yb:yt]

        distances[xl:xr, yb:yt][indices] = _dis[indices]

        classes[xl:xr, yb:yt][indices] = i

    # update

    for i in range(len(means)):

        x_indices, y_indices = np.where(classes == i)

        if len(x_indices) == 0:

            continue

        means[i] = data[x_indices, y_indices].mean(axis=0)

def slic(img, size, max_iters=10, compactness=10):

    data, classes, distances = _generate_data(img)

    means = _generate_means(data, size)

    dsm = size

    dcm = (img.max(axis=(0, 1)) - img.min(axis=(0, 1))) * compactness

    dsc = np.concatenate((dcm, [dsm] * 2))

    def dis_func(p, m):

        _dis = ((p - m) / dsc) ** 2

        return _dis.sum(axis=-1)

    for _ in range(max_iters):

        _unit_step(data, means, classes, distances, size, dis_func)

    new_img = np.zeros_like(img, dtype=np.float)

    for i, m in enumerate(means):

        x_indices, y_indices = np.where(classes == i)

        if len(x_indices) == 0:

            continue

        new_img[x_indices, y_indices] = m[:-2]

    return new_img.astype(img.dtype)
from skimage import io, segmentation, filters

from freeplot.base import FreePlot
img = io.imread(r"Lenna.png")

ours = slic(img, size=50, compactness=0.5)

def mask2img(mask, img):

    new_img = img.astype(np.float)

    masks = np.unique(mask)

    for m in masks:

        x, y = np.where(mask == m)

        mcolor = new_img[x, y].mean(axis=0)

        new_img[x, y] = mcolor

    return new_img.astype(img.dtype)

mask = segmentation.slic(img)

yours = mask2img(mask, img)

fp = FreePlot((1, 3), (10.3, 5), titles=('Lenna', 'ours', 'skimage.segmentation.slic'))

fp.imageplot(img, index=(0, 0))

fp.imageplot(ours, index=(0, 1))

fp.imageplot(yours, index=(0, 2))

fp.set_title()

fp.show()


skimage上实现的代码还有强制连通性, 我想这个是为什么它看起来这么流畅的原因. Compactness 越大, 聚类越倾向于空间信息, 所以越容易出现块状结构.
SuperPixel的更多相关文章
- Superpixel Based RGB-D Image Segmentation Using Markov Random Field——阅读笔记
1.基本信息 题目:使用马尔科夫场实现基于超像素的RGB-D图像分割: 作者所属:Ferdowsi University of Mashhad(Iron) 发表:2015 International ...
- {Links}{Matting}{Saliency Detection}{Superpixel}Source links
自然图像抠图/视频抠像技术发展情况梳理(image matting, alpha matting, video matting)--计算机视觉专题1 http://blog.csdn.net/ansh ...
- SLIC superpixel算法
标题 SLIC superpixel算法 作者 YangZheng 联系方式 263693992 SLIC算法是simple linear iterative cluster的简称,该算法用来生成超像 ...
- 跑superpixel的程序
知乎上对superpixel的讲解还不错:https://www.zhihu.com/question/27623988 superpixel的算法有很多,opencv中也包含了很多,我找了一个比较经 ...
- 【深度聚类】Superpixel Sampling Networks
Superpixel Sampling Networks 原始文档:https://www.yuque.com/lart/papers/ssn 本文的思想很简单,传统的超像素算法是一种有效的低/中级的 ...
- SLIC superpixel实现分析
http://infoscience.epfl.ch/record/149300这是SLIC算法的官网,网站有和SLIC相关的资源. SLIC主要运用K-means聚类算法进行超像素的处理,聚类算法中 ...
- 超像素经典算法SLIC的代码的深度优化和分析。
现在这个社会发展的太快,到处都充斥着各种各样的资源,各种开源的平台,如github,codeproject,pudn等等,加上一些大型的官方的开源软件,基本上能找到各个类型的代码.很多初创业的老板可能 ...
- paper 116:自然图像抠图/视频抠像技术梳理(image matting, video matting)
1. Bayesian Matting, Chuang, CVPR 2001.http://grail.cs.washington.edu/projects/digital-matting/paper ...
- {Reship}{Code}{CV}
UIUC的Jia-Bin Huang同学收集了很多计算机视觉方面的代码,链接如下: https://netfiles.uiuc.edu/jbhuang1/www/resources/vision/in ...
随机推荐
- 开发安卓记账本-HelloAndroid的完成
这个寒假要完成一个家庭记账本软件的开发,今天完成了Android Studio的安装与第一个安卓应用的运行(HelloAndroid) 下图是效果: 1.Android Studio的安装 可直接百度 ...
- 如何删除苹果电脑垃圾文件-7个高级技巧释放大量苹果Mac
硬盘空间用尽是一件很让人头疼的事情,尤其是MacBook Air等设备上的固态硬盘可用的储存空间很少.下面[微IT]为大家介绍7个高级技巧来释放大量的硬盘空间,当然这些高级技巧更改了系统功能和文件,必 ...
- 3.2 go WaitGroup代码示例
sync.WaitGroup提供了一种安全的多协程处理方法,内部使用race.atomic来处理,避免了资源竞争及锁的产生. 主要的方法有Add.Done.Wait,可以等待一组协程全部执行完毕后,主 ...
- Spring Batch Event Listeners
Learn to create and configure Spring batch's JobExecutionListener (before and after job), StepExecut ...
- C# 使用modbus 读取PLC 寄存器地址
使用的组件Nmodbus 定义参数,全局变量: //创建modbus实体对象 private static ModbusFactory modbusFactory; private static IM ...
- 基于Kubernetes的hpa实现pod实例数量的自动伸缩
Pod 是在 Kubernetes 体系中,承载用户业务负载的一种资源.Pod 们运行的好坏,是用户们最为关心的事情.在业务流量高峰时,手动快速扩展 Pod 的实例数量,算是玩转 Kubernetes ...
- Windows下mysql5.6升级到5.7的方法(亲测有效哦!)
Mysql的升级方式分为两种:原地升级和逻辑升级.这两种升级方式,本质没有什么区别的. 只是在对数据文件的处理上有些区别而已.原地升级是直接将数据文件进行拷贝,而逻辑升级对数据文件的处理方式是通过逻辑 ...
- Mongodb集群调研
目录 一.高可用集群的解决方案 二.MongoDB的高可用集群配置 三.Mongo集群实现高可用方式详解 四.Sharding分片技术 一.高可用集群的解决方案 高可用性即HA(High Availa ...
- 第45篇-查找native方法的本地实现函数native_function
在之前介绍为native方法设置解释执行的入口时讲到过Method实例的内存布局,如下: 对于第1个slot来说,如果是native方法,其对应的本地函数的实现会放到Method实例的native_f ...
- spring security oauth2搭建resource-server demo及token改造成JWT令牌
我们在上文讲了如何在spring security的环境中搭建基于oauth2协议的认证中心demo:https://www.cnblogs.com/process-h/p/15688971.html ...