使用Nginx搭建图片服务器(windows)
知识点:在windows系统中,搭建图片上传服务器
参考博客:http://blog.csdn.net/u010942834/article/details/72953441
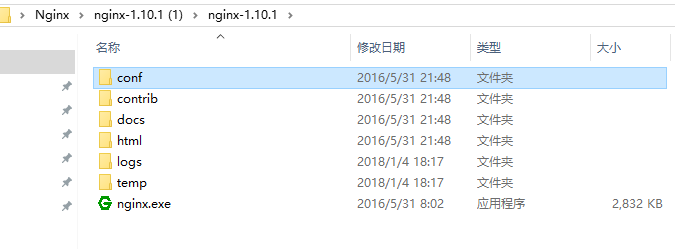
1.进入官网下载nginx压缩包,解压后目录如下
2.在解压后的conf/nginx.conf配置文件中,添加添加或者修改带有颜色地方的代码
#user nobody;
worker_processes 1;
#error_log logs/error.log;
#error_log logs/error.log notice;
#error_log logs/error.log info;
#pid logs/nginx.pid;
events {
worker_connections 1024;
}
http {
include mime.types;
default_type application/octet-stream;
#log_format main '$remote_addr - $remote_user [$time_local] "$request" '
# '$status $body_bytes_sent "$http_referer" '
# '"$http_user_agent" "$http_x_forwarded_for"';
#access_log logs/access.log main;
sendfile on;
#tcp_nopush on;
#keepalive_timeout 0;
keepalive_timeout 65;
#gzip on;
server {
listen ;
server_name localhost;
#charset utf-8;
#access_log logs/host.access.log main;
#添加博客的代码
location ~ .*\.(gif|jpg|jpeg|png)$ {
expires 24h;
root G:/images/;#指定图片存放路径
access_log G:/images/log;#图片路径
proxy_store on;
proxy_store_access user:rw group:rw all:rw;
proxy_temp_path G:/images/;#图片路径
proxy_redirect off;
proxy_set_header Host 127.0.0.1;
proxy_set_header X-Real-IP $remote_addr;
proxy_set_header X-Forwarded-For $proxy_add_x_forwarded_for;
client_max_body_size 10m;
client_body_buffer_size 1280k;
proxy_connect_timeout 900;
proxy_send_timeout 900;
proxy_read_timeout 900;
proxy_buffer_size 40k;
proxy_buffers 40 320k;
proxy_busy_buffers_size 640k;
proxy_temp_file_write_size 640k;
if ( !-e $request_filename)
{
proxy_pass http://169.254.140.133:8089; #代理访问地址
}
}
location / {
root html;
index index.html index.htm;
}
#error_page 404 /404.html;
# redirect server error pages to the static page /50x.html
#
error_page 500 502 503 504 /50x.html;
location = /50x.html {
root html;
}
# proxy the PHP scripts to Apache listening on 127.0.0.1:80
#
#location ~ \.php$ {
# proxy_pass http://127.0.0.1;
#}
# pass the PHP scripts to FastCGI server listening on 127.0.0.1:9000
#
#location ~ \.php$ {
# root html;
# fastcgi_pass 127.0.0.1:9000;
# fastcgi_index index.php;
# fastcgi_param SCRIPT_FILENAME /scripts$fastcgi_script_name;
# include fastcgi_params;
#}
# deny access to .htaccess files, if Apache's document root
# concurs with nginx's one
#
#location ~ /\.ht {
# deny all;
#}
}
# another virtual host using mix of IP-, name-, and port-based configuration
#
#server {
# listen 8000;
# listen somename:8080;
# server_name somename alias another.alias;
# location / {
# root html;
# index index.html index.htm;
# }
#}
# HTTPS server
#
#server {
# listen 443 ssl;
# server_name localhost;
# ssl_certificate cert.pem;
# ssl_certificate_key cert.key;
# ssl_session_cache shared:SSL:1m;
# ssl_session_timeout 5m;
# ssl_ciphers HIGH:!aNULL:!MD5;
# ssl_prefer_server_ciphers on;
# location / {
# root html;
# index index.html index.htm;
# }
#}
}
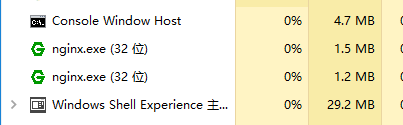
3.点击绿色的nginx.exe图标,启动服务器,在任务管理器看到如下,则启动成功
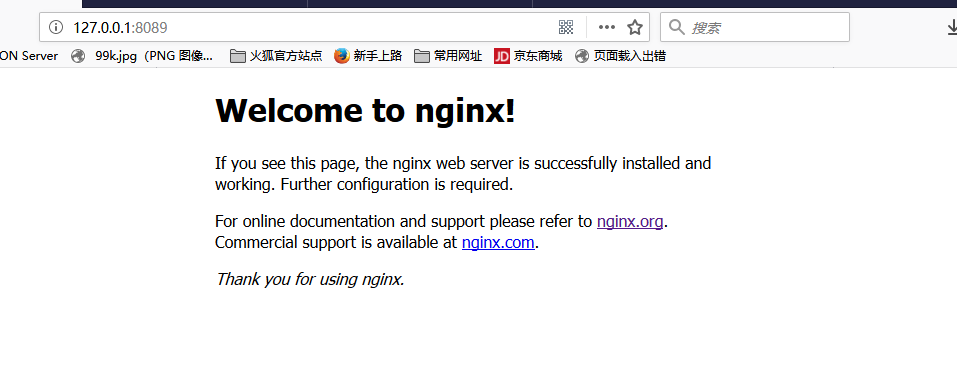
4.在浏览器中输入http://127.0.0.1:8089可以看到
5.在G:/images/下,放一个图片,在浏览器地址栏输入http://127.0.0.1:8089/img.jpg,就可以访问到服务器上的图片

使用Nginx搭建图片服务器(windows)的更多相关文章
- nginx 搭建图片服务器(windows 下,linux 下原理应该一样)
作者的心声:很多知道的.用过的东西,不写下来,下次还要百度查询,浪费时间和精力,故本次写下学习笔记,方便下次查阅. 题外话:如有读者通过我这篇博客解决了工作上的难题,可以给个评论,让我一起分享你的喜悦 ...
- Nginx,Nginx 搭建图片服务器
Nginx Nginx 概述 反向代理 工作流程 优点 1:保护了真实的web服务器,保证了web服务器的资源安全 2:节约了有限的IP地址资源 3:减少WEB服务器压力,提高响应速度 4:其他优点 ...
- Nginx 搭建图片服务器
Nginx 搭建图片服务器 本章内容通过Nginx 和 FTP 搭建图片服务器.在学习本章内容前,请确保您的Linux 系统已经安装了Nginx和Vsftpd. Nginx 安装:http://www ...
- Nginx搭建图片服务器
Nginx搭建图片服务器 标签(空格分隔): linux,nginx Nginx常用命令 ./nginx 启动 ./nginx -s reload 重载配置文件 ./nginx -s stop|sta ...
- nginx+ftp搭建图片服务器(Windows Server服务器环境下)
几种图片服务器的对比 1.直接使用ftp服务器,访问图片路径为 ftp://账户:密码@192.168.0.106/31275-105.jpg 不采用这种方式,不安全容易暴露ftp账户信息 2.直接使 ...
- ftp&nginx搭建图片服务器
下面使用ftp+nginx搭建一个简单的服务器 ftp用于文件的传输 nginx提供http服务 nginx服务器的安装和配置可以参照之前的教程:nginx安装及其配置详细教程 下面介绍ftp服务的安 ...
- 二、nginx搭建图片服务器
接上篇:Nginx安装手册 cd /usr/local/nginx/conf/ 配置图片服务器 方法一.在配置文件server{}中location /{} 修改配置: #默认请求 location ...
- ubuntu16.06+vsftpd+nginx搭建图片服务器
安装vsftpd 注:以下指令都在root账户下操作 # apt安装vsftpd apt-get install vsftpd #启动vsftpd service vsftpd start #新建用户 ...
- 【nginx】解决nginx搭建图片服务器访问图片404
图片通过ftp服务上传到/home/ftpuser/www/images目录下后访问 http://192.168.128.128/images/xxx.jpg 还是 404 NOT FOUND ,解 ...
随机推荐
- DHCP服务原理
DHCP 工作原理 一.什么是DHCP? DHCP,动态主机配置协议,前身是BOOTP协议,是一个局域网的网络协议,使用UDP协议工作,常用的2个端口:67(DHCP server),68(DHCP ...
- SpringCloud 进阶之Eureka(服务注册和发现)
1. Eureka 服务注册与发现 Eureka 是一个基于REST的服务,用于服务的的注册与发现; Eureka采用C-S的设计架构,Eureka Server作为服务注册功能的服务器,它是服务注册 ...
- Android Studio下编译调试 ndk 的示例
https://github.com/googlesamples/android-ndk https://github.com/googlesamples android studio 手动安装cma ...
- C++学习笔记--友元
C++控制对类对象私有部分的访问,在外部无法直接访问类的私有或保护成员.通常,公有类方法提供唯一的访问途径.有时这种限制太严格,不适合特定的编程问题.所以C++提供了友元这种形式,通过让函数或类成为类 ...
- 在MFC下如何定义全局变量和全局函数
用MFC制作的工程由很多文件构成,它不能象一般C++程序那样随意在类外定义全局变量,在这里要想定义能被工程内多个文件共享的全局变量和函数必须用一些特殊方法才行.实际上有多种方法可以实现,这里只介绍两种 ...
- gdb core
程序运行发生异常退出,比如segment错误,此时可以利用系统生成的core文件,配合GDB来定位问题. 问题程序: segment.c #include <stdio.h> #inclu ...
- adb push ,adb pull和adb install的区别
1.用命令行把手机上的文件拷贝到电脑上 1 adb pull sdcard/1222073679.png 拷贝文件夹命令,如把log文件夹拷贝到电脑当前目录 1 adb pull sdcard/log ...
- linux怎样使用top命令查看系统状态
有时候有很多问题只有在线上或者预发环境才能发现,而线上又不能Debug,所以线上问题定位就只能看日志,系统状态和Dump线程. Linux系统可以通过top命令查看系统的CPU.内存.运行时间.交换分 ...
- 网页图片jpg,gif,png对比。
总结:照片类的jpg如:banner图,小图gif或png8 GIF格式特点: 透明性 Gif是一种布尔透明类型,既它可以是全透明,也可以是全不透明,但是它并没有半透明(alpha 透明). 动画 G ...
- 不允许有匹配 "[xX][mM][lL]" 的处理指令目标
八月 , :: 上午 org.apache.tomcat.util.digester.SetPropertiesRule begin 警告: [SetPropertiesRule]{Server/Se ...