
Spring容器启动源码分析
1. 前言
最近搭建的工程都是基于SpringBoot,简化配置的感觉真爽。但有个以前的项目还是用SpringMvc写的,看到满满的配置xml文件,却有一种想去深入了解的冲动。折腾了好几天,决心去写这篇关于Spring启动的博客,自己是个刚入职的小白,技术水平有限,也是硬着头皮看源码去Debug,很多不懂的地方还请谅解!
2. 概述
先给出几个让我头皮发麻的概念:web容器,Spring容器,SpringMvc容器
容器就是管理对象的地方,例如web容器就是管理servlet的地方,Spring容器就是管理Service,dao等Bean的地方,SpringMvc就是管理Controller等bean的地方(下文会做解释)。一个SpringMvc项目的启动离不开上述三个容器。所以这就是这篇文章的讲点,各个容器的启动过程解析。
3. Web容器初始化过程
官方文档是对于Web容器初始化时是这样描述的(英文不懂,已翻译成中文)
1. 部署描述文件(web.xml)中的<listener>标记的监听器会被创建和初始化
2. 对于实现了ServletContextListener的监听器,会执行它的初始化方法 contextInitialized()
3. 部署描述文件中的<filter>标记的过滤器会被创建和初始化,调用其init()方法
4. 部署描述文件中的<servlet>标记的servlet会根据<load-on-startup>中的序号创建和初始化,调用init()方法
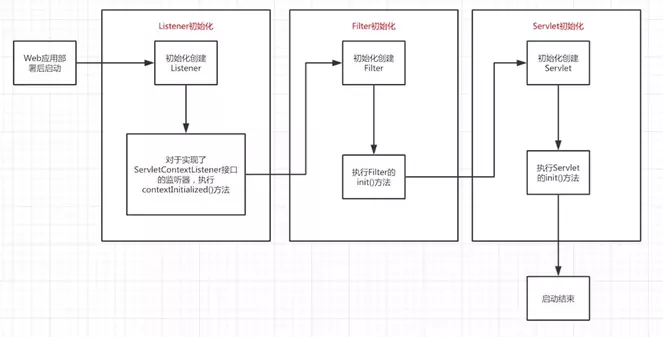
大致流程了解之后,结合自己的SpringMvc项目一步步深入,先贴一下基本的web.xml文件

<?xml version="1.0" encoding="UTF-8"?>
<web-app xmlns:xsi="http://www.w3.org/2001/XMLSchema-instance" xmlns:web="http://java.sun.com/xml/ns/javaee" xmlns="http://java.sun.com/xml/ns/javaee" xsi:schemaLocation="http://java.sun.com/xml/ns/javaee http://java.sun.com/xml/ns/javaee/web-app_2_5.xsd" id="WebApp_ID" version="2.5">
  <display-name>dmpserver</display-name>
  <welcome-file-list>
    <welcome-file>login.jsp</welcome-file>
  </welcome-file-list>
  <context-param>
    <param-name>contextConfigLocation</param-name>
    <param-value>classpath:spring.xml</param-value>
  </context-param>
  <context-param>
    <param-name>log4jConfigLocation</param-name>
    <param-value>classpath:log4jConfig.xml</param-value>
  </context-param>

  <filter>
    <filter-name>encodingFilter</filter-name>
    <filter-class>org.springframework.web.filter.CharacterEncodingFilter</filter-class>
    <init-param>
      <param-name>encoding</param-name>
      <param-value>utf-8</param-value>
    </init-param>
  </filter>
  <filter-mapping>
    <filter-name>encodingFilter</filter-name>
    <url-pattern>/*</url-pattern>
  </filter-mapping>
  <listener>
    <listener-class>org.springframework.web.context.ContextLoaderListener</listener-class>
  </listener>
   <listener>
    <listener-class>org.springframework.web.util.Log4jConfigListener</listener-class>
  </listener>
  <servlet>
    <description>spring mvc servlet</description>
    <servlet-name>rest</servlet-name>
    <servlet-class>org.springframework.web.servlet.DispatcherServlet</servlet-class>
    <init-param>
        <param-name>contextConfigLocation</param-name>
        <param-value>
            classpath:spring-mvc.xml
        </param-value>
    </init-param>
    <load-on-startup>1</load-on-startup>
  </servlet>

</web-app>
1. 容器会先解析<context-param>中的键值对(上述代码重点关注Spring配置文件Spring.xml)
2. 容器创建一个application内置对象servletContext(可以理解为servlet上下文或web容器),用于全局变量共享
3. 将解析的<context-param>键值对存放在application即servletContext中
4. 读取<listener>中的监听器,一般会使用ContextLoaderListener类,调用其contextInitialized方法,创建IOC容器(Spring容器)webApplicationContext。将webApplication容器放入application(servlet上下文)中作为根IOC容器,键名为WebApplicationContext.ROOT_WEB_APPLICATION_CONTEXT_ATTRIBUTE 注意的是,webApplicationContext是全局唯一的,一个web应用只能有一个根IOC容器。因为这个根IOC容器是读取<context-param>配置的键值对来创建Bean,这个根IOC容器只能访问spring.xml中配置的Bean,我们在Spring.xml中一般配置的是service,dao等Bean。所以根IOC容器(Spring容器)只能管理service,dao等Bean
5. listener加载完毕后,加载filter过滤器
6. 加载servlet,一般springMvc项目中会优先加载 DispatcherServlet(现在开始加载SpringMvc容器了)
7. DispatcherServlet的父类FrameworkServlet重写了其父类的initServletBean()方法,在初始化时调用initWebApplicationContext()方法和onRefresh()方法
8. initWebApplicationContext()方法会在servletContext(即当前servlet上下文)创建一个子IOC容器(即SpringMvc容器),如果存在上述的根IOC容器,就设置根IOC容器作为父容器,如果不存在,就将父容器设置为NULL
9. 读取<servlet>标签的<init-param>配置的xml文件并加载相关Bean。此时加载的是Spring-mvc.xml配置文件,管理的是Controller等Bean
10. onRefresh()加载其他组件
4. 启动过程分析
4.1 listener初始化Spring容器
tomcat启动后,<context-param>标签的内容读取后会被放进application中,做为Web应用的全局变量使用,接下来创建listener时会使用到这个全局变量,因此,Web应用在容器中部署后,进行初始化时会先读取这个全局变量,之后再进行上述讲解的初始化启动过程。
查看ContextLoaderListener源码
public class ContextLoaderListener extends ContextLoader implements ServletContextListener {
    public ContextLoaderListener() {
    }

    public ContextLoaderListener(WebApplicationContext context) {
        super(context);
    }

    public void contextInitialized(ServletContextEvent event) {
        this.initWebApplicationContext(event.getServletContext());
    }

    public void contextDestroyed(ServletContextEvent event) {
        this.closeWebApplicationContext(event.getServletContext());
        ContextCleanupListener.cleanupAttributes(event.getServletContext());
    }
}
据官方文档说明,实现ServletContextListener接口,执行contextInitialized(),进入initWebApplicationContext方法。contextInitialized()和contextDestroyed()方法会在web容器启动或销毁时执行。网上查了下此处设计模式用到的是观察者模式和代理模式,自己也不懂就不做详解了
查看ContextLoader.class中的initWebApplicationContext方法
public WebApplicationContext initWebApplicationContext(ServletContext servletContext) {
        /*
        首先通过WebApplicationContext.ROOT_WEB_APPLICATION_CONTEXT_ATTRIBUTE
        这个String类型的静态变量获取一个根IoC容器,根IoC容器作为全局变量
        存储在application对象中,如果存在则有且只能有一个
        如果在初始化根WebApplicationContext即根IoC容器时发现已经存在
        则直接抛出异常,因此web.xml中只允许存在一个ContextLoader类或其子类的对象
        */
        if (servletContext.getAttribute(WebApplicationContext.ROOT_WEB_APPLICATION_CONTEXT_ATTRIBUTE) != null) {
            throw new IllegalStateException("Cannot initialize context because there is already a root application context present - check whether you have multiple ContextLoader* definitions in your web.xml!");
        } else {
            Log logger = LogFactory.getLog(ContextLoader.class);
            servletContext.log("Initializing Spring root WebApplicationContext");
            if (logger.isInfoEnabled()) {
                logger.info("Root WebApplicationContext: initialization started");
            }

            long startTime = System.currentTimeMillis();

            try {
                if (this.context == null) {
                    // 创建一个根IOC容器
                    this.context = this.createWebApplicationContext(servletContext);
                }

                if (this.context instanceof ConfigurableWebApplicationContext) {
                    ConfigurableWebApplicationContext cwac = (ConfigurableWebApplicationContext)this.context;
                    if (!cwac.isActive()) {
                        if (cwac.getParent() == null) {
                            // 为根IOC容器设置一个父容器
                            ApplicationContext parent = this.loadParentContext(servletContext);
                            cwac.setParent(parent);
                        }

                        this.configureAndRefreshWebApplicationContext(cwac, servletContext);
                    }
                }
                //将创建好的IoC容器放入到application对象中,并设置key为WebApplicationContext.ROOT_WEB_APPLICATION_CONTEXT_ATTRIBUTE
                servletContext.setAttribute(WebApplicationContext.ROOT_WEB_APPLICATION_CONTEXT_ATTRIBUTE, this.context);
                ClassLoader ccl = Thread.currentThread().getContextClassLoader();
                if (ccl == ContextLoader.class.getClassLoader()) {
                    currentContext = this.context;
                } else if (ccl != null) {
                    currentContextPerThread.put(ccl, this.context);
                }

                if (logger.isDebugEnabled()) {
                    logger.debug("Published root WebApplicationContext as ServletContext attribute with name [" + WebApplicationContext.ROOT_WEB_APPLICATION_CONTEXT_ATTRIBUTE + "]");
                }

                if (logger.isInfoEnabled()) {
                    long elapsedTime = System.currentTimeMillis() - startTime;
                    logger.info("Root WebApplicationContext: initialization completed in " + elapsedTime + " ms");
                }

                return this.context;
            } catch (RuntimeException var8) {
                logger.error("Context initialization failed", var8);
                servletContext.setAttribute(WebApplicationContext.ROOT_WEB_APPLICATION_CONTEXT_ATTRIBUTE, var8);
                throw var8;
            } catch (Error var9) {
                logger.error("Context initialization failed", var9);
                servletContext.setAttribute(WebApplicationContext.ROOT_WEB_APPLICATION_CONTEXT_ATTRIBUTE, var9);
                throw var9;
            }
        }
    }
initWebApplicationContext方法的主要目的是创建一个根IOC容器,并放入servlet上下文中。看上述源码可知,根IOC容器只能仅有一个,作为全局变量存储在servletContext中。将根IoC容器放入到application对象之前进行了IoC容器的配置和刷新操作,调用了configureAndRefreshWebApplicationContext()方法,该方法源码如下:
protected void configureAndRefreshWebApplicationContext(ConfigurableWebApplicationContext wac, ServletContext sc) {
        String configLocationParam;
        if (ObjectUtils.identityToString(wac).equals(wac.getId())) {
            configLocationParam = sc.getInitParameter("contextId");
            if (configLocationParam != null) {
                wac.setId(configLocationParam);
            } else {
                wac.setId(ConfigurableWebApplicationContext.APPLICATION_CONTEXT_ID_PREFIX + ObjectUtils.getDisplayString(sc.getContextPath()));
            }
        }

        wac.setServletContext(sc);
        /*
            在容器启动时,会把<context-param>中的内容放入servlet上下文的全局变量中,
            此时获取key为contextConfigLocation的变量,及Spring.xml配置文件
            将其放入到webApplicationContext中
        */
        configLocationParam = sc.getInitParameter("contextConfigLocation");
        if (configLocationParam != null) {
            wac.setConfigLocation(configLocationParam);
        }

        ConfigurableEnvironment env = wac.getEnvironment();
        if (env instanceof ConfigurableWebEnvironment) {
            ((ConfigurableWebEnvironment)env).initPropertySources(sc, (ServletConfig)null);
        }

        this.customizeContext(sc, wac);
        wac.refresh();
    }
configureAndRefreshWebApplicationContext方法比较重要的是把配置文件信息放入根IOC容器中。方法最后调用了refresh()方法,对配置文件信息(Bean)进行加载。因为refresh()这是个ConfigurableApplication-Context接口方法,想到了它的常用实现类ClassPathXmlApplicationContext,一层层进去找到了Abstract-ApplicationContext,实现了refresh(),见如下源码:
public void refresh() throws BeansException, IllegalStateException {
        Object var1 = this.startupShutdownMonitor;
        synchronized(this.startupShutdownMonitor) {
            this.prepareRefresh();
            ConfigurableListableBeanFactory beanFactory = this.obtainFreshBeanFactory();
            this.prepareBeanFactory(beanFactory);

            try {
                this.postProcessBeanFactory(beanFactory);
                this.invokeBeanFactoryPostProcessors(beanFactory);
                this.registerBeanPostProcessors(beanFactory);
                this.initMessageSource();
                this.initApplicationEventMulticaster();
                this.onRefresh();
                this.registerListeners();
                this.finishBeanFactoryInitialization(beanFactory);
                this.finishRefresh();
            } catch (BeansException var9) {
                if (this.logger.isWarnEnabled()) {
                    this.logger.warn("Exception encountered during context initialization - cancelling refresh attempt: " + var9);
                }

                this.destroyBeans();
                this.cancelRefresh(var9);
                throw var9;
            } finally {
                this.resetCommonCaches();
            }

        }
    }
该方法主要用于创建并初始化contextConfigLocation类配置的xml文件中的Bean,因此,如果我们在配置Bean时出错,在Web应用启动时就会抛出异常,而不是等到运行时才抛出异常。因为技术能力有限加上此处方法太多,就不在一一解析了。到此为止,整个Spring容器加载完毕,下面开始加载SpringMVC容器
4.2 Filter初始化
因为Filter的操作没有涉及IOC容器,此处不做详解,上面web.xml中配置的是一个UTF8编码过滤器
5. 总结
时间有限,只大致介绍了Spring容器的初始化,后面还没来得及整理,对于springMvc容器的创建和初始化下篇文章见
Spring容器启动源码分析的更多相关文章
- 深入理解 spring 容器,源码分析加载过程
Spring框架提供了构建Web应用程序的全功能MVC模块,叫Spring MVC,通过Spring Core+Spring MVC即可搭建一套稳定的Java Web项目.本文通过Spring MVC ...
- Spring容器启动源码解析
1. 前言 最近搭建的工程都是基于SpringBoot,简化配置的感觉真爽.但有个以前的项目还是用SpringMvc写的,看到满满的配置xml文件,却有一种想去深入了解的冲动.折腾了好几天,决心去写这 ...
- 十、Spring之BeanFactory源码分析(二)
Spring之BeanFactory源码分析(二) 前言 在前面我们简单的分析了BeanFactory的结构,ListableBeanFactory,HierarchicalBeanFactory,A ...
- 九、Spring之BeanFactory源码分析(一)
Spring之BeanFactory源码分析(一) 注意:该随笔内容完全引自https://blog.csdn.net/u014634338/article/details/82865644,写的 ...
- Spring Developer Tools 源码分析:二、类路径监控
在 Spring Developer Tools 源码分析一中介绍了 devtools 提供的文件监控实现,在第二部分中,我们将会使用第一部分提供的目录监控功能,实现对开发环境中 classpath ...
- Spring Developer Tools 源码分析:三、重启自动配置'
接上文 Spring Developer Tools 源码分析:二.类路径监控,接下来看看前面提到的这些类是如何配置,如何启动的. spring-boot-devtools 使用了 Spring Bo ...
- RocketMQ中Broker的启动源码分析(一)
在RocketMQ中,使用BrokerStartup作为启动类,相较于NameServer的启动,Broker作为RocketMQ的核心可复杂得多 [RocketMQ中NameServer的启动源码分 ...
- RocketMQ中Broker的启动源码分析(二)
接着上一篇博客 [RocketMQ中Broker的启动源码分析(一)] 在完成准备工作后,调用start方法: public static BrokerController start(Broker ...
- RocketMQ中PullConsumer的启动源码分析
通过DefaultMQPullConsumer作为默认实现,这里的启动过程和Producer很相似,但相比复杂一些 [RocketMQ中Producer的启动源码分析] DefaultMQPullCo ...
随机推荐
- 【2019.3.20】NOI模拟赛
题目 这里必须标记一下那个傻逼问题,再不解决我人就没了! 先放一个 $T3$ $20$ 分暴力 #include<bits/stdc++.h> #define rep(i,x,y) for ...
- jquery 在将对象作为参数传递的时候要转换成 JSON
不转换成JSON 会报错 Unexpected identifier 方法: JSON.stringify(对象)
- Android编程使用httpHelper不执行错误-20171017
解决方法:将显示等代码(例如setText()和setAdapter()等方法)从主函数onCreate()中移到httpHelper.get()函数中: 原因:有可能是主线程运行的较快,而连接服 ...
- Five minutes to understand async and defer
Script tag When we want to insert a script into a web page, the standard way is to use the script ta ...
- 解决Iview 中 input 无法监听 enter 事件
比如 我们想要在某个组件的根元素监听一个原生事件 可以使用 .native 修饰 v-on 例子: 这样子写 enter事件将无效 但是使用 .native 修饰 就可以监听到 enter事件啦.
- SVN各种错误提示产生原因及处理方法大全
SVN各种错误提示产生原因及处理方法大全 SVN各种错误提示产生原因及处理方法大全 1. svn: Server sent unexpected return value (500 Internal ...
- js 引号 转义字符 json字符串
element_obj.NewTitle.value = json_obj.NewTitle.replace(/\"/g, "\""); model.NewTi ...
- HTML的状态码
HTML状态码的相关知识 ㈠:含义 HTTP状态码(英语:HTTP Status Code)是用以表示网页服务器超文本传输协议响应状态的3位数字代码. 也就是当浏览者访问一个网页时,浏览者的浏览器会向 ...
- POJ 3422 矩阵取数 最小费用流拆点+负边
Kaka's Matrix Travels Time Limit: 1000MS Memory Limit: 65536K Total Submissions: 9153 Accepted: ...
- python3基础:基本语句
http://www.cnblogs.com/qq21270/p/4591318.html 字符串.文本文件 http://www.cnblogs.com/qq21270/p/7872824.htm ...