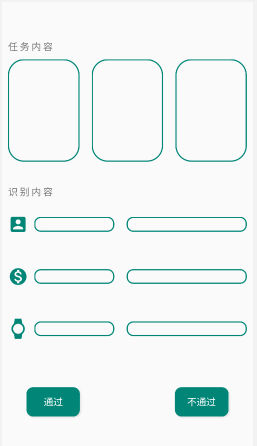
android studio 设计任务内容和识别内容界面 (android stuido design task layout)
本人android studio版本是 3.4.1,设计了一个任务内容和识别内容的界面,欢迎大家品尝。
界面显示如下图所示:

实现代码如下:
<?xml version="1.0" encoding="utf-8"?>

<LinearLayout xmlns:android="http://schemas.android.com/apk/res/android"

    xmlns:app="http://schemas.android.com/apk/res-auto"

    xmlns:tools="http://schemas.android.com/tools"

    android:layout_width="match_parent"

    android:layout_height="match_parent"

    android:orientation="vertical"

    >

    <LinearLayout

        android:layout_width="match_parent"

        android:layout_height="wrap_content"

        android:layout_weight="2"

        android:orientation="horizontal"

        >

        <LinearLayout

            android:layout_width="match_parent"

            android:layout_height="match_parent"

            android:orientation="vertical"

            >

            <TextView

                android:layout_width="wrap_content"

                android:layout_height="wrap_content"

                android:layout_weight="1"

                android:text="任 务 内 容"

                android:textSize="16sp"

                android:gravity="bottom"

                android:layout_marginLeft="10dp"

                />

            <LinearLayout

                android:layout_width="match_parent"

                android:layout_height="0dp"

                android:orientation="horizontal"

                android:layout_weight="3"

                android:gravity="center"

                android:padding="0dp"

                >

                <TextView

                    android:id="@+id/show1"

                    android:layout_weight="1"

                    android:layout_width="0dp"

                    android:layout_height="match_parent"

                    android:layout_margin="10dp"

                    android:background="@drawable/shapeshow"

                    android:textColor="@color/colortheme" />

                <TextView

                    android:id="@+id/show2"

                    android:layout_weight="1"

                    android:layout_width="0dp"

                    android:layout_height="match_parent"

                    android:layout_margin="10dp"

                    android:background="@drawable/shapeshow"

                    android:textColor="@color/colortheme" />

                <TextView

                    android:id="@+id/show3"

                    android:layout_weight="1"

                    android:layout_width="0dp"

                    android:layout_height="match_parent"

                    android:layout_margin="10dp"

                    android:background="@drawable/shapeshow"

                    android:textColor="@color/colortheme" />

            </LinearLayout>

        </LinearLayout>

    </LinearLayout>

    <LinearLayout

        android:layout_width="match_parent"

        android:layout_height="wrap_content"

        android:layout_weight="2"

        android:orientation="horizontal"

        >

        <LinearLayout

            android:layout_width="match_parent"

            android:layout_height="match_parent"

            android:orientation="vertical"

            >

            <TextView

                android:layout_width="wrap_content"

                android:layout_height="wrap_content"

                android:layout_weight="1"

                android:text="识 别 内 容"

                android:textSize="16sp"

                android:gravity="bottom"

                android:layout_marginLeft="10dp"

                />

            <LinearLayout

                android:layout_width="match_parent"

                android:layout_height="0dp"

                android:orientation="horizontal"

                android:layout_weight="3"

                android:gravity="center"

                >

                <ImageView

                    android:layout_weight="0.5"

                    android:layout_width="0dp"

                    android:layout_height="match_parent"

                    android:layout_marginLeft="10dp"

                    android:src="@drawable/ic_account_box_black_24dp"

                    />

                <EditText

                    android:layout_weight="2"

                    android:layout_width="0dp"

                    android:layout_height="wrap_content"

                    android:background="@drawable/shapesinput"

                    android:layout_marginLeft="10dp"

                    android:layout_marginRight="10dp"

                    />

                <EditText

                    android:layout_weight="3"

                    android:layout_width="0dp"

                    android:layout_height="wrap_content"

                    android:background="@drawable/shapesinput"

                    android:layout_marginLeft="10dp"

                    android:layout_marginRight="10dp"

                    />

            </LinearLayout>

            <LinearLayout

                android:layout_width="match_parent"

                android:layout_height="0dp"

                android:orientation="horizontal"

                android:layout_weight="3"

                android:gravity="center"

                >

                <ImageView

                    android:layout_weight="0.5"

                    android:layout_width="0dp"

                    android:layout_height="match_parent"

                    android:layout_marginLeft="10dp"

                    android:src="@drawable/ic_monetization_on_black_24dp"

                    />

                <EditText

                    android:layout_weight="2"

                    android:layout_width="0dp"

                    android:layout_height="wrap_content"

                    android:background="@drawable/shapesinput"

                    android:layout_marginLeft="10dp"

                    android:layout_marginRight="10dp"

                    />

                <EditText

                    android:layout_weight="3"

                    android:layout_width="0dp"

                    android:layout_height="wrap_content"

                    android:background="@drawable/shapesinput"

                    android:layout_marginLeft="10dp"

                    android:layout_marginRight="10dp"

                    />

            </LinearLayout>

            <LinearLayout

                android:layout_width="match_parent"

                android:layout_height="0dp"

                android:orientation="horizontal"

                android:layout_weight="3"

                android:gravity="center"

                >

                <ImageView

                    android:layout_weight="0.5"

                    android:layout_width="0dp"

                    android:layout_height="match_parent"

                    android:layout_marginLeft="10dp"

                    android:src="@drawable/ic_watch_black_24dp"

                    />

                <EditText

                    android:layout_weight="2"

                    android:layout_width="0dp"

                    android:layout_height="wrap_content"

                    android:background="@drawable/shapesinput"

                    android:layout_marginLeft="10dp"

                    android:layout_marginRight="10dp"

                    />

                <EditText

                    android:layout_weight="3"

                    android:layout_width="0dp"

                    android:layout_height="wrap_content"

                    android:background="@drawable/shapesinput"

                    android:layout_marginLeft="10dp"

                    android:layout_marginRight="10dp"

                    />

            </LinearLayout>

        </LinearLayout>

    </LinearLayout>

    <LinearLayout

        android:layout_width="wrap_content"

        android:layout_height="wrap_content"

        android:layout_weight="1"

        >

        <RelativeLayout

            android:layout_width="match_parent"

            android:layout_height="match_parent"

            >

            <Button

                android:id="@+id/pass"

                android:layout_width="wrap_content"

                android:layout_height="wrap_content"

                android:layout_centerVertical="true"

                android:layout_marginLeft="40dp"

                android:text="通过"

                android:textSize="16dp"

                android:textColor="#fff"

                android:background="@drawable/shapesbutton"

                />

            <Button

                android:id="@+id/not_pass"

                android:layout_width="wrap_content"

                android:layout_height="wrap_content"

                android:layout_alignParentEnd="true"

                android:layout_alignParentRight="true"

                android:layout_centerVertical="true"

                android:layout_marginEnd="40dp"

                android:layout_marginRight="40dp"

                android:background="@drawable/shapesbutton"

                android:text="不通过"

                android:textColor="#fff"

                android:textSize="16dp" />

        </RelativeLayout>

    </LinearLayout>

</LinearLayout>
其中, 以下是 shapesbutton.xml 的代码, 而其他的shape代码大同小异, 只要修改其中的参数就可以变成想要的形状和颜色
<?xml version="1.0" encoding="utf-8"?>

<shape xmlns:android="http://schemas.android.com/apk/res/android"

    android:shape="rectangle">

    <solid

        android:color="#008577">

    </solid>

    <corners

        android:radius="10dp">

    </corners>

    <stroke

        android:width="2dp"

        android:color="#008577">

    </stroke>

    <padding

        android:top="0dp"

        android:right="20dp"

        android:left="20dp"

        android:bottom="0dp">

    </padding>

</shape>
其中,关于图标文件的创建,右击 drawable, 选择 new, 选择 Vector Asset 进入界面, 再点击 Clip Art 选择自己想要的图标, 点击 next 和 finish 即可.若想要修改图标的颜色, 则可以打开图标文件, 修改 fillColor即可.
android studio 设计任务内容和识别内容界面 (android stuido design task layout)的更多相关文章
- Android Studio软件技术基础 —Android项目描述---1-类的概念-android studio 组件属性-+标志-Android Studio 连接真机不识别其他途径
学习android对我来说,就是兴趣,所以我以自己的兴趣写出的文章,希望各位多多支持!多多点赞,评论讨论加关注. 最近有点忙碌,对于我来说,学习Android开发,是对于我的考验,最近一位大佬发给我一 ...
- 【Android Studio安装部署系列】二十一、Android studio将项目上传到github中
版权声明:本文为HaiyuKing原创文章,转载请注明出处! 概述 两个相关概念:git和github Git是一个开源的分布式版本控制系统,用以有效.高速的处理从很小到非常大的项目版本管理.Git ...
- Android studio 使用心得(三)—从Eclipse迁移到Android studio
断断续续的也算是把eclipse上的代码成功迁移到android studio上来了,现在,我同事继续用eclipse,我用android studio,svn上还是之前eclipse的项目,迁移成功 ...
- 【Android Studio探索之路系列】之中的一个:Android Studio开篇
作者:郭孝星 微博:郭孝星的新浪微博 邮箱:allenwells@163.com 博客:http://blog.csdn.net/allenwells github:https://github.co ...
- Android Studio 连接真机不识别
本人也是初学..写错的请大神多多批评指正! 不胜荣幸!! 强烈推荐使用真机测试..除非是最后关头要测试各个Android系统版本.. 本人遇到的连不上的原因有以下几种: 1 -- 手机设置问题. ...
- 【Android Studio安装部署系列】十九、Android studio使用SVN
版权声明:本文为HaiyuKing原创文章,转载请注明出处! 概述 在AndroidStudio中开发版本控制,除了Git就是SVN,和Eclipse不同,Android Studio没有提供单独的插 ...
- 【Android Studio安装部署系列】四十、Android Studio安装Statistic插件(统计项目总行数)
版权声明:本文为HaiyuKing原创文章,转载请注明出处! 概述 Android Studio 是没有提提供统计代码全部行数的功能的,但是对于开发者来说,这个功能确实必备的,Statistic统计代 ...
- [Unity][安卓]Unity和Android Studio 3.0 交互通讯(1)Android Studio 3.0 设置
[安卓]Android Studio 3.0 JDK安卓环境配置(2017.10) http://blog.csdn.net/bulademian/article/details/78387052 [ ...
- Android Studio 使用笔记:[转] Mac下修改Android Studio 所用的JDK版本
原文链接:http://www.jianshu.com/p/d8d1d72d0248# 最近项目从Eclipse+Ant构建模式转移到了Android Studio+Gradle构建模式,自然的JDK ...
随机推荐
- nginx实现高性能负载均衡的Tomcat集群
1. 安装软件: nginx 两个apache-tomcat 安装过程省略. 2.配置两个tomcat的http端口,第一个为18080,第二个为28080 注意:需要把server.xml文件中所有 ...
- RIDE使用介绍
[转载] RIDE是一款专门用来编辑Robot Framework用例的软件,用Python编写并且开源.当我们针对一个系统编写好一套用例后,每当我们对系 统做一些更改的时候,便可以把已经写好的用例拿 ...
- 力扣——candy (分糖果) python实现
题目描述: 中文: 老师想给孩子们分发糖果,有 N 个孩子站成了一条直线,老师会根据每个孩子的表现,预先给他们评分. 你需要按照以下要求,帮助老师给这些孩子分发糖果: 每个孩子至少分配到 1 个糖果. ...
- shell 提取文件的某行,并在行尾添加字符
sed -n '100,200p' file.txt #提取文件file.txt第100行到第200行的内容 sed 's/$/test/' file.txt #在行尾添加字符串test,$代表行尾
- sed编辑器基础
一. 更多的替换选项 ①替换标记 root@localhost sed]# cat data4.txt This is a test of the test script. This is the s ...
- String StringBuffer BufferBuilder区别
String 是一个字符串常量,即该对象一旦被创建之后是不可以进行更改的 StringBuffer StringBuilder 是一个字符串变量 StringBuffer 是非线程安全的 但是Stri ...
- ldap yum安装-centos6
yum安装openldap 系统环境信息 操作系统:CentOS release 6.7 基础的环境准备 iptables -F && /etc/init.d/iptables sav ...
- express上传图片
var express = require('express') var app = express() var proxy = require('http-proxy-middleware') co ...
- Android 中RelativeLayout各个属性的含义
转载博客:http://blog.csdn.net/softkexin/article/details/5933589 android:layout_above="@id/xxx" ...
- CJE-Jenkins认证工程师备考指南1-考试简介
CloudBees公司提供两项认证 Jenkins工程师(CJE)考试 包括60个选择题 测试开源Jenkins的知识. CloudBees 平台工程师(CCJE)考试 包含90个问题: 60个问题测 ...
