10.DRF-认证
Django rest framework源码分析(1)----认证
一、基础
1.1.安装
两种方式:
- github
- pip直接安装
pip install djangorestframework
1.2.需要先了解的一些知识
理解下面两个知识点非常重要,django-rest-framework源码中到处都是基于CBV和面向对象的封装
(1)面向对象封装的两大特性
把同一类方法封装到类中

将数据封装到对象中
(2)CBV
基于反射实现根据请求方式不同,执行不同的方法
原理:url-->view方法-->dispatch方法(反射执行其它方法:GET/POST/PUT/DELETE等等)
二、简单实例
2.1.settings
先创建一个project和一个app(我这里命名为API)
首先要在settings的app中添加
INSTALLED_APPS = [

    'rest_framework',

]
2.2.url
from django.contrib import admin

from django.urls import path

from API.views import AuthView

urlpatterns = [

    path('admin/', admin.site.urls),

    path('api/v1/auth/',AuthView.as_view()),

]
2.3.models
一个保存用户的信息
一个保存用户登录成功后的token
from django.db import models

class UserInfo(models.Model):

    USER_TYPE = (

        (1,'普通用户'),

        (2,'VIP'),

        (3,'SVIP')

    )

    user_type = models.IntegerField(choices=USER_TYPE)

    username = models.CharField(max_length=32)

    password = models.CharField(max_length=64)

class UserToken(models.Model):

    user = models.OneToOneField(UserInfo,on_delete=models.CASCADE)

    token = models.CharField(max_length=64)
2.4.views
用户登录(返回token并保存到数据库)
from django.shortcuts import render

from django.http import JsonResponse

from rest_framework.views import APIView

from API import models

def md5(user):

    import hashlib

    import time

    #当前时间,相当于生成一个随机的字符串

    ctime = str(time.time())

    m = hashlib.md5(bytes(user,encoding='utf-8'))

    m.update(bytes(ctime,encoding='utf-8'))

    return m.hexdigest()

class AuthView(object):

    def post(self,request,*args,**kwargs):

        ret = {'code':1000,'msg':None}

        try:

            user = request._request.POST.get('username')

            pwd = request._request.POST.get('password')

            obj = models.UserInfo.objects.filter(username=user,password=pwd).first()

            if not obj:

                ret['code'] = 1001

                ret['msg'] = '用户名或密码错误'

            #为用户创建token

            token = md5(user)

            #存在就更新,不存在就创建

            models.UserToken.objects.update_or_create(user=obj,defaults={'token':token})

            ret['token'] = token

        except Exception as e:

            ret['code'] = 1002

            ret['msg'] = '请求异常'

        return JsonResponse(ret)
2.5.利用postman发请求

如果用户名和密码正确的话 会生成token值,下次该用户再登录时,token的值就会更新
数据库中可以看到token的值

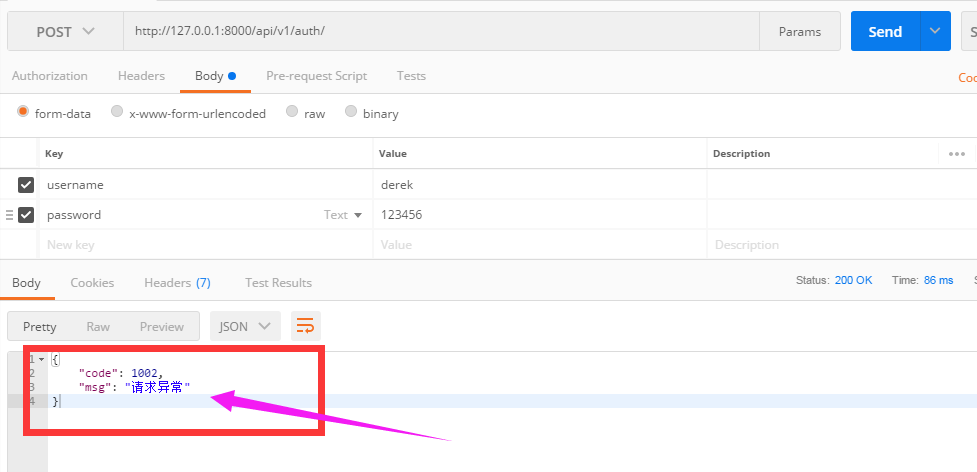
当用户名或密码错误时,抛出异常
三、添加认证
基于上面的例子,添加一个认证的类
3.1.url
path('api/v1/order/',OrderView.as_view()),
3.2.views
from django.shortcuts import render,HttpResponse

from django.http import JsonResponse

from rest_framework.views import APIView

from API import models

from rest_framework.request import Request

from rest_framework import exceptions

from rest_framework.authentication import BasicAuthentication

ORDER_DICT = {

    1:{

        'name':'apple',

        'price':15

    },

    2:{

        'name':'dog',

        'price':100

    }

}

def md5(user):

    import hashlib

    import time

    #当前时间,相当于生成一个随机的字符串

    ctime = str(time.time())

    m = hashlib.md5(bytes(user,encoding='utf-8'))

    m.update(bytes(ctime,encoding='utf-8'))

    return m.hexdigest()

class AuthView(object):

    '''用于用户登录验证'''

    def post(self,request,*args,**kwargs):

        ret = {'code':1000,'msg':None}

        try:

            user = request._request.POST.get('username')

            pwd = request._request.POST.get('password')

            obj = models.UserInfo.objects.filter(username=user,password=pwd).first()

            if not obj:

                ret['code'] = 1001

                ret['msg'] = '用户名或密码错误'

            #为用户创建token

            token = md5(user)

            #存在就更新,不存在就创建

            models.UserToken.objects.update_or_create(user=obj,defaults={'token':token})

            ret['token'] = token

        except Exception as e:

            ret['code'] = 1002

            ret['msg'] = '请求异常'

        return JsonResponse(ret)

class Authentication(APIView):

    '''认证'''

    def authenticate(self,request):

        token = request._request.GET.get('token')

        token_obj = models.UserToken.objects.filter(token=token).first()

        if not token_obj:

            raise exceptions.AuthenticationFailed('用户认证失败')

        #在rest framework内部会将这两个字段赋值给request,以供后续操作使用

        return (token_obj.user,token_obj)

    def authenticate_header(self, request):

        pass

class OrderView(APIView):

    '''订单相关业务'''

    authentication_classes = [Authentication,]    #添加认证

    def get(self,request,*args,**kwargs):

        #request.user

        #request.auth

        ret = {'code':1000,'msg':None,'data':None}

        try:

            ret['data'] = ORDER_DICT

        except Exception as e:

            pass

        return JsonResponse(ret)
3.3用postman发get请求
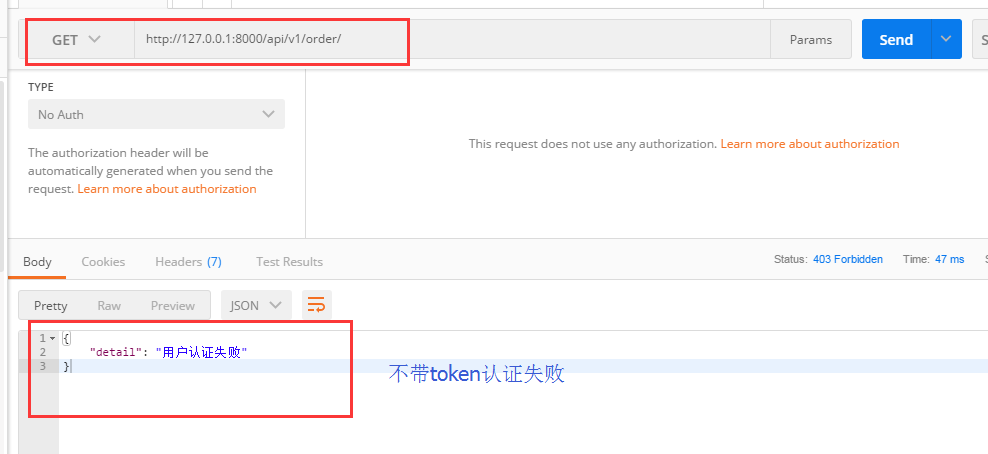
请求的时候没有带token,可以看到会显示“用户认证失败”

这样就达到了认证的效果,django-rest-framework的认证是怎么实现的呢,下面基于这个例子来剖析drf的源码。
四、drf的认证源码分析
源码流程图
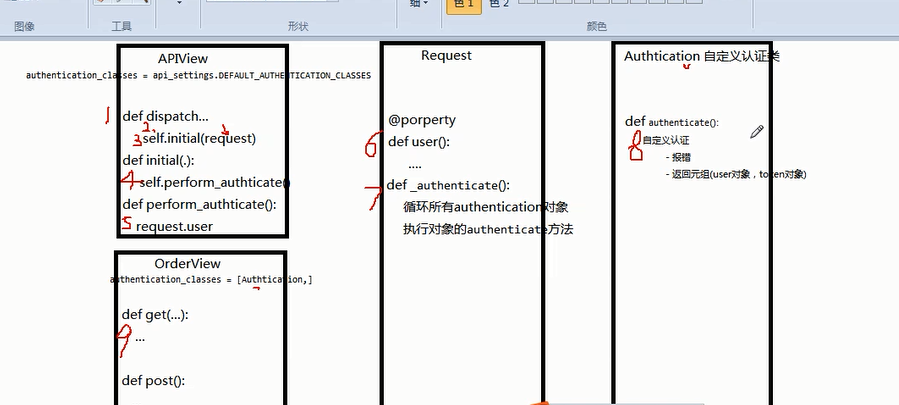
请求先到dispatch
dispatch()主要做了两件事
- 封装request
- 认证
具体看我写的代码里面的注释
def dispatch(self, request, *args, **kwargs):

	"""

	`.dispatch()` is pretty much the same as Django's regular dispatch,

	but with extra hooks for startup, finalize, and exception handling.

	 """

	self.args = args

    self.kwargs = kwargs

    #对原始request进行加工,丰富了一些功能

    #Request(

    #     request,

    #     parsers=self.get_parsers(),

    #     authenticators=self.get_authenticators(),

    #     negotiator=self.get_content_negotiator(),

    #     parser_context=parser_context

    # )

    #request(原始request,[BasicAuthentications对象,])

    #获取原生request,request._request

    #获取认证类的对象,request.authticators

    #1.封装request

    request = self.initialize_request(request, *args, **kwargs)

    self.request = request

    self.headers = self.default_response_headers  # deprecate?

    try:

        #2.认证

        self.initial(request, *args, **kwargs)

        # Get the appropriate handler method

        if request.method.lower() in self.http_method_names:

            handler = getattr(self, request.method.lower(),

                                  self.http_method_not_allowed)

        else:

            handler = self.http_method_not_allowed

        response = handler(request, *args, **kwargs)

	except Exception as exc:

        response = self.handle_exception(exc)

	self.response = self.finalize_response(request, response, *args, **kwargs)

    return self.response
4.1.reuqest
(1)initialize_request()
可以看到initialize()就是封装原始request
def initialize_request(self, request, *args, **kwargs):

    """

    Returns the initial request object.

    """

    parser_context = self.get_parser_context(request)

    return Request(

        request,

        parsers=self.get_parsers(),

        #[BasicAuthentication(),],把对象封装到request里面了

        authenticators=self.get_authenticators(),

        negotiator=self.get_content_negotiator(), parser_context=parser_context )
(2)get_authenticators()
通过列表生成式,返回对象的列表
def get_authenticators(self):

    """

    Instantiates and returns the list of authenticators that this view can use.

    """

    return [auth() for auth in self.authentication_classes]
(3)authentication_classes
APIView里面有个 authentication_classes 字段
可以看到默认是去全局的配置文件找(api_settings)
class APIView(View):

    # The following policies may be set at either globally, or per-view.

    renderer_classes = api_settings.DEFAULT_RENDERER_CLASSES

    parser_classes = api_settings.DEFAULT_PARSER_CLASSES

    authentication_classes = api_settings.DEFAULT_AUTHENTICATION_CLASSES

    throttle_classes = api_settings.DEFAULT_THROTTLE_CLASSES

    permission_classes = api_settings.DEFAULT_PERMISSION_CLASSES

    content_negotiation_class = api_settings.DEFAULT_CONTENT_NEGOTIATION_CLASS

    metadata_class = api_settings.DEFAULT_METADATA_CLASS

    versioning_class = api_settings.DEFAULT_VERSIONING_CLASS
4.2.认证
self.initial(request, *args, **kwargs)
def dispatch(self, request, *args, **kwargs):

    """

    `.dispatch()` is pretty much the same as Django's regular dispatch,

    but with extra hooks for startup, finalize, and exception handling.

    """

    self.args = args

    self.kwargs = kwargs

    #对原始request进行加工,丰富了一些功能

    #Request(

    #     request,

    #     parsers=self.get_parsers(),

    #     authenticators=self.get_authenticators(),

    #     negotiator=self.get_content_negotiator(),

    #     parser_context=parser_context

    # )

    #request(原始request,[BasicAuthentications对象,])

    #获取原生request,request._request

    #获取认证类的对象,request.authticators

    #1.封装request

    request = self.initialize_request(request, *args, **kwargs)

    self.request = request

    self.headers = self.default_response_headers  # deprecate?

    try:

        #2.认证

        self.initial(request, *args, **kwargs)

        # Get the appropriate handler method

        if request.method.lower() in self.http_method_names:

            handler = getattr(self, request.method.lower(),

                                  self.http_method_not_allowed)

        else:

            handler = self.http_method_not_allowed

        response = handler(request, *args, **kwargs)

	except Exception as exc:

        response = self.handle_exception(exc)

	self.response = self.finalize_response(request, response, *args, **kwargs)

    return self.response
(1)initial()
主要看 self.perform_authentication(request),实现认证
def initial(self, request, *args, **kwargs):

    """

    Runs anything that needs to occur prior to calling the method handler.

    """

    self.format_kwarg = self.get_format_suffix(**kwargs)

    # Perform content negotiation and store the accepted info on the request

    neg = self.perform_content_negotiation(request)

    request.accepted_renderer, request.accepted_media_type = neg

    # Determine the API version, if versioning is in use.

    version, scheme = self.determine_version(request, *args, **kwargs)

    request.version, request.versioning_scheme = version, scheme

    # Ensure that the incoming request is permitted

    #3.实现认证

    self.perform_authentication(request)

    self.check_permissions(request)

    self.check_throttles(request)
(2)perform_authentication()
调用了request.user
def perform_authentication(self, request):

    """

    Perform authentication on the incoming request.

	Note that if you override this and simply 'pass', then authentication

	will instead be performed lazily, the first time either

	`request.user` or `request.auth` is accessed.

	"""

    request.user
(3)user
request.user的request的位置

点进去可以看到Request有个user方法,加 @property 表示调用user方法的时候不需要加括号“user()”,可以直接调用:request.user
@property

def user(self):

    """

    Returns the user associated with the current request, as authenticated

    by the authentication classes provided to the request.

    """

    if not hasattr(self, '_user'):

        with wrap_attributeerrors():

            #获取认证对象,进行一步步的认证

            self._authenticate()

    return self._user
(4)_authenticate()
循环所有authenticator对象
def _authenticate(self):

    """

    Attempt to authenticate the request using each authentication instance

    in turn.

    """

    #循环认证类的所有对象

    #执行对象的authenticate方法

    for authenticator in self.authenticators:

        try:

            #执行认证类的authenticate方法

            #这里分三种情况

            #1.如果authenticate方法抛出异常,self._not_authenticated()执行

            #2.有返回值,必须是元组:(request.user,request.auth)

            #3.返回None,表示当前认证不处理,等下一个认证来处理

            user_auth_tuple = authenticator.authenticate(self)

        except exceptions.APIException:

            self._not_authenticated()

            raise

        if user_auth_tuple is not None:

            self._authenticator = authenticator

            self.user, self.auth = user_auth_tuple

            return

	self._not_authenticated()
返回值就是例子中的:
token_obj.user-->>request.user

token_obj-->>request.auth

#在rest framework内部会将这两个字段赋值给request,以供后续操作使用

return (token_obj.user,token_obj)     #例子中的return
当都没有返回值,就执行self._not_authenticated(),相当于匿名用户,没有通过认证
def _not_authenticated(self):

    """

    Set authenticator, user & authtoken representing an unauthenticated request.

	Defaults are None, AnonymousUser & None.

	"""

    self._authenticator = None

    if api_settings.UNAUTHENTICATED_USER:

        self.user = api_settings.UNAUTHENTICATED_USER()   #AnonymousUser匿名用户

    else:

        self.user = None

	if api_settings.UNAUTHENTICATED_TOKEN:

        self.auth = api_settings.UNAUTHENTICATED_TOKEN()  #None

	else:

        self.auth = None
面向对象知识:
子类继承 父类,调用方法的时候:
- 优先去自己里面找有没有这个方法,有就执行自己的
- 只有当自己里面没有这个方法的时候才会去父类找
因为authenticate方法我们自己写,所以当执行authenticate()的时候就是执行我们自己写的认证
父类中的authenticate方法
def authenticate(self, request):

    return (self.force_user, self.force_token)
我们自己写的
class Authentication(APIView):

    '''用于用户登录验证'''

    def authenticate(self,request):

        token = request._request.GET.get('token')

        token_obj = models.UserToken.objects.filter(token=token).first()

        if not token_obj:

            raise exceptions.AuthenticationFailed('用户认证失败')

        #在rest framework内部会将这两个字段赋值给request,以供后续操作使用

        return (token_obj.user,token_obj)
认证的流程就是上面写的,弄懂了原理,再写代码就更容易理解为什么了。
4.3.配置文件
继续解读源码

默认是去全局配置文件中找,所以我们应该在settings.py中配置好路径
api_settings源码
api_settings = APISettings(None, DEFAULTS, IMPORT_STRINGS)

def reload_api_settings(*args, **kwargs):

    setting = kwargs['setting']

    if setting == 'REST_FRAMEWORK':

        api_settings.reload()
setting中‘REST_FRAMEWORK’中找
全局配置方法:
API文件夹下面新建文件夹utils,再新建auth.py文件,里面写上认证的类
settings.py
#设置全局认证

REST_FRAMEWORK = {

    "DEFAULT_AUTHENTICATION_CLASSES":['API.utils.auth.Authentication',]   #里面写你的认证的类的路径

}
auth.py
# API/utils/auth.py

from rest_framework import exceptions

from API import models

class Authentication(object):

    '''用于用户登录验证'''

    def authenticate(self,request):

        token = request._request.GET.get('token')

        token_obj = models.UserToken.objects.filter(token=token).first()

        if not token_obj:

            raise exceptions.AuthenticationFailed('用户认证失败')

        #在rest framework内部会将这两个字段赋值给request,以供后续操作使用

        return (token_obj.user,token_obj)

    def authenticate_header(self, request):

        pass
在settings里面设置的全局认证,所有业务都需要经过认证,如果想让某个不需要认证,只需要在其中添加下面的代码:
authentication_classes = [] #里面为空,代表不需要认证
from django.shortcuts import render,HttpResponse

from django.http import JsonResponse

from rest_framework.views import APIView

from API import models

from rest_framework.request import Request

from rest_framework import exceptions

from rest_framework.authentication import BasicAuthentication

ORDER_DICT = {

    1:{

        'name':'apple',

        'price':15

    },

    2:{

        'name':'dog',

        'price':100

    }

}

def md5(user):

    import hashlib

    import time

    #当前时间,相当于生成一个随机的字符串

    ctime = str(time.time())

    m = hashlib.md5(bytes(user,encoding='utf-8'))

    m.update(bytes(ctime,encoding='utf-8'))

    return m.hexdigest()

class AuthView(APIView):

    '''用于用户登录验证'''

    authentication_classes = []    #里面为空,代表不需要认证

    def post(self,request,*args,**kwargs):

        ret = {'code':1000,'msg':None}

        try:

            user = request._request.POST.get('username')

            pwd = request._request.POST.get('password')

            obj = models.UserInfo.objects.filter(username=user,password=pwd).first()

            if not obj:

                ret['code'] = 1001

                ret['msg'] = '用户名或密码错误'

            #为用户创建token

            token = md5(user)

            #存在就更新,不存在就创建

            models.UserToken.objects.update_or_create(user=obj,defaults={'token':token})

            ret['token'] = token

        except Exception as e:

            ret['code'] = 1002

            ret['msg'] = '请求异常'

        return JsonResponse(ret)

class OrderView(APIView):

    '''订单相关业务'''

    def get(self,request,*args,**kwargs):

        # self.dispatch

        #request.user

        #request.auth

        ret = {'code':1000,'msg':None,'data':None}

        try:

            ret['data'] = ORDER_DICT

        except Exception as e:

            pass

        return JsonResponse(ret)

API/view.py代码
再测试一下我们的代码
不带token发请求
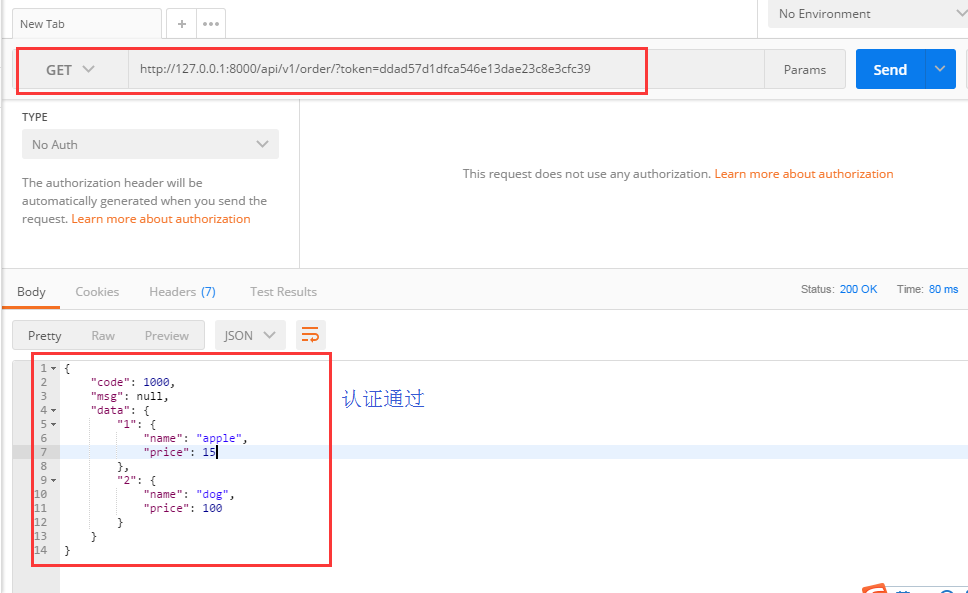
带token发请求
五、drf的内置认证
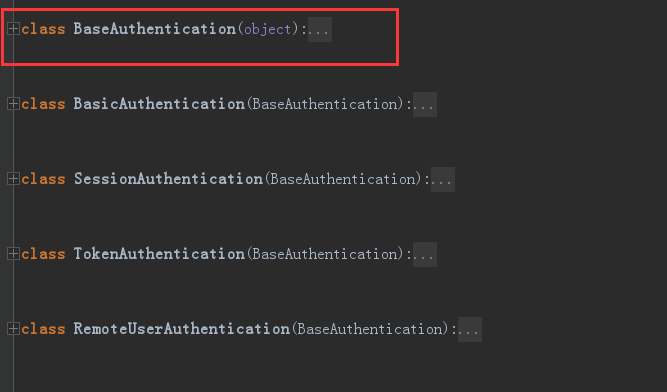
rest_framework里面内置了一些认证,我们自己写的认证类都要继承内置认证类 "BaseAuthentication"
4.1.BaseAuthentication源码:
class BaseAuthentication(object):

    """

    All authentication classes should extend BaseAuthentication.

    """

    def authenticate(self, request):

        """

        Authenticate the request and return a two-tuple of (user, token).

        """

        #内置的认证类,authenticate方法,如果不自己写,默认则抛出异常

        raise NotImplementedError(".authenticate() must be overridden.")

    def authenticate_header(self, request):

        """

        Return a string to be used as the value of the `WWW-Authenticate`

        header in a `401 Unauthenticated` response, or `None` if the

        authentication scheme should return `403 Permission Denied` responses.

        """

        #authenticate_header方法,作用是当认证失败的时候,返回的响应头

        pass
4.2.修改自己写的认证类
自己写的Authentication必须继承内置认证类BaseAuthentication
# API/utils/auth/py

from rest_framework import exceptions

from API import models

from rest_framework.authentication import BaseAuthentication

class Authentication(BaseAuthentication):

    '''用于用户登录验证'''

    def authenticate(self,request):

        token = request._request.GET.get('token')

        token_obj = models.UserToken.objects.filter(token=token).first()

        if not token_obj:

            raise exceptions.AuthenticationFailed('用户认证失败')

        #在rest framework内部会将这两个字段赋值给request,以供后续操作使用

        return (token_obj.user,token_obj)

    def authenticate_header(self, request):

        pass
4.3.其它内置认证类
rest_framework里面还内置了其它认证类,我们主要用到的就是BaseAuthentication,剩下的很少用到
六、总结
自己写认证类方法梳理
(1)创建认证类
- 继承BaseAuthentication --->>1.重写authenticate方法;2.authenticate_header方法直接写pass就可以(这个方法必须写)
(2)authenticate()返回值(三种)
- None ----->>>当前认证不管,等下一个认证来执行
- raise exceptions.AuthenticationFailed('用户认证失败') # from rest_framework import exceptions
- 有返回值元祖形式:(元素1,元素2) #元素1复制给request.user; 元素2复制给request.auth
(3)局部使用
- authentication_classes = [BaseAuthentication,]
(4)全局使用
#设置全局认证

REST_FRAMEWORK = {

    "DEFAULT_AUTHENTICATION_CLASSES":['API.utils.auth.Authentication',]

}
源码流程
--->>dispatch
--封装request
---获取定义的认证类(全局/局部),通过列表生成式创建对象
---initial
----peform_authentication
-----request.user (每部循环创建的对象)
10.DRF-认证的更多相关文章
- DRF 认证、权限、限制
DRF 认证.权限.限制 认证: 定义一个用户表和一个保存用户的Token表 # ======================day96======================= class ...
- python 全栈开发,Day97(Token 认证的来龙去脉,DRF认证,DRF权限,DRF节流)
昨日内容回顾 1. 五个葫芦娃和三行代码 APIView(views.View) 1. 封装了Django的request - request.query_params --> 取URL中的参数 ...
- (四) DRF认证, 权限, 节流
一.Token 认证的来龙去脉 摘要 Token 是在服务端产生的.如果前端使用用户名/密码向服务端请求认证,服务端认证成功,那么在服务端会返回 Token 给前端.前端可以在每次请求的时候带上 To ...
- drf认证组件、权限组件、jwt认证、签发、jwt框架使用
目录 一.注册接口 urls.py views.py serializers.py 二.登录接口 三.用户中心接口(权限校验) urls.py views.py serializers.py 四.图书 ...
- DRF认证组件
1.DRF认证组件之视图注册用法(自定义简单使用) settings.py配置 INSTALLED_APPS = [ 'django.contrib.admin', 'django.contrib.a ...
- drf 认证功能
drf(django rest-framework)认证组件 复习 HyperlinkedIdentityField ```python 功能:快速生成连接 1. publish = seriali ...
- 【DRF认证】
目录 认证组件的详细用法 本文详细讲述了DRF认证组件的原理以及用法. @ * 源码剖析** 上一篇博客讲解DRF版本的时候我们都知道了,在dispatch方法里执行了initial方法来初始化我们的 ...
- 三 drf 认证,权限,限流,过滤,排序,分页,异常处理,接口文档,集xadmin的使用
因为接下来的功能中需要使用到登陆功能,所以我们使用django内置admin站点并创建一个管理员. python manage.py createsuperuser 创建管理员以后,访问admin站点 ...
- drf 认证、权限、限流、过滤、排序、分页器
认证Authentication 准备工作:(需要结合权限用) 1. 需要使用到登陆功能,所以我们使用django内置admin站点并创建一个管理员. python manage.py creates ...
- Django -- DRF 认证流程
Django Restful Framework (DRF)中类的调用与自定义-- 以 autentication 认证为例 DRF 的 request 对 django 的 request 进行了更 ...
随机推荐
- 跟着阿里学JavaDay01——Java编程环境搭建
一.下载并完成JDK的安装 我们要学习Java就需要下载JDK.因为JDK是Java的开发工具. JDK的获取可以通过官方网站下载:JDK下载地址(这里我们下载Java SE10的版本) JDK下载完 ...
- (七)剩余DAO代码
AccountDAO.java package com.aff.bookstore.dao; import com.aff.bookstore.domain.Account; public inter ...
- switch-case与if-else的转换
对学会成绩大于60分的,输出合格,低于60分的输出不合格 import java.util.Scanner; public class TestSwitch3 { public static void ...
- jchdl - GSL实例 - LogicalLeft
https://mp.weixin.qq.com/s/WNm4bLWzZ0oWHWa7HQ6Y6w 逻辑左移,继承自Shifter类.只需要实现shift方法即可. 参考链接 https:// ...
- Linux(十) —— 使用 rz 和 sz 命令上传与下载
以CentOS 7 系统为例,一般上传下载都是使用的第三方工具,但是在操作上并不方便,每次都要找到对应的目录才可以执行上传.下载操作,比较麻烦. 而CentOS为例的 Linux 系统可以通过安装 插 ...
- OkHttp,一次无奈的使用
一次使用OKHTTP的心痛历程 最近由于一些不得已的原因,接触到了OKHttp,说起来也挺Dan疼的,之前同事将生产附件上传地址配置成了测试地址,还好数量不多,没有造成太大的影响,况且的是这位同事又离 ...
- Java 第十一届 蓝桥杯 省模拟赛 70044与113148的最大公约数
问题描述 70044与113148的最大公约数是多少? 答案提交 这是一道结果填空的题,你只需要算出结果后提交即可.本题的结果为一个整数,在提交答案时只填写这个整数,填写多余的内容将无法得分. pac ...
- Java实现 LeetCode 66 加一
66. 加一 给定一个由整数组成的非空数组所表示的非负整数,在该数的基础上加一. 最高位数字存放在数组的首位, 数组中每个元素只存储单个数字. 你可以假设除了整数 0 之外,这个整数不会以零开头. 示 ...
- Java实现 蓝桥杯 历届真题 数字拆分
正整数可以表示为若干正整数的累加和. 如,对于正整数n=6,可以分划为: 5+1 4+2 4+1+1 3+3 3+2+1 3+1+1+1 2+2+2 2+2+1+1 2+1+1+1+1 1+1+1+1 ...
- Java GUI 窗体事件
import java.awt.Frame; import java.awt.event.WindowAdapter; import java.awt.event.WindowEvent; publi ...
