
View Animation 运行原理解析
Android 平台目前提供了两大类动画,在 Android 3.0 之前,一大类是 View Animation,包括 Tween animation(补间动画),Frame animation(帧动画),在 Android 3.0 中又引入了一个新的动画系统:Property Animation,即属性动画。本篇文章主要介绍 View Animation 的运行原理。
View Animation 可以使视图执行补间动画。即给定两个关键帧,然后中间部分按照一定的算法自动计算补充。
补间动画的继承关系:
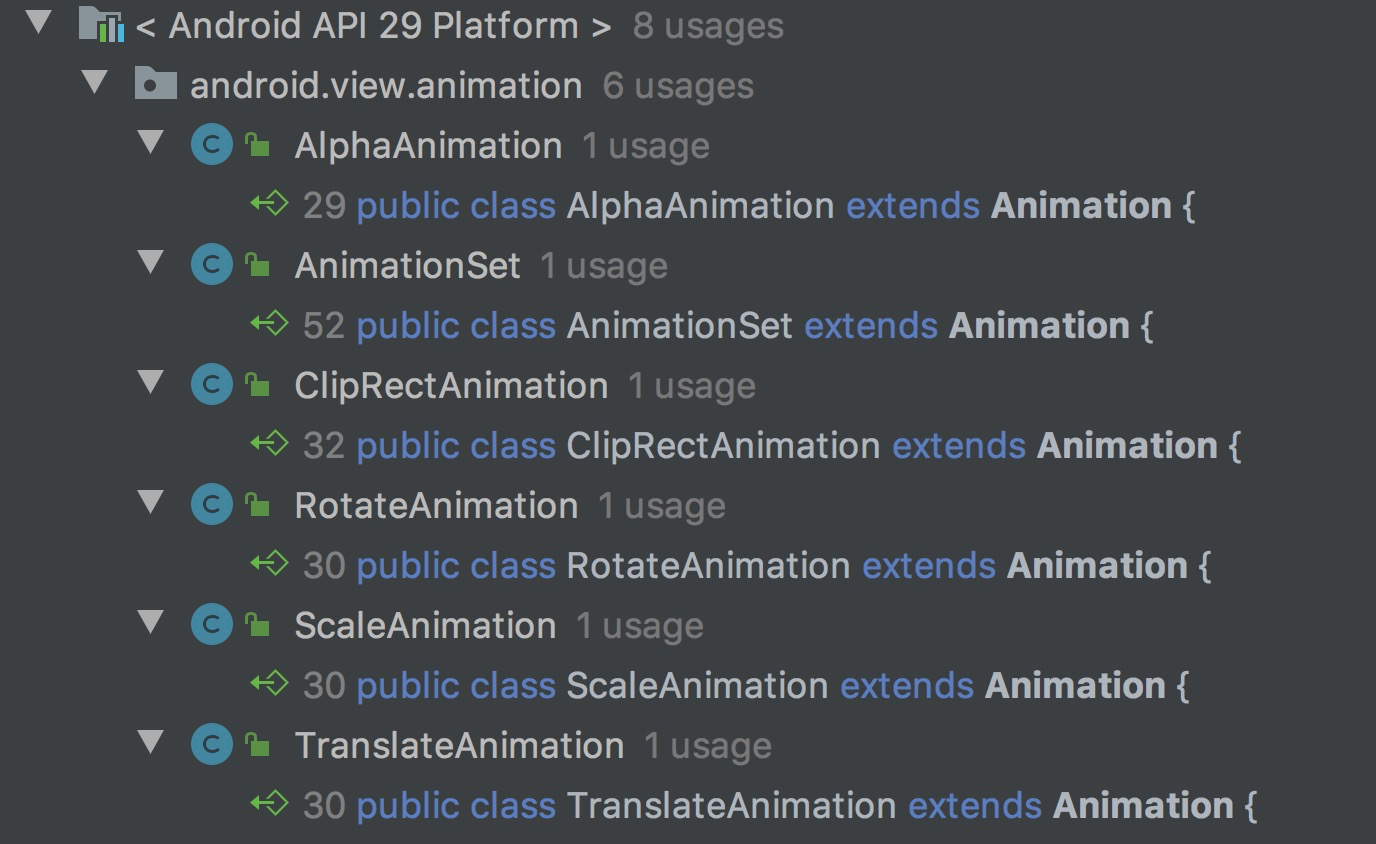
下面看一个示例,比如想要对透明度做一个变化:
Animation alphaAnimation = new AlphaAnimation(,);

alphaAnimation.setDuration(1);

imageView.startAnimation(alphaAnimation);

那么这个动画是如何实现的呢,下面就要讲述其实现原理。
为了探究补间动画的实现原理,需要对相关源码进行解读,源码版本为 Android API 29 Platform。在解读之前,大家可以试着回答下面这些问题。
为什么移动位置后,点击事件的响应依旧是在原来位置上?
如果想知道动画的执行进度,是如何获取呢?
如果对 View 做放大缩小得动画,那么其宽度高度值是否会变化。
相关类介绍
下面开始源码分析。首先看下基类 Animation。
public abstract class Animation implements Cloneable {

}
Animation 是一个抽象类,里面包含了各种动画相关的属性(时长,起始时间,重复次数,插值器等),回调(listeners)。该类整体比较简单,大家直接看源码就好。
alphaAnimation
下面来看下 Animation 子类,为了方便,本次就只说说 AlphaAnimation。
public class AlphaAnimation extends Animation {

    private float mFromAlpha;

    private float mToAlpha;

    /**

     * Constructor used when an AlphaAnimation is loaded from a resource.

     *

     * @param context Application context to use

     * @param attrs Attribute set from which to read values

     */

    public AlphaAnimation(Context context, AttributeSet attrs) {

        super(context, attrs);

        TypedArray a =

            context.obtainStyledAttributes(attrs, com.android.internal.R.styleable.AlphaAnimation);

        mFromAlpha = a.getFloat(com.android.internal.R.styleable.AlphaAnimation_fromAlpha, 1.0f);

        mToAlpha = a.getFloat(com.android.internal.R.styleable.AlphaAnimation_toAlpha, 1.0f);

        a.recycle();

    }

    /**

     * Constructor to use when building an AlphaAnimation from code

     *

     * @param fromAlpha Starting alpha value for the animation, where 1.0 means

     *        fully opaque and 0.0 means fully transparent.

     * @param toAlpha Ending alpha value for the animation.

     */

    public AlphaAnimation(float fromAlpha, float toAlpha) {

        mFromAlpha = fromAlpha;

        mToAlpha = toAlpha;

    }

    /**

     * Changes the alpha property of the supplied {@link Transformation}
   * 实现动画的关键函数,这里通过当前的播放进度,计算当前的透明度,然后将其赋值给 Transformation 实例

     */

    @Override

    protected void applyTransformation(float interpolatedTime, Transformation t) {

        final float alpha = mFromAlpha;

        t.setAlpha(alpha + ((mToAlpha - alpha) * interpolatedTime));

    }

    @Override

    public boolean willChangeTransformationMatrix() {

        return false;

    }

    @Override // 不改变边界

    public boolean willChangeBounds() {

        return false;

    }

    /**

     * @hide

     */

    @Override

    public boolean hasAlpha() {

        return true;

    }

}
整个代码也是很简单,其实很多逻辑都在基类处理了。然后子类只需要重写一些和自己动画相关的方法就好。其中 applyTransformation 是实现某一种动画的关键,每个子类都必须重写。
这里需要注意的是,Transformation 就是用来存储每一次动画的参数。其中平移,旋转,缩放都是通过改变 Matrix 实现的,而透明度则是改变 Alpha 值实现的。
为了便于大家进一步理解,可以在看看 AnimationSet。
AnimationSet
因为 AnimationSet 是其他几个子类得集合体,所以看看它的代码逻辑还是可以发现一些不一样的。其内部代码比较多,就不贴出来了。只是挑一部分讲下:
    /**

     * Add a child animation to this animation set.

     * The transforms of the child animations are applied in the order

     * that they were added

     * @param a Animation to add.

     */

    public void addAnimation(Animation a) {
     // 数组来保存动画

        mAnimations.add(a);

        boolean noMatrix = (mFlags & PROPERTY_MORPH_MATRIX_MASK) == 0;

        if (noMatrix && a.willChangeTransformationMatrix()) {

            mFlags |= PROPERTY_MORPH_MATRIX_MASK;

        }

        boolean changeBounds = (mFlags & PROPERTY_CHANGE_BOUNDS_MASK) == 0;

        if (changeBounds && a.willChangeBounds()) {

            mFlags |= PROPERTY_CHANGE_BOUNDS_MASK;

        }

        if ((mFlags & PROPERTY_DURATION_MASK) == PROPERTY_DURATION_MASK) {

            mLastEnd = mStartOffset + mDuration;

        } else {

            if (mAnimations.size() == 1) {

                mDuration = a.getStartOffset() + a.getDuration();

                mLastEnd = mStartOffset + mDuration;

            } else {

                mLastEnd = Math.max(mLastEnd, mStartOffset + a.getStartOffset() + a.getDuration());

                mDuration = mLastEnd - mStartOffset;

            }

        }

        mDirty = true;

    }

    /**

     * The transformation of an animation set is the concatenation of all of its

     * component animations.

     *

     * @see android.view.animation.Animation#getTransformation
   * true 表示动画还在运行

     */

    @Override

    public boolean getTransformation(long currentTime, Transformation t) {

        final int count = mAnimations.size();

        final ArrayList<Animation> animations = mAnimations;

        final Transformation temp = mTempTransformation;

        boolean more = false;

        boolean started = false;

        boolean ended = true;

        t.clear();

        for (int i = count - 1; i >= 0; --i) {

            final Animation a = animations.get(i);

       // 清除上一个的数据

            temp.clear();
       // 通过 temp 来获取每个 Animation 的 transformation

            more = a.getTransformation(currentTime, temp, getScaleFactor()) || more;
       // 将各种动画参数组合在一起,注意 t 是引用对象,所以这里改了之后,外面拿到的也是改了的。

            t.compose(temp);

            started = started || a.hasStarted();

            ended = a.hasEnded() && ended;

        }

     // 是否开始了

        if (started && !mStarted) {

            dispatchAnimationStart();

            mStarted = true;

        }

        if (ended != mEnded) {

            dispatchAnimationEnd();

            mEnded = ended;

        }

        return more;

    }
上面是 AnimationSet 中我认为两个比较重要的方法:
addAnimation:将其他动画类型添加到 set 里面,内部实际上是通过一个 list 来保存的。然后将每个动画的各种属性都记录下。
getTransformation:获取每个动画的下一个动画参数,然后将其组合在一起。
前面介绍了 Animation 一些背景知识。到这里,大家多少会有一些认识了。接下去就按照调用流程来分析动画的执行。
源码解析
View.startAnimation()
    public void startAnimation(Animation animation) {
     // 传入的值是-1,代表准备动画了

        animation.setStartTime(Animation.START_ON_FIRST_FRAME);

        setAnimation(animation);

        invalidateParentCaches();  // 给 parent 的 mPrivateFlag 加了一个 PFLAG_INVALIDATED

        invalidate(true);  // 其目的就是将其和子 view 的 drawing 缓存都标记为无效,然后可以 redrawn

    }

    public void setAnimation(Animation animation) {
     // View 中有个属性是用来存储当前的 Animation 的

        mCurrentAnimation = animation;

        if (animation != null) {

            // If the screen is off assume the animation start time is now instead of

            // the next frame we draw. Keeping the START_ON_FIRST_FRAME start time

            // would cause the animation to start when the screen turns back on

            if (mAttachInfo != null && mAttachInfo.mDisplayState == Display.STATE_OFF

                    && animation.getStartTime() == Animation.START_ON_FIRST_FRAME) {

                animation.setStartTime(AnimationUtils.currentAnimationTimeMillis());

            }

            animation.reset();

        }

    }
简而言之 startAnimation 主要是做这么几件事情:
开始动画前,先告知 Animation,可以做一些准备,包括部分参数的赋值;
更新 View 自身的 Animation 的属性值;
给父 View 的 mPrivateFlag 加上 PFLAG_INVALIDATED 属性;
将自身和子 view 的 draw cache 都标记为无效的,通过 父 View 调用 invalidateChild 促发 redrawn;
ViewGroup.invalidateChild
下面看下 invalidateChild 是怎么促发重绘的:
// ViewGroup

 public final void invalidateChild(View child, final Rect dirty) {

        final AttachInfo attachInfo = mAttachInfo;

        if (attachInfo != null && attachInfo.mHardwareAccelerated) {

            // HW accelerated fast path

            onDescendantInvalidated(child, child);

            return;

        }

        ViewParent parent = this;

        if (attachInfo != null) {

           //  ..... 省略非关键性代码

            do { // 无限循环

                View view = null;

                if (parent instanceof View) {

                    view = (View) parent;

                }

                if (drawAnimation) {

                    if (view != null) {

                        view.mPrivateFlags |= PFLAG_DRAW_ANIMATION;

                    } else if (parent instanceof ViewRootImpl) {

                        ((ViewRootImpl) parent).mIsAnimating = true;

                    }

                }

                // If the parent is dirty opaque or not dirty, mark it dirty with the opaque

                // flag coming from the child that initiated the invalidate

                if (view != null) {

                    if ((view.mPrivateFlags & PFLAG_DIRTY_MASK) != PFLAG_DIRTY) {

                        view.mPrivateFlags = (view.mPrivateFlags & ~PFLAG_DIRTY_MASK) | PFLAG_DIRTY;

                    }

                }

          // 最终调用的是该方法来重绘

                parent = parent.invalidateChildInParent(location, dirty);

                //  .... 省略非关键性代码

            } while (parent != null);  // 终止条件是找不到父 View 了。

        }

    }
这里很主要的一件事,找到 rooView ,然后调用了 invalidateChildInParent 方法。这里的 rootView 其实就是 ViewRootImpl,至于为啥不是 DecorVIew,这个可以去看看这篇文章:
Android View 绘制流程之 DecorView 与 ViewRootImpl
ViewRootImpl.invalidateChildInParent
    @Override

    public ViewParent invalidateChildInParent(int[] location, Rect dirty) {

        checkThread();  // 检查是否是主线程

        if (DEBUG_DRAW) Log.v(mTag, "Invalidate child: " + dirty);

        if (dirty == null) {  // 从上面路径来看,这里是不可能为空的

            invalidate();

            return null;

        } else if (dirty.isEmpty() && !mIsAnimating) {

            return null;

        }

        // ... 跳过一段无关的代码

        invalidateRectOnScreen(dirty);

        return null;

    }
这里可以看出的是,最终会调用 invalidateRectOnScreen 方法。
ViewRootImpl.invalidateRectOnScreen
    private void invalidateRectOnScreen(Rect dirty) {

        final Rect localDirty = mDirty;

        // Add the new dirty rect to the current one 其实就是把两个矩阵融合在一起

        localDirty.union(dirty.left, dirty.top, dirty.right, dirty.bottom);

        // Intersect with the bounds of the window to skip

        // updates that lie outside of the visible region

        final float appScale = mAttachInfo.mApplicationScale;
      // 主要就是检查菊矩阵边界对不对

        final boolean intersected = localDirty.intersect(0, 0,

                (int) (mWidth * appScale + 0.5f), (int) (mHeight * appScale + 0.5f));
      // 边界不对,就会直接置空

        if (!intersected) {

            localDirty.setEmpty();

        }
     // mWillDrawSoon 是当前是否马上就要开始绘制了,如果开始绘制,就不去发起绘制了

        if (!mWillDrawSoon && (intersected || mIsAnimating)) {

            scheduleTraversals();

        }

    }
invalidateRectOnScreen 主要是就是把 dirty 这个矩阵和已有的进行融合,然后再看看需不需要发起刷新。
scheduleTraversals() 作用是将 performTraversals() 封装到一个 Runnable 里面,然后扔到 Choreographer 的待执行队列里,这些待执行的 Runnable 将会在最近的一个 16.6 ms 屏幕刷新信号到来的时候被执行。而 performTraversals() 是 View 的三大操作:测量、布局、绘制的发起者。
小结:
当调用了 View.startAniamtion() 之后,动画并没有马上就被执行,这个方法只是做了一些变量初始化操作,接着将 View 和 Animation 绑定起来,然后调用重绘请求操作,内部层层寻找 mParent,最终走到 ViewRootImpl 的 scheduleTraversals 里发起一个遍历 View 树的请求,这个请求会在最近的一个屏幕刷新信号到来的时候被执行,调用 performTraversals 从根布局 DecorView 开始遍历 View 树。
开始动画
前面说到了动画的开始最终是通过促发 View 绘制来形成的。此处不会再讲 View 的绘制原理,不懂得可以看下面两篇文章:
那么在 View 绘制过程中,是在哪里开始绘制的呢? 答案是 View 的 draw 方法里面开始的。
但是这个 draw 不是我们自定义 view 时常见的 draw 方法,该 draw 方法有三个参数,是用于 View 自身绘制用的。
View.draw
该方法比较长,截取部分来讲:
/**

     * This method is called by ViewGroup.drawChild() to have each child view draw itself.

     *

     * This is where the View specializes rendering behavior based on layer type,

     * and hardware acceleration.

     */

    boolean draw(Canvas canvas, ViewGroup parent, long drawingTime) {
     // 用于判断是否支持硬件加速

        final boolean hardwareAcceleratedCanvas = canvas.isHardwareAccelerated();

        /* If an attached view draws to a HW canvas, it may use its RenderNode + DisplayList.

         *

         * If a view is dettached, its DisplayList shouldn't exist. If the canvas isn't

         * HW accelerated, it can't handle drawing RenderNodes.

         */

        boolean drawingWithRenderNode = mAttachInfo != null

                && mAttachInfo.mHardwareAccelerated

                && hardwareAcceleratedCanvas;

        boolean more = false;

        // ..... 跳过一些代码

     // 获取之前存储的 animation

     final Animation a = getAnimation();

        if (a != null) {
       // 不为空就说明是有动画的

            more = applyLegacyAnimation(parent, drawingTime, a, scalingRequired);

            concatMatrix = a.willChangeTransformationMatrix();

            if (concatMatrix) {

                mPrivateFlags3 |= PFLAG3_VIEW_IS_ANIMATING_TRANSFORM;

            }
       // 这里是拿到动画参数,后面会再次讲到

            transformToApply = parent.getChildTransformation();

        }

        // ...... 省略代码

}
首先来看这个 draw 方法的三个参数:
canvas:这个没有什么好分析的,是用来绘制用的
parent:这个其实就是父 View,方便获取一些数据;
drawingTime:这个很重要,就是当前的绘制时间,后续做动画的时候,会计算时间差,然后更新插值器;
一进到 draw 方法,就先获取当前是否支持硬件加速。有硬件加速和没有硬件加速走的是两套逻辑。然后是获取保之前存储的 animation。
View.applyLegacyAnimation
接着调用 applyLegacyAnimation 开始处理动画相关的逻辑。下面看下其方法内部的逻辑。
    /**

     * Utility function, called by draw(canvas, parent, drawingTime) to handle the less common

     * case of an active Animation being run on the view.

     */

    private boolean applyLegacyAnimation(ViewGroup parent, long drawingTime,

            Animation a, boolean scalingRequired) {
     // 用于保存此时重绘的变换

        Transformation invalidationTransform;

        final int flags = parent.mGroupFlags;

        final boolean initialized = a.isInitialized();
     // 判断动画有没有开始初始化,没有的化先进行初始化

        if (!initialized) {

            a.initialize(mRight - mLeft, mBottom - mTop, parent.getWidth(), parent.getHeight());

            a.initializeInvalidateRegion(0, 0, mRight - mLeft, mBottom - mTop);

            if (mAttachInfo != null) a.setListenerHandler(mAttachInfo.mHandler);
       // 同时调用开始动画回调

            onAnimationStart();

        }

     // 这里是从父类中获取当前的t,但是如果一个父类存在多个子 view 需要运动,那获取的岂不是一样了?其实每个子view 都会重新赋值,不会影响。

        final Transformation t = parent.getChildTransformation();
     // 这里是根据时间,t, 缩放因子来计算 t,这里 t 是一个对象,在 animation 中进行赋值后,在这里也可以用到

        boolean more = a.getTransformation(drawingTime, t, 1f);
     // 对于需要缩放的子view,需要重新计算t,可是调用方法确是一样的?那结果有啥不一样吗?这里是为了将缩放和不缩放的 t 分出来

        if (scalingRequired && mAttachInfo.mApplicationScale != 1f) {

            if (parent.mInvalidationTransformation == null) {

                parent.mInvalidationTransformation = new Transformation();

            }

            invalidationTransform = parent.mInvalidationTransformation;

            a.getTransformation(drawingTime, invalidationTransform, 1f);

        } else {

            invalidationTransform = t;

        }

     // more 为 true ,代表动画还未结束

        if (more) {

            if (!a.willChangeBounds()) {

                if ((flags & (ViewGroup.FLAG_OPTIMIZE_INVALIDATE | ViewGroup.FLAG_ANIMATION_DONE)) ==

                        ViewGroup.FLAG_OPTIMIZE_INVALIDATE) {

                    parent.mGroupFlags |= ViewGroup.FLAG_INVALIDATE_REQUIRED;

                } else if ((flags & ViewGroup.FLAG_INVALIDATE_REQUIRED) == 0) {

                    // The child need to draw an animation, potentially offscreen, so

                    // make sure we do not cancel invalidate requests

                    parent.mPrivateFlags |= PFLAG_DRAW_ANIMATION;
            // 发起下一次重绘

                    parent.invalidate(mLeft, mTop, mRight, mBottom);

                }

            } else {

                if (parent.mInvalidateRegion == null) {

                    parent.mInvalidateRegion = new RectF();

                }

                final RectF region = parent.mInvalidateRegion;
          // 对于会改变自己边界的动画,比如缩放,这时候需要计算当前缩放的尺寸范围

                a.getInvalidateRegion(0, 0, mRight - mLeft, mBottom - mTop, region,

                        invalidationTransform);

                // The child need to draw an animation, potentially offscreen, so

                // make sure we do not cancel invalidate requests

                parent.mPrivateFlags |= PFLAG_DRAW_ANIMATION;

          // region 此时是更新尺寸后的范围了

                final int left = mLeft + (int) region.left;

                final int top = mTop + (int) region.top;
         // 发起下一次重绘

                parent.invalidate(left, top, left + (int) (region.width() + .5f),

                        top + (int) (region.height() + .5f));

            }

        }

        return more;

    }
这个方法其实理解起来也很简单,主要就是为了得到一个根据当前时间计算得到 Transformation 实例,里面包含了下一次动画所需要的信息。
Transformation 里面的内容如下:
Transformation
public class Transformation {

    /**

     * Indicates a transformation that has no effect (alpha = 1 and identity matrix.)

     */

    public static final int TYPE_IDENTITY = 0x0;

    /**

     * Indicates a transformation that applies an alpha only (uses an identity matrix.)

     */

    public static final int TYPE_ALPHA = 0x1;

    /**

     * Indicates a transformation that applies a matrix only (alpha = 1.)

     */

    public static final int TYPE_MATRIX = 0x2;

    /**

     * Indicates a transformation that applies an alpha and a matrix.

     */

    public static final int TYPE_BOTH = TYPE_ALPHA | TYPE_MATRIX;

   // 矩阵,控制缩放,平移,旋转

    protected Matrix mMatrix;
   // 透明度

    protected float mAlpha;

    protected int mTransformationType;

    private boolean mHasClipRect;

    private Rect mClipRect = new Rect();

  // ...... 省略一大串代码

}
上述代码还省略很多方法,其实都是对矩阵的操作。
这里提一下:Matrix 方法中的 setRotate() 方法会先清除该矩阵,即设为单位矩阵。之后设置旋转操作的,同样,setTranslate() 等方法也是一样的。所以是不能叠加各种效果在一起的.如果是想多种效果同时使用的话,postRotate(),postTranslate()等类似的矩阵变换方法吧。
想进一步了解的可直接阅读代码。
下面讲下是如何获取 Transformation 的。
Animation.getTransformation
    public boolean getTransformation(long currentTime, Transformation outTransformation) {
     // 等于-1,说明是刚开始动画,记录第一帧动画时间

        if (mStartTime == -1) {

            mStartTime = currentTime;

        }

     // 相当于是延迟多少时间执行

        final long startOffset = getStartOffset();

        final long duration = mDuration;

        float normalizedTime;

        if (duration != 0) {
       // 归一化,也就是转化为百分比,当前动画进度

            normalizedTime = ((float) (currentTime - (mStartTime + startOffset))) /

                    (float) duration;

        } else {

            // time is a step-change with a zero duration

            normalizedTime = currentTime < mStartTime ? 0.0f : 1.0f;

        }

        final boolean expired = normalizedTime >= 1.0f || isCanceled();

        mMore = !expired;

     // 确保动画在 0-1 之间

        if (!mFillEnabled) normalizedTime = Math.max(Math.min(normalizedTime, 1.0f), 0.0f);

        if ((normalizedTime >= 0.0f || mFillBefore) && (normalizedTime <= 1.0f || mFillAfter)) {

            if (!mStarted) {
          // 通知动画开始了。onAnimationStart 就是在这里被调用

                fireAnimationStart();

                mStarted = true;

                if (NoImagePreloadHolder.USE_CLOSEGUARD) {

                    guard.open("cancel or detach or getTransformation");

                }

            }

            if (mFillEnabled) normalizedTime = Math.max(Math.min(normalizedTime, 1.0f), 0.0f);

            if (mCycleFlip) {

                normalizedTime = 1.0f - normalizedTime;

            }

       // 根据进度获取当前插值器的值

            final float interpolatedTime = mInterpolator.getInterpolation(normalizedTime);
       // 这里 out 前缀就是这个是要传出去的,这个方法每个 Animation 子类都要自己实现,然后其实我们可以重写这个方法,把进度传出去你就知道当前动画的进度了

            applyTransformation(interpolatedTime, outTransformation);

        }

     // 如果动画被取消或者已经完成了

        if (expired) {

            if (mRepeatCount == mRepeated || isCanceled()) {

                if (!mEnded) {

                    mEnded = true;

                    guard.close();
            // 这里就是 onAnimationEnd 调用的地方

                    fireAnimationEnd();

                }

            } else {
          // else 说明动画是重复的,这是需要计算重复次数,还有是不是无限循环的

                if (mRepeatCount > 0) {

                    mRepeated++;

                }

                if (mRepeatMode == REVERSE) {

                    mCycleFlip = !mCycleFlip;

                }

                mStartTime = -1;

                mMore = true;

          // 这里就是 onAnimationRepeat 调用的地方

                fireAnimationRepeat();

            }

        }

        if (!mMore && mOneMoreTime) {

            mOneMoreTime = false;

            return true;

        }

        return mMore;

    }
getTransformation 主要就是管理动画状态的。到底是开始(记录开始时间),还是正在进行(计算进度),还是已经结束了(通知结束了)。
其中调用的 applyTransformation,每个 Animation 子类都要自己实现,然后其实我们可以重写这个方法,把进度传出去你就知道当前动画的进度了。子类其实是把最后的计算结果保存在 Transformation 里面了,这样就拿到了下一帧动画参数。
还有大家平时用到的 AnimationListener 也是在这里进行通知回调的。
那拿到 Transformation 后,是怎么用的呢,这个就得 回到 view.draw 方法了。
view.draw
前面讲到了 Transformation 其实是从 parent 中获取,赋值给 transformToApply;
    boolean draw(Canvas canvas, ViewGroup parent, long drawingTime) {

         // ...... 省略一大部分代码

        float alpha = drawingWithRenderNode ? 1 : (getAlpha() * getTransitionAlpha());
     // 下面这个if 会进入动画的真正的绘制时期

        if (transformToApply != null

                || alpha < 1

                || !hasIdentityMatrix()

                || (mPrivateFlags3 & PFLAG3_VIEW_IS_ANIMATING_ALPHA) != 0) {

            if (transformToApply != null || !childHasIdentityMatrix) {

                int transX = 0;

                int transY = 0;

                if (offsetForScroll) {

                    transX = -sx;

                    transY = -sy;

                }

                if (transformToApply != null) {

                    if (concatMatrix) {
               // 为TRUE,代表是使用硬件加速来进行绘制

                        if (drawingWithRenderNode) {

                            renderNode.setAnimationMatrix(transformToApply.getMatrix());

                        } else {

                            // Undo the scroll translation, apply the transformation matrix,

                            // then redo the scroll translate to get the correct result.

                            canvas.translate(-transX, -transY);

                            canvas.concat(transformToApply.getMatrix());

                            canvas.translate(transX, transY);

                        }

                        parent.mGroupFlags |= ViewGroup.FLAG_CLEAR_TRANSFORMATION;

                    }

                    float transformAlpha = transformToApply.getAlpha();
            // 下面是关于透明度的动画

                    if (transformAlpha < 1) {

                        alpha *= transformAlpha;

                        parent.mGroupFlags |= ViewGroup.FLAG_CLEAR_TRANSFORMATION;

                    }

                }

                if (!childHasIdentityMatrix && !drawingWithRenderNode) {

                    canvas.translate(-transX, -transY);

                    canvas.concat(getMatrix());

                    canvas.translate(transX, transY);

                }

            }

            // Deal with alpha if it is or used to be <1

            if (alpha < 1 || (mPrivateFlags3 & PFLAG3_VIEW_IS_ANIMATING_ALPHA) != 0) {

                if (alpha < 1) {

                    mPrivateFlags3 |= PFLAG3_VIEW_IS_ANIMATING_ALPHA;

                } else {

                    mPrivateFlags3 &= ~PFLAG3_VIEW_IS_ANIMATING_ALPHA;

                }

                parent.mGroupFlags |= ViewGroup.FLAG_CLEAR_TRANSFORMATION;

                if (!drawingWithDrawingCache) {

                    final int multipliedAlpha = (int) (255 * alpha);

                    if (!onSetAlpha(multipliedAlpha)) {

                        if (drawingWithRenderNode) {

                            renderNode.setAlpha(alpha * getAlpha() * getTransitionAlpha());

                        } else if (layerType == LAYER_TYPE_NONE) {

                            canvas.saveLayerAlpha(sx, sy, sx + getWidth(), sy + getHeight(),

                                    multipliedAlpha);

                        }

                    } else {

                        // Alpha is handled by the child directly, clobber the layer's alpha

                        mPrivateFlags |= PFLAG_ALPHA_SET;

                    }

                }

            }

        } else if ((mPrivateFlags & PFLAG_ALPHA_SET) == PFLAG_ALPHA_SET) {

            onSetAlpha(255);

            mPrivateFlags &= ~PFLAG_ALPHA_SET;

        }
那么对于 AnimationSet 又是如何处理的呢?
首先他也是继承了了 Animation,其次,它有个数组装门用来存放 Animation 集合。也是通过 getTransformation 来获取Transformation的。
AnimationSet.
    public boolean getTransformation(long currentTime, Transformation t) {

        final int count = mAnimations.size();

        final ArrayList<Animation> animations = mAnimations;

        final Transformation temp = mTempTransformation;

        boolean more = false;

        boolean started = false;

        boolean ended = true;

        t.clear();

        for (int i = count - 1; i >= 0; --i) {

            final Animation a = animations.get(i);

            temp.clear();

            more = a.getTransformation(currentTime, temp, getScaleFactor()) || more;

            t.compose(temp);

            started = started || a.hasStarted();

            ended = a.hasEnded() && ended;

        }

        if (started && !mStarted) {

            dispatchAnimationStart();

            mStarted = true;

        }

        if (ended != mEnded) {

            dispatchAnimationEnd();

            mEnded = ended;

        }

        return more;

    }
通过 for 循环,依次获取对应的 annimation 的矩阵,然后再将矩阵效果合到一起。
到此,对于 动画应该是有自己的认识了。 View Animation 的整个执行逻辑也就讲完了。
总结
那么这里回答开头的三个问题:
为什么移动位置后,点击事件的响应依旧是在原来位置上?
因为动画是在 draw 时候形成的,也就是说只是视觉效果。其并没有改变它本身在父类中的位置;
如果想知道动画的执行进度,是如何获取呢?
继承 Animation 对应的子类,然后重写 applyTransformation 方法,就可以从中获取到进度。
如果对 View 做放大缩小得动画,那么其宽度高度值是否会变化。
动画发生在 draw 时期,并不会改变测量结果
View Animation 是在绘制的时候,改变 view 的视觉效果来实现动画的。所以不会对 view 的测量和布局过程有影响。
View 的动画是通过触发绘制过程来执行 draw 的。因为动画是连续的,所以需要不停的触发。
参考文章:
View Animation 运行原理解析的更多相关文章
- View 动画 Animation 运行原理解析
这次想来梳理一下 View 动画也就是补间动画(ScaleAnimation, AlphaAnimation, TranslationAnimation...)这些动画运行的流程解析.内容并不会去分析 ...
- (转)Apache和Nginx运行原理解析
Apache和Nginx运行原理解析 原文:https://www.server110.com/nginx/201402/6543.html Web服务器 Web服务器也称为WWW(WORLD WID ...
- JavaScript运行原理解析
原文:1.http://blog.csdn.net/liaodehong/article/details/50488098 2.Stack的三种含义 (阮一峰) 3. http://lib.csdn. ...
- .NET CORE学习笔记系列(5)——ASP.NET CORE的运行原理解析
一.概述 在ASP.NET Core之前,ASP.NET Framework应用程序由IIS加载.Web应用程序的入口点由InetMgr.exe创建并调用托管,初始化过程中触发HttpApplicat ...
- 转:Apache和Nginx运行原理解析
Web服务器 Web服务器也称为WWW(WORLD WIDE WEB)服务器,主要功能是提供网上信息浏览服务. 应用层使用HTTP协议. HTML文档格式. 浏览器统一资源定位器(URL). Web服 ...
- React Native运行原理解析
Facebook 于2015年9月15日推出react native for Android 版本, 加上2014年底已经开源的IOS版本,至此RN (react-native)真正成为跨平台的客户端 ...
- Apache和Nginx运行原理解析
Web服务器 Web服务器也称为WWW(WORLD WIDE WEB)服务器,主要功能是提供网上信息浏览服务. 应用层使用HTTP协议. HTML文档格式. 浏览器统一资源定位器(URL). Web服 ...
- 转载-Apache和Nginx运行原理解析
本文只作为了解Apache和Nginx知识的一个梳理,想详细了解的请阅读文末参考链接中的博文. Web服务器 Web服务器也称为WWW(WORLD WIDE WEB)服务器,主要功能是提供网上信息浏览 ...
- maven内部运行原理解析
maven至今还是Java编程语言构建的事实标准,大部分项目还在使用maven来进行构建,因此了解maven内部运行的原理对定位和分析问题还是很有裨益的.本篇文章主要介绍一些maven内部运行过程中的 ...
随机推荐
- oracle自定义split分割函数
函数如下: create or replace FUNCTION fn_rme_split(p_str IN VARCHAR2, p_delimiter IN VARCHAR2) RETURN rme ...
- 35 _ 队列1 _ 什么是队列.swf
队列是一种可以实现一个先进先出的存储结构 什么是队列? 队列(Queue)也是一种运算受限的线性表.它只允许在表的一端进行插入,而在另一端进行删除.允许删除的一端称为队头(front),允许插入的一端 ...
- Hibenate面试
5. 对比总结 返回值: get()返回的是查询出来的实体对象,而load()查询出来的是一个目标实体的代理对象. 查询时机: get()在调用的时候就立即发出SQL语句查询,而load()在访问非I ...
- CountDownLatch 计数器
这里我暂时只讲CountDownLatch的作用和怎么使用,至于他是怎么实现这种功能的,涉及源码,以后我再补上. 正文 什么是CountDownLatch? CountDownLatch是在java1 ...
- 【Model Log】模型评估指标可视化,自动画Loss、Accuracy曲线图工具,无需人工参与!
1. Model Log 介绍 Model Log 是一款基于 Python3 的轻量级机器学习(Machine Learning).深度学习(Deep Learning)模型训练评估指标可视化工具, ...
- 以api文档为中心--前后端分开发离新思维
api文档编写好像很简单,其实不是.一个良好的api文档,需要就有以下内容:接口详细描述,接口参数详细描述,接口返回结果详细描述,容易理解的范例.这些内容其实是不少的,编写过程中还非常单调乏味.再加上 ...
- Redis为何是单线程的
以前一直有个误区,以为:高性能服务器 一定是 多线程来实现的 原因很简单因为误区二导致的: 多线程 一定比 单线程 效率高.其实不然. redis 核心就是 如果我的数据全都在内存里,我单线程的去操作 ...
- 切忌一步到位,谈谈DevOps实施落地
2020年6月19日,由云计算开源产业联盟指导,高效运维社区和 DevOps 时代社区联合举办的GNSEC 2020线上峰会圆满举办.BoCloud博云参加了本次峰会并分享了博云帮助客户实施DevOp ...
- 基于tcp/udp协议的套接字通信
目录 一.套接字分类 二.套接字的工作流程 三.基于tcp协议的套接字 四.基于udp协议的套接字 一.套接字分类 1.基于文件类型的套接字家族:AF_UNIX 2.基于网络类型的套接字家族:AF_I ...
- day25 ATM项目(第一天)
项目的说明书 项目:ATM + 购物车 项目需求: 1.额度15000或自定义 --> 注册功能 2.实现购物商城,买东西加入购物车,调用信用卡接口结账 --> 购物功能.支付功能 3.可 ...