Spring IOC 笔记
什么是IOC与DI
IOC(inversion of control) 它描述的其实是一种面向对象编程中的设计原则,用来降低代码之间的耦合度, 而DI(dependency Injection)依赖注入是spring对IOC编程思想的实现
spring的编程风格
- 基于xml配置文件维护bean之间的关系
- 基于注解维护bean之间的关系
- 基于javaconfig维护bean之间的关系
IOC中注入Bean的两种方式
方式1: 配置文件+setter方法
配置文件
<bean id="dao" class="com.changwu.tryspring.FirstDaoImpl"></bean>

<bean id="service" class="com.changwu.tryspring.service">

    <property name="dao" ref="dao"></property>

</bean>
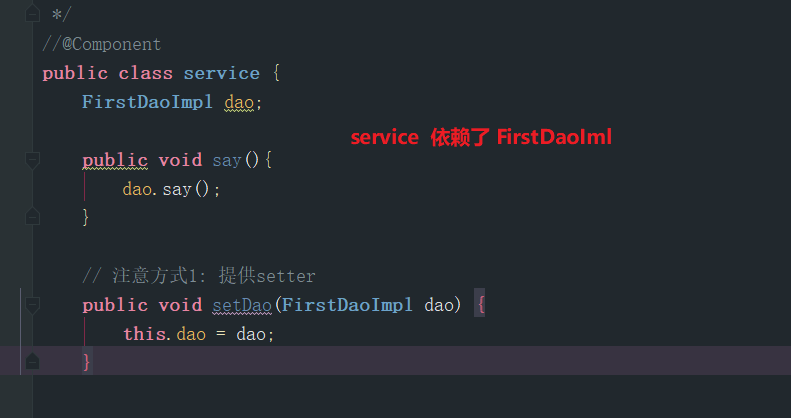
java类中提供构造方法
public class service {

    FirstDaoImpl dao;

    public void say(){

        dao.say();

    }

    // 注意方式1: 提供setter

    public void setDao(FirstDaoImpl dao) {

        this.dao = dao;

    }

}
方式2: 配置文件+构造方法注入
配置文件
   <bean id="dao" class="com.changwu.tryspring.FirstDaoImpl">

    </bean>

    <bean id="service" class="com.changwu.tryspring.service">

         <constructor-arg ref="dao"></constructor-arg>

    </bean>
java类,提供构造方法
public class service {

    FirstDaoImpl dao;

    // 方式2 构造方法

    public service(FirstDaoImpl dao) {

        this.dao = dao;

    }

    public void say(){

        dao.say();

    }

}
方式3: 基于注解注入Bean
在配置文件中配置开启注解模式
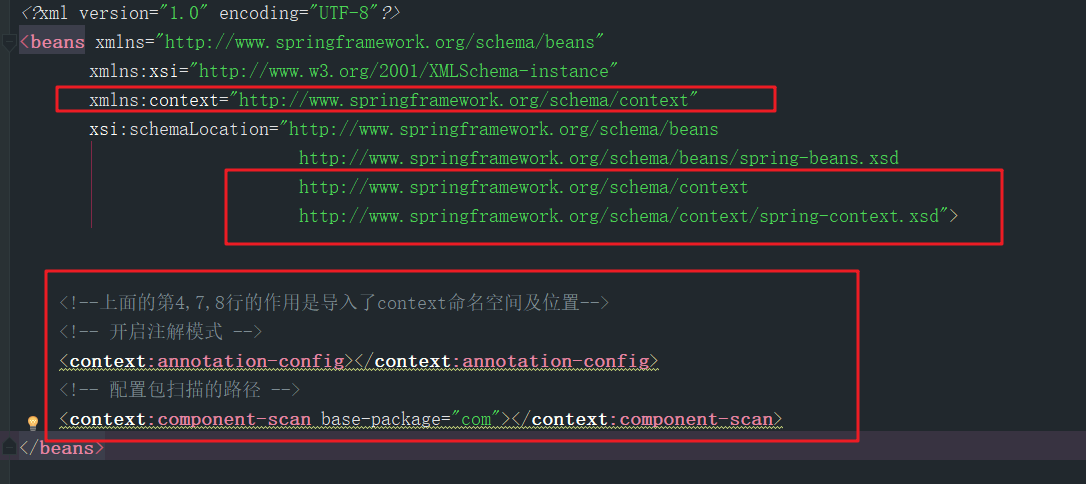
在spring4中,仅仅保存下面的一行配置信息,(它涵盖了开启注解和包扫描两层语义)
<!-- 配置包扫描的路径 -->

<context:component-scan base-package="com"></context:component-scan>
虽然现在可以开启注解了,但是xml文件还在,下面演示使用java-basic方式完成注入bean,完全抛弃xml
通过这个配置类完全舍弃xml
@Configuration

@ComponentScan("com.changwu.tryspring")

public class SpringConfiguration {

}
启动类
public class MainTest {

    public static void main(String[] args) {

        AnnotationConfigApplicationContext applicationContext = new AnnotationConfigApplicationContext(SpringConfiguration.class);

        service bean = applicationContext.getBean(service.class);

        bean.say();

    }

}
annotaion + xml + java-basic 混合使用的实现方式:
在javaConfiguration类上使用@ImportResources("classpath:spring.xml")
@Configuration

@ComponentScan("com.changwu.tryspring")

@ImportResource("classpath:spring.xml")

public class SpringConfiguration {

}
自动装配的优势参考
就像上面那样, 本来我们的java代码中就已经存在了类之间的关系,但是还得通过xml文件的方式再重复描述一遍类之间的关系,这本来就是很鸡肋,
自动装配模式就帮我们省去了在xml中描述类之间的关系这一步
有了自动装配,当对象中添加或者减少某些属性时,不用更改 xml文件中 标签下的 等等...
基于xml版的自动装配的五种模式
no & default
不使用自动装配,需要我们手动装配,否则报错
byType
常用的根据类型的自动注入
我的java类
然后这样写配置文件
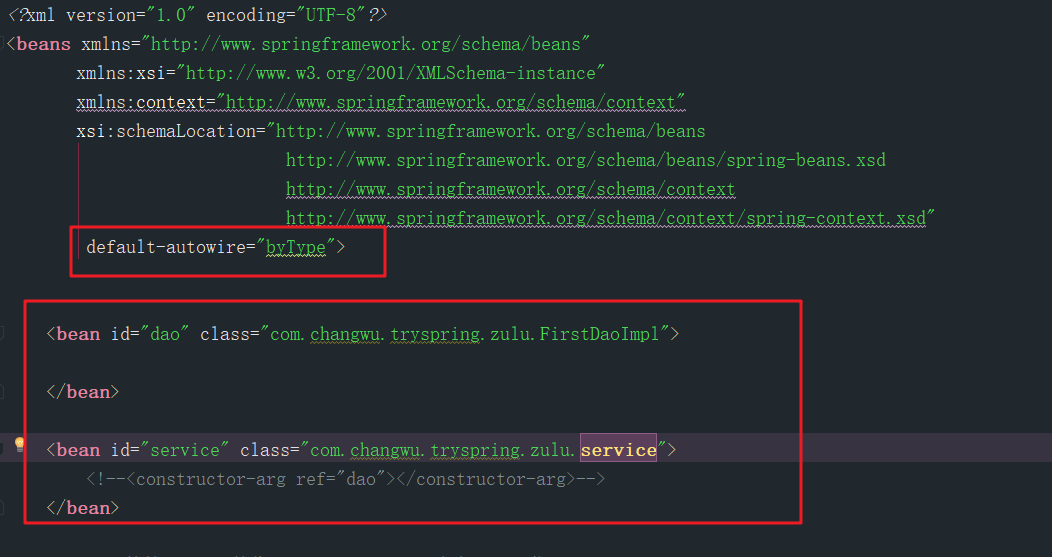
程序一开始运行他就去读取配置文件,根据配置文件创建出相应的bean的代理对象放到IOC中但是,虽然我没有明确的指出service依赖于FirstDaoImpl,程序会正常运行因为我添加了default-autowired=byType,他会替我将FirstDaoImpl装配进service
这是根据类型的自动装配,如果是我们像下面的配置一样,添加多个FirstDaoImpl,他就会报错: 说同一个类型的对象找到了两个,不知道使用哪个
byName
还是上面的场景,使用byName的自动装配,当程序发现service依赖FirstDaoImpl时,会根据名字在IOC中查询出指定的bean,完成依赖注入,
那使用的什么名字呢? 就是我们在service类中提供的setter方法去掉开头的set然后首字母小写, 默认情况下,name和id相同
constructor
补充
byName,ByType等这些自动装配的配置还可以单独的配置在某一个<bean>上,如下
<bean id="service" class="com.changwu.tryspring.service" autowire="byType">

    <!--<constructor-arg ref="dao"></constructor-arg>-->

</bean>
注解版本的自动装配
@Autowired默认使用的自动装配类型为Autowired_No- 但是还是会通过
byType查找, 如果没有找到,就使用byName, 什么name呢? 就是属性名
- 但是还是会通过
@Resource默认采用的自动装配类型为byName,和xml版本不同的是,它是根据属性名完成的注入,而xml版本的name为setter方法去掉set后首字母小写的英文单词@Resource(name = "XXX")明确指定按照名字注入, XXX是什么呢? 其实是类名首字母小写@Resource(type=A.class)就是明确指定注入A.class
使用注解的方式完成依赖注入
举个例子, 通过@Bean 往IOC中注入对象时,如果这个对象还依赖其他的对象,可以使用下面的构造函数的方式注入进去
public class AppConfig {

    @Bean

    public TransferService transferService(AccountRepository accountRepository) {

        return new TransferServiceImpl(accountRepository);

    }

    @Bean

    public AccountRepository accountRepository(AccountRepository accountRepository) {

        return new AccountRepository();

    }

}
Spring中的循环依赖
如果Spring中的Bean的单例的,可以存在循环引用,因为在扫描包时,会把扫描的到的bean实例化到一个缓冲区,然后他们就可以相互引用了,但是
如果是prototype多例的bean,容器创建之初,不进行初始化,因此循环引用失败
Spring的懒加载
默认情况下,spring上下文中的bean都是单例的,并且spring在加载上下文时,就会初始化所有的单实例bean.因为这样做可以立即发现环境中的
错误,我们也可以配置懒加载,也就是说在第一次使用bean时对bean进行初始化的工作
在xml中可以这样配置
<bean id="lazy" class="com.something.ExpensiveToCreateBean" lazy-init="true"/>

<bean name="not.lazy" class="com.something.AnotherBean"/>
或者
<beans default-lazy-init="true">

    <!-- no beans will be pre-instantiated... -->

</beans>
或者使用注解 @Lazy
SpringBean的作用域
默认是singleton
基于xml配置文件配置单例
<bean id="accountService" class="com.something.DefaultAccountService"/>

<!-- the following is equivalent, though redundant (singleton scope is the default) -->

<bean id="accountService" class="com.something.DefaultAccountService" scope="singleton"/>
基于注解:@Scope 默认单例
- 多例
prototype
bean被配置成多例,每次从IOC中获取都将获取一个新的对象,并且容器不负责该对象的销毁
此外还有四种
- request
- session
- application
- websocket
拓展-多例失效问题
当单例bean中引用了多例bean时,默认情况下多实例bean的多实例会失效
例:多例bean代码如下
@Component

@Scope("prototype")

public class FirstDaoImpl implements FirstDao {

    @Override

    public void say() {

        System.out.println("hello");

    }

}
单例bean如下
@Component

public class service {

    @Autowired

    FirstDaoImpl dao;

    public void say(){

        System.out.println("this.hashcode = "+this.hashCode());

        System.out.println("dao.hashcode = "+dao.hashCode());

       // dao.say();

    }
主类:
public class MainTest {

        public static void main(String[] args) {

            AnnotationConfigApplicationContext applicationContext = new AnnotationConfigApplicationContext(SpringConfiguration.class);

            service bean = applicationContext.getBean(service.class);

            bean.say();

            service bean1 = applicationContext.getBean(service.class);

            bean1.say();

            service bean2 = applicationContext.getBean(service.class);

            bean2.say();

        }
打印的结果中可以看到,单例的service和多例的dao中的一个实例进行了唯一的绑定,换句话说是多例失效,如果项目真的需要dao是
多例的话,就会产生并发问题
this.hashcode = 1032000752

dao.hashcode = 770911223

this.hashcode = 1032000752

dao.hashcode = 770911223

this.hashcode = 1032000752

dao.hashcode = 770911223
- 解决方法1
实现ApplicationContextAware接口,通过这个接口可以获取到Spring的应用上下文,进而通过getBean()随意获取IOC的bean
@Component

public class service implements ApplicationContextAware {

    private ApplicationContext applicationContext;

    public void say(){

        System.out.println("this.hashcode = "+this.hashCode());

        System.out.println("dao.hashcode = "+applicationContext.getBean("firstDaoImpl").hashCode());

    }

    @Override

    public void setApplicationContext(ApplicationContext applicationContext) throws BeansException {

        this.applicationContext = applicationContext;

    }

}
- 解决方法2
使用@lookup注解
@Component

public class service   {

  /*  @Autowired

    FirstDaoImpl dao;*/

   @Lookup

    public FirstDaoImpl getFirstDaoImpl(){

        return null;

    }

    public void say(){

        System.out.println("this.hashcode = "+this.hashCode());

        System.out.println("dao.hashcode = "+getFirstDaoImpl().hashCode());

    }
或者
@Component

public abstract class service   {

    @Lookup

    public abstract FirstDaoImpl getFirstDaoImpl();

    public void say(){

        System.out.println("this.hashcode = "+this.hashCode());

        System.out.println("dao.hashcode = "+getFirstDaoImpl().hashCode());

    }
方法名字随便取,返回值没差就行
springBean的生命周期和回调
- 实现Spring提供的InitializingBean接口
- 通过xml配置
- 通过注解完成
在构造方法完成后的回调钩子
方式1: 实现InitializingBean接口
public class AnotherExampleBean implements InitializingBean {

    @Override

    public void afterPropertiesSet() {

        // do some initialization work

    }

}
方式2: 配置xml
public class DefaultBlogService implements BlogService {

    private BlogDao blogDao;

    public void setBlogDao(BlogDao blogDao) {

        this.blogDao = blogDao;

    }

    // this is (unsurprisingly) the initialization callback method

    public void init() {

        if (this.blogDao == null) {

            throw new IllegalStateException("The [blogDao] property must be set.");

        }

    }

}
配置default-init-method如下
<beans default-init-method="init">

    <bean id="blogService" class="com.something.DefaultBlogService">

        <property name="blogDao" ref="blogDao" />

    </bean>

</beans>
或者配置init-method
<bean id="exampleInitBean" class="examples.ExampleBean" init-method="init"/>
方式3: 添加注解
@PostConstruct
容器销毁前的回调
方式1: 实现接口
实现这个接口

org.springframework.beans.factory.DisposableBean

重写它的 void destroy() throws Exception;
方式2: 通过xml配置
<bean id="exampleInitBean" class="examples.ExampleBean" destroy-method="cleanup"/>
方式3: 添加注解
@PreDestroy
如果为一个对象的用不同的方式添加了不同声明周期回调钩子,并且回调的方法名还不一样**,那么这些会钩子按顺序依次回调,
方法名一样的话,回调一次, 回调的顺序如下
initialization methods are called as follows
Methods annotated with @PostConstruct
afterPropertiesSet() as defined by the InitializingBean callback interface
A custom configured init() method
Destroy methods are called in the same order:
Methods annotated with @PreDestroy
destroy() as defined by the DisposableBean callback interface
A custom configured destroy() method
Spring IOC 笔记的更多相关文章
- Spring 学习笔记 IoC 基础
Spring IoC Ioc 是什么 IoC -- Inversion of Control(控制反转)什么是控制?什么是反转? 控制反转了什么? 在很早之前写项目不用 Spring 的时候,都是在 ...
- Spring IOC(控制反转)思想笔记
Spring IOC(控制反转)思想笔记 IOC控制反转基本理念就是将程序控制权从程序员手中交给用户自定义,从而避免了因为用户一个小需求的变化使得程序员需要改动大量代码. 案例 如果按照之前javaw ...
- Spring Framework 学习笔记——核心技术之Spring IOC
Spring Framework 官网文档学习笔记--核心技术之Spring IOC 官方文档 spring-framework-5.3.9 1. Spring Framework 核心技术 1.1 ...
- spring笔记6 spring IOC的中级知识
1,spring ioc的整体流程,xml配置 spring ioc初始化的流程结合上图 步骤编号 完成的工作 1 spring容器读取配置文件,解析称注册表 2 根据注册表,找到相应的bean实现类 ...
- Spring学习笔记之三----基于Annotation的Spring IOC配置
使用Annotation 来创建Bean有两种方式 在配置类中创建bean(配置类是指标注为@Configuration的类),在配置类中每一个创建bean的方法都应该标注为@Bean,可以在@Bea ...
- Spring Framework 笔记(一):IoC
一:Spring中重要的概念 1. 容器( container ) : spring容器( ApplicationContext )的工作原则是创建容器中的组件( instance ),处理组件之间的 ...
- Spring学习笔记(二)Spring基础AOP、IOC
Spring AOP 1. 代理模式 1.1. 静态代理 程序中经常需要为某些动作或事件作下记录,以便在事后检测或作为排错的依据,先看一个简单的例子: import java.util.logging ...
- [跟我学spring学习笔记][IoC]
IoC基础 什么是IoC Ioc—Inversion of Control,即“控制反转”,不是什么技术,而是一种设计思想. ioc做什么 IoC容器帮对象找相应的依赖对象并注入,而不是由对象主动去找 ...
- Spring Boot笔记十:IOC控制反转
目录 IOC控制反转和DI依赖注入 IOC实现Hello World Spring IOC容器怎么知道哪些是管理的对象? IOC容器getBean方法的三种签名 xml配置文件的import导入 @A ...
随机推荐
- day2(APlview+Serializers使用)
1.APIview使用 ModelVIewSet 是对 APIView 封装 ModelSerializer是对Serializeer 1.1 在user/urls.py中添加路由 urlpatte ...
- ERP费用报销操作与设计--开源软件诞生31
赤龙ERP费用报销讲解--第31篇 用日志记录"开源软件"的诞生 [进入地址 点亮星星]----祈盼着一个鼓励 博主开源地址: 码云:https://gitee.com/redra ...
- OpenCV阈值处理函数threshold处理32位彩色图像的案例
☞ ░ 前往老猿Python博文目录 ░ 一.概述 openCV图像的阈值处理又称为二值化,之所以称为二值化,是它可以将一幅图转换为感兴趣的部分(前景)和不感兴趣的部分(背景).转换时,通常将某个值( ...
- moviepy音视频开发:音频剪辑基类AudioClip详解
☞ ░ 前往老猿Python博文目录 ░ 一.背景知识介绍 1.1.声音三要素: 音调:人耳对声音高低的感觉称为音调(也叫音频).音调主要与声波的频率有关.声波的频率高,则音调也高. 音量:也就是响度 ...
- Python中sorted(iterable, /, *, key=None, reverse=False)的参数中的斜杆是什么意思?
通过help(sorted)查看sorted的帮助文档,显示如下: Help on built-in function sorted in module builtins: sorted(iterab ...
- Python正则表达式re.search(r'\*{3,8}','*****')和re.search('\*{3,8}','*****')的匹配结果为什么相同?
老猿做过如下测试: >>> re.search(r'\*{3,100}','*****') <re.Match object; span=(0, 5), match='**** ...
- shell 编程 && bash 简介(shell 变量、shell操作环境、数据流重导向、管线命令、shell script)
如何学习一门编程语言 数据类型 运算符 关键字 1 认识BASH 这个shell linux是操作系统核心,用户通过shell与核心进行沟通,达到我们想要的目的.硬件.核心.用户之间的关系: 原理:所 ...
- 揭秘 VMAF 视频质量评测标准
作者:杨洋,阿里云技术专家,从事直播相关媒体处理引擎开发 背景 图像质量的衡量是个老问题,对此人们提出过很多简单可行的解决方案.例如均方误差(Mean-squared-error,MSE).峰值信噪比 ...
- x++ 和 ++x的区别
很多编程语言都会有x++和++x的问题,两个到底是怎么回事? 一个先执行一个后执行的区别 var x = 0; console.log(x++);//0 遇到x++当前执行值不变 console.lo ...
- 题解-MtOI2019 幽灵乐团
题面 MtOI2019 幽灵乐团 给定 \(p\),\(Cnt\) 组测试数据,每次给 \(a,b,c\),求 \[\prod_{i=1}^a\prod_{j=1}^b\prod_{k=1}^c\le ...