
基于Python与命令行人脸识别项目(系列二)
接着系统一,继续开始我们face_recognition.
Python 模块:face_recognition
在Python中,你可以导入face_recognition模块,调用丰富的API接口,用几行代码就可以轻松玩转各种人脸识别功能!
API 接口文档: https://face-recognition.readthedocs.io(可以参考这个)
在图片中定位人脸的位置关键代码
import face_recognition

image = face_recognition.load_image_file("my_picture.jpg")

face_locations = face_recognition.face_locations(image)

# face_locations is now an array listing the co-ordinates of each face!

看定位鞠婧祎的脸:在knowe_people文件夹中创建find_faces_in_picture.py文件并写入以下代码:

from PIL import Image
import face_recognition

# Load the jpg file into a numpy array
image = face_recognition.load_image_file("鞠婧祎.jpeg")

# Find all the faces in the image using the default HOG-based model.
# This method is fairly accurate, but not as accurate as the CNN model and not GPU accelerated.
# See also: find_faces_in_picture_cnn.py
face_locations = face_recognition.face_locations(image)

print("I found {} face(s) in this photograph.".format(len(face_locations)))

for face_location in face_locations:

    # Print the location of each face in this image
    top, right, bottom, left = face_location
    print("A face is located at pixel location Top: {}, Left: {}, Bottom: {}, Right: {}".format(top, left, bottom, right))

    # You can access the actual face itself like this:
    face_image = image[top:bottom, left:right]
    pil_image = Image.fromarray(face_image)
    pil_image.show()

然后终端切换到knowe_people目录下,输入以下命令,弹出窗口如下:
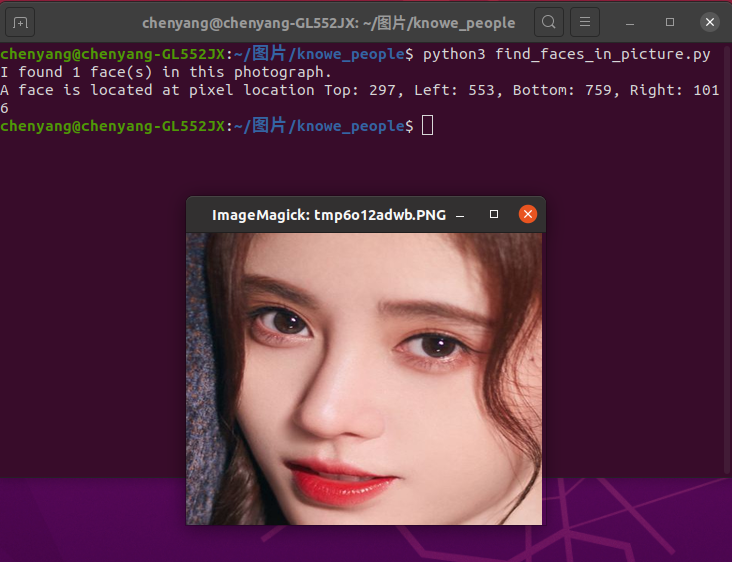
可以看到终端已经找到鞠婧祎人脸坐标分别是:Top: 297, Left: 553, Bottom: 759, Right: 1016,并输出人脸。继续测试
将第二段第二行改为image = face_recognition.load_image_file("特朗普.jpg"),终端输出如下:
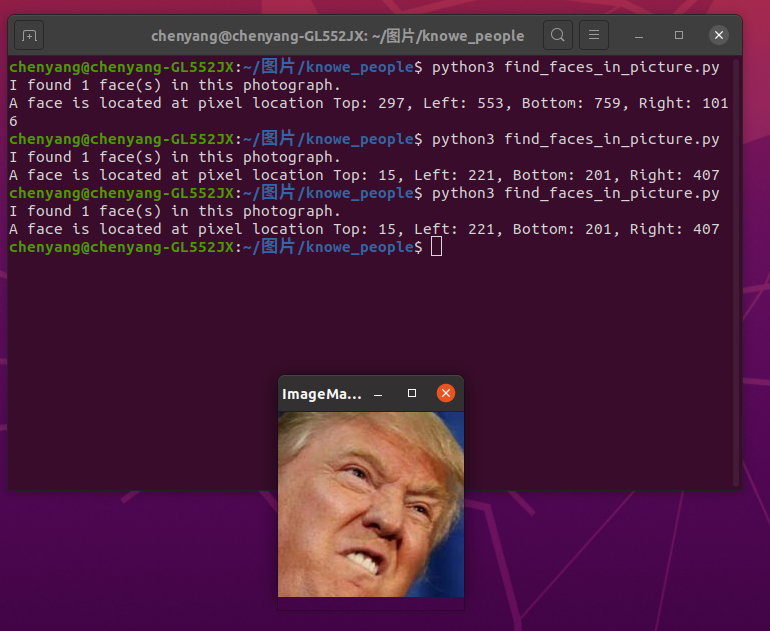
你也可以使用深度学习模型达到更加精准的人脸定位。
注意:这种方法需要GPU加速(通过英伟达显卡的CUDA库驱动),你在编译安装dlib的时候也需要开启CUDA支持。
import face_recognition

image = face_recognition.load_image_file("my_picture.jpg")

face_locations = face_recognition.face_locations(image, model="cnn")

# face_locations is now an array listing the co-ordinates of each face!

看案例:利用卷积神经网络深度学习模型定位鞠婧祎的人脸
在knowe_people文件夹中创建find_faces_in_picture_cnn.py文件并写入以下代码:
from PIL import Image
import face_recognition

# Load the jpg file into a numpy array
image = face_recognition.load_image_file("鞠婧祎.jpg")

# Find all the faces in the image using a pre-trained convolutional neural network.
# This method is more accurate than the default HOG model, but it's slower
# unless you have an nvidia GPU and dlib compiled with CUDA extensions. But if you do,
# this will use GPU acceleration and perform well.
# See also: find_faces_in_picture.py
face_locations = face_recognition.face_locations(image, number_of_times_to_upsample=0, model="cnn")

print("I found {} face(s) in this photograph.".format(len(face_locations)))

for face_location in face_locations:

    # Print the location of each face in this image
    top, right, bottom, left = face_location
    print("A face is located at pixel location Top: {}, Left: {}, Bottom: {}, Right: {}".format(top, left, bottom, right))

    # You can access the actual face itself like this:
    face_image = image[top:bottom, left:right]
    pil_image = Image.fromarray(face_image)
    pil_image.show()
然后终端切换到knowe_people目录下,输入以下命令,弹出窗口如下:
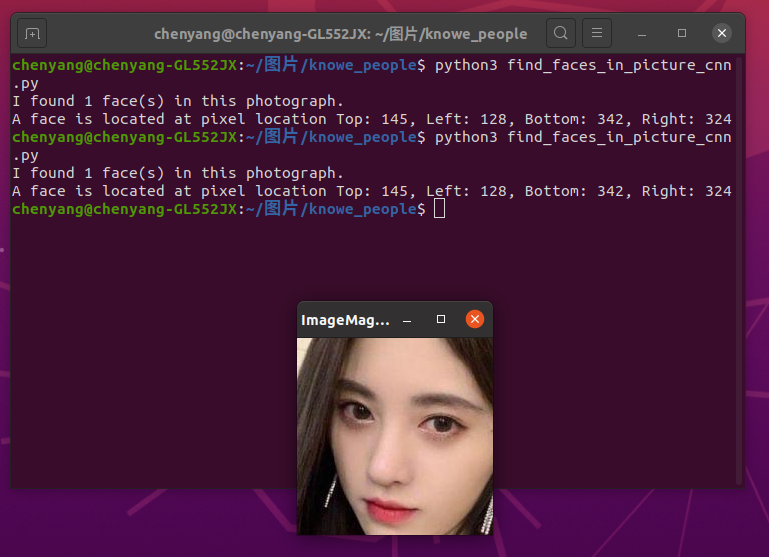
在knowe_people文件夹中创建find_faces_in_batches.py文件并写入以下代码:

import face_recognition
import cv2

# This code finds all faces in a list of images using the CNN model.
#
# This demo is for the _special case_ when you need to find faces in LOTS of images very quickly and all the images
# are the exact same size. This is common in video processing applications where you have lots of video frames
# to process.
#
# If you are processing a lot of images and using a GPU with CUDA, batch processing can be ~3x faster then processing
# single images at a time. But if you aren't using a GPU, then batch processing isn't going to be very helpful.
#
# PLEASE NOTE: This example requires OpenCV (the `cv2` library) to be installed only to read the video file.
# OpenCV is *not* required to use the face_recognition library. It's only required if you want to run this
# specific demo. If you have trouble installing it, try any of the other demos that don't require it instead.

# Open video file
video_capture = cv2.VideoCapture("short_hamilton_clip.mp4")

frames = []
frame_count = 0

while video_capture.isOpened():
    # Grab a single frame of video
    ret, frame = video_capture.read()

    # Bail out when the video file ends
    if not ret:
        break

    # Convert the image from BGR color (which OpenCV uses) to RGB color (which face_recognition uses)
    frame = frame[:, :, ::-1]

    # Save each frame of the video to a list
    frame_count += 1
    frames.append(frame)

    # Every 128 frames (the default batch size), batch process the list of frames to find faces
    if len(frames) == 128:
        batch_of_face_locations = face_recognition.batch_face_locations(frames, number_of_times_to_upsample=0)

        # Now let's list all the faces we found in all 128 frames
        for frame_number_in_batch, face_locations in enumerate(batch_of_face_locations):
            number_of_faces_in_frame = len(face_locations)

            frame_number = frame_count - 128 + frame_number_in_batch
            print("I found {} face(s) in frame #{}.".format(number_of_faces_in_frame, frame_number))

            for face_location in face_locations:
                # Print the location of each face in this frame
                top, right, bottom, left = face_location
                print(" - A face is located at pixel location Top: {}, Left: {}, Bottom: {}, Right: {}".format(top, left, bottom, right))

        # Clear the frames array to start the next batch
        frames = []

注意到:这个例子需要安装openCV.这个例子需要GPU cuda加速,否则运行卡顿。我就试了几次,电脑死机,先跳过,以后再说。

案例:使用卷积神经网络深度学习模型把来自网络摄像头视频的人脸高斯模糊。
在knowe_people文件夹中创建blur_faces_on_webcam.py文件并写入以下代码:

import face_recognition
import cv2

# This is a demo of blurring faces in video.

# PLEASE NOTE: This example requires OpenCV (the `cv2` library) to be installed only to read from your webcam.
# OpenCV is *not* required to use the face_recognition library. It's only required if you want to run this
# specific demo. If you have trouble installing it, try any of the other demos that don't require it instead.

# Get a reference to webcam #0 (the default one)
video_capture = cv2.VideoCapture(0)

# Initialize some variables
face_locations = []

while True:
    # Grab a single frame of video
    ret, frame = video_capture.read()

    # Resize frame of video to 1/4 size for faster face detection processing
    small_frame = cv2.resize(frame, (0, 0), fx=0.25, fy=0.25)

    # Find all the faces and face encodings in the current frame of video
    face_locations = face_recognition.face_locations(small_frame, model="cnn")

    # Display the results
    for top, right, bottom, left in face_locations:
        # Scale back up face locations since the frame we detected in was scaled to 1/4 size
        top *= 4
        right *= 4
        bottom *= 4
        left *= 4

        # Extract the region of the image that contains the face
        face_image = frame[top:bottom, left:right]

        # Blur the face image
        face_image = cv2.GaussianBlur(face_image, (99, 99), 30)

        # Put the blurred face region back into the frame image
        frame[top:bottom, left:right] = face_image

    # Display the resulting image
    cv2.imshow('Video', frame)

    # Hit 'q' on the keyboard to quit!
    if cv2.waitKey(1) & 0xFF == ord('q'):
        break

# Release handle to the webcam
video_capture.release()
cv2.destroyAllWindows()
然后终端切换到knowe_people目录下,输入以下命令,弹出窗口如下:(把自己宿舍卖了,希望室友不要介意,嘻嘻)


好了,今天就到这吧,今天主要实现4个功能(如下),更多功能见系列三。
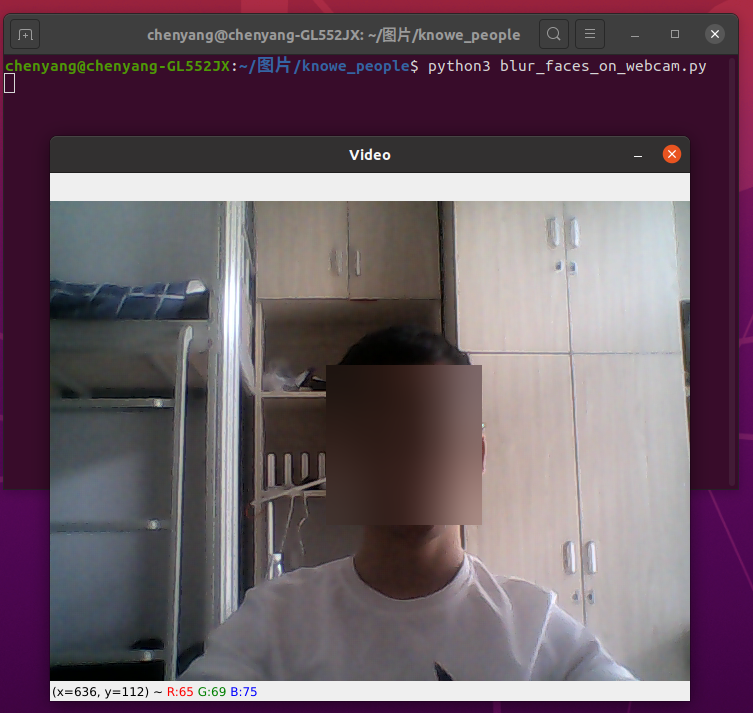
案例一:定位鞠婧祎的脸
案例二:利用卷积神经网络深度学习模型定位鞠婧祎的人脸
案例三:利用卷积神经网络深度学习模型批量识别人脸照片
案例四:使用卷积神经网络深度学习模型把来自网络摄像头视频的人脸高斯模糊。
基于Python与命令行人脸识别项目(系列二)的更多相关文章
- 基于Python与命令行人脸识别项目(系列一)
Face Recognition 人脸识别 摘要:本项目face_recognition是一个强大.简单.易上手的人脸识别开源项目,并且配备了完整的开发文档和应用案例,方便大家使用.对于本项目可以使用 ...
- 基于卷积神经网络的人脸识别项目_使用Tensorflow-gpu+dilib+sklearn
https://www.cnblogs.com/31415926535x/p/11001669.html 基于卷积神经网络的人脸识别项目_使用Tensorflow-gpu+dilib+sklearn ...
- [Android] 基于 Linux 命令行构建 Android 应用(二):命令行管理项目
创建 Android 项目 在命令行创建 Android 项目需要用到 android 工具(该工具由 Android SDK 提供,位于 <sdk>/tools/ 目录下.).它能自动生 ...
- Github开源人脸识别项目face_recognition
Github开源人脸识别项目face_recognition 原文:https://www.jianshu.com/p/0b37452be63e 译者注: 本项目face_recognition是一个 ...
- 关于运行“基于极限学习机ELM的人脸识别程序”代码犯下的一些错误
代码来源 基于极限学习机ELM的人脸识别程序 感谢文章主的分享 我的环境是 win10 anaconda Command line client (version 1.6.5)(conda 4.3.3 ...
- 10分钟手把手教你运用Python实现简单的人脸识别
欲直接下载代码文件,关注我们的公众号哦!查看历史消息即可! 前言:让我的电脑认识我 我的电脑只有认识我,才配称之为我的电脑! 今天,我们用Python实现高大上的人脸识别技术! Python里,简单的 ...
- opencv基于PCA降维算法的人脸识别
opencv基于PCA降维算法的人脸识别(att_faces) 一.数据提取与处理 # 导入所需模块 import matplotlib.pyplot as plt import numpy as n ...
- 命令行创建Maven项目卡住以及出错解决办法。
第一次通过命令行创建maven项目.结果,果不其然啊,还是出问题了,不过出问题比没有出问题强,知道哪里有问题并学会解决也是一种收获. 遇到的第一个问题,在从仓库下载东西的时候会卡住,我开始以为是网速问 ...
- 学习笔记-使用cmd命令行创建nodejs项目
使用cmd命令行创建nodejs项目 1)在DOS下cd 进入到你想要创建项目的路径. 2)mkdir sing (创建一个sing文件夹) 3)cd sing 4) npm init (初始化工程 ...
随机推荐
- vue 项目中实时请求接口 建立长连接
需求:在项目中需要每隔五秒请求一次接口 第一种方法:直接在mounted钩子函数中处理 mounted() { window.setInterval(() => { setTimeout(thi ...
- json与字典的相互转化
json格式初学者如果在编辑器中自己编写一个json格式,可能会出错:虽然json格式本质上也是字符串,但是json格式要求,要使用双引号将key和value括起来: 如果要将上面的字符串格式和jso ...
- NX二次开发-使用NXOPEN C#手工搭建开发环境配置
新建类库 进来后编译代码,成功 添加NXOPEN的库到项目中 不同NX版本,可能dll所在位置不一样,NX11以上版本在NXBIN这里,NX11以下版本大概在UGII. 添加头文件 using NXO ...
- 刷题[FBCTF2019]Event
解题思路 信息收集 打开发现是这样的登陆框,信息泄露,弱口令什么的尝试一下,无果,正常注册登陆 发现需要通过admin用户登陆,并且发现有/flag这样的路由,猜测后台为python编写 抓包发现有看 ...
- Layer层自定义
keras允许自定义Layer层, 大大方便了一些复杂操作的实现. 也方便了一些novel结构的复用, 提高搭建模型的效率. 实现方法 通过继承keras.engine.Layer类, 重写其中的部分 ...
- Python练习题 010:分解质因数
[Python练习题 010]将一个正整数分解质因数.例如:输入90,打印出90=2*3*3*5. -------------------------------------------------- ...
- JAVA运行环境 和 Java Applet的运行环境 的区别
Java小程序,也就是Java Applet,可以在Web浏览器中运行.Java Applet必须以<applet>脚本的形式嵌入到HTML页面中,才能在web浏览器中运行. 之前总以为本 ...
- 晚间测试3 B. 单(single)
题目描述 单车联通大街小巷.这就是出题人没有写题目背景的原因. 对于一棵树,认为每条边长度为 \(1\),每个点有一个权值\(a[i]\).\(dis(u,v)\)为点\(u\)到\(v\)的最短路径 ...
- python 给IDLE添加行号
[LineNumbers] enable=1 enable_editor=1 enable_shell=1 visible=1 [LineNumbers_cfgBindings] linenumber ...
- Arduino 与 SPI 结合使用 以及SPI 深层理解
本文主要讲解两部分内容,不做任何转发,仅个人学习记录: 一. Arduino 与 SPI 结合使用 : 二. SPI 深层理解 有价值的几个好的参考: 1. 中文版: https://blog.cs ...