从源码的角度看Activity是如何启动的
欢迎访问我的个人博客,原文链接:http://wensibo.top/2017/07/03/Binder/ ,未经允许不得转载!
大家好,今天想与大家一起分享的是Activity。我们平时接触的最多的就是Activity了,作为四大组件中最为重要的老大,Activity究竟是如何启动的呢?这篇文章将会从源码的角度为大家进行全方位的解析,为了方便大家理解整个的过程,我会用流程图的方式将整个过程串起来,希望对大家有所帮助。
开始吧!
一般我们启动Activity有两种方法,这里我就不再详细说这两种方法的用法了,不过他们都是调用了同样的一个逻辑startActivity。所以我们分析Activity的启动流程就从这个方法开始。
 public void startActivity(Intent intent, @Nullable Bundle options) {

    if (options != null) {

        startActivityForResult(intent, -1, options);

    } else {

        startActivityForResult(intent, -1);

    }

}
可以看到尽管startActivity()有多种重载方式,但是最终调用的还是startActivityForResult,所以我们只需要看startActivityForResult里面的实现逻辑即可。这里需要注意的一点就是调用了startActivityForResult方法时传入的一个参数为-1,为什么是-1呢?还记得我们如果需要下一个Activity返回数据给目前这个Activity的时候都是调用startActivityForResult方法,不会去调用startActivity,因为startActivity尽管最后还是调用startActivityForResult,但是他设置了requestCode参数为-1,二在startActivityForResult方法中会判断requestCode是否大于等于0,如果小于0就不会返回结果,因此我们都会选择startActivityForResult方法以取回结果,并且设置其code参数大于等于0。下面我们来看看startActivityForResult的实现:
public void startActivityForResult(

@RequiresPermission Intent intent, int requestCode,@Nullable Bundle options) {

        //mParent是一个Activity对象,表示该Activity是否由父Activity启动

    if (mParent == null) {

        options = transferSpringboardActivityOptions(options);

        Instrumentation.ActivityResult ar =

            mInstrumentation.execStartActivity(

                this, mMainThread.getApplicationThread(), mToken, this,

                intent, requestCode, options);

        if (ar != null) {

            mMainThread.sendActivityResult(

                mToken, mEmbeddedID, requestCode, ar.getResultCode(),

                ar.getResultData());

        }

        //这里就是判断requestCode的逻辑

        if (requestCode >= 0) {

            mStartedActivity = true;

        }

        cancelInputsAndStartExitTransition(options);

    } else {

        if (options != null) {

            mParent.startActivityFromChild(this, intent, requestCode, options);

        } else {

            mParent.startActivityFromChild(this, intent, requestCode);

        }

    }

}
在startActivityForResult方法中,首先会判断该Activity是否由父Activity启动,即mParent,如果他是第一个Activity,就会调用Instrumentation的execStartActivity方法,这里再看一下判断requestCode的逻辑:
if (requestCode >= 0) {

    mStartedActivity = true;

}
可以看到在这里确实判断了requestCode的大小,大于等于0的时候才会返回结果,否则是不会的。
继续说回execStartActivity方法,这里就是正真执行Activity启动的操作,解释一下他的几个参数:
this,为启动Activity的对象mMainThread.getApplicationThread(),为Binder对象,是主进程的context对象token,也是一个Binder对象,指向了服务端一个ActivityRecord对象target,为启动的Activityintent,启动的Intent对象requestCode,请求码options,参数
这里的第一个Binder对象在我们的整个分析过程中将扮演者非常重要的作用,如果你对Binder不熟悉的话,请到这里了解有关Binder机制的内容。
接下来是execStartActivity方法:
public ActivityResult execStartActivity(

        Context who, IBinder contextThread, IBinder token, Activity target,

        Intent intent, int requestCode, Bundle options) {

    ...

    try {

        intent.migrateExtraStreamToClipData();

        intent.prepareToLeaveProcess();

        int result = ActivityManagerNative.getDefault()

            .startActivity(whoThread, who.getBasePackageName(), intent,

                    intent.resolveTypeIfNeeded(who.getContentResolver()),

                    token, target != null ? target.mEmbeddedID : null,

                    requestCode, 0, null, options);

        checkStartActivityResult(result, intent);

    } catch (RemoteException e) {

        throw new RuntimeException("Failure from system", e);

    }

    return null;

}
这里最重要的就是调用了ActivityManagerNative.getDefault().startActivity(),但是ActivityManagerNative.getDefault()是什么东西呢?我们继续看getDefault()的源码:
static public IActivityManager getDefault() {

    return gDefault.get();

}

private static final Singleton<IActivityManager> gDefault = new Singleton<IActivityManager>() {

    protected IActivityManager create() {

        IBinder b = ServiceManager.getService("activity");

        if (false) {

            Log.v("ActivityManager", "default service binder = " + b);

        }

        IActivityManager am = asInterface(b);

        if (false) {

            Log.v("ActivityManager", "default service = " + am);

        }

        return am;

    }

};
可以看到其中声明了一个Singleton封装类,其类型是IActivityManager,注意到其中调用了asInterface方法,接着看他做了什么?
static public IActivityManager asInterface(IBinder obj) {

    if (obj == null) {

        return null;

    }

    IActivityManager in =

        (IActivityManager)obj.queryLocalInterface(descriptor);

    if (in != null) {

        return in;

    }

    return new ActivityManagerProxy(obj);

}

//ActivityManagerProxy:startActivity

public int startActivity(IApplicationThread caller, String callingPackage, Intent intent,

            String resolvedType, IBinder resultTo, String resultWho, int requestCode,

            int startFlags, ProfilerInfo profilerInfo, Bundle options) throws RemoteException {

        Parcel data = Parcel.obtain();

        Parcel reply = Parcel.obtain();

        data.writeInterfaceToken(IActivityManager.descriptor);

        data.writeStrongBinder(caller != null ? caller.asBinder() : null);

        data.writeString(callingPackage);

        intent.writeToParcel(data, 0);

        data.writeString(resolvedType);

        data.writeStrongBinder(resultTo);

        data.writeString(resultWho);

        data.writeInt(requestCode);

        data.writeInt(startFlags);

        if (profilerInfo != null) {

            data.writeInt(1);

            profilerInfo.writeToParcel(data, Parcelable.PARCELABLE_WRITE_RETURN_VALUE);

        } else {

            data.writeInt(0);

        }

        if (options != null) {

            data.writeInt(1);

            options.writeToParcel(data, 0);

        } else {

            data.writeInt(0);

        }

        mRemote.transact(START_ACTIVITY_TRANSACTION, data, reply, 0);

        reply.readException();

        int result = reply.readInt();

        reply.recycle();

        data.recycle();

        return result;

    }
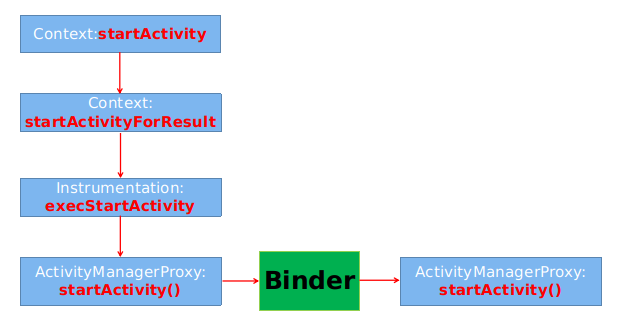
可以看到asInterface返回了一个ActivityManagerProxy对象,也就是说ActivityManagerNative.getDefault()返回的就是一个ActivityManagerProxy对象,通过之前的BInder机制的文章我们可以知道Proxy是运行在客户端的,客户端通过将参数写入Proxy类,接着Proxy就会通过Binder去远程调用服务端的具体方法,因此,我们只是借用ActivityManagerProxy来调用ActivityManagerService的方法,他们之间的关系如下所示:

到目前为止Activity的启动流程就是如下所示了,可以看到Activity的启动逻辑来到了AMS中。
在AMS中启动Activity
@Override

public final int startActivity(IApplicationThread caller, String callingPackage,

        Intent intent, String resolvedType, IBinder resultTo, String resultWho, int requestCode,

        int startFlags, ProfilerInfo profilerInfo, Bundle options) {

    return startActivityAsUser(caller, callingPackage, intent, resolvedType, resultTo,

        resultWho, requestCode, startFlags, profilerInfo, options,

        UserHandle.getCallingUserId());

}

@Override

public final int startActivityAsUser(IApplicationThread caller, String callingPackage,

        Intent intent, String resolvedType, IBinder resultTo, String resultWho, int requestCode,

        int startFlags, ProfilerInfo profilerInfo, Bundle options, int userId) {

    enforceNotIsolatedCaller("startActivity");

    userId = handleIncomingUser(Binder.getCallingPid(), Binder.getCallingUid(), userId,

            false, ALLOW_FULL_ONLY, "startActivity", null);

    // TODO: Switch to user app stacks here.

    return mStackSupervisor.startActivityMayWait(caller, -1, callingPackage, intent,

            resolvedType, null, null, resultTo, resultWho, requestCode, startFlags,

            profilerInfo, null, null, options, false, userId, null, null);

}
在startActivity中直接调用了startActivityAsUser方法,而在startActivityAsUser中则是调用mStackSupervisor.startActivityMayWait方法:
final int startActivityLocked(IApplicationThread caller,

    Intent intent, String resolvedType, ActivityInfo aInfo,

    IVoiceInteractionSession voiceSession, IVoiceInteractor voiceInteractor,

    IBinder resultTo, String resultWho, int requestCode,

    int callingPid, int callingUid, String callingPackage,

    int realCallingPid, int realCallingUid, int startFlags, Bundle options,

    boolean ignoreTargetSecurity, boolean componentSpecified, ActivityRecord[] outActivity,

    ActivityContainer container, TaskRecord inTask) {

    int err = ActivityManager.START_SUCCESS;

    ...

    err = startActivityUncheckedLocked(r, sourceRecord, voiceSession, voiceInteractor,

        startFlags, true, options, inTask);

    ...

    return err;

    }
这个方法中主要构造了ActivityManagerService端的Activity对象:ActivityRecord,并根据Activity的启动模式执行了相关逻辑。然后调用了startActivityUncheckedLocked方法,而在startActivityUncheckedLocked中则调用了startActivityUncheckedLocked方法,startActivityUncheckedLocked方法则会调用startActivityLocked方法,startActivityLocked又会调用resumeTopActivitiesLocked方法,其最后调用了resumeTopActivityLocked方法。
经过一系列的调用之后,最终来到了startPausingLocked方法,它会执行Activity的onPause方法,从而结束当前的Activity。
首先来看startPausingLocked方法:
final boolean startPausingLocked(boolean userLeaving, boolean uiSleeping, boolean resuming,boolean dontWait) {

    ...

    if (prev.app != null && prev.app.thread != null) {

        if (DEBUG_PAUSE) Slog.v(TAG_PAUSE, "Enqueueing pending pause: " + prev);

        try {

            EventLog.writeEvent(EventLogTags.AM_PAUSE_ACTIVITY,

                    prev.userId, System.identityHashCode(prev),

                    prev.shortComponentName);

            mService.updateUsageStats(prev, false);

            prev.app.thread.schedulePauseActivity(prev.appToken, prev.finishing,

                    userLeaving, prev.configChangeFlags, dontWait);

        } catch (Exception e) {

            // Ignore exception, if process died other code will cleanup.

            Slog.w(TAG, "Exception thrown during pause", e);

            mPausingActivity = null;

            mLastPausedActivity = null;

            mLastNoHistoryActivity = null;

        }

    } else {

        mPausingActivity = null;

        mLastPausedActivity = null;

        mLastNoHistoryActivity = null;

    }

    ...

}
这里有一个很重要的地方就是prev.app.thread,其实他就是一个IApplicationThread类型的对象,而ApplicationThread则是ActivityThread的一个内部类,它继承了IApplicationThread,并且都是Binder对象,所以说Appcation是一个客户端,而ActivityThread中是一个服务端,到现在为止,Activity的调用来到了ActivityThread中,如下图所示:
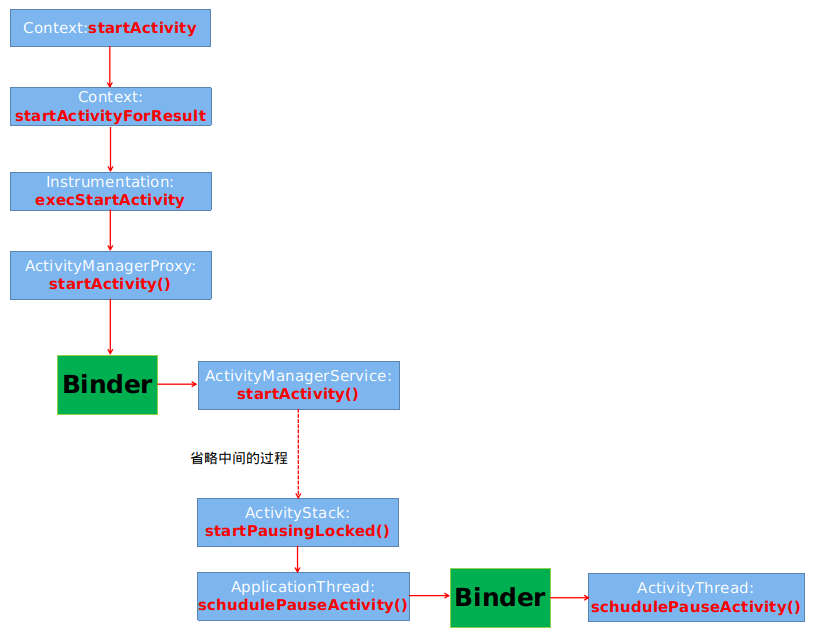
在ActivityThread中pause掉当前Activity
在ActivityThread中则是调用了schedulePauseActivity来执行pause操作:
public final void schedulePauseActivity(IBinder token, boolean finished,boolean userLeaving, int configChanges, boolean dontReport) {

    sendMessage(

        finished ? H.PAUSE_ACTIVITY_FINISHING : H.PAUSE_ACTIVITY,

        token,

        (userLeaving ? 1 : 0) | (dontReport ? 2 : 0),

        configChanges);

}
可以看到在schedulePauseActivity中则是通过handler来发送消息,消息类型为PAUSE_ACTIVITY_FINISHING,那接下来就应该看收到消息之后如何来处理了,
private void handlePauseActivity(IBinder token, boolean finished,

            boolean userLeaving, int configChanges, boolean dontReport) {

    ActivityClientRecord r = mActivities.get(token);

    if (r != null) {

        //Slog.v(TAG, "userLeaving=" + userLeaving + " handling pause of " + r);

        if (userLeaving) {

            performUserLeavingActivity(r);

        }

        r.activity.mConfigChangeFlags |= configChanges;

        performPauseActivity(token, finished, r.isPreHoneycomb());

        // Make sure any pending writes are now committed.

        if (r.isPreHoneycomb()) {

            QueuedWork.waitToFinish();

        }

        // Tell the activity manager we have paused.

        if (!dontReport) {

            try {

                ActivityManagerNative.getDefault().activityPaused(token);

            } catch (RemoteException ex) {

            }

        }

        mSomeActivitiesChanged = true;

    }

}
可以看到在方法内部通过调用performPauseActivity方法来实现对当前Activity的onPause生命周期方法的回调,具体是调用了performPause方法:
final void performPause() {

    mDoReportFullyDrawn = false;

    mFragments.dispatchPause();

    mCalled = false;

    onPause();

    mResumed = false;

    if (!mCalled && getApplicationInfo().targetSdkVersion

            >= android.os.Build.VERSION_CODES.GINGERBREAD) {

        throw new SuperNotCalledException(

                "Activity " + mComponent.toShortString() +

                " did not call through to super.onPause()");

    }

    mResumed = false;

}
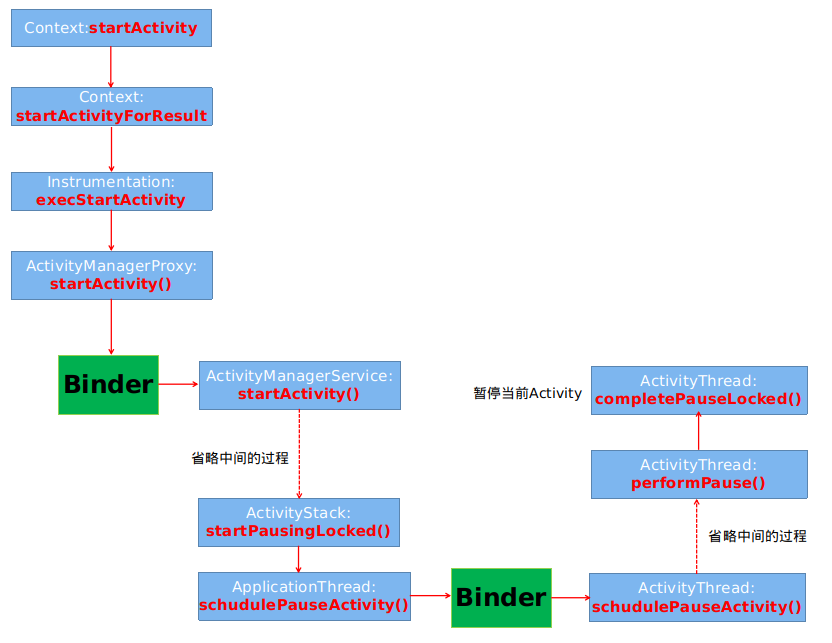
可以看到最终是调用了Activity的onPause()方法,接着我们回到handlePauseActivity的第二个方法ActivityManagerNative.getDefault().activityPaused(token),这是应用进程告诉服务进程,当前的Activity已经执行完成onPause方法了,其最后会调用completePauseLocked方法:
private void completePauseLocked(boolean resumeNext) {

    ...

    if (resumeNext) {

        final ActivityStack topStack = mStackSupervisor.getFocusedStack();

        if (!mService.isSleepingOrShuttingDown()) {

            mStackSupervisor.resumeTopActivitiesLocked(topStack, prev, null);

        } else {

            mStackSupervisor.checkReadyForSleepLocked();

            ActivityRecord top = topStack.topRunningActivityLocked(null);

            if (top == null || (prev != null && top != prev)) {

                // If there are no more activities available to run,

                // do resume anyway to start something.  Also if the top

                // activity on the stack is not the just paused activity,

                // we need to go ahead and resume it to ensure we complete

                // an in-flight app switch.

                mStackSupervisor.resumeTopActivitiesLocked(topStack, null, null);

            }

        }

    }

}
可以看到经过了一系列的逻辑之后,又调用了resumeTopActivitiesLocked方法,而在该方法中则是调用了startSpecificActivityLocked 来启动新的Activity。来看看目前的流程图:
启动新的Activity
在startSpecificActivityLocked方法中,其实现细节则是和调用Activity的pause方法一样,都是通过Handler机制,发送一个启动Activity的消息,接着处理该消息最后启动Activity。其调用的是performLaunchActivity方法:
private Activity performLaunchActivity(ActivityClientRecord r, Intent customIntent) {

Activity activity = null;

        try {

            java.lang.ClassLoader cl = r.packageInfo.getClassLoader();

            activity = mInstrumentation.newActivity(

                    cl, component.getClassName(), r.intent);

            StrictMode.incrementExpectedActivityCount(activity.getClass());

            r.intent.setExtrasClassLoader(cl);

            r.intent.prepareToEnterProcess();

            if (r.state != null) {

                r.state.setClassLoader(cl);

            }

        } catch (Exception e) {

            if (!mInstrumentation.onException(activity, e)) {

                throw new RuntimeException(

                    "Unable to instantiate activity " + component

                    + ": " + e.toString(), e);

            }

        }

        ...

        activity.mCalled = false;

        if (r.isPersistable()) {

           mInstrumentation.callActivityOnCreate(activity, r.state, r.persistentState);

        } else {

           mInstrumentation.callActivityOnCreate(activity, r.state);

        }

        ...

        if (!r.activity.mFinished) {

                    activity.performStart();

                    r.stopped = false;

                }

        ...

        return activity;

    }
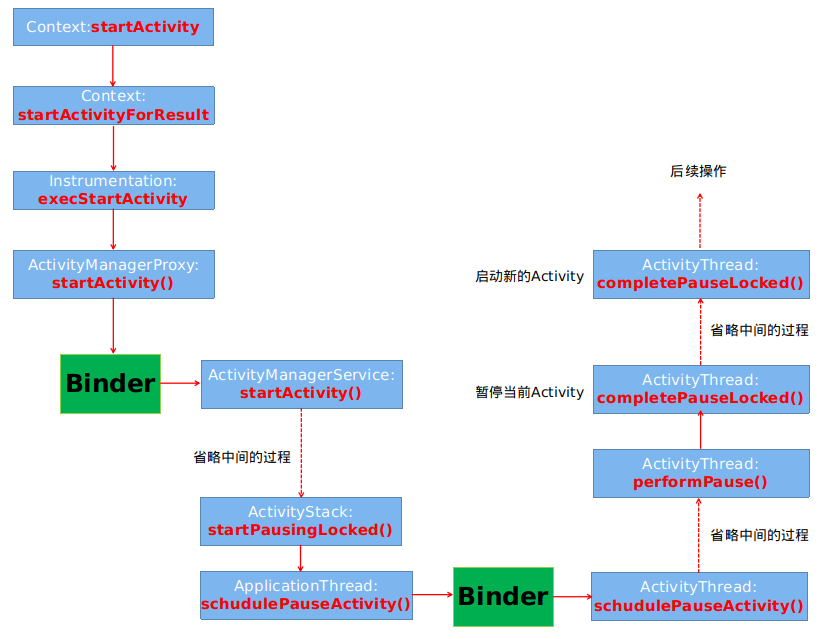
可以看到最终的Activity对象终于创建出来了,可以看到其过程是使用反射机制创建的,而反射机制在Android系统中的应用也是随处可见。在接下来的过程中还会继续执行Activity的onCreate等一系列的生命周期方法。
最后再来看一下整个过程最终的流程图:
从源码的角度看Activity是如何启动的的更多相关文章
- 从源码的角度看Service是如何启动的
欢迎访问我的个人博客 ,原文链接:http://wensibo.top/2017/07/16/service/ ,未经允许不得转载! 七月中旬了,大家的实习有着落了吗?秋招又准备的怎么样了呢?我依旧在 ...
- 从源码的角度看 React JS 中批量更新 State 的策略(下)
这篇文章我们继续从源码的角度学习 React JS 中的批量更新 State 的策略,供我们继续深入学习研究 React 之用. 前置文章列表 深入理解 React JS 中的 setState 从源 ...
- 从源码的角度看 React JS 中批量更新 State 的策略(上)
在之前的文章「深入理解 React JS 中的 setState」与 「从源码的角度再看 React JS 中的 setState」 中,我们分别看到了 React JS 中 setState 的异步 ...
- 从源码的角度再看 React JS 中的 setState
在这一篇文章中,我们从源码的角度再次理解下 setState 的更新机制,供深入研究学习之用. 在上一篇手记「深入理解 React JS 中的 setState」中,我们简单地理解了 React 中 ...
- [转]Android事件分发机制完全解析,带你从源码的角度彻底理解(上)
Android事件分发机制 该篇文章出处:http://blog.csdn.net/guolin_blog/article/details/9097463 其实我一直准备写一篇关于Android事件分 ...
- 从源码的角度解析View的事件分发
有好多朋友问过我各种问题,比如:onTouch和onTouchEvent有什么区别,又该如何使用?为什么给ListView引入了一个滑动菜单的功能,ListView就不能滚动了?为什么图片轮播器里的图 ...
- Android AsyncTask完全解析,带你从源码的角度彻底理解
转载请注明出处:http://blog.csdn.net/guolin_blog/article/details/11711405 我们都知道,Android UI是线程不安全的,如果想要在子线程里进 ...
- 从源码的角度分析ViewGruop的事件分发
从源码的角度分析ViewGruop的事件分发. 首先我们来探讨一下,什么是ViewGroup?它和普通的View有什么区别? 顾名思义,ViewGroup就是一组View的集合,它包含很多的子View ...
- 第九节:从源码的角度分析MVC中的一些特性及其用法
一. 前世今生 乍眼一看,该标题写的有点煽情,最近也是在不断反思,怎么能把博客写好,让人能读下去,通俗易懂,深入浅出. 接下来几个章节都是围绕框架本身提供特性展开,有MVC程序集提供的,也有其它程序集 ...
随机推荐
- VR全景智慧城市
随着虚拟现实产业的发展,我国对虚拟现实产业也越来越重视了.我国虚拟现实VR市场增长速度很快,市场活跃性很高,很多人都看好我国的虚拟现实VR市场,而且未来国内虚拟现实VR市场的销量还将有更大的增长.据赛 ...
- Fragment回调接口应用间分享数据
package com.example.mydemo; import java.util.List; import android.app.Activity; import android.app.A ...
- 2017 UESTC Training for Graph Theory
图论姿势太弱,这套题做了好久.. A:枚举最短那条边,然后最小生成树那种操作,1 和 n 联通就算答案 B:考虑到假如我们能凑出x的话,那很明显我们也能凑出任意数表示x + ai,考虑选取一个ai,然 ...
- WannaflyUnion每日一题
---恢复内容开始--- 1. http://www.spoj.com/problems/KAOS/ 题意:给定n个字符串,统计字符串(s1, s2)的对数,使得s1的字典序比s2的字典序要大,s1反 ...
- struts2.1.6教程十二、总结
本教程对struts2的基本知识进行了一些说明,关于struts2的更多详细内容应参看struts2的官方文档及提供的app实例. 下面对struts2的基本执行流程作一简要说明,此流程说明可以结合官 ...
- Segmentation Faul
转自:http://www.cnblogs.com/panfeng412/archive/2011/11/06/segmentation-fault-in-linux.html
- python利用selenium和safari浏览器驱动实现新浪微博自动点赞 Demo
import time from selenium import webdriver browser = webdriver.Safari() browser.get('http://weibo.co ...
- TextView 实现跑马灯效果
在String.xml中添加: <string name="txt">跑马灯效果,我跑啊跑</string>在layout/mian.xml中添加TextV ...
- jQuery链式操作如何返回上一级DOM
有时候我们在链式操作的时候,选择到了其他的DOM进行操作,如何再返回先前的dom呢,有一下几个方法,end(); addBack(); add(); 使用形式 $("#divFather&q ...
- 动态添加Redis密码认证
如果redis已在线上业务使用中,但没有添加密码认证,那么如何在不影响业务服务的前提下给redis添加密码认证,就是一个需要仔细考虑的问题. 本文描述一种可行的方案,适用于客户端使用了jedis连接池 ...