.9-浅析webpack源码之NodeEnvironmentPlugin模块总览
介绍Compiler的构造比较无趣,不如先过后面的,在用到compiler的时候再做讲解。
这一节主要讲这行代码:
// 不管这里

compiler = new Compiler();

compiler.context = options.context;

compiler.options = options;

// 看这里

new NodeEnvironmentPlugin().apply(compiler);
这个构造了一个NodeEnvironmentPlugin对象并调用apply对compiler进行操作。
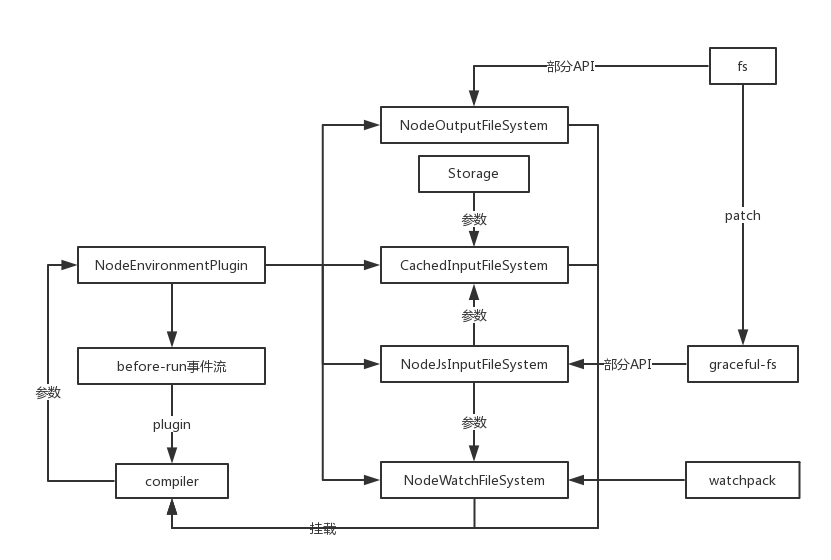
流程图:
模块源码如下:
"use strict";

const NodeWatchFileSystem = require("./NodeWatchFileSystem");

const NodeOutputFileSystem = require("./NodeOutputFileSystem");

const NodeJsInputFileSystem = require("enhanced-resolve/lib/NodeJsInputFileSystem");

const CachedInputFileSystem = require("enhanced-resolve/lib/CachedInputFileSystem");

class NodeEnvironmentPlugin {

    apply(compiler) {

        // 可以缓存输入的文件系统

        compiler.inputFileSystem = new CachedInputFileSystem(new NodeJsInputFileSystem(), 60000);

        const inputFileSystem = compiler.inputFileSystem;

        // 输出文件系统

        compiler.outputFileSystem = new NodeOutputFileSystem();

        // 监视文件系统

        compiler.watchFileSystem = new NodeWatchFileSystem(compiler.inputFileSystem);

        // 添加事件流before-run

        compiler.plugin("before-run", (compiler, callback) => {

            if (compiler.inputFileSystem === inputFileSystem)

                inputFileSystem.purge();

            callback();

        });

    }

}

module.exports = NodeEnvironmentPlugin;
除去添加事件流,其余几步都是在compiler对象上挂载node的fs文件系统,详细的API用法可以去nodejs官网看文档:https://nodejs.org/dist/latest-v8.x/docs/api/
这里只做简介:
NodeJsInputFileSystem
var fs = require("graceful-fs");

module.exports = NodeJsInputFileSystem;

// 获取文件信息

NodeJsInputFileSystem.prototype.stat = fs.stat.bind(fs);

// 读取目录内容

NodeJsInputFileSystem.prototype.readdir = function readdir(path, callback) {

    // files 是目录中不包括 '.' 和 '..' 的文件名的数组

    fs.readdir(path, function(err, files) {

        callback(err, files && files.map(function(file) {

            // 对文件名进行NFC格式化

            return file.normalize ? file.normalize("NFC") : file;

        }));

    });

};

// 读取文件

NodeJsInputFileSystem.prototype.readFile = fs.readFile.bind(fs);

// 读取链接

NodeJsInputFileSystem.prototype.readlink = fs.readlink.bind(fs);

// 同步方法

NodeJsInputFileSystem.prototype.statSync = fs.statSync.bind(fs);

NodeJsInputFileSystem.prototype.readdirSync = function readdirSync(path) {/**/};

NodeJsInputFileSystem.prototype.readFileSync = fs.readFileSync.bind(fs);

NodeJsInputFileSystem.prototype.readlinkSync = fs.readlinkSync.bind(fs);
可以看到,这里只是对引入的graceful-js的部分方法进行bind绑定,大概看一下graceful-fs的内容:
var fs = require('fs')

// ...工具方法

module.exports = patch(require('./fs.js'))

if (process.env.TEST_GRACEFUL_FS_GLOBAL_PATCH) {

    module.exports = patch(fs)

}

module.exports.close = fs.close = (function(fs$close) { /*...*/ })(fs.close)

module.exports.closeSync = fs.closeSync = (function(fs$closeSync) { /*...*/ })(fs.closeSync)

function patch(fs) {

    // fs方法二次封装

    return fs

}
跟名字一样,内部调用了一个patch对fs模块进行二次封装,变得更加'优雅'。
NodeOutputFileSystem
"use strict";

const fs = require("fs");

const path = require("path");

const mkdirp = require("mkdirp");

class NodeOutputFileSystem {

    constructor() {

        // 新建多层级文件夹

        this.mkdirp = mkdirp;

        // 新建单个文件夹

        this.mkdir = fs.mkdir.bind(fs);

        // 删除文件夹

        this.rmdir = fs.rmdir.bind(fs);

        // 删除文件

        this.unlink = fs.unlink.bind(fs);

        // 将内容写进某个文件

        this.writeFile = fs.writeFile.bind(fs);

        // 略

        this.join = path.join.bind(path);

    }

}

module.exports = NodeOutputFileSystem;
这个模块就十分亲民,都是原生的nodeAPI,并没有进行包装。
"use strict";

const Watchpack = require("watchpack");

class NodeWatchFileSystem {

    constructor(inputFileSystem) {

            this.inputFileSystem = inputFileSystem;

            this.watcherOptions = {

                aggregateTimeout: 0

            };

            this.watcher = new Watchpack(this.watcherOptions);

        }

        // 对文件进行监视

    watch(files, dirs, missing, startTime, options, callback, callbackUndelayed) { /*...*/ }

}

module.exports = NodeWatchFileSystem;
模块内容比较简单,引入一个inputFileSystem进行初始化监视对象,原型上只有一个watch方法。(实际内容非常深入和繁杂,后面再讲)
这个模块主要是为了接下来输出打包文件做准备,主要内容大部分是nodejs相关。
不过没关系,都是用JS写的。
.9-浅析webpack源码之NodeEnvironmentPlugin模块总览的更多相关文章
- .12-浅析webpack源码之NodeWatchFileSystem模块总览
剩下一个watch模块,这个模块比较深,先大概过一下整体涉及内容再分部讲解. 流程图如下: NodeWatchFileSystem const Watchpack = require("wa ...
- .3-浅析webpack源码之预编译总览
写在前面: 本来一开始想沿用之前vue源码的标题:webpack源码之***,但是这个工具比较巨大,所以为防止有人觉得我装逼跑来喷我(或者随时鸽),加上浅析二字,以示怂. 既然是浅析,那么案例就不必太 ...
- .6-浅析webpack源码之validateSchema模块
validateSchema模块 首先来看错误检测: const webpackOptionsValidationErrors = validateSchema(webpackOptionsSchem ...
- .4-浅析webpack源码之convert-argv模块
上一节看了一眼预编译的总体代码,这一节分析convert-argv模块. 这个模块主要是对命令参数的解析,也是yargs框架的核心用处. 生成默认配置文件名数组 module.exports = fu ...
- .15-浅析webpack源码之WebpackOptionsApply模块-plugin事件流总览
总体过了一下后面的流程,发现Compiler模块确实不适合单独讲解,这里继续讲解后面的代码: compiler.options = new WebpackOptionsApply().process( ...
- .14-浅析webpack源码之Watchpack模块
解决掉了最头疼的DirectoryWatcher内部实现,这一节可以结束NodeWatchFileSystem模块. 关于watch的应用场景,仔细思考了下,这不就是热重载的核心嘛. 首先是监视文件, ...
- .13-浅析webpack源码之WatcherManager模块
从模块流可以看出,这个NodeWatchFileSystem模块非常深,这里暂时不会深入到chokidar模块,有点太偏离本系列文章了,从WatcherManager开始讲解. 流程如图: 源码非常简 ...
- .11-浅析webpack源码之Storage模块
至此已完成NodeJsInputFileSysten模块的讲解,下一步就是实际实用的模块: compiler.inputFileSystem = new CachedInputFileSystem(n ...
- .10-浅析webpack源码之graceful-fs模块
在cachedInput.output.watch三大文件系统中,output非常简单,没有必要讲,其余两个模块依赖于input模块,而input主要是引用了graceful-fs的部分API,所以这 ...
随机推荐
- bug:未考虑实际使用场景
最近bug比较多,汗颜. 1.需求背景 (1)app活动页面,用户参与并完成能够以1分钱价格购买指定商品(2)这个页面可分享至app以外的渠道,如微信.QQ等 2.这个bug的表现形式:用户在第三方渠 ...
- java自动化-juint框架简述
本人使用的是java的juint框架来组织的自动化测试,故我这边需要简单介绍一下juint框架 首先,建议自行百度一下juint框架,先有一个大概的了解 所谓的接口自动化测试,会对多个接口中每一个接口 ...
- poj 2720 Last Digits
Last Digits Time Limit: 1000MS Memory Limit: 65536K Total Submissions: 2233 Accepted: 474 Descri ...
- NTP时间服务器 搭建
1.1 NTP简介 NTP(Network Time Protocol,网络时间协议)是用来使网络中的各个计算机时间同步的一种协议.它的用途是把计算机的时钟同步到世界协调时UTC,其精度在局域网内可达 ...
- hadoop命令
1.查看指定目录下内容 Hadoop dfs –ls [文件目录] eg: hadoop dfs –ls /user/wangkai.pt 2.打开某个已存在文件 hadoop dfs –cat [f ...
- Matrix 矩阵
CSS3中的矩阵指的是一个方法,书写为matrix()和matrix3d(),前者是元素2D平面的移动变换(transform),后者则是3D变换.2D变换矩阵为3*3, 如上面矩阵示意图:3D变换则 ...
- BPF漫谈
源起 最近看到国内两篇文章[1][2]先后翻译了就职于Netflix的性能分析大牛Brendan Gregg于2017年7月31日写的<Golang bcc/BPF Function Traci ...
- 入门到熟练-Eclipse开发工具
1. 概述 本文用于Eclipse说明开发功能的各种配置.希望可以帮助到对于Eclipse工具设置不同熟练的朋友,快速上手Eclipse开发工具. 2. Eclipse的配置 2.1. 设置Eclip ...
- Asp.Net MVC 使用 Ajax
Asp.Net MVC 使用 Ajax Ajax 简单来说Ajax是一个无需重新加载整个网页的情况下,可以更新局部页面或数据的技术(异步的发送接收数据,不会干扰当前页面). Ajax工作原理 Ajax ...
- docker下编译mangoszero WOW60级服务端(一)
这几天看到暴雪准备开放怀旧服的新闻,突然想到几年前用大芒果window一键服务端自己搭建过服务,就想着在Linux环境下重新编译一套,毕竟Linux作为服务端,性能和稳定性都会高一些,于是在mac虚拟 ...