Ubuntu下搭建Hyperledger Fabric v1.0环境
一、安装Ubuntu16
二、安装基础工具
注意操作用户是自建用户,不是root,特别一些命令涉及用户目录的地方要特别注意
首先安装一些常用工具
- sudo apt-get update
- sudo apt-get install ssh
- sudo apt-get install git
- sudo apt-get install python-pip
go需要单独安装下
- wget https://storage.googleapis.com/golang/go1.9.linux-amd64.tar.gz
- sudo tar -C /usr/local -xzf go1.9.linux-amd64.tar.gz
- gedit /etc/profile
编辑全局变量环境,添加一下profile
- export PATH=$PATH:/usr/local/go/bin
- export GOROOT=/usr/local/go
- export GOPATH=/home/<span style="color:#ff0000;">用户名</span>/go
- export PATH=$PATH:/home/<span style="color:#ff0000;">用户名</span>/go/bin
生效profile,建立go目录
- source /etc/profile
- mkdir /home/<spanstyle="color:#ff0000;">用户名</span>/go
此时酌情重启下系统
三、安装docker 基于aliyun
- sudo apt-get update
- sudo apt-get -y install apt-transport-https ca-certificates curl software-properties-common
- # step 2: 安装GPG证书
- curl -fsSL http://mirrors.aliyun.com/docker-ce/linux/ubuntu/gpg | sudo apt-key add -
- # Step 3: 写入软件源信息
- sudo add-apt-repository "deb [arch=amd64] http://mirrors.aliyun.com/docker-ce/linux/ubuntu $(lsb_release -cs) stable"
- # Step 4: 更新并安装 Docker-CE
- sudo apt-get -y update
- sudo apt-get -y install docker-ce
sudo usermod -aG docker XXX - sudo mkdir -p /etc/docker
- sudo gedit /etc/docker/daemon.json
- sudo systemctl daemon-reload
- sudo systemctl restart docker
四、安装 Docker-Compose 从DaoClound
- curl -L https://get.daocloud.io/docker/compose/releases/download/1.19.0/docker-compose-`uname -s`-`uname -m` > /usr/local/bin/docker-compose
- chmod +x /usr/local/bin/docker-compose
- docker-compose version
五.Fabric源码下载
- mkdir –p ~/go/src/github.com/hyperledger
- cd ~/go/src/github.com/hyperledger
- git clone https://github.com/hyperledger/fabric.git
- cd ~/go/src/github.com/hyperledger/fabric 进入fabric目录
- git checkout v1.0.0
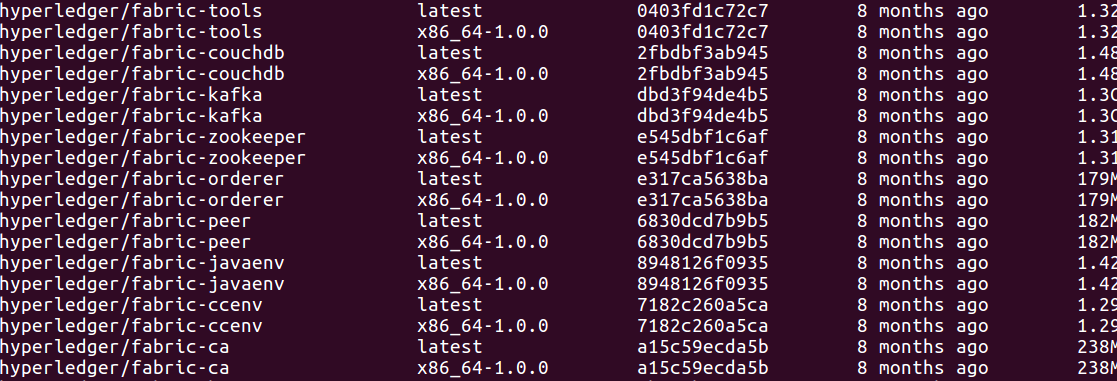
六. Fabric Docker镜像的下载
- cd ~/go/src/github.com/hyperledger/fabric/examples/e2e_cli/
- source download-dockerimages.sh -c x86_64-1.0.0 -f x86_64-1.0.0
- docker images
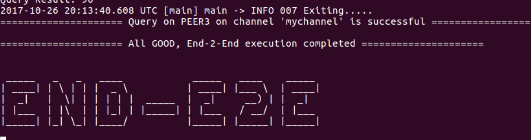
七、启动Fabric网络并完成ChainCode的测试
./network_setup.sh up- 编译生成Fabric公私钥、证书的程序,程序在目录:fabric/release/linux-amd64/bin
- 基于configtx.yaml生成创世区块和通道相关信息,并保存在channel-artifacts文件夹。
- 基于crypto-config.yaml生成公私钥和证书信息,并保存在crypto-config文件夹中。
- 基于docker-compose-cli.yaml启动1Orderer+4Peer+1CLI的Fabric容器。
- 在CLI启动的时候,会运行scripts/script.sh文件,这个脚本文件包含了创建Channel,加入Channel,安装Example02,运行Example02等功能。
出现则表示网络运行成功,ctrl+c退出
八、手动测试Fabric网络
这里有官方提供的小例子,在官方例子中,channel名字是mychannel,链码的名字是mycc。
首先进入CLI,然后重新打开一个命令行窗口,输入: docker exec -it cli bash
这时用户为root@748dafdc900b,在/opt/gopath/src/github.com/hyperledger/fabric/peer目录下,运行以下命令可以查询a账户的余额: peer chaincode query -C mychannel -n mycc -c '{"Args":["query","a"]}'
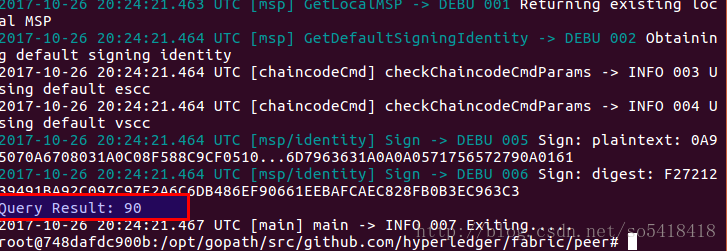
方框内可以看见余额为:90
下面我们可以进行转账操作,操作为invoke ,由a转b 50:
现在转账完毕, 我们试一试再查询一下a账户的余额,重复之前的查询指令,结果为:
结果正确,a的余额只有40了。
最后,我们需要关闭Fabric,这里先使用exit命令退出cli容器。 exit
然后类似于启动指令: cd ~/go/src/github.com/hyperledger/fabric/examples/e2e_cli ./network_setup.sh down

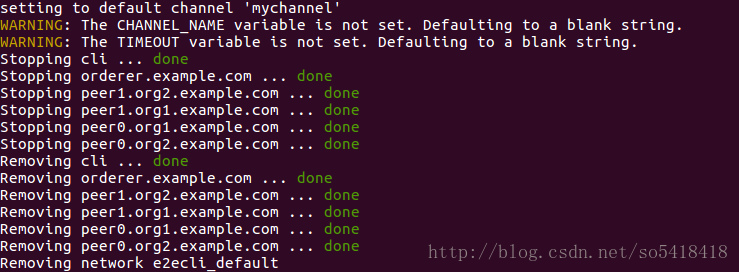
最后,我们整个Fabric的环境已经测试完毕!!
Ubuntu无法解析域名的解决办法:
Could not resolve host: download.docker.com
修改文件/etc/resolvconf/resolv.conf.d/base
vim /etc/resolvconf/resolv.conf.d/base

# 在该文件加上一行:

nameserver 8.8.8.8
resolvconf -u #执行
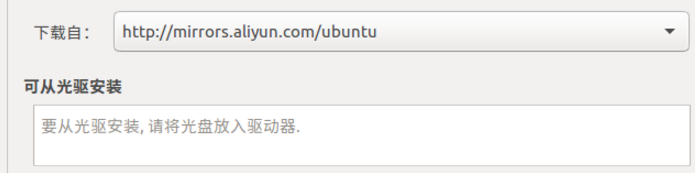
安装过程中如果出现网络连接错误,可以将软件源改成阿里云镜像
# 编辑/etc/apt/sources.list文件, 在文件最前面添加以下条目(适用于Ubuntu18.04)
deb http://mirrors.aliyun.com/ubuntu/ bionic main restricted universe multiverse

deb http://mirrors.aliyun.com/ubuntu/ bionic-security main restricted universe multiverse

deb http://mirrors.aliyun.com/ubuntu/ bionic-updates main restricted universe multiverse

deb http://mirrors.aliyun.com/ubuntu/ bionic-proposed main restricted universe multiverse

deb http://mirrors.aliyun.com/ubuntu/ bionic-backports main restricted universe multiverse

deb-src http://mirrors.aliyun.com/ubuntu/ bionic main restricted universe multiverse

deb-src http://mirrors.aliyun.com/ubuntu/ bionic-security main restricted universe multiverse

deb-src http://mirrors.aliyun.com/ubuntu/ bionic-updates main restricted universe multiverse

deb-src http://mirrors.aliyun.com/ubuntu/ bionic-proposed main restricted universe multiverse

deb-src http://mirrors.aliyun.com/ubuntu/ bionic-backports main restricted universe multiverse
#(适用于Ubuntu16.04)

deb-src http://archive.ubuntu.com/ubuntu xenial main restricted #Added by software-properties

deb http://mirrors.aliyun.com/ubuntu/ xenial main restricted

deb-src http://mirrors.aliyun.com/ubuntu/ xenial main restricted multiverse universe #Added by software-properties

deb http://mirrors.aliyun.com/ubuntu/ xenial-updates main restricted

deb-src http://mirrors.aliyun.com/ubuntu/ xenial-updates main restricted multiverse universe #Added by software-properties

deb http://mirrors.aliyun.com/ubuntu/ xenial universe

deb http://mirrors.aliyun.com/ubuntu/ xenial-updates universe

deb http://mirrors.aliyun.com/ubuntu/ xenial multiverse

deb http://mirrors.aliyun.com/ubuntu/ xenial-updates multiverse

deb http://mirrors.aliyun.com/ubuntu/ xenial-backports main restricted universe multiverse

deb-src http://mirrors.aliyun.com/ubuntu/ xenial-backports main restricted universe multiverse #Added by software-properties

deb http://archive.canonical.com/ubuntu xenial partner

deb-src http://archive.canonical.com/ubuntu xenial partner

deb http://mirrors.aliyun.com/ubuntu/ xenial-security main restricted

deb-src http://mirrors.aliyun.com/ubuntu/ xenial-security main restricted multiverse universe #Added by software-properties

deb http://mirrors.aliyun.com/ubuntu/ xenial-security universe

deb http://mirrors.aliyun.com/ubuntu/ xenial-security multiverse
运行sudo apt install curl 安装curl,此时如果出现如下错误:
E: Could not get lock /var/lib/dpkg/lock - open (11: Resource temporarily unavailable)

E: Unable to lock the administration directory (/var/lib/dpkg/), is another process using it?
解决方案:
ps -A |grep apt # 查看进程号

sudo kill -9 [processnumber]  #结束进程

sudo apt install curl
如果出现路径权限问题,需要将路径所有者改成自建用户,例如:
sudo chown -R dsd:dsd ./bin/ # 将目录所有者改为自建用户
如果提示已经有容器在运行,发生冲突,则应停止正在运行的docker进程:
docker ps -qa | xargs docker stop

docker ps -qa | xargs docker rm

# 或者:

./ network_setup.sh down
Make 编译出错如下
make configtxgen configtxlator cryptogen

Makefile:93: *** "No go in PATH: Check dependencies".  Stop.
解决方案:重新source环境变量,如:
source /etc/profile

# 或者:

source ~/.bashrc
教程参考以下:
http://blog.csdn.net/so5418418/article/details/78355868
https://yq.aliyun.com/articles/110806
http://get.daocloud.io/
Ubuntu下搭建Hyperledger Fabric v1.0环境 2018快速国内源
一、安装Ubuntu16
二、安装基础工具
注意操作用户是自建用户,不是root,特别一些命令涉及用户目录的地方要特别注意
首先安装一些常用工具
- sudo apt-get update
- sudo apt-get install ssh
- sudo apt-get install git
- sudo apt-get install python-pip
go需要单独安装下
- wget https://storage.googleapis.com/golang/go1.9.linux-amd64.tar.gz
- sudo tar -C /usr/local -xzf go1.9.linux-amd64.tar.gz
- gedit /etc/profile
编辑全局变量环境,添加一下profile
- export PATH=$PATH:/usr/local/go/bin
- export GOROOT=/usr/local/go
- export GOPATH=/home/<span style="color:#ff0000;">用户名</span>/go
- export PATH=$PATH:/home/<span style="color:#ff0000;">用户名</span>/go/bin
生效profile,建立go目录
- source /etc/profile
- mkdir /home/<spanstyle="color:#ff0000;">用户名</span>/go
此时酌情重启下系统
三、安装docker 基于aliyun
- sudo apt-get update
- sudo apt-get -y install apt-transport-https ca-certificates curl software-properties-common
- # step 2: 安装GPG证书
- curl -fsSL http://mirrors.aliyun.com/docker-ce/linux/ubuntu/gpg | sudo apt-key add -
- # Step 3: 写入软件源信息
- sudo add-apt-repository "deb [arch=amd64] http://mirrors.aliyun.com/docker-ce/linux/ubuntu $(lsb_release -cs) stable"
- # Step 4: 更新并安装 Docker-CE
- sudo apt-get -y update
- sudo apt-get -y install docker-ce
sudo usermod -aG docker XXX - sudo mkdir -p /etc/docker
- sudo gedit /etc/docker/daemon.json
- sudo systemctl daemon-reload
- sudo systemctl restart docker
四、安装 Docker-Compose 从DaoClound
- curl -L https://get.daocloud.io/docker/compose/releases/download/1.19.0/docker-compose-`uname -s`-`uname -m` > /usr/local/bin/docker-compose
- chmod +x /usr/local/bin/docker-compose
- docker-compose version
五.Fabric源码下载
- mkdir –p ~/go/src/github.com/hyperledger
- cd ~/go/src/github.com/hyperledger
- git clone https://github.com/hyperledger/fabric.git
- cd ~/go/src/github.com/hyperledger/fabric 进入fabric目录
- git checkout v1.0.0
六. Fabric Docker镜像的下载
- cd ~/go/src/github.com/hyperledger/fabric/examples/e2e_cli/
- source download-dockerimages.sh -c x86_64-1.0.0 -f x86_64-1.0.0
- docker images
七、启动Fabric网络并完成ChainCode的测试
./network_setup.sh up- 编译生成Fabric公私钥、证书的程序,程序在目录:fabric/release/linux-amd64/bin
- 基于configtx.yaml生成创世区块和通道相关信息,并保存在channel-artifacts文件夹。
- 基于crypto-config.yaml生成公私钥和证书信息,并保存在crypto-config文件夹中。
- 基于docker-compose-cli.yaml启动1Orderer+4Peer+1CLI的Fabric容器。
- 在CLI启动的时候,会运行scripts/script.sh文件,这个脚本文件包含了创建Channel,加入Channel,安装Example02,运行Example02等功能。
出现则表示网络运行成功,ctrl+c退出
八、手动测试Fabric网络
这里有官方提供的小例子,在官方例子中,channel名字是mychannel,链码的名字是mycc。
首先进入CLI,然后重新打开一个命令行窗口,输入: docker exec -it cli bash
这时用户为root@748dafdc900b,在/opt/gopath/src/github.com/hyperledger/fabric/peer目录下,运行以下命令可以查询a账户的余额: peer chaincode query -C mychannel -n mycc -c '{"Args":["query","a"]}'
方框内可以看见余额为:90
下面我们可以进行转账操作,操作为invoke ,由a转b 50:
现在转账完毕, 我们试一试再查询一下a账户的余额,重复之前的查询指令,结果为:
结果正确,a的余额只有40了。
最后,我们需要关闭Fabric,这里先使用exit命令退出cli容器。 exit
然后类似于启动指令: cd ~/go/src/github.com/hyperledger/fabric/examples/e2e_cli ./network_setup.sh down
最后,我们整个Fabric的环境已经测试完毕!!
教程参考以下:
http://blog.csdn.net/so5418418/article/details/78355868
https://yq.aliyun.com/articles/110806
http://get.daocloud.io/
Ubuntu下搭建Hyperledger Fabric v1.0环境的更多相关文章
- 在Ubuntu下搭建ASP.NET 5开发环境
在Ubuntu下搭建ASP.NET 5开发环境 0x00 写在前面的废话 年底这段时间实在太忙了,各种事情都凑在这个时候,没时间去学习自己感兴趣的东西,所以博客也好就没写了.最近工作上有个小功能要做成 ...
- 三、主流区块链技术特点及Hyperledger Fabric V1.0版本特点
一.Hyperledger fabric V1.0 架构 1.逻辑架构: 2.区块链网络 3.运行时架构 二.架构总结 1.架构要点 分拆Peer的功能,将Blockchain的数据维护和共识服务进行 ...
- 003-主流区块链技术特点及Hyperledger Fabric V1.0版本特点
一.Hyperledger fabric V1.0 架构 1.逻辑架构: 2.区块链网络 3.运行时架构 二.架构总结 1.架构要点 分拆Peer的功能,将Blockchain的数据维护和共识服务进行 ...
- Ubuntu16.04下安装Hyperledger Fabric 1.0.0
系统环境 * Ubuntu: 16.04 * Go: 1.9.2 * NodeJS: v6.12.0 * Docker: 17.09.0-ce * HyperLedger Fabric: 1.0.0 ...
- 区块链 Hyperledger Fabric v1.0.0 环境搭建
前言:最近项目涉及到超级账本,在有些理论知识的基础上,需要整一套环境来. 这是一个特别要注意的事情,笔者之前按照网络上推荐,大部分都是推荐ubuntu系统的,于是下载Ubuntu系统(16.04.5和 ...
- Ubuntu下配置Hyperledger Fabric环境
在win10系统的台式机上安装配置Hyperledger Fabric环境 安装Ubuntu 16.04 双系统 镜像下载地址:https://www.ubuntu.com/download/desk ...
- 安装hyperledger fabric V1.0.1
安装文档位置: https://github.com/hyperledger/fabric fabric代码托管地址 https://hyperledger-fabric.readthedoc ...
- 安装hyperledger fabric V1.0.0-beta
安装文档位置: https://github.com/hyperledger/fabric fabric代码托管地址 https://hyperledger-fabric.readthedoc ...
- ubuntu 下搭建apache+python的运行环境
ubuntu下怎么搭建apache+python运行环境,可以参考http://www.01happy.com/ubuntu-apache-mod-python/ ,这里只是简单的记录下步骤,本文主要 ...
随机推荐
- 【LOJ】 #2308. 「APIO2017」商旅
题解 分数题可以想到分数规划,我们预处理出从i到j卖什么货物赚的最多,然后把每条边的边权改成"利润 - 效率 × 时间" 用spfa找正环即可 代码 #include <bi ...
- P1855 榨取kkksc03 二维费用背包
Kkksc03的时间和金钱是有限的,所以他很难满足所有同学的愿望.所以他想知道在自己的能力范围内,最多可以完成多少同学的愿望? 输入输出格式 输入格式: 第一行,n M T,表示一共有n(n<= ...
- C语言中对数组名取地址
在C/C++中,数组名相当于一个指针,指向数组的首地址.这里“相当于”不代表等于,数组名和指针还是有很多区别的,这个在<C陷阱与缺陷>里有详尽的讲述.而这里要说的是对于数组名取地址的这么一 ...
- iOS技术篇:sizeToFit 和 sizeThatFits 区别
sizeToFit:会计算出最优的 size 而且会改变自己的size UILabel *label = [[UILabel alloc] initWithFrame:CGRectMake(, , , ...
- 容器(Container)Frames和Panels
Frames 1)是Window的子类 2)具有标题和缩放角 3)从容器继承并以add方式添加组件 4)能以字符串规定的标题来创建不可见框架对象 5)能将BorderLayout当做缺省布局管理器 6 ...
- Go面试题精编100题
Golang精编100题 选择题 1. [初级]下面属于关键字的是()A. funcB. defC. structD. class 参考答案:AC 2. [初级]定义一个包内全局字符串变量,下 ...
- JavaScript学习历程和心得体验
一.前言 在过去,JavaScript只是被用来做一些简单的网页效果,比如表单验证.浮动广告等,所以那时候JavaScript并没有受到重视.自从AJAX开始流行后,人们发现利用JavaScript可 ...
- j.u.c系列(09)---之并发工具类:CyclicBarrier
写在前面 CyclicBarrier是一个同步辅助类,允许一组线程互相等待,直到到达某个公共屏障点 (common barrier point).因为该 barrier 在释放等待线程后可以重用,所以 ...
- sqlserver2014内存数据库特性介绍
sql server 2014提供了众多激动人心的新功能,但其中我想最让人期待的特性之一就要算内存数据库了,下面就简单介绍一下sql server 2014的内存数据库的一些特性 相信大家对内存数 ...
- THE TOOLS TO MANAGE YOUR DATA ACROSS CLOUDS
http://blog.grexit.com/manage-data-across-clouds/ That the average small business uses a cloud servi ...