Spring框架系列(二)--装配和注入Bean
企业日常开发中,几乎都是Spring系的框架,无论是SSM、还是现在大火的SpringBoot,使用最大的目的就是简化开发
基本模块:
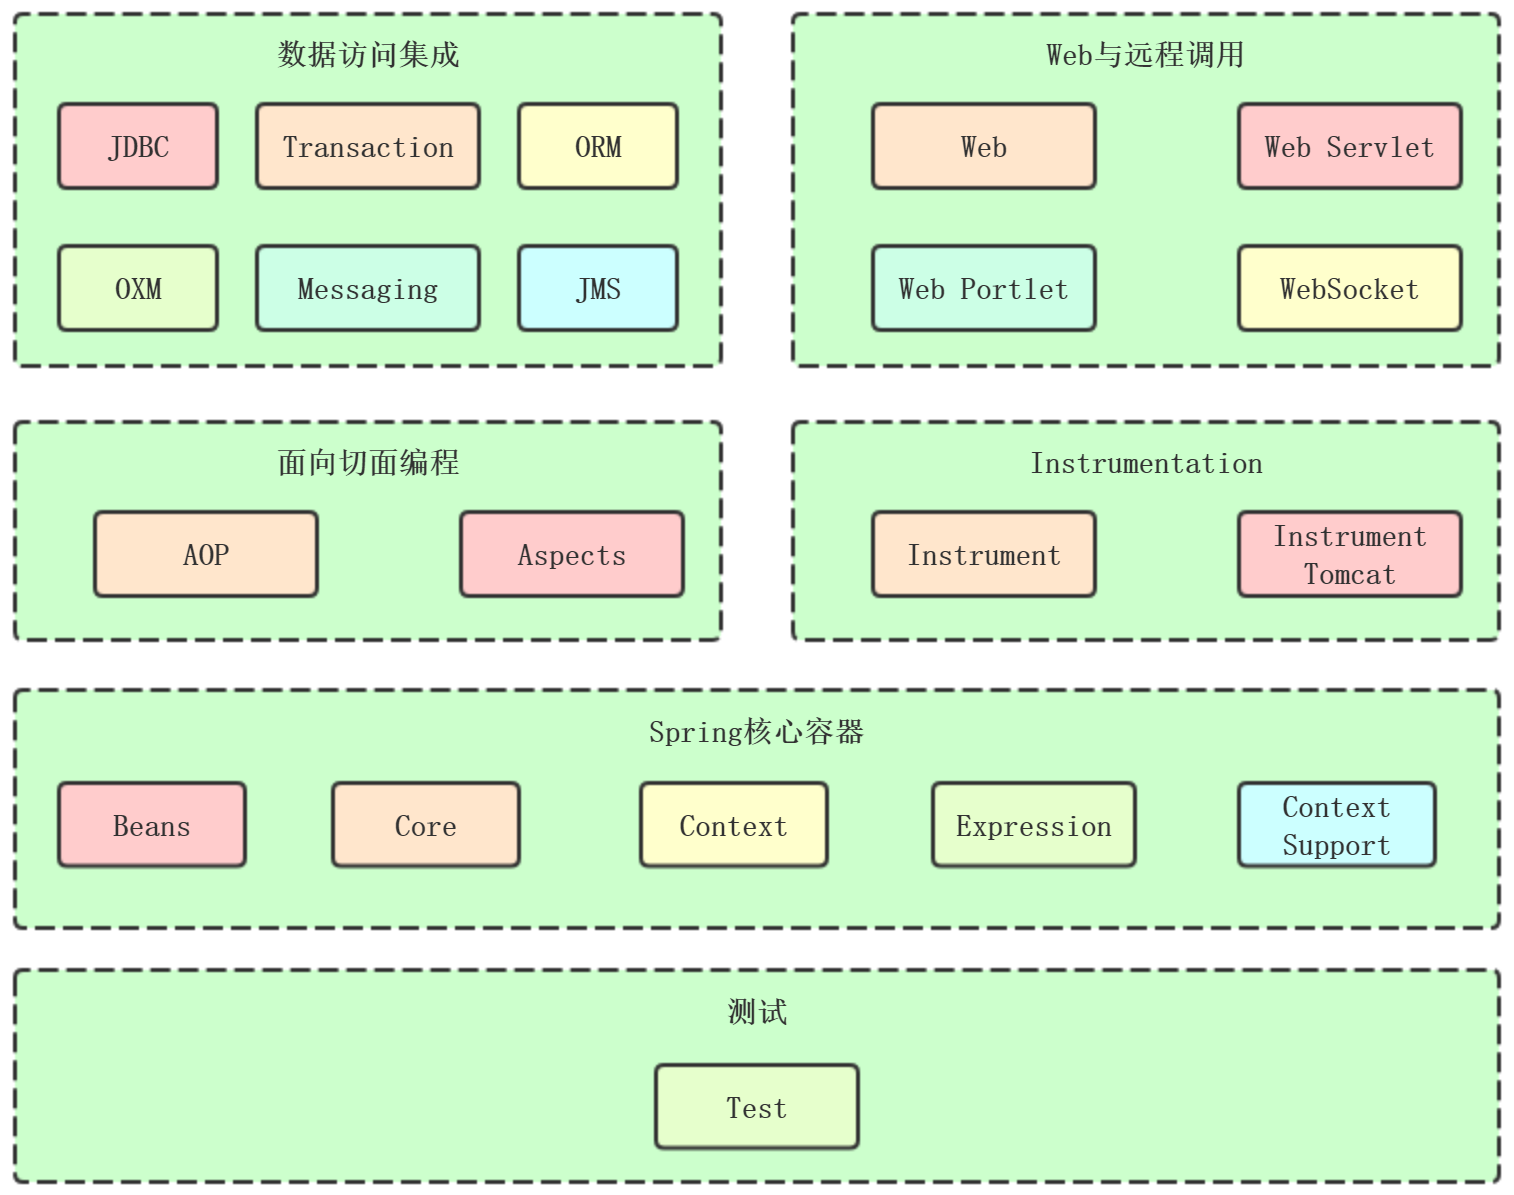
核心容器:Beans、Core、Context、SpEL
1. core和beans模块提供了整个框架最基础的部分,包括了IoC(控制反转)和Dependency Injection(依赖注入)。
2. Context建立在Core和Beans模块提供的基础之上:他提供了框架式访问对象的方式
3. core、beans、context构成了Spring的骨架
4. SpEL:提供了一种强大的用于在运行时操作对象的表达式语言
优点:
1、对象之间的依赖关系通过IOC容器进行管理,降低组件之间的耦合,不需要总是new一个对象
2、提供面向切面编程
3、功能丰富,Transaction、JDBC、WebSocket等
4、轻量级:大小和开销方面都是轻量级的
5、开放性很高,可以选择自己想要使用的功能
装配Bean
pojo的使用体现了非侵入式编程,通过DI进行装配
装配方式:
1、xml显式配置
2、java中显式配置
3、隐式的bean发现机制和自动装配
StudentDaoImpl.java
public class StudentDaoImpl implements StudentDao {

    @Override

    public void add() {

        System.out.println("add");

    }

    @Override

    public void del() {

        System.out.println("del");

    }

}
StudentServiceImpl.java
@Data

@AllArgsConstructor

public class StudentServiceImpl implements StudentService {

    private StudentRepository studentResponstory;

    @Override

    public void add() {

        System.out.println("add");

    }

    @Override

    public void del() {

        System.out.println("del");

    }

}
1、xml显式配置
Spring最开始的配置方式,相比注解装配和java配置比较麻烦
<?xml version="1.0" encoding="UTF-8"?>

<beans

    xmlns="http://www.springframework.org/schema/beans"

    xmlns:xsi="http://www.w3.org/2001/XMLSchema-instance"

    xmlns:context="http://www.springframework.org/schema/context"

    xsi:schemaLocation="http://www.springframework.org/schema/beans http://www.springframework.org/schema/beans/spring-beans.xsd

    http://www.springframework.org/schema/context http://www.springframework.org/schema/context/spring-context.xsd">

    <beans>

        <bean id="studentDao" class="com.it.dao.impl.StudentDaoImpl"/>

        <bean id="studentService" class="com.it.service.impl.StudentServiceImpl" >

            <constructor-arg ref="studentDao" />

        </bean>

    </beans>

</beans>
xml文件中首先要声明多个xml模式文件,这些xsd文件了配置spring xml元素
通过<bean>去配置,id如果省略的话,自动生成名称:"class内容"#0,可读性较差,一般主动声明,首字母要小写
2、自动化装配Bean
实现:
1、自动扫描@ComponentScan,自动发现应用上下文中所创建的 bean
2、自动装配@Autowired,自动满足 bean 之间的依赖
例如上面例子service和dao之间关系,dao上面都要通过@Component("StudentDao")声明是个组件,通过config的@ComponentScan去扫描(也可以
在xml配置扫描),通过@Autowired去自动注入
@Service

public class StudentServiceImpl implements StudentService {

    private StudentDao studentDao;

    @Override

    public void add() {

        studentDao.add();

    }

    @Override

    public void del() {

        studentDao.del();

    }

}
注入的方式一般有两种:
1、@Autowired,按类型注入,只能是当有且仅有一个匹配的Bean才可以,如果有多个,就需要和@Qualifier联合使用,确定唯一的实现类,相
比@Resource多一个required属性,如果等于false,即使没有发现这个bean,也不会抛出异常
2、@Resource,按名称注入,建议指明name值,@Resource(name="xxx"),这个注解是javax带有的,而不是Spring的注解
3、@RequiredArgsConstructor(onConstructor = @__(@Autowired)):基于lombok的注入,实际上通过构造器注入的方式,不需要为每个注入
的Bean书写@Autowired,只需要写在class的上面。而且对于某些IDE不识别的Bean,会爆红,例如MyBatis的Mapper注入,这种方式不会爆红。
@Autowired

public AddressServiceImpl(ModelMapper modelMapper, SupportAddressRepository supportAddressRepository) {

    this.modelMapper = modelMapper;

    this.supportAddressRepository = supportAddressRepository;

}
Bean注入/创建方式
1、XML配置
Student.java
@Data

@NoArgsConstructor

@AllArgsConstructor

public class Student {

    private int id;

    private String name;

    private int age;

}
1.1)属性注入,也就是setter注入
需要生成属性的set方法
<?xml version="1.0" encoding="UTF-8"?>

<beans

    xmlns="http://www.springframework.org/schema/beans"

    xmlns:xsi="http://www.w3.org/2001/XMLSchema-instance"

    xmlns:context="http://www.springframework.org/schema/context"

    xsi:schemaLocation="http://www.springframework.org/schema/beans http://www.springframework.org/schema/beans/spring-beans.xsd

    http://www.springframework.org/schema/context http://www.springframework.org/schema/context/spring-context.xsd">

    <beans>

        <bean id="student" class="com.it.entity.Student">

            <property name="id" value="1001" />

            <property name="name" value="sam" />

            <property name="age" value="25" />

        </bean>

    </beans>

</beans>
1.2)构造器注入
School.java
@Data

@AllArgsConstructor

public class School {

    private Student student;

}
<?xml version="1.0" encoding="UTF-8"?>

<beans

    xmlns="http://www.springframework.org/schema/beans"

    xmlns:xsi="http://www.w3.org/2001/XMLSchema-instance"

    xmlns:context="http://www.springframework.org/schema/context"

    xsi:schemaLocation="http://www.springframework.org/schema/beans http://www.springframework.org/schema/beans/spring-beans.xsd

    http://www.springframework.org/schema/context http://www.springframework.org/schema/context/spring-context.xsd">

    <beans>

        <bean id="student" class="com.it.entity.Student" />

        <bean id="school" class="com.it.entity.School" >

            <constructor-arg name="student" ref="student" />

        </bean>

    </beans>

</beans>
1.3)工厂方法注入:静态工厂和实例工厂
School.java
public class School {

    public Teacher createTeacher() {

        Teacher teacher = new Teacher();

        teacher.setId(1001);

        teacher.setName("sam");

        return teacher;

    }

    public static Teacher createTeacher1() {

        Teacher teacher = new Teacher();

        return teacher;

    }

}
<?xml version="1.0" encoding="UTF-8"?>

<beans

    xmlns="http://www.springframework.org/schema/beans"

    xmlns:xsi="http://www.w3.org/2001/XMLSchema-instance"

    xmlns:context="http://www.springframework.org/schema/context"

    xsi:schemaLocation="http://www.springframework.org/schema/beans http://www.springframework.org/schema/beans/spring-beans.xsd

    http://www.springframework.org/schema/context http://www.springframework.org/schema/context/spring-context.xsd">

    <beans>

        <bean id="school" class="com.it.entity.School" />

        <bean factory-bean="school" factory-method="createTeacher" />

        <bean id="school1" class="com.it.entity.School" factory-method="createTeacher1"/>

    </beans>

</beans>
2、基于Java类的bean定义
在任何一个配置类中通过@Bean实现创建Bean,适用于外部引用jar包
@Bean

public Gson gson() {

    return new Gson();

}
此时就可以通过@Autowired装配
3、基于注解
@Component:当对组件的层次难以定位的时候使用这个注解
@Controller:表示控制层的组件
@Service:表示业务逻辑层的组件
@Repository:表示数据访问层的组件
基于注解也是项目中使用最多的,只有在引用外部jar包才会采用第二种方式,尽量避免XML配置
Spring框架系列(二)--装配和注入Bean的更多相关文章
- Spring框架系列(8) - Spring IOC实现原理详解之Bean实例化(生命周期,循环依赖等)
上文,我们看了IOC设计要点和设计结构:以及Spring如何实现将资源配置(以xml配置为例)通过加载,解析,生成BeanDefination并注册到IoC容器中的:容器中存放的是Bean的定义即Be ...
- Spring框架(3)---IOC装配Bean(注解方式)
IOC装配Bean(注解方式) 上面一遍文章讲了通过xml来装配Bean,那么这篇来讲注解方式来讲装配Bean对象 注解方式需要在原先的基础上重新配置环境: (1)Component标签举例 1:导入 ...
- 使用spring框架,用xml方式进行bean装配出现“The fully qualified name of the bean's class, except if it serves...”
使用spring框架,用xml方式进行bean装配出现“The fully qualified name of the bean's class, except if it serves...”. 原 ...
- Spring框架系列(3) - 深入浅出Spring核心之控制反转(IOC)
在Spring基础 - Spring简单例子引入Spring的核心中向你展示了IoC的基础含义,同时以此发散了一些IoC相关知识点; 本节将在此基础上进一步解读IOC的含义以及IOC的使用方式.@pd ...
- Spring框架系列(6) - Spring IOC实现原理详解之IOC体系结构设计
在对IoC有了初步的认知后,我们开始对IOC的实现原理进行深入理解.本文将帮助你站在设计者的角度去看IOC最顶层的结构设计.@pdai Spring框架系列(6) - Spring IOC实现原理详解 ...
- Spring框架系列(7) - Spring IOC实现原理详解之IOC初始化流程
上文,我们看了IOC设计要点和设计结构:紧接着这篇,我们可以看下源码的实现了:Spring如何实现将资源配置(以xml配置为例)通过加载,解析,生成BeanDefination并注册到IoC容器中的. ...
- Spring框架系列之AOP思想
微信公众号:compassblog 欢迎关注.转发,互相学习,共同进步! 有任何问题,请后台留言联系! 1.AOP概述 (1).什么是 AOP AOP 为 Aspect Oriented Progra ...
- Spring框架系列(2) - Spring简单例子引入Spring要点
上文中我们简单介绍了Spring和Spring Framework的组件,那么这些Spring Framework组件是如何配合工作的呢?本文主要承接上文,向你展示Spring Framework组件 ...
- Spring框架系列(9) - Spring AOP实现原理详解之AOP切面的实现
前文,我们分析了Spring IOC的初始化过程和Bean的生命周期等,而Spring AOP也是基于IOC的Bean加载来实现的.本文主要介绍Spring AOP原理解析的切面实现过程(将切面类的所 ...
随机推荐
- Codeforces 216D Spider's Web 树状数组+模拟
题目链接:http://codeforces.com/problemset/problem/216/D 题意: 对于一个梯形区域,假设梯形左边的点数!=梯形右边的点数,那么这个梯形为红色.否则为绿色, ...
- initial ram filesystem
1 制作最简单的initramfs 1.1 创建init #include <stdio.h> int main() { printf ("\n"); printf ( ...
- ARP协议(4)ARP编程
之前的几篇文章,分别介绍了 ARP 协议格式,在vs2012里配置winpcap环境,我们该做的准备都已经做完了.如今我们真正来实现了. 一.定义数据结构 依据ARP的协议格式,设计一个ARP协议格式 ...
- 蓝桥 ADV-233 算法提高 队列操作 【STL】
算法提高 队列操作 时间限制:1.0s 内存限制:256.0MB 问题描述 队列操作题.根据输入的操作命令,操作队列(1)入队.(2)出队并输出.(3)计算队中元素个数并输出. ...
- ios29--多线程
进程是指在系统中正在运行的一个应用程序(一个程序可以对应多个进程).每个进程之间是独立的,每个进程均运行在其专用且受保护的内存空间内.比如同时打开迅雷.Xcode,系统就会分别启动2个进程.1个进程要 ...
- Weex 和 React Native 的比较看这里
写在前面 目前主流的应用大体分成三类:Native App, Web App, Hybrid App. Native App 特点: 性能好 完美的用户体验 开发成本高,无法跨平台 升级困难 (审核) ...
- 【HDU 1588】 Gauss Fibonacci
[题目链接] 点击打开链接 [算法] 要求 f(g(0)) + f(g(1)) + f(g(2)) + ... + f(g(n-1)) 因为g(i) = k * i + b 所以原式 = f(b) + ...
- MySQL-day1数据库的安装与介绍
一.mysql的安装步骤 以5.7.20版本为例: 第1步: 第2步: 第3步: 第4步: 第5步: 第6步: 第7步: 第8步: 第9步: 第10步: 第11步: 第12步: 第13步: 第14步: ...
- Asp.Net 文件下载1——流下载(适用于大文件且防盗链)(转)
使用流防盗链下载大文件 直接上 Asp.net 后置代码好了 using System; using System.Data; using System.Configuration; using Sy ...
- 什么是javascript闭包?
在我们开发中,也经常使用到闭包,但当有人问什么是闭包,就会可能说不上来.那就谈谈一些基本的: 一.理解闭包的概念, 简单说当function里嵌套function时,内部的function可以访问外部 ...