A Complete Guide to Usage of ‘usermod’ command– 15 Practical Examples with Screenshots
https://www.tecmint.com/usermod-command-examples/
--------------------------------------------------------------------------------------------------------------------------------------------------------------------------------
In Unix/Linux distributions, the command ‘usermod‘ is used to modify or change any attributes of a already created user account via command line. The command ‘usermod‘ is similar to that ‘useradd‘ or ‘adduser‘ but the login granted to an existing user.

15 usermod Command Examples
The command ‘useradd‘ or ‘adduser‘ is used for creating user accounts in Linux systems. To know more about on how to create system users, read our complete guide at:
After creating user accounts, in some scenarios where we need to change the attributes of an existing user such as, change user’s home directory, login name, login shell, password expiry date, etc, where in such case ‘usermod’ command is used.
When we execute ‘usermod‘ command in terminal, the following files are used and affected.
- /etc/passwd – User account information.
- /etc/shadow – Secure account information.
- /etc/group – Group account information.
- /etc/gshadow – Secure group account information.
- /etc/login.defs – Shadow password suite configuration..
Basic syntax of command is:
usermod [options] username
Requirements
- We must have existing user accounts to execute usermod command.
- Only superuser (root) is allowed to execute usermod command.
- The usermod command can be executed on any Linux distribution.
- Must have basic knowledge of usermod command with options
Options of Usermod
The ‘usermod‘ command is simple to use with lots of options to make changes to an existing user. Let us see how to use usermod command by modifying some existing users in Linux box with the help of following options.
- -c = We can add comment field for the useraccount.
- -d = To modify the directory for any existing user account.
- -e = Using this option we can make the account expiry in specific period.
- -g = Change the primary group for a User.
- -G = To add a supplementary groups.
- -a = To add anyone of the group to a secondary group.
- -l = To change the login name from tecmint to tecmint_admin.
- -L = To lock the user account. This will lock the password so we can’t use the account.
- -m = moving the contents of the home directory from existing home dir to new dir.
- -p = To Use un-encrypted password for the new password. (NOT Secured).
- -s = Create a Specified shell for new accounts.
- -u = Used to Assigned UID for the user account between 0 to 999.
- -U = To unlock the user accounts. This will remove the password lock and allow us to use the user account.
In this article we will see ‘15 usermod commands‘ with their practical examples and usage in Linux, which will help you to learn and enhance your command-line skills using these options.
1. Adding Information to User Account
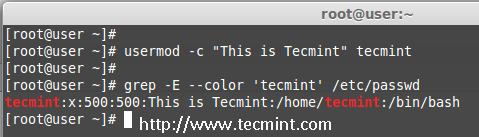
The ‘-c‘ option is used to set a brief comment (information) about the user account. For example, let’s add information on ‘tecmint‘ user, using the following command.
# usermod -c "This is Tecmint" tecmint
After adding information on user, the same comment can be viewed in /etc/passwd file.
# grep -E --color 'tecmint' /etc/passwd

tecmint:x:500:500:This is Tecmint:/home/tecmint:/bin/sh
Add Information to User
2. Change User Home Directory
In the above step we can see that our home directory is under /home/tecmint/, If we need to change it to some other directory we can change it using -d option with usermod command.
For example, I want to change our home directory to /var/www/, but before changing, let’s check the current home directory of a user, using the following command.
# grep -E --color '/home/tecmint' /etc/passwd

tecmint:x:500:500:This is Tecmint:/home/tecmint:/bin/sh
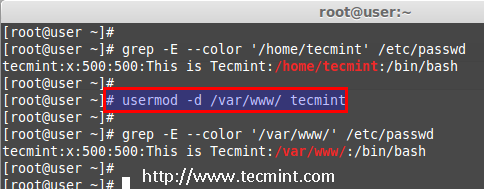
Now, change home directory from /home/tecmint to /var/www/ and confirm the home director after changing.
# usermod -d /var/www/ tecmint

# grep -E --color '/var/www/' /etc/passwd

tecmint:x:500:500:This is Tecmint:/var/www:/bin/sh
Change User Home Directory
3. Set User Account Expiry Date
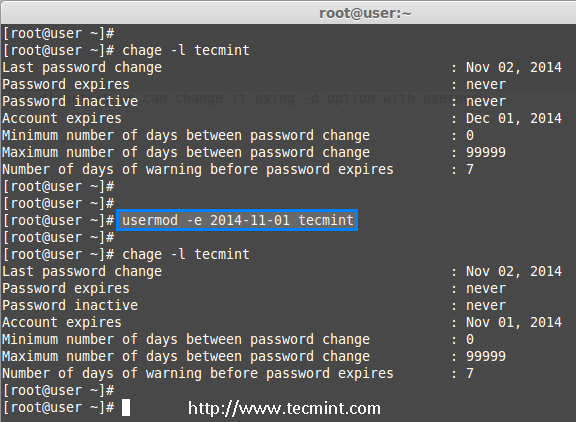
The option ‘-e‘ is used to set expiry date on a user account with the date format YYYY-MM-DD. Before, setting up an expiry date on a user, let’s first check the current account expiry status using the ‘chage‘ (change user password expiry information) command.
# chage -l tecmint

Last password change					: Nov 02, 2014

Password expires					: never

Password inactive					: never

Account expires						: Dec 01, 2014

Minimum number of days between password change		: 0

Maximum number of days between password change		: 99999

Number of days of warning before password expires	: 7
The expiry status of a ‘tecmint‘ user is Dec 1 2014, let’s change it to Nov 1 2014 using ‘usermod -e‘ option and confirm the expiry date with ‘chage‘ command.
# usermod -e 2014-11-01 tecmint

# chage -l tecmint

Last password change					: Nov 02, 2014

Password expires					: never

Password inactive					: never

Account expires						: Nov 01, 2014

Minimum number of days between password change		: 0

Maximum number of days between password change		: 99999

Number of days of warning before password expires	: 7
Set User Account Expiry Date
4. Change User Primary Group
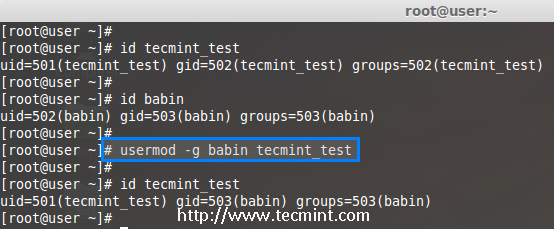
To set or change a user primary group, we use option ‘-g‘ with usermod command. Before, changing user primary group, first make sure to check the current group for the user tecmint_test.
# id tecmint_test

uid=501(tecmint_test) gid=502(tecmint_test) groups=502(tecmint_test)
Now, set the babin group as a primary group to user tecmint_test and confirm the changes.
# usermod -g babin tecmint_test

# id tecmint_test

uid=501(tecmint_test) gid=502(babin) groups=502(tecmint_test)
Change User Primary Group
5. Adding Group to an Existing User
If you want to add a new group called ‘tecmint_test0‘ to ‘tecmint‘ user, you can use option ‘-G‘ with usermod command as shown below.
# usermod -G tecmint_test0 tecmint

# id tecmint
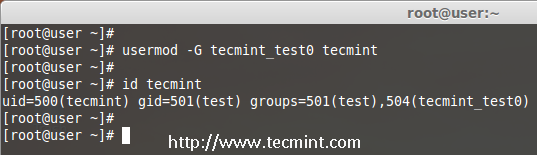
Add Group to User
Note: Be careful, while adding a new groups to an existing user with ‘-G’ option alone, will remove all existing groups that user belongs. So, always add the ‘-a‘ (append) with ‘-G‘ option to add or append new groups.
6. Adding Supplementary and Primary Group to User
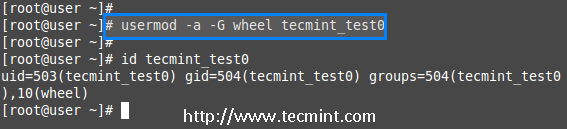
If you need to add a user to any one of the supplementary group, you can use the options ‘-a‘ and ‘-G‘. For example, here we going to add a user account tecmint_test0 with the wheel user.
# usermod -a -G wheel tecmint_test0

# id tecmint_test0
So, user tecmint_test0 remains in its primary group and also in secondary group (wheel). This will make my normal user account to execute any root privileged commands in Linux box.
eg : sudo service httpd restart
Add Multiple Groups to User
7. Change User Login Name
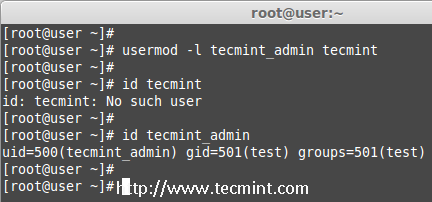
To change any existing user login name, we can use ‘-l‘ (new login) option. In the example below, we changing login name tecmint to tecmint_admin. So the username tecmint has been renamed with the new name tecmint_admin.
# usermod -l tecmint_admin tecmint
Now check for the tecmint user, It will not be present because we have changed it to tecmint_admin.
# id tecmint
Check for the tecmint_admin account it will be there with same UID and with existing group what we have added before.
# id tecmint_admin
Change User Login Name
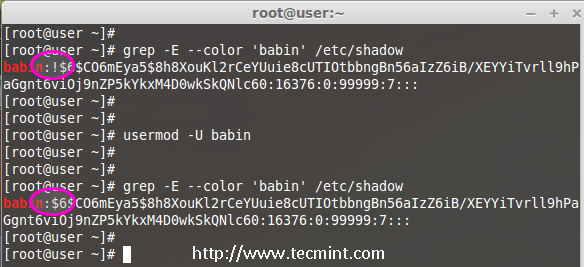
8. Lock User Account
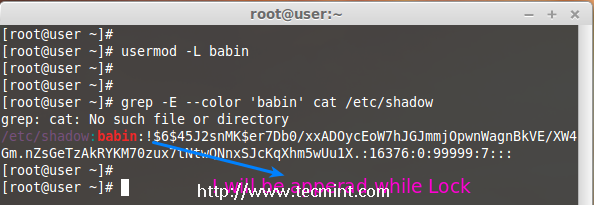
To Lock any system user account, we can use ‘-L‘ (lock) option, After the account is locked we can’t login by using the password and you will see a ! added before the encrypted password in /etc/shadow file, means password disabled.
# usermod -L babin
Check for the locked account.
# grep -E --color 'babin' cat /etc/shadow
Lock User Account
9. Unlock User Account
The ‘-U‘ option is used to unlock any locked user, this will remove the ! before the encrypted password.
# grep -E --color 'babin' /etc/shadow

# usermod -U babin
Verify the user after unlock.
# grep -E --color 'babin' /etc/shadow
Unlock User Account
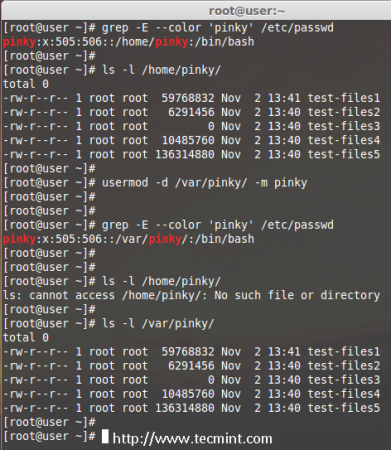
10. Move User Home Directory to New location
Let’s say you’ve a user account as ‘pinky‘ with home directory ‘/home/pinky‘, you want to move to new location say ‘/var/pinky‘. You can use the options ‘-d‘ and ‘-m‘ to move the existing user files from current home directory to a new home directory.
Check for the account and it’s current home directory.
# grep -E --color 'pinky' /etc/passwd
Then list the files which is owned by user pinky.
# ls -l /home/pinky/
Now we have to move the home directory from /home/pinky to /var/pinky.
# usermod -d /var/pinky/ -m pinky
Next, verify the directory change.
# grep -E --color 'pinky' /etc/passwd
Check for the files under ‘/home/pinky‘. Here we have moved the files using -m option so there will be no files. The pinky user files will be now under /var/pinky.
# ls -l /home/pinky/

# ls -l /var/pinky/
Move User Home Directory
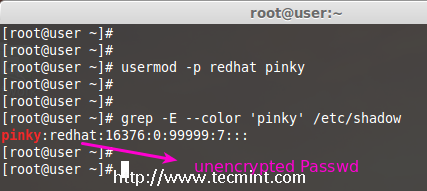
11. Create Un-encrypted Password for User
To create an un-encrypted password, we use option ‘-p‘ (password). For demonstration purpose, I’m setting a new password say ‘redhat’ on a user pinky.
# usermod -p redhat pinky
After setting password, now check the shadow file to see whether its in encrypted format or un-encrypted.
# grep -E --color 'pinky' /etc/shadow
Create Unencrypted User Password
Note: Did you see in the above image, the password is clearly visible to everyone. So, this option is not recommended to use, because the password will be visible to all users.
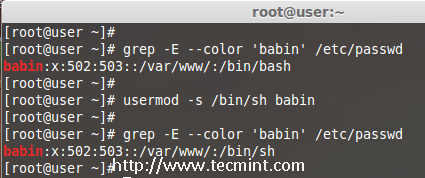
12. Change User Shell
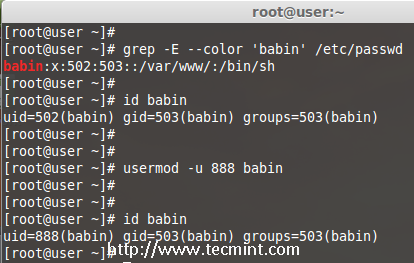
The user login shell can be changed or defined during user creation with useradd command or changed with ‘usermod‘ command using option ‘-s‘ (shell). For example, the user ‘babin‘ has the /bin/bash shell by default, now I want to change it to /bin/sh.
# grep -E --color 'babin' /etc/passwd

# usermod -s /bin/sh babin
After changing user shell, verify the user shell using the following command.
# grep -E --color 'babin' /etc/passwd
Change User Login Shell
13. Change User ID (UID)
In the example below, you can see that my user account ‘babin‘ holds the UID of 502, now I want to change it to 888 as my UID. We can assign UID between 0 to 999.
# grep -E --color 'babin' /etc/passwd

OR

# id babin
Now, let’s change the UID for user babin using ‘-u‘ (uid) option and verify the changes.
# usermod -u 888 babin

# id babin
Change User UID
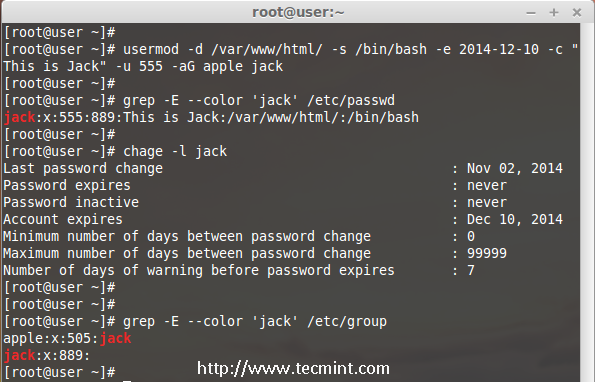
14. Modifying User Account with Multiple Options
Here we have a user jack and now I want to modify his home directory, shell, expiry date, label, UID and group at once using one single command with all options as we discussed above.
The user Jack has the default home directory /home/jack, Now I want to change it to /var/www/html and assign his shell as bash, set expiry date as December 10th 2014, add new label as This is jack, change UID to 555 and he will be member of apple group.
Let we see how to modify the jack account using multiple option now.
# usermod -d /var/www/html/ -s /bin/bash -e 2014-12-10 -c "This is Jack" -u 555 -aG apple jack
Then check for the UID & home directory changes.
# grep -E --color 'jack' /etc/passwd
Account expire check.
# chage -l jack
Check for the group which all jack have been member.
# grep -E --color 'jack' /etc/group
Using Multiple Options with usermod
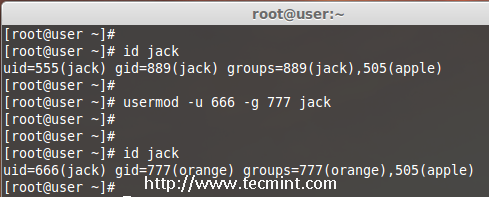
15. Change UID and GID of a User
We can change UID and GID of a current user. For changing to a New GID we need an existing group. Here already there is an account named as orange with GID of 777.
Now my jack user account want to be assigned with UID of 666 and GID of Orange (777).
Check for the current UID and GID before modifying.
# id jack
Modify the UID and GID.
# usermod -u 666 -g 777 jack
Check for the changes.
# id jack
Change User UID and GID
Conclusion
Here we have seen how to use usermod command with its options in very detailed fashion, Before knowing about usermod command, one should must know ‘useradd’ command and its options to use the usermod. If I’ve missed any point in the article do let me know via comments and don’t forget to add your valuable comments.
A Complete Guide to Usage of ‘usermod’ command– 15 Practical Examples with Screenshots的更多相关文章
- 15 Practical Grep Command Examples In Linux / UNIX
You should get a grip on the Linux grep command. This is part of the on-going 15 Examples series, wh ...
- 《Complete Guide to Value Investing》读书总结
大好的周末,决定写一篇读书笔记.:) 最近读了一些股票估值以及价值投资相关的文章和书籍.今天将其中的一本做一些笔记以及简单的总结. 该书名为<Complete Guide to Value In ...
- Regular Expressions in Grep Command with 10 Examples --reference
Regular expressions are used to search and manipulate the text, based on the patterns. Most of the L ...
- Complete Guide for Spring Boot Actuator
You are here to learn about Spring Boot Actuator for collecting metrics about your production grade ...
- the usage of linux command "expect"
#! /usr/bin/expect -f# this script is used to practise the command "expect" #when "li ...
- Ehcache(2.9.x) - API Developer Guide, Cache Usage Patterns
There are several common access patterns when using a cache. Ehcache supports the following patterns ...
- A Complete Guide to the <Picture> Element
If you’ve ever struggled building responsive websites, this post is for you. It’s part of a series o ...
- Flexbox完整指南- A Complete Guide to Flexbox
背景 Flexbox 布局 (FLexible Box)模块(现在处于W3C的最终征求意见稿(Last Call Working Draft)阶段)意在提供一个更为有效的方式来进行布局.对齐和分配一个 ...
- Udemy - Angular 2 - The Complete Guide 笔记
1. install > npm install -g angular-cli 2. create app > ng new first-app 3. build app > cd ...
随机推荐
- opencv函数之cv.InRange函数
2018-03-0421:22:46 (1)cv.InRange函数 void cvInRange(//提取图像中在阈值中间的部分 const CvArr* src,//目标图像const CvArr ...
- Typora——自定义设置
Typora提供自定义设置,在偏好设置里面,有一个主题文件夹,如果对界面的样式进行设定,可以添加一个css文件,命名规范是 github.user.css,下面代码会对h1~h4进行自动序列化 bod ...
- jq封装插件
$.extend()拓展方法: $(function(){ $.extend({ money:function(){ alert("我要努力赚钱") }, money:functi ...
- TypeError: 'TestCase' object is not iterable
这个异常呢其实是因为我对list没有足够熟悉 我一开始很疑惑,明明已经正确返回testcase对象了呀,为啥会报TypeError: 'TestCase' object is not iterable ...
- vs2013打包
C#打包需要这个:InstallShield 2013 Limited Edition for Visual Studio . 下载地址: InstallShield 2013 Limited Ed ...
- PHP封装数据库
(1)按照步骤封装数据库 ①引入抽象类和抽象方法,即引入模板: ②继承抽象类,注意参数(规定几个就传入几个): ③逐个写入抽象方法,必须一一对应:(抽象方法必须一一引入,否则会报错-->有个抽象 ...
- 08Java Server Pages 语法
Java Server Pages 语法 基础语法 注释 <!-- -->可以在客户端通过源代码看到:<%-- --%>在客户端通过查看源代码看不到. <!--浏 ...
- illuminate/routing 源码分析之注册路由
我们知道,在 Laravel 世界里,外界传进来一个 Request 时,会被 Kernel 处理并返回给外界一个 Response.Kernel 在处理 Request 时,会调用 illumina ...
- 怎么提交小程序给微信?微信小程序的提交审核流程
开发者开发好一款微信小程序后,如何将其提交给微信审核呢?今天正好有空,就整理了一下小程序的提交流程,以供大家参考.如果要发布小程序,那么你需要申请真正的小程序账号,拿到appId,才能在手机预览.及提 ...
- Xcode 出现Thread 1: signal SIGABRT
代码语言:C 出现原因:数组初始化时,循环赋值越界. 例 bool type [30]; for (int i = 0;i<100;i++) type = 0;