[UWP]使用AdaptiveTrigger实现自适应布局
这篇博客将介绍如何在UWP开发中使用AdaptiveTrigger实现自适应布局。
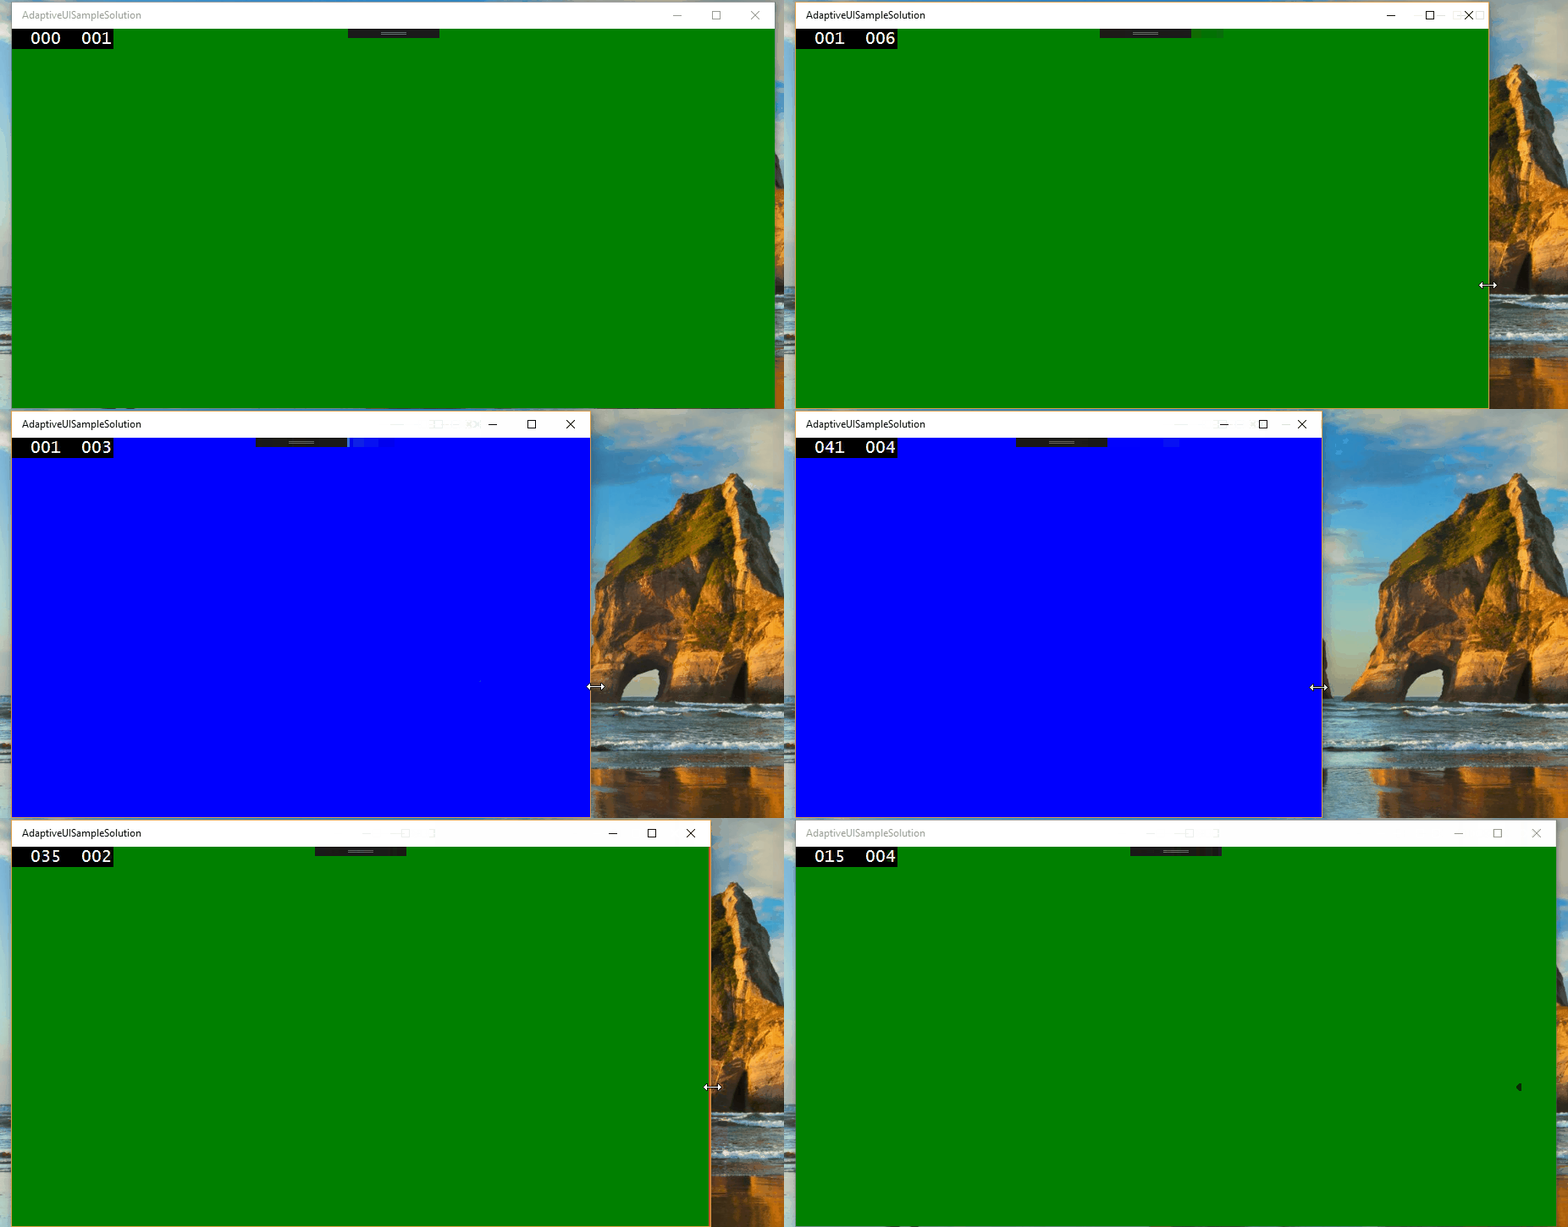
场景1:窗体宽度大于800时,窗体背景色为绿色,窗体在0到800之间为蓝色。

XAML Code:
<Grid x:Name="LayoutRoot" Background="{ThemeResource ApplicationPageBackgroundThemeBrush}">

    <VisualStateManager.VisualStateGroups>

        <VisualStateGroup x:Name="WindowStates">

            <!--Windows's size >= 800, background green-->

            <VisualState x:Name="WideState">

                <VisualState.StateTriggers>

                    <AdaptiveTrigger MinWindowWidth="800" />

                </VisualState.StateTriggers>

                <VisualState.Setters>

                    <Setter Target="LayoutRoot.Background" Value="Green" />

                </VisualState.Setters>

            </VisualState>

            <!--Windows's size >0 and < 800, background blue-->

            <VisualState x:Name="NarrowState">

                <VisualState.StateTriggers>

                    <AdaptiveTrigger MinWindowWidth="0" />

                </VisualState.StateTriggers>

                <VisualState.Setters>

                    <Setter Target="LayoutRoot.Background" Value="Blue" />

                </VisualState.Setters>

            </VisualState>

        </VisualStateGroup>

    </VisualStateManager.VisualStateGroups>

</Grid>
在VisualStateGroup中有两组VisualState对Grid的背景色进行了设置。
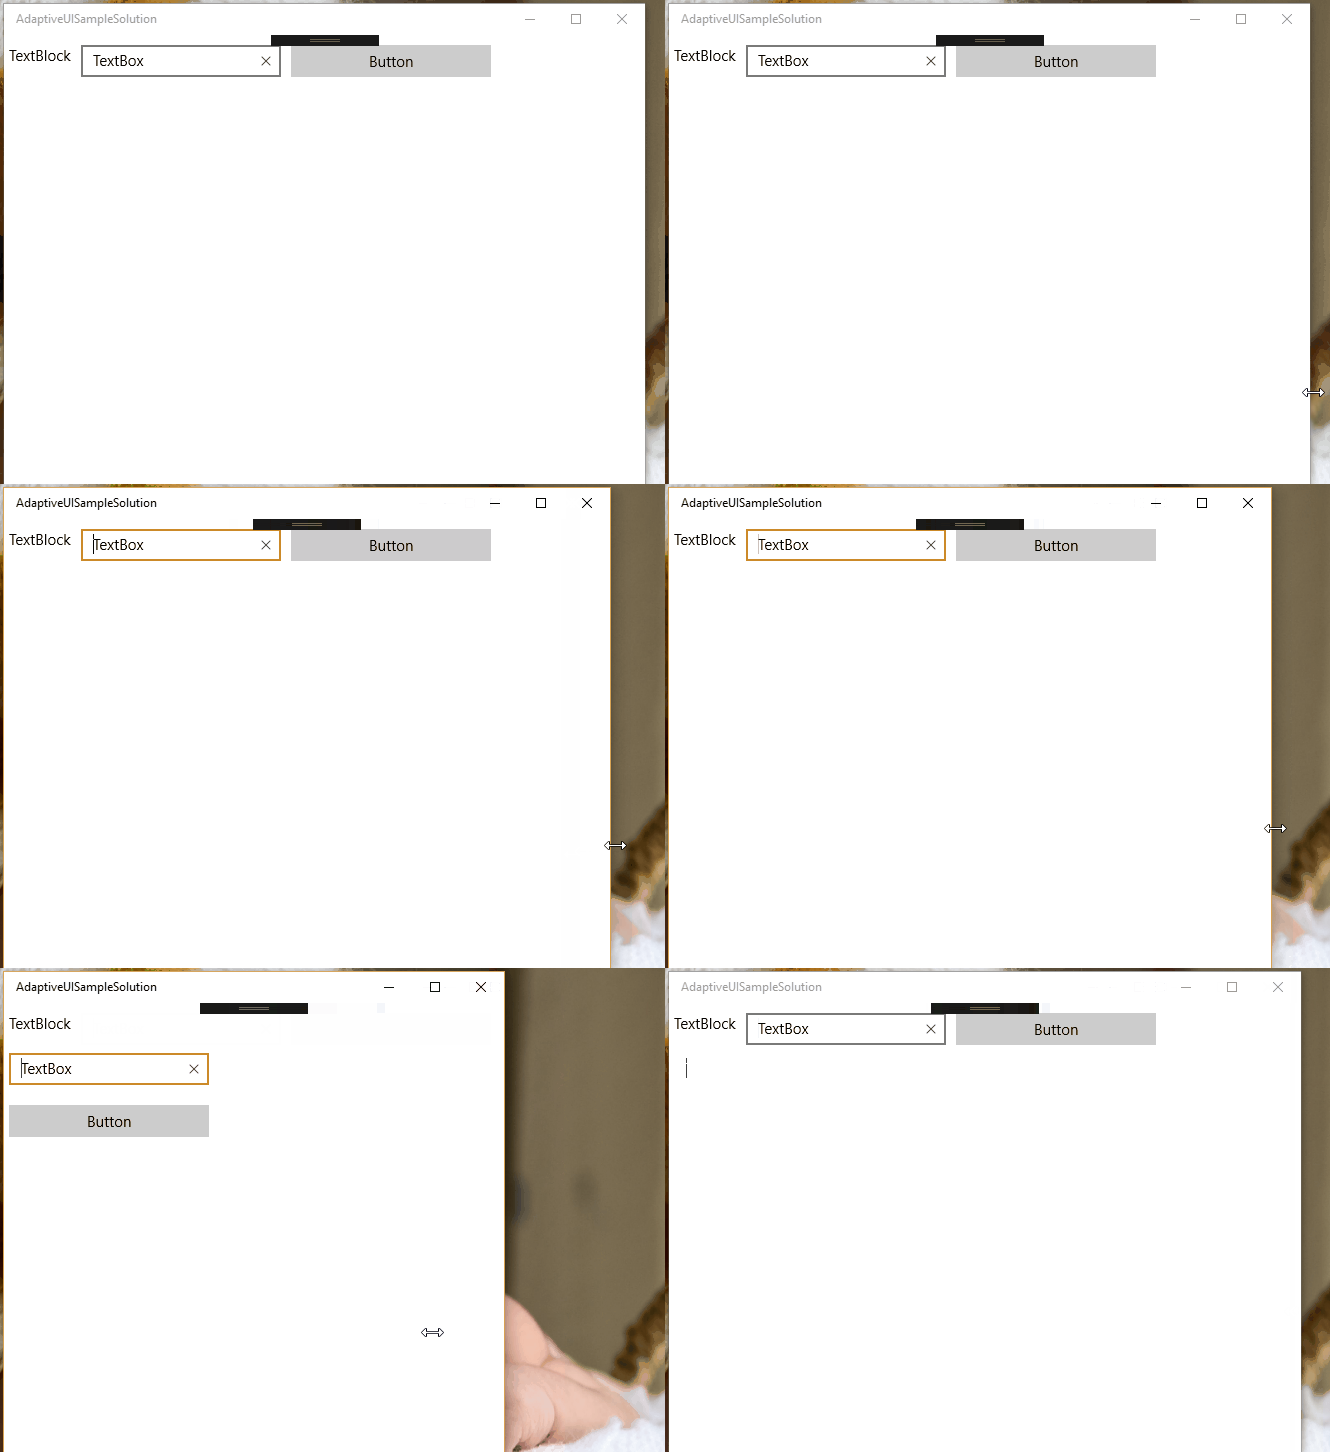
场景2:一个窗体上面有一个TextBlock,TextBox,Button。当窗体宽度合适时,这三个控件水平排放;缩小窗体后,垂直排放。

XAML Code:
<Grid x:Name="LayoutRoot" Background="{ThemeResource ApplicationPageBackgroundThemeBrush}">

    <RelativePanel HorizontalAlignment="Stretch">

        <TextBlock x:Name="MyTextBlock" Text="TextBlock" Margin="5,10"/>

        <TextBox x:Name="MyTextBox" Text="TextBox" Width="200" Margin="5,10"/>

        <Button x:Name="MyButton" Content="Button" Margin="5,10" Width="200" />

    </RelativePanel>

    <VisualStateManager.VisualStateGroups>

        <VisualStateGroup x:Name="WindowState">

            <VisualState x:Name="WideState">

                <VisualState.StateTriggers>

                    <AdaptiveTrigger MinWindowWidth="600" />

                </VisualState.StateTriggers>

                <VisualState.Setters>

                    <Setter Target="MyTextBox.(RelativePanel.RightOf)" Value="MyTextBlock" />

                    <Setter Target="MyButton.(RelativePanel.RightOf)" Value="MyTextBox" />

                </VisualState.Setters>

            </VisualState>

            <VisualState x:Name="NarrowState">

                <VisualState.StateTriggers>

                    <AdaptiveTrigger MinWindowWidth="0" />

                </VisualState.StateTriggers>

                <VisualState.Setters>

                    <Setter Target="MyTextBox.(RelativePanel.Below)" Value="MyTextBlock" />

                    <Setter Target="MyTextBox.(RelativePanel.AlignLeftWith)" Value="MyTextBlock" />

                    <Setter Target="MyButton.(RelativePanel.Below)" Value="MyTextBox" />

                    <Setter Target="MyButton.(RelativePanel.AlignLeftWith)" Value="MyTextBlock" />

                </VisualState.Setters>

            </VisualState>

        </VisualStateGroup>

    </VisualStateManager.VisualStateGroups>

</Grid>
VisualState.Setter的Target中RalativePanel的内容都用括号圈起来了是因为这些都是附加属性。这里同时引入了一个UWP支持的布局控件RelativePanel,关于RelativePanel布局,
可以参考:https://msdn.microsoft.com/en-us/library/windows/apps/windows.ui.xaml.controls.relativepanel.aspx
[UWP]使用AdaptiveTrigger实现自适应布局的更多相关文章
- UWP开发-自适应布局
了解css的人知道,对于不同的屏幕尺寸,css使用一种名为媒体查询的东东来适用不同的屏幕尺寸,以提升用户体验.当用户使用PC等大屏幕的设备时,网页将呈现一种布局形式:而当用户使用手机等小屏幕设备时,布 ...
- 微信小程序新单位rpx与自适应布局
rpx是微信小程序新推出的一个单位,按官方的定义,rpx可以根据屏幕宽度进行自适应,在rpx出现之前,web页面的自适应布局已经有了多种解决方案,为什么微信还捣鼓出新的rpx单位?在解释这个单位前,我 ...
- 这可能是史上最全的CSS自适应布局总结教程
标题严格遵守了新广告法,你再不爽,我也没犯法呀!话不多说,直入正题. 所谓布局,其实包含两个含义:尺寸与定位.也就是说,所有与尺寸和定位相关的属性,都可以用来布局. 大体上,布局中会用到的有:尺寸相关 ...
- css经典布局——头尾固定高度中间高度自适应布局
转载:穆乙 http://www.cnblogs.com/pigtail/ 相信做过后台管理界面的同学,都非常清楚这个布局.最直观的方式是框架这个我不想多写费话,因为我们的重心不在这里.如果有不了解的 ...
- 常见css水平自适应布局
左右布局,左边固定,右边自适应布局 BFC方法解决 <!DOCTYPE html PUBLIC "-//W3C//DTD XHTML 1.0 Transitional//EN" ...
- DIV+CSS自适应布局
自适应布局分两类:高度和宽度,方法有很多,我用三列布局举例,我就列几个通俗易懂的例子呗,懂了三列的,两列的原理一样,呵呵哒. 效果图如下:高度自适应——宽度自适应 1,高度自适应 ...
- BFC之宽度自适应布局篇
说到自适应布局,我们曾在“抛砖引玉之宽度自适应布局”一文中学习过.当时的核心思想主要是利用float+margin的形式.利用块状元素的流体特性,然后计算出float元素的宽度,并赋予到块状元素的相应 ...
- table-cell实现宽度自适应布局
利用table-cell可以实现宽度自适应布局. table-cell有一些比较好用的属性,比如垂直居中,自适应高度宽度等,为元素设置table-cell布局之后,元素的margin失效,paddin ...
- 自适应布局webkit-box的用法
Flexible Box Model(灵活盒子模型)在平常的web横排布局中,会经常用到float或display:inline-block,但是在多种不同宽度的移动设备的自适应布局中用的话,还得设置 ...
随机推荐
- Python 下载 tushare 数据,然后调用 C++ DLL 计算 wMA 存入本地 csv 文件再 python 读取
CMakeLists.txt project(wMA) add_library(wMA SHARED wMA.cpp) wMA.h #pragma once #ifndef WMA_WMA_H #de ...
- ecshop随机分类
$get_categories_tree = get_categories_tree(); $smarty->assign('category_1', RandArray($get_catego ...
- juery学习总结——例子
1.select元素在选择是找到选择的值和option中的值 <!DOCTYPE html> <html> <head lang="en"> & ...
- linux 命令 之判断表达式
摘自http://www.comptechdoc.org/os/linux/usersguide/linux_ugshellpro.html Tests There is a function pro ...
- Dom4j解析xml文件
dom4j是一个Java的XML API,类似于jdom,用来读取的XML文件,由于它是将文件解析完存放在内存当中的,所以不适合解析大的XML文件,但就方便性和性能方面,一定程度要优于JDK中Domc ...
- Linux学习之八--关闭firewall防火墙安装iptables并配置
CentOS 7之后默认使用的是firewall作为防火墙,这里改为iptables防火墙,并开启80端口.3306端口. 1.关闭firewall: systemctl stop firewalld ...
- Windows7安装 .net framework 4.0
1.首先下载安装包.net framework 4.0点击下载即可 2.安装,双击下载好的安装包
- bzoj4555题解
我们计算$f(i)=\sum_{j=1}^i S(i,j)\times 2^j\times (j!)$,容(o)易(e)知(i)道(s)$f(i)$的指数生成函数为$\frac{1}{3-2\time ...
- javascript 性能惰性加载2016.12.13
利用函数的惰性载入提高 javascript 代码性能 原文:利用函数的惰性载入提高javascript代码性能 作者:阿安 在 javascript 代码中,因为各浏览器之间的行为的差异,我们经常会 ...
- linux之netstat命令
netstat用于显示各种网络相关的信息,如网络连接,路由表接口状态(interface statistics), masquerade连接,多播成员(Multicast Memberships)等等 ...
