angular流程引擎集成
工作流在oa和erp中十分常见,现有成熟的工作流通常是在客户端实现的,web实现工作流的案例十分稀少。要实现web工作流必须要有强大的流程设计器,这里为大家介绍一款基于angular的流程控件,其功能十分强大,可直接开发在线流程设计工具。
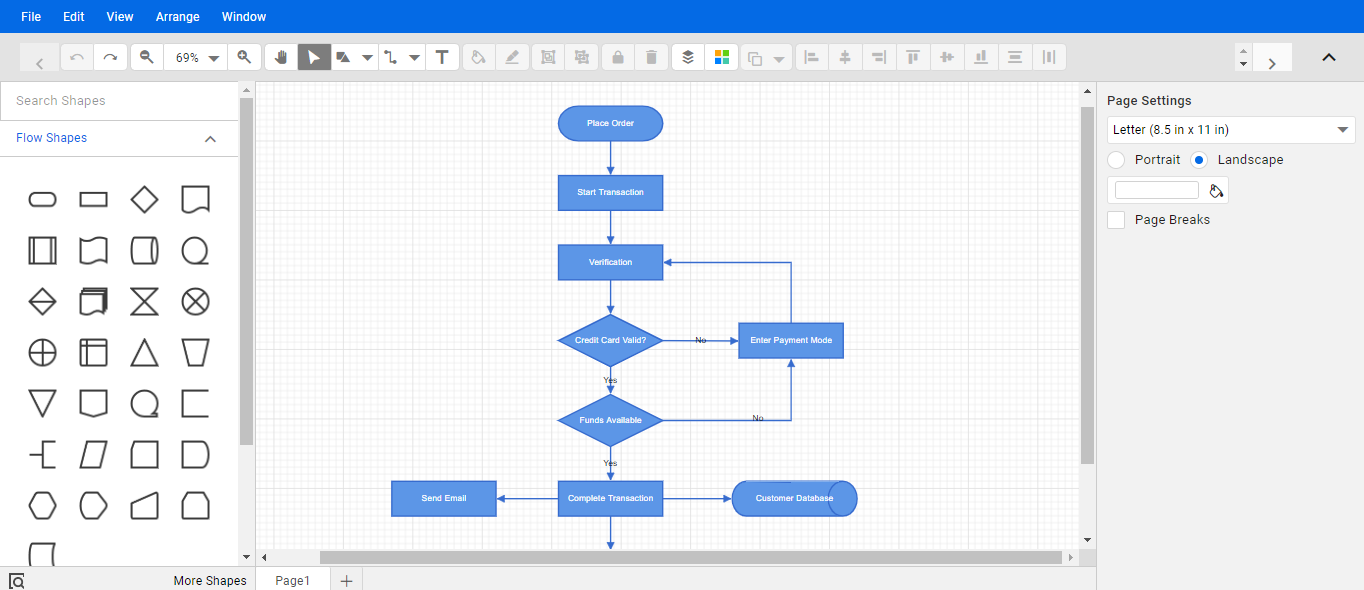
流程设计效果如下:
该流程工具使用的是syncfusion旗下的angular组件开发,需要先安装组件: @syncfusion/ej2-angular-diagrams
angular项目中添加demo-flow组件,在demo-flow目录中添加script文件夹,script中粘贴diagram-common.js
准备就绪后开始布局流程页面,布局代码如下:
<script src="script/diagram-common.ts"></script>
<div class="m-portlet m-portlet--mobile">
<div class="m-portlet__head">
<div class="m-portlet__head-caption">
<div class="m-portlet__head-title">
<h3 class="m-portlet__head-text">
流程设计测试
</h3>
</div>
</div>
</div>
<div class="diagram-serialization" style="width: 100%;height: 10%">
<ejs-toolbar width="100%" (clicked)="onClicked($event)">
<e-items>
<e-item text='New' tooltipText='New' prefixIcon='e-ddb-icons e-new'></e-item>
<e-item type='Separator'></e-item>
<e-item text='Save' tooltipText='Save' prefixIcon='e-ddb-icons e-save'></e-item>
<e-item type='Separator'></e-item>
<e-item text='Load' tooltipText='Load' prefixIcon='e-ddb-icons e-open'></e-item>
<e-item type='Separator'></e-item>
</e-items>
</ejs-toolbar>
</div>
<div style="width:100%;height: 80%">
<div id="palette-space" class="sb-mobile-palette">
<ejs-symbolpalette id="symbolpalette" [enableAnimation]='enableAnimation' [expandMode]='expandMode'
[palettes]='palettes' (created)='create($event)' width="100%" height="700px" [symbolHeight]=60
[symbolWidth]=60 [symbolMargin]='symbolMargin' [getSymbolInfo]='getSymbolInfo'
[getNodeDefaults]='getSymbolDefaults'>
</ejs-symbolpalette>
</div> <div id="diagram-space" class="sb-mobile-diagram">
<div class="content-wrapper">
<ejs-diagram #diagram id="diagram" width="100%" height="700px" [snapSettings]='snapSettings'
[getConnectorDefaults]='getConnectorDefaults' (doubleClick)="doubleClick($event)">
<e-nodes>
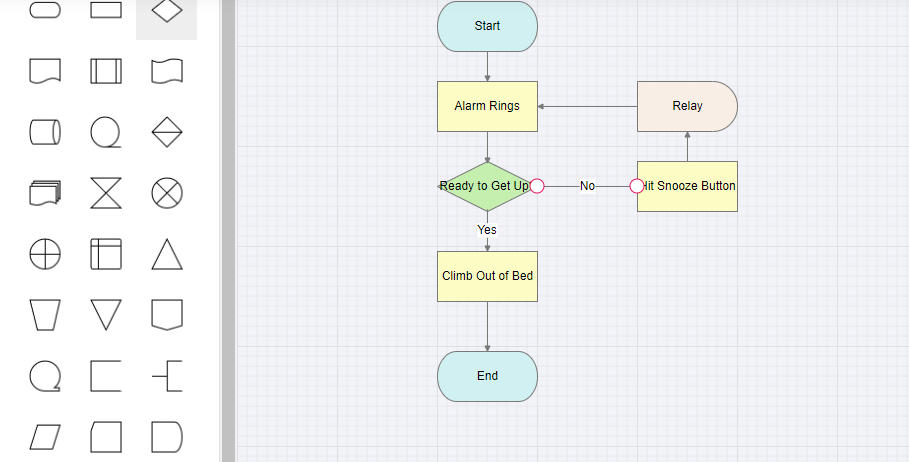
<e-node id='Start' [height]=50 [width]=100 [shape]='terminator' [offsetX]=250 [offsetY]=80
[style]='terminatorStyle'>
<e-node-annotations>
<e-node-annotation content='Start'>
</e-node-annotation>
</e-node-annotations>
</e-node>
<e-node id='Alarm' [height]=50 [width]=100 [shape]='process' [offsetX]=250 [offsetY]=160
[style]='processStyle'>
<e-node-annotations>
<e-node-annotation content='Alarm Rings'>
</e-node-annotation>
</e-node-annotations>
</e-node>
<e-node id='Ready' [height]=50 [width]=100 [shape]='decision' [offsetX]=250 [offsetY]=240
[style]='decisionStyle'>
<e-node-annotations>
<e-node-annotation content='Ready to Get Up?'>
</e-node-annotation>
</e-node-annotations>
</e-node>
<e-node id='Climb' [height]=50 [width]=100 [shape]='process' [offsetX]=250 [offsetY]=330
[style]='processStyle'>
<e-node-annotations>
<e-node-annotation content='Climb Out of Bed'>
</e-node-annotation>
</e-node-annotations>
</e-node>
<e-node id='End' [height]=50 [width]=100 [shape]='terminator' [offsetX]=250 [offsetY]=430
[style]='terminatorStyle'>
<e-node-annotations>
<e-node-annotation content='End'>
</e-node-annotation>
</e-node-annotations>
</e-node>
<e-node id='Relay' [height]=50 [width]=100 [shape]='delay' [offsetX]=450 [offsetY]=160
[style]='delayStyle'>
<e-node-annotations>
<e-node-annotation content='Relay'>
</e-node-annotation>
</e-node-annotations>
</e-node>
<e-node id='Hit' [height]=50 [width]=100 [shape]='process' [offsetX]=450 [offsetY]=240
[style]='processStyle'>
<e-node-annotations>
<e-node-annotation content='Hit Snooze Button'>
</e-node-annotation>
</e-node-annotations>
</e-node>
</e-nodes>
<e-connectors>
<e-connector id='connector1' sourceID='Start' targetID='Alarm'>
</e-connector>
<e-connector id='connector2' sourceID='Alarm' targetID='Ready'>
</e-connector>
<e-connector id='connector3' sourceID='Ready' targetID='Climb'>
<e-connector-annotations>
<e-connector-annotation content='Yes' [style]='connectorTextStyle'>
</e-connector-annotation>
</e-connector-annotations>
</e-connector>
<e-connector id='connector4' sourceID='Climb' targetID='End'>
</e-connector>
<e-connector id='connector5' sourceID='Ready' targetID='Hit'>
<e-connector-annotations>
<e-connector-annotation content='No' [style]='connectorTextStyle'>
</e-connector-annotation>
</e-connector-annotations>
</e-connector>
<e-connector id='connector6' sourceID='Hit' targetID='Relay'>
</e-connector>
<e-connector id='connector7' sourceID='Relay' targetID='Alarm'>
</e-connector>
</e-connectors>
</ejs-diagram>
</div>
<ejs-uploader #defaultupload id='fileupload' (success)='onUploadSuccess($event)'
[asyncSettings]='asyncSettings'></ejs-uploader>
</div>
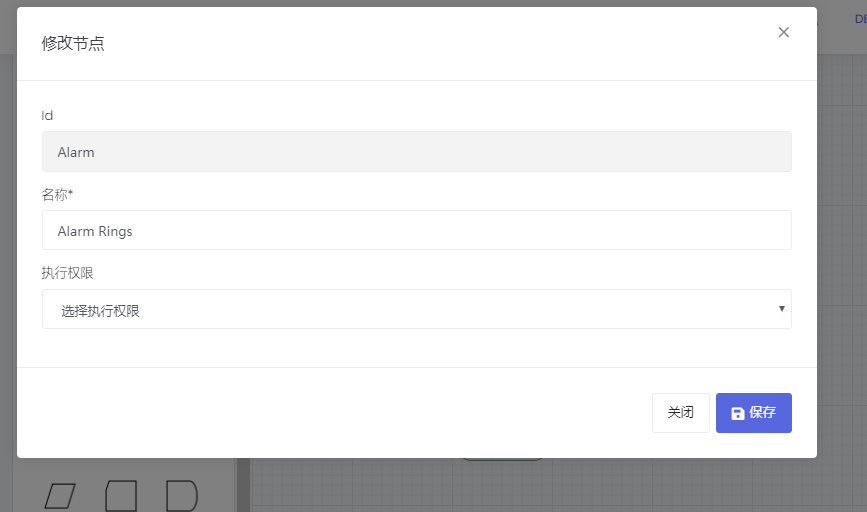
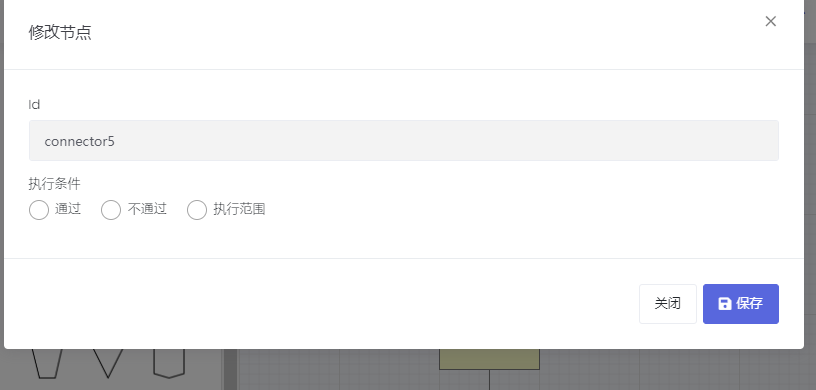
</div> <div bsModal #createOrEditModal="bs-modal" class="modal fade" tabindex="-1" role="dialog"
aria-labelledby="createOrEditModal" aria-hidden="true" [config]="{backdrop:'static'}">
<div class="modal-dialog modal-lg">
<div class="modal-content">
<div class="modal-header">
<h4 class="modal-title">
<span>修改节点</span>
</h4>
<button type="button" class="close" (click)="close()" attr.aria-label="关闭">
<span aria-hidden="true">×</span>
</button>
</div>
<div class="modal-body">
<div class="form-group">
<label>Id</label>
<input type="text" class="form-control" [(ngModel)]="selectItem.id" readonly>
</div>
<div class="form-group" [hidden]="selectItem.type!='node'">
<label>名称*</label>
<input type="text" class="form-control" [(ngModel)]="selectItem.name">
</div>
<div class="form-group" [hidden]="selectItem.type!='node'">
<label>执行权限</label>
<select class="form-control" [formControl]="selectedState">
<option value="">选择执行权限</option>
<option value="1">所有人</option>
<option value="2">指定角色</option>
</select>
</div>
<div class="form-group" [hidden]="selectItem.type!='node' || selectedState.value!='2'">
<label class="m-checkbox">
<input type="checkbox">
部门主管
<span></span>
</label>
<label class="m-checkbox">
<input type="checkbox">
部门经理
<span></span>
</label>
</div>
<div class="form-group" [hidden]="selectItem.type!='connector'">
<label>执行条件</label><br>
<p-radioButton name="radGroup" value="yes" label="通过" [(ngModel)]="condition"></p-radioButton>
<p-radioButton name="radGroup" value="no" label="不通过" [(ngModel)]="condition"></p-radioButton>
<p-radioButton name="radGroup" value="scope" label="执行范围" [(ngModel)]="condition"></p-radioButton>
</div>
<div class="form-row" [hidden]="selectItem.type!='connector' || condition!='scope'">
<div class="form-group col-md-4">
<label>运算符</label>
<select class="form-control" [formControl]="operator">
<option value="">选择运算符</option>
<option value="大于">大于</option>
<option value="小于">小于</option>
<option value="等于">等于</option>
</select>
</div>
<div class="form-group col-md-4">
<label class="">值</label>
<div class="">
<input type="number" [(ngModel)]="scopeValue" class="form-control" placeholder="值">
</div>
</div>
<div class="form-group col-md-4">
<label>单位</label>
<select class="form-control" [formControl]="unit">
<option value="">选择单位</option>
<option value="天">天</option>
<option value="小时">小时</option>
<option value="元">元</option>
</select>
</div>
</div> </div>
<div class="modal-footer">
<button type="button" class="btn btn-secondary" (click)="close()">关闭</button>
<button type="button" class="btn btn-primary" (click)="save()">
<i class="fa fa-save"></i><span>保存</span>
</button>
</div>
</div> </div>
</div>
</div>
流程页面模板中加入了双击节点和连接器的事件,如果要开发工作流必须要对事件作处理,仅开发流程设计器则需要取消双击事件以免影响使用。
事件处理如下:
    public doubleClick(args: IDoubleClickEventArgs): void {

        var node = this.diagram.selectedItems.nodes[0];

        var connector = this.diagram.selectedItems.connectors[0];

        if (node) {

            this.selectItem.id = node.id;

            this.selectItem.name = node.annotations[0].content;

            this.selectItem.type = 'node';

            this.modal.show();

        }

        if (connector) {

            this.selectItem.id = connector.id;

            this.selectItem.name = connector.annotations[0].content;

            this.selectItem.type = 'connector';

            this.modal.show();

        }

    }

    save(): void {

        if (this.diagram.selectedItems.nodes[0]) {

            this.diagram.selectedItems.nodes[0].annotations[0].content = this.selectItem.name;

            this.close();

        }

        if (this.diagram.selectedItems.connectors[0]) {

            if(this.condition=='yes'){

                this.diagram.selectedItems.connectors[0].annotations[0].content="通过";

            }

            if(this.condition=='no'){

                this.diagram.selectedItems.connectors[0].annotations[0].content="不通过";

            }

            if(this.condition=='scope'){

                this.diagram.selectedItems.connectors[0].annotations[0].content=this.operator.value+' '+this.scopeValue+' '+this.unit.value;

            }

            this.close();

        }

    }

    close(): void {

        this.modal.hide();

    }
流程器显示和双击功能如下:
到这里angular的流程设计器已经介绍完毕,要实现工作流机制需要针对自己的系统作表单设计和业务关联,相关的实现文档有很多,这里就不过多介绍了。目前功能还比较粗糙,优化完后我会对这些功能进行开源,感兴趣的可以后续关注。
angular流程引擎集成的更多相关文章
- .NET 开源工作流: Slickflow流程引擎高级开发(七)--消息队列(RabbitMQ)的集成使用
前言:工作流流程过程中,除了正常的人工审批类型的节点外,事件类型的节点处理也尤为重要.比如比较常见的事件类型的节点有:Timer/Message/Signal等.本文重点阐述消息类型的节点处理,以及实 ...
- 基于开源流程引擎开发BPM或OA有哪些难点
前言 如何基于开源流程引擎开发OA系统?开源流程引擎哪个好?把它整合到自己的产品里难不难,有没有啥风险?这是大家经常遇到的问题.笔者从2006年开始参与流程引擎开发,经历了三代流程引擎研发,支 ...
- .NET 开源工作流: Slickflow流程引擎高级开发(十) -- BpmnJS流程设计器集成
前言: 在Slickflow产品开发过程中,前端流程设计器经历了几个不同的版本(jsPlumb, mxGraph等),目的是为了在设计流程时的用户体验更加良好,得到客户的好评和认可.BpmnJS流程设 ...
- Fixflow引擎解析(一)(介绍) - Fixflow开源流程引擎介绍
Fixflow引擎解析(四)(模型) - 通过EMF扩展BPMN2.0元素 Fixflow引擎解析(三)(模型) - 创建EMF模型来读写XML文件 Fixflow引擎解析(二)(模型) - BPMN ...
- 从零开始学习和改造activiti流程引擎的13天,自己记录一下
day#1(11.13) 尝试通过spring boot 集成最新版activiti 7,但是苦于官方的文档基本为空,无法完成spring boot的配置,最终按照activiti 6的文档,手工初始 ...
- 关于广州xx公司对驰骋BPM, 流程引擎表单引擎 常见问题解答
关于广州xx公司对驰骋BPM, 流程引擎表单引擎 常见问题解答 @驰骋工作流,ccflow周朋 周总早, ccflow 功能很强大,在体验过程中,以下几个问题需沟通下: 先使用.net 再使用java ...
- 低代码平台--基于surging开发微服务编排流程引擎构思
前言 微服务对于各位并不陌生,在互联网浪潮下不是在学习微服务的路上,就是在使用改造的路上,每个人对于微服务都有自己理解,有用k8s 就说自己是微服务,有用一些第三方框架spring cloud, du ...
- 项目实践之工作流引擎基本文档!Activiti工作流框架中流程引擎API和服务详解
流程引擎的API和服务 流程引擎API(ProcessEngine API)是与Activiti打交道的最常用方式 Activiti从ProcessEngine开始.在ProcessEngine中,可 ...
- 开源流程引擎osworkflow、jbpm、activiti、flowable、camunda哪个好?
市场上比较有名的开源流程引擎有osworkflow.jbpm.activiti.flowable.camunda.其中:Jbpm4.Activiti.Flowable.camunda四个框架同宗同源, ...
随机推荐
- 简单wait(),notify()方法
1.两个类public class Name{ public static void main(String[] args) throws InterruptedException { User us ...
- .net 开源 FTP 组件 edtFTPnet
edtFTPnet官方网站:http://www.enterprisedt.com/products/edtftpnet/ 目前最新版本为2.2.3,下载后在bin目录中找到edtFTPnet.dll ...
- vue的特点 关键字
1.对mvvm模式的理解 Model-view-viewmodel Model数据模型 View代表ui组件 Viewmodel监听模型数据的改变和控制视图行为.处理用户交互,简单理解就是一个同步vi ...
- Python学习笔记——以函数为参数的内置函数
1.用法 一个参数 def ds(x): return 2 * x + 1 print(ds(5)) 11 g = lambda x : 2 * x + 1 print(g(5)) 11 两个参数 d ...
- Linux配置文件的修改
在很多时候,我们需要对Linux的配置文件进行修改.此时就涉及到了不同Linux发行版的修改配置问题.下面就以主流的几个操作系统(Unix:Solaris,Linux:Ubuntu,Redhat)作为 ...
- My life
突然想到的好笑的: 1. 世界上一共有10种人,一种是男人,另一种是女人 2. 吐槽一个网站的域名: 你这网站域名取得,跟色情网站似的 明知这是一场意外,你要不要来,明知这是一场重伤害,你会不会来: ...
- Design Linked List
Design your implementation of the linked list. You can choose to use the singly linked list or the d ...
- Minimum Cost For Tickets
In a country popular for train travel, you have planned some train travelling one year in advance. ...
- k8s之statefulSet-有状态应用副本集控制器
1.概述 无状态应用更关注群体,任何一个成员都可以被取代,有状态应用关注的是个体.用deployment控制器管理的nginx.myapp等都属于无状态应用,像mysql.redis.zookeepe ...
- CVPR2019目标检测方法进展综述
CVPR2019目标检测方法进展综述 置顶 2019年03月20日 14:14:04 SIGAI_csdn 阅读数 5869更多 分类专栏: 机器学习 人工智能 AI SIGAI 版权声明:本文为 ...