day15 CSS JS DOM初探
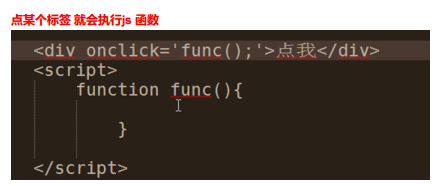
2 写动作JS
写一个悬浮菜单:
<!DOCTYPE html>
<html lang="en">
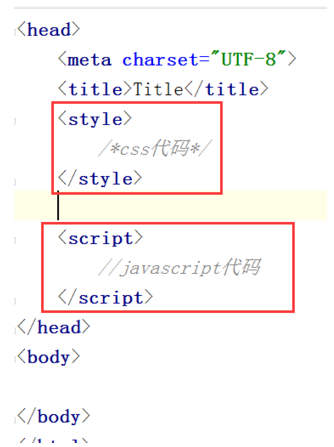
<head>
<meta charset="UTF-8">
<title>Title</title>
<style>
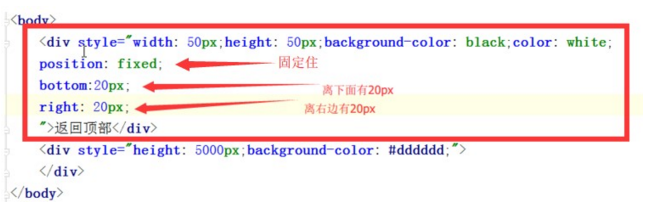
.pg-header{
margin: 0 auto;
height: 48px;
width:980px;
background-color: aquamarine;
color: coral;
position: fixed;
top: 0;
left: 20px;
right: 20px;
line-height: 48px;
text-align: center;
}
.pg-body{
margin: 0 auto;
background-color: #dddddd;
width:980px;
height: 5000px;
margin-top: 50px;
}
</style>
</head>
<body>
<div class="pg-header">此处为菜单</div>
<div class="pg-body">此处为内容</div>
</body>
</html>
效果:
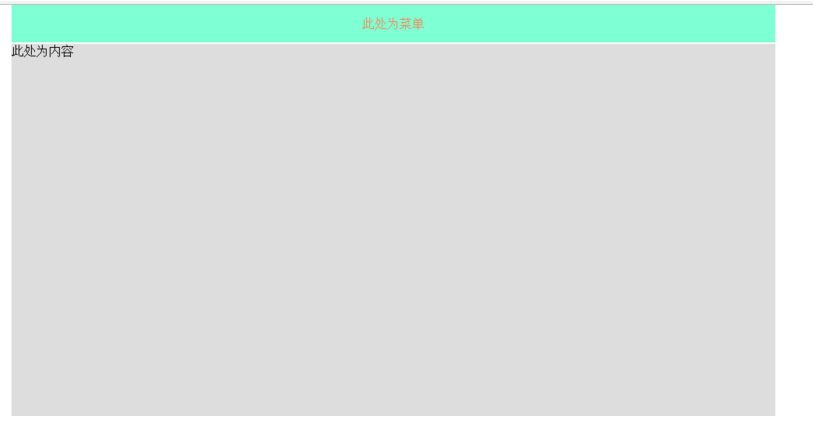
上下滚动菜单始终固定在顶部
实现一个点赞按钮的效果:
<!DOCTYPE html>

<html lang="en">

<head>

    <meta charset="UTF-8">

    <title>Title</title>

</head>

<body>

    <div style="position: relative;width: 500px;height: 200px;border: 1px solid red; margin: 0 auto;">

        <div style="position: absolute;left: 0;bottom: 0;width: 50px;height: 50px;background-color: aquamarine"></div>

    </div>

    <div style="position: relative;width: 500px;height: 200px;border: 1px solid red; margin: 0 auto;">

        <div style="position: absolute;right: 0;top: 0;width: 50px;height: 50px;background-color: aquamarine"></div>

    </div>

</body>

</html>
效果:
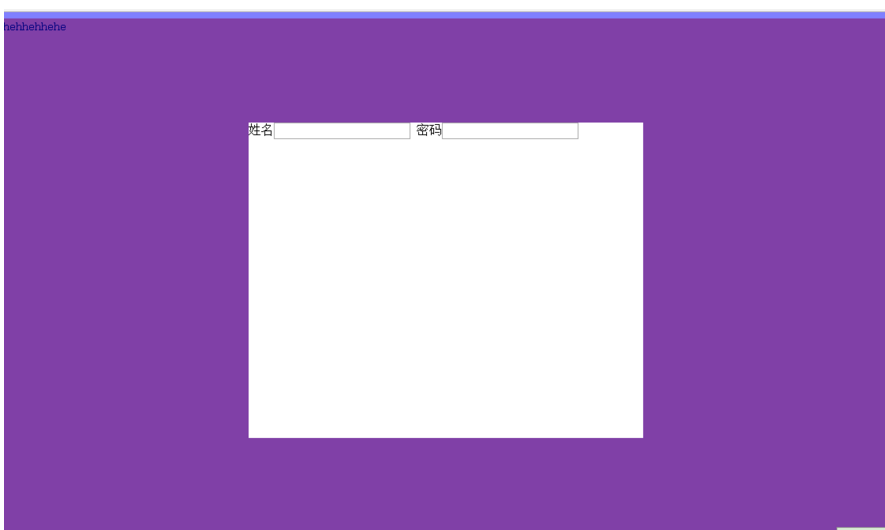
实现一个遮罩层,就是平时的弹出选择框,即模态框:
实践:
<!DOCTYPE html>
<html lang="en">
<head>
<meta charset="UTF-8">
<title>Title</title>
</head>
<body>
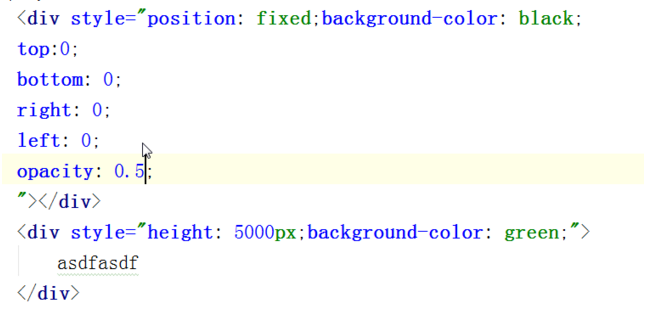
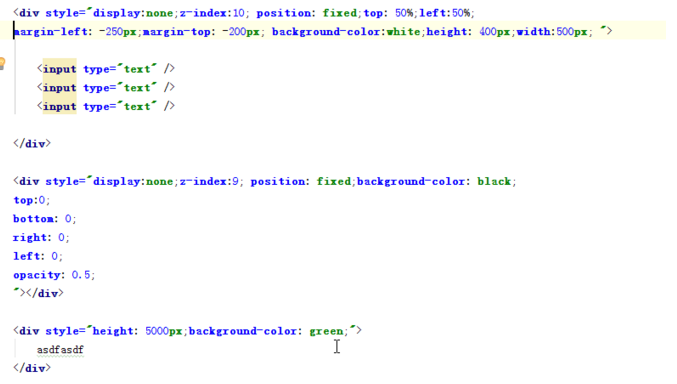
<div style="background-color: white;
/*display: none;*/
z-index: 10;
position: fixed;
height: 400px;
width: 500px;
top: 50%;
left: 50%;
margin-left: -250px;
margin-top: -200px;
border: 1px brown;
">
<div style="display: inline">姓名</div><input type="text"/>
<div style="display: inline">密码</div><input type="text"/>
</div>
<div style="background-color: blue;
/*display: none;*/
position: fixed;
z-index: 9;
top:0;
bottom: 0;
left: 0;
right: 0;
opacity: 0.5;"></div> <div style="height: 5000px;background-color: coral;"> hehhehhehe</div>
</body>
</html>
效果:
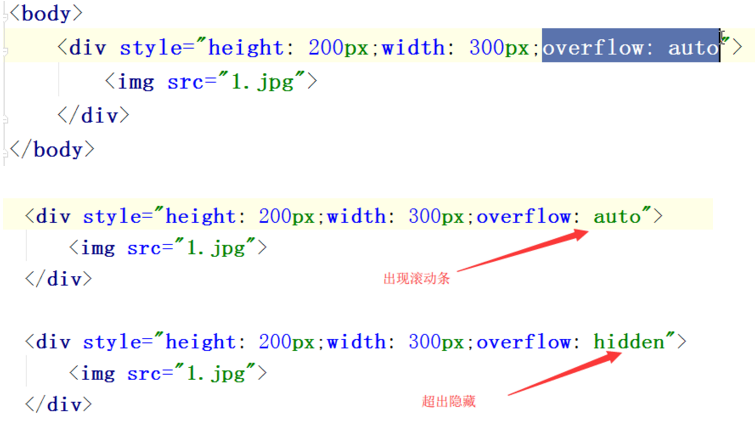
设置上右下左的间隔:
伪类:
实践:
<!DOCTYPE html>
<html lang="en">
<head>
<meta charset="UTF-8">
<title>Title</title>
<style>
.pg-header{
position: fixed; /* 设置为固定位置*/
right: 0; /*距离右边0*/
left: 0; /*距离左边0*/
top: 0; /*距离上边0*/
height: 48px; /*高度为48像素*/
background-color: #2459a2; /*背景颜色*/
line-height: 48px; /*设置上下居中,和高度一样才能居中*/
}
.pg-body{
margin-top: 50px; /*设置距离顶部50像素,避免menu挡住body*/
}
.w{
width: 980px; /*全局宽度 980像素*/
margin: 0 auto; /*自动居中*/
}
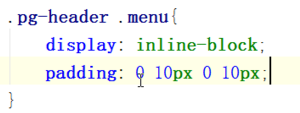
.pg-header .menu{
display: inline-block; /*设置标签为行内块级混合标签,可以设置高度和宽度*/
padding: 0 10px 0 10px; /*设置标签上下左右的距离*/
color: white; /*字体颜色*/
}
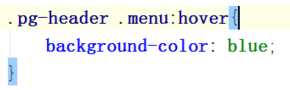
.pg-header .menu:hover{ /*此属性是当鼠标移动到此时应用*/
background-color: dodgerblue; /*背景颜色*/
}
</style>
</head>
<body>
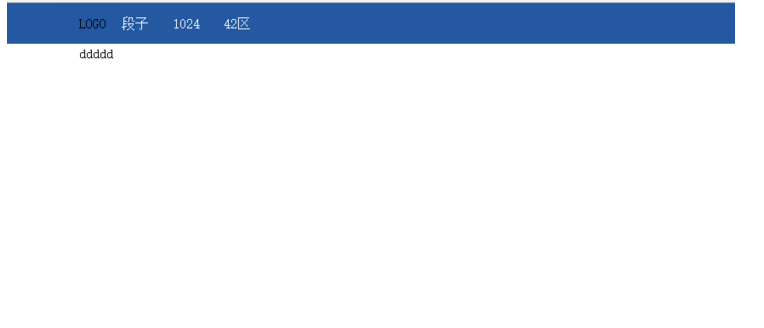
<div class="pg-header">
<div class="w">
<a class="logo">LOGO</a>
<a class="menu">段子</a>
<a class="menu">1024</a>
<a class="menu">42区</a>
</div>
</div>
<div class="pg-body">
<div class="w">ddddd</div>
</div>
</body>
</html>

渐变色 就是一个非常细的图片一直自动堆叠

其实图标都是只用一个图,然后通过调整
就能显示一个图片不同的位置
实践:
<body>

    <div style="height: 100px;"></div>

    <div style="height: 20px;width:20px;background-image: url(icon_18_118.png);border: 1px solid red"></div>

</body>
显示不同位置:
<body>

    <div style="height: 100px;"></div>

    <div style="height: 20px;

    width:20px;

    background-image: url(icon_18_118.png);

    background-position-x: 0px;

    background-position-y: -58px;

    border: 1px solid red"></div>

</body>

相对的位置,如点赞的图案:
有个问题,图片会挡住输入,修改后就好了

实践:
<!DOCTYPE html>
<html lang="en">
<head>
<meta charset="UTF-8">
<title>Title</title>
</head>
<body>
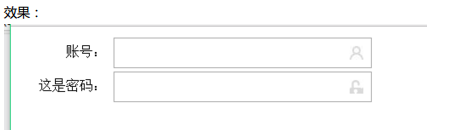
<div class="user-input" style="padding: 5px;">
<div style="display: inline-block;width: 100px;text-align: right;">账号:</div>
<div style="display: inline-block;width: 300px;height:30px;position: relative;">
<input type="text" style="height: 30px;
width: 270px;
padding-right: 30px"></input>
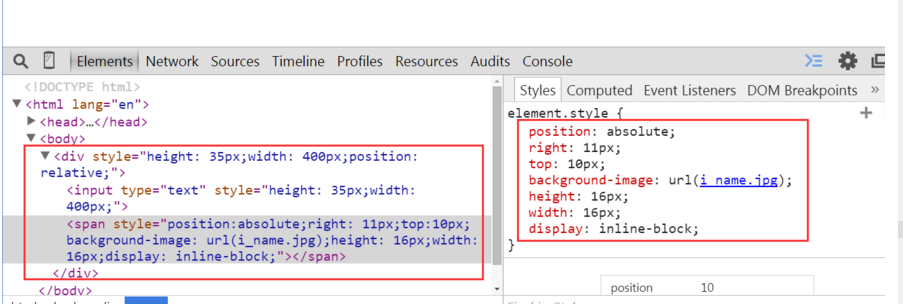
<span style="position:absolute;
right: 6px;
top:10px;
background-image: url(user.jpg);
height: 16px;
width: 16px;
display: inline-block"></span>
</div>
</div>
<div class="passwd-input" style="padding: 5px;">
<div style="display: inline-block;width: 100px;text-align: right;">这是密码:</div>
<div style="display: inline-block;width: 300px;height:30px;position: relative;">
<input type="text" style="height: 30px;
width: 270px;
padding-right: 30px"></input>
<span style="position:absolute;
right: 6px;
top:10px;
background-image: url(i_pwd.jpg);
height: 16px;
width: 16px;
display: inline-block"></span>
</div>
</div>
</body>
</html>
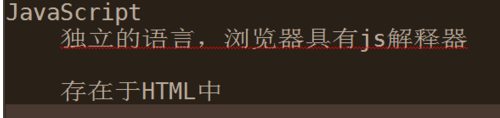
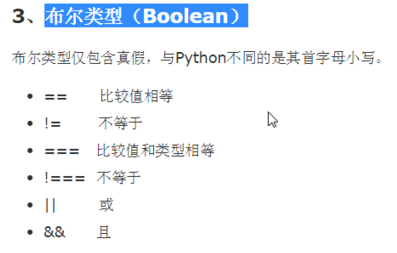
开始 javascript
helloworld
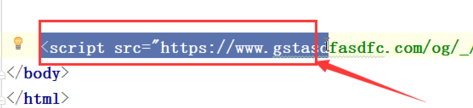
写代码的位置,两种形式:
1在html 文件中:
2 单独文件,引入到html文件中:


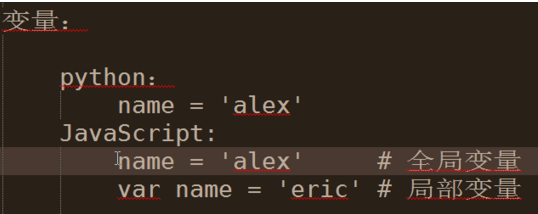
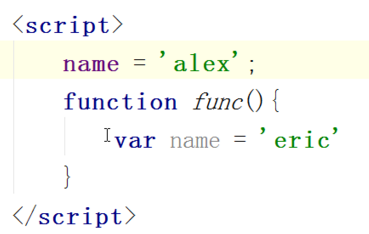
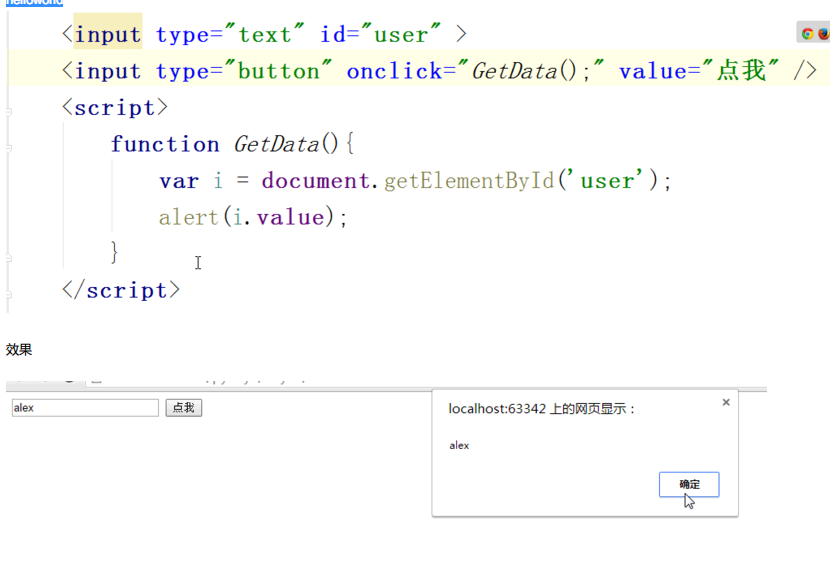
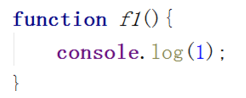
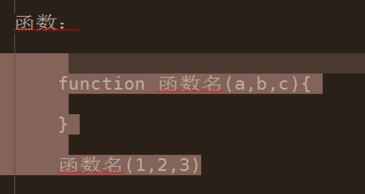
定义函数:
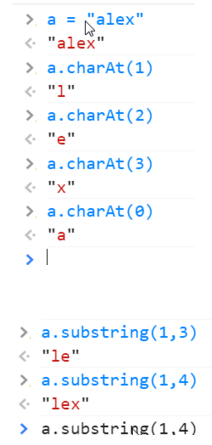
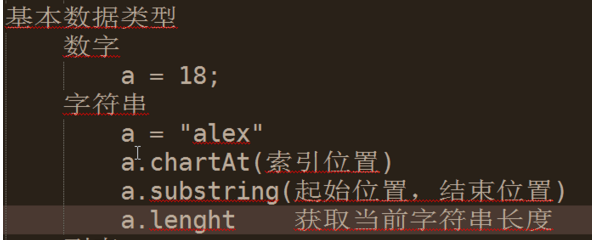
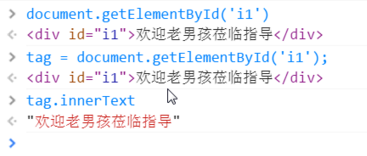
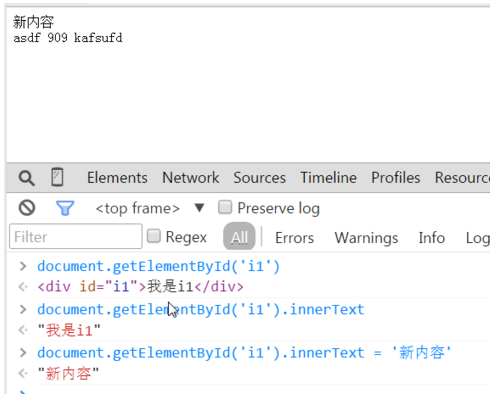
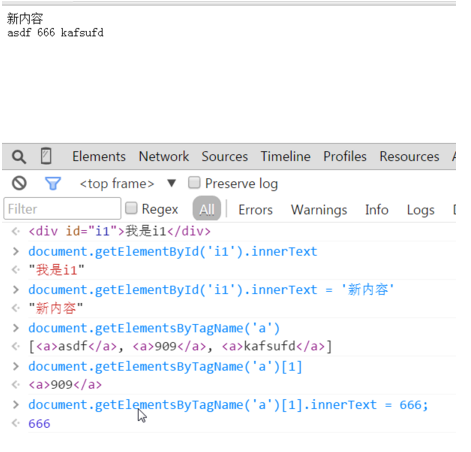
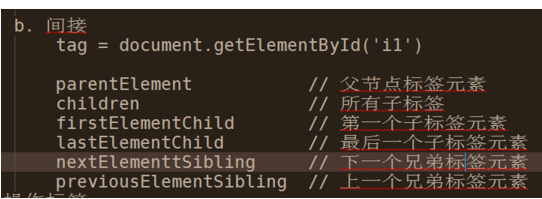
根据id找到内容:
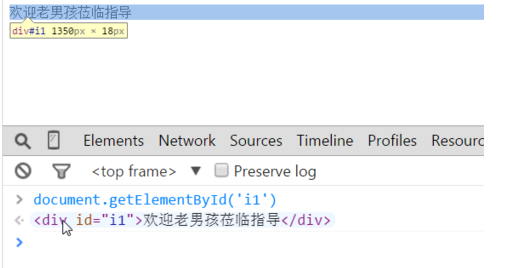
获取内容:
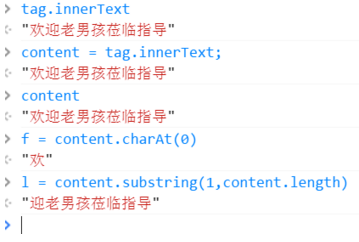
拼接字符串:
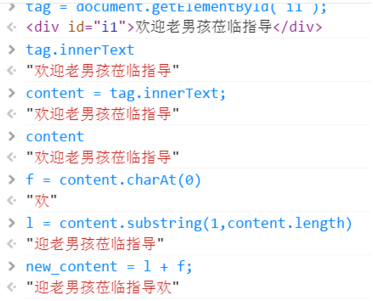
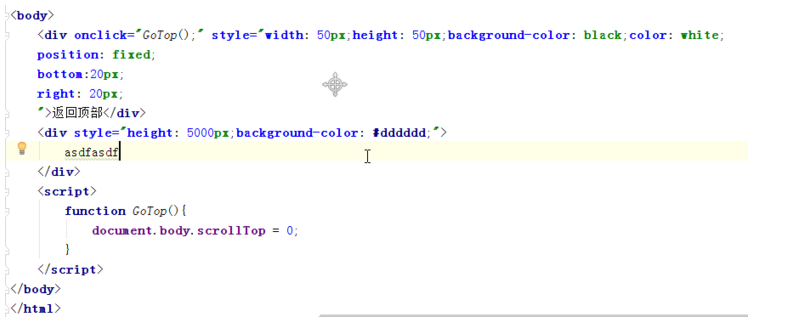
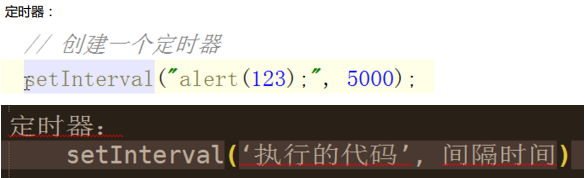
做一个滚动条效果:

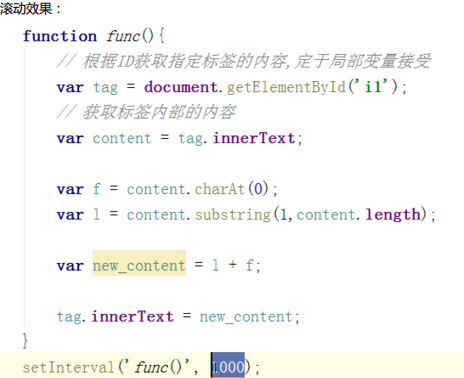
实践:
<!DOCTYPE html>
<html lang="en">
<head>
<meta charset="UTF-8">
<title>Title</title>
<script>
function func() {
var tag = document.getElementById('i1');
var content = tag.innerText;
var f = content.charAt(0);
var l = content.substring(1,content.length)
var new_content = l + f;
tag.innerText = new_content;
}
setInterval('func()',500);
</script>
</head>
<body>
<div id="i1">欢迎老男孩莅临指导 </div>
</body>
</html>
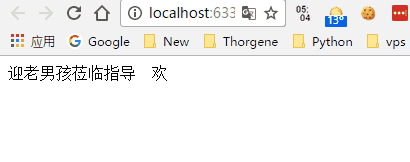
效果:


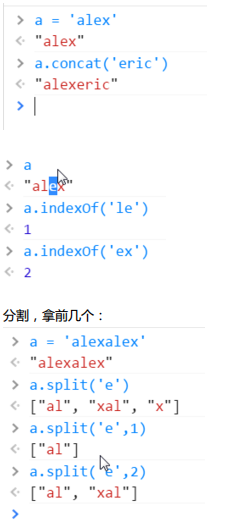
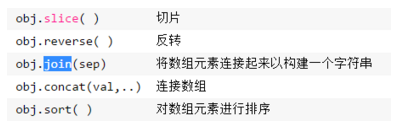
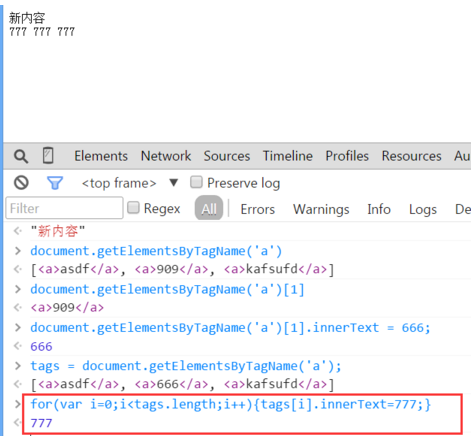
join 添加分隔符
循环:


实现模态框:
<!DOCTYPE html>
<html lang="en">
<head>
<meta charset="UTF-8">
<title>Title</title>
<style>
.hide{
display: none;
}
.c1{
position: fixed;
left: 0;
right: 0;
top: 0;
bottom: 0;
background-color: black;
opacity: 0.6;
z-index: 9;
}
.c2{
width: 500px;
height: 400px;
background-color: white;
position: fixed;
left: 50%;
right: 50%;
top: 50%;
margin-left: -250px;
margin-top: -100px;
z-index: 10;
}
</style>
</head>
<body>
<div>
<input type="button" value="添加" onclick="ShowModel();"/>
</div>
<!--遮罩层 -->
<div id="i1" class="c1 hide"></div>
<!-- 弹出窗-->
<div id="i2" class="c2 hide">
<p>
<input type="text"/>
<input type="text"/>
</p>
<p>
<input type="button" value="取消" onclick="HideModel();"/>
<input type="button" value="确定" onclick="HideModel();"/>
</p>
</div>
<script>
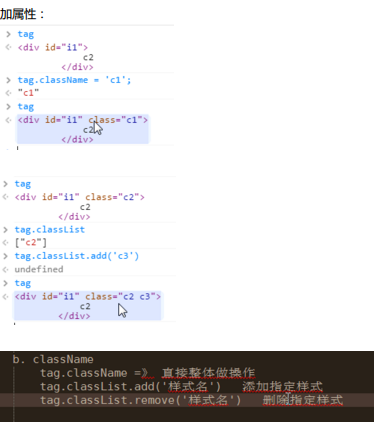
function ShowModel() {
document.getElementById('i1').classList.remove('hide')
document.getElementById('i2').classList.remove('hide')
}
function HideModel() {
document.getElementById('i1').classList.add('hide')
document.getElementById('i2').classList.add('hide')
}
</script>
</body>
</html>
效果:

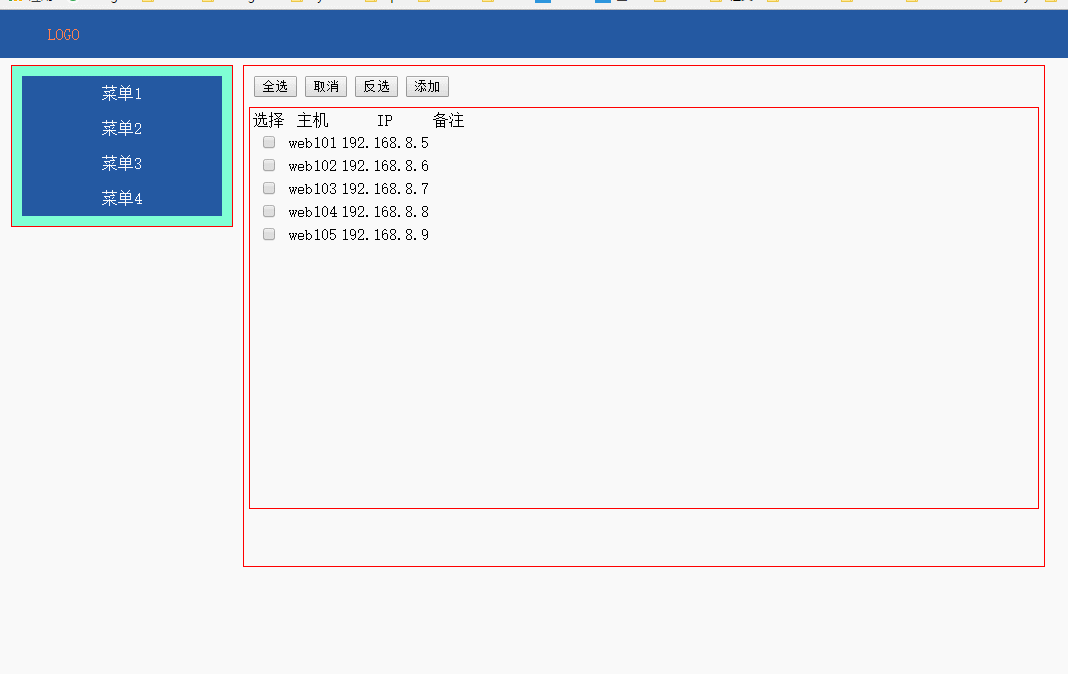
实现一个后台管理的简单页面,需要点击菜单显示菜单,可以全选,反选,可以点击有模态框效果:
<!DOCTYPE html>
<html lang="en">
<head>
<meta charset="UTF-8">
<title>管理</title>
<style>
.pg-header{
margin: 0 auto;
height: 48px;
/*width:980px;*/
background-color: #2459a2;
color: coral;
position: fixed;
top: 0;
left: 0;
right: 0;
line-height: 48px;
z-index: 10;
}
.pg-header .logo{
display: inline-block;
margin-left: 50px;
}
.pg-body{
margin-top: 50px;
width:1080px;
height: 2000px;
}
.pg-body .menu{
text-align: center;
width:200px;
border: 1px solid red;
padding: 10px;
background-color: aquamarine;
float: left;
margin: 5px;
}
.pg-body .menu .every-menu{
text-align: center;
display: inline-block;
border: 1px solid red;
width: 180px;
height: 50px;
margin: 5px;
padding: 2px;
line-height: 50px;
}
.pg-body .info{
float: left;
margin: 5px;
border: 1px solid red;
width: 800px;
height: 500px;
}
.pg-body .info .info-menu{
margin: 10px;
}
.pg-body .info-body{
margin: 5px;
/*width: 650px;*/
height: 400px;
border: 1px solid red;
text-align: center;
}
.go-header{
position: fixed;
bottom:20px;
right:20px;
width: 80px;
height: 80px;
background-color: coral;
color: white;
z-index: 11;
cursor: pointer;
}
.hide{
display: none;
}
.c1{
position: fixed;
left: 0;
right: 0;
top: 0;
bottom: 0;
background-color: black;
opacity: 0.6;
z-index: 9;
}
.c2{
width: 500px;
height: 400px;
background-color: white;
position: fixed;
left: 50%;
right: 50%;
top: 50%;
margin-left: -250px;
margin-top: -100px;
z-index: 10;
}
.hide-menu{
display: none;
}
.item .header{
height: 35px;
background-color: #2459a2;
color: white;
line-height: 35px;
} </style>
</head>
<body>
<div class="pg-header">
<a class="logo">LOGO</a>
</div> <div class="go-header" onclick="GoTop();">
<img src="back_top.png" alt="美女" title="返回顶部">
</div> <!--遮罩层 -->
<div id="i1" class="c1 hide"></div>
<!-- 弹出窗-->
<div id="i2" class="c2 hide">
<p>
<div style="margin: 5px;">
<div style="display: inline-block;width: 60px;text-align: right">IP:</div>
<input type="text"/>
</div>
<div style="margin: 5px;">
<div style="display: inline-block;width: 60px;text-align: right">主机:</div>
<input type="text"/>
</div>
</p>
<p>
<div style="display: inline-block;width: 200px;text-align: center">
<input type="button" value="取消" onclick="HideModel();"/>
<input type="button" value="确定" onclick="HideModel();"/>
</div>
</p>
</div> <div class="pg-body">
<div class="menu">
<div class="item">
<div id='m1' class="header" onclick="ChangeMenu('m1');">菜单1</div>
<div class="content hide-menu">
<div>内容1</div>
<div>内容1</div>
<div>内容1</div>
</div>
</div>
<div class="item">
<div id='m2' class="header" onclick="ChangeMenu('m2');">菜单2</div>
<div class="content hide-menu">
<div>内容2</div>
<div>内容2</div>
<div>内容2</div>
</div>
</div>
<div class="item">
<div id='m3' class="header" onclick="ChangeMenu('m3');">菜单3</div>
<div class="content hide-menu">
<div>内容3</div>
<div>内容3</div>
<div>内容3</div>
</div>
</div>
<div class="item">
<div id='m4' class="header" onclick="ChangeMenu('m4');">菜单4</div>
<div class="content hide-menu">
<div>内容4</div>
<div>内容4</div>
<div>内容4</div>
</div>
</div>
</div> <div class="info">
<div class="info-menu">
<input type="button" value="全选" onclick="CheckAll();"> </input>
<input type="button" value="取消" onclick="CancleAll();"> </input>
<input type="button" value="反选" onclick="ReCheckAll();"> </input>
<input type="button" value="添加" onclick="ShowModel();"> </input>
</div>
<div class="info-body">
<div>
<table>
<thead>
<tr>
<td>选择</td>
<td>主机</td>
<td>IP</td>
<td>备注</td>
</tr>
</thead>
<tbody id="tb">
<tr>
<td><input type="checkbox"/></td>
<td>web101</td>
<td>192.168.8.5</td>
<td></td>
</tr>
<tr>
<td><input type="checkbox"/></td>
<td>web102</td>
<td>192.168.8.6</td>
<td></td>
</tr>
<tr>
<td><input type="checkbox"/></td>
<td>web103</td>
<td>192.168.8.7</td>
<td></td>
</tr>
<tr>
<td><input type="checkbox"/></td>
<td>web104</td>
<td>192.168.8.8</td>
<td></td>
</tr>
<tr>
<td><input type="checkbox"/></td>
<td>web105</td>
<td>192.168.8.9</td>
<td></td>
</tr>
</tbody>
</table>
</div>
</div>
</div>
<div style="clear: both;"></div>
</div>
<script>
function CheckAll() {
var tbody = document.getElementById('tb');
var tr_list = tbody.children;
for (var i = 0; i < tr_list.length; i++) {
var curren_tr = tr_list[i];
var checkbox = curren_tr.children[0].children[0];
checkbox.checked = true;
}
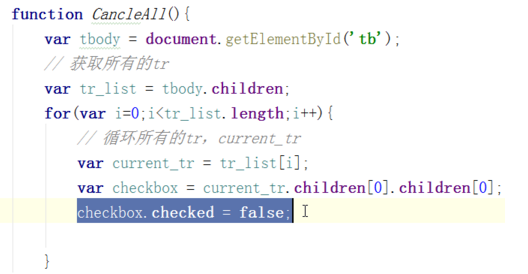
} function CancleAll() {
var tbody = document.getElementById('tb');
var tr_list = tbody.children;
for (var i = 0; i < tr_list.length; i++) {
var curren_tr = tr_list[i];
var checkbox = curren_tr.children[0].children[0];
checkbox.checked = false;
}
} function ReCheckAll() {
var tbody = document.getElementById('tb');
var tr_list = tbody.children;
for (var i = 0; i < tr_list.length; i++) {
var curren_tr = tr_list[i];
var checkbox = curren_tr.children[0].children[0];
if (checkbox.checked) {
checkbox.checked = false;
}else{
checkbox.checked = true;
}
}
} function GoTop() {
document.body.scrollTop = 0;
} function ShowModel() {
document.getElementById('i1').classList.remove('hide')
document.getElementById('i2').classList.remove('hide')
} function HideModel() {
document.getElementById('i1').classList.add('hide')
document.getElementById('i2').classList.add('hide')
} function ChangeMenu(nid){
var current_header = document.getElementById(nid);
var item_list = current_header.parentElement.parentElement.children;
for(var i=0;i<item_list.length;i++){
var current_item = item_list[i];
current_item.children[1].classList.add('hide-menu');
}
current_header.nextElementSibling.classList.remove('hide-menu');
}
</script>
</body>
</html>
效果:
day15 CSS JS DOM初探的更多相关文章
- HTML,CSS,JS,DOM,jQuery
HTML 超链接访问顺序 a:link-->a:visited-->a:hover-->a:active.(有顺序) link:表示从未访问过的链接的样式 visited:表示已经访 ...
- 转战JS(1) 初探与变量类型、运算符、常用函数与转换
转战JS(1)初探与变量类型.运算符.常用函数与转换 做为一名.NET后台开发人员,正考滤向Web前端开发转型,之前也写过一代前端代码,可是当再回头看JS,并有转向它的意愿的时候,突然发现:原来JS不 ...
- 1. web前端开发分享-css,js入门篇
关注前端这么多年,没有大的成就,就入门期间积累了不少技巧与心得,跟大家分享一下,不一定都适合每个人,毕竟人与人的教育背景与成长环境心理活动都有差别,但就别人的心得再结合自己的特点,然后探索适合自己的学 ...
- css+js+html基础知识总结
css+js+html基础知识总结 一.CSS相关 1.css的盒子模型:IE盒子模型.标准W3C盒子模型: 2.CSS优先级机制: 选择器的优先权:!important>style(内联样式) ...
- web前端开发分享-css,js入门篇(转)
转自:http://www.cnblogs.com/jikey/p/3600308.html 关注前端这么多年,没有大的成就,就入门期间积累了不少技巧与心得,跟大家分享一下,不一定都适合每个人,毕竟人 ...
- jQuery中的ready方法及实现按需加载css,js
模拟jQuery中的ready方法及实现按需加载css,js 一.ready函数的实现 经常用jQuery类库或其他类库中的ready方法,有时候想想它们到底是怎么实现的,但是看了一下jQuery中的 ...
- Js DOM 详解
DOM事件类 基本概念 DOM事件的级别 1.DOM0 element.onclick = function(){} 2.DOM2 element.addEventListener("cli ...
- 用html+css+js实现选项卡切换效果
文章转载自:http://tongling.github.io/JSCards/ 用html+css+js实现选项卡切换效果 使用之前学过的综合知识,实现一个新闻门户网站上的常见选项卡效果: 文字素材 ...
- web前端开发分享-css,js入门篇
学习没有捷径,但学习是有技巧与方法. 一,css入门篇: 推荐书籍:css哪些事儿,精通css. 理由:css那些事儿,他是一本介绍css基础类的书,是入门的经典读物. 系统的介绍了css的选 ...
随机推荐
- Pixel XL 刷机及Root详细方法
需要准备的文件: 获取 Google USB 驱动程序并安装 https://developer.android.com/studio/run/win-usb 下载Google官方镜像文件 [8.1. ...
- C# sftp通过秘钥上传下载
一.适用场景 我们平时习惯了使用ftp来上传下载文件,尤其是很多Linux环境下,我们一般都会通过第三方的SSH工具连接到Linux,但是当我们需要传输文件到Linux服务器当中,很多人习惯用ftp来 ...
- python any all函数
a = [0, 0, 0, 0] b = [0, 0, 0, 1] c = [1, 1, 1, 1] >>> any(a) False >>> any(b) Tru ...
- crontab配置shell实现后台进程不间断运行
检测get_report_no.php进程是否一直在运行 #!/bin/bash PROC=`ps -ef |grep get_report_no.php|grep -v grep|wc -l` if ...
- SAP成都研究院的体育故事
"平生不识陈近南,纵称英雄也枉然". 这是清朝反government武装圈子里流传的一句话,给予了天地会CEO陈近南极高的评价. 同样,如果您是SAP体育运动界的一份子,而您还不认 ...
- 弹出页面第一次加载可以生成table和方法的绑定,第二次点击进来不能生成table和方法的帮定
问题原因: 弹出页面的写法是每次点击都会在原有页面基础之上新添加一个将其覆盖,原有页面不关闭.我用的生成table和点击事件的绑定是id选择器.页面中只绑定第一次的页面,第二次的页面作用不上. 解决: ...
- 【转】iOS学习笔记(八)——iOS网络通信http之NSURLConnection
移动互联网时代,网络通信已是手机终端必不可少的功能.我们的应用中也必不可少的使用了网络通信,增强客户端与服务器交互.这一篇提供了使用NSURLConnection实现http通信的方式. NSURLC ...
- 2017.12.20 Java中的 IO/XML学习总结 File类详细
IO / XML 一.File类 1.定义/概念 Java是面向对象的语言,要想把数据存到文件中,就必须要有一个对象表示这个文件.File类的作用就是代表一个特定的文件或目录,并提供了若干方法对这些文 ...
- 随机获得MySQL数据库中100条数据方法 驾照题库项目 MVC架构 biz业务层的实现类 根据考试类型rand或order通过dao数据访问层接口得到数据库中100或全部数据
package com.swift.jztk.biz; import java.util.Collections; import java.util.Comparator; import java.u ...
- SummerVocation_Learning--java的线程死锁
public class Test_DeadLock implements Runnable { ; static Object o1 = new Object(),o2 = new Object() ...