
[UE4] Adding a custom shading model
转自:https://blog.felixkate.net/2016/05/22/adding-a-custom-shading-model-1/
This was written in February 2016 which means it was written for an old version of the Unreal Engine.
There were a few changes with the newer versions so this is not up to date (mostly changes in which lines the code can be found)
In the comment section of the second part someone mentioned a few useful hints for changes to the 4.14 version so be sure to give that a look if something isn’t working as expected.
For my first three posts I want to write about how to add a custom shading model for the Material-Editor of the Unreal Engine 4. This is something that isn’t very well documented and quite a few people on the forums were struggling with it so I would like to share my results so far.

Rows: 1. roughness & specular 2. shadow smoothness 3. light support 4. normal map examples
First of here’s a few pictures on what the result looks like. This model will give us some control over the shadows from within the Material-Editor to achieve a toony look. It also offers support for metallic, translucency etc. Some of the effects like the outline, the fresnel or the colored shadow are handled in the Material-Editor.
If you feel interested in how this was implemented please continue reading. Even if you try to implement something else or simply want to change the BRDF you can continue reading as the groundwork is basically the same.
Before we get to the implementation there’s a few things worth of notice:
- You should be familiar with at least one shading language. Unreals shading files (.usf) are pretty similar to HLSL.
- This is just a guide about doing some changes to the deferred pipeline so rendering on mobile devices might not be affected (I haven’t made any changes to the forward lighting). I don’t plan to look into that at the moment but if you have any information on the subject you can add it in the comments.
- I won’t upload the whole engine code so don’t ask for it.
- This shading model is mostly based on the information found in an old Thread on the Unreal Forums. I also found out later that there was another attempt making a custom toon shading model which is based on the preview version so you might look up line numbers there if you have problems finding something.
Let’s get started.
First we need to get our hands on a source code version of Unreal4 since the normal launcher installation won’t let us modify the code. Either grab a fresh source copy of the Engine from Epics GitHub or if you already have one make a backup of all files you are editing and then open the solution in the editor of your choice. I used version 4.10 of the Engine. If you are using a really old version you will notice differences in the base structure of the code so this probably won’t be compatible. On the newer versions (current preview builds) Unreal added a few more shading models and the code has changed a bit so keep that in mind (mostly line changes and new names for the custom variables).
EngineTypes.h
First we need to add our new shading model so that the engine actually knows about it. Open up EngineTypes.h and scroll to line 203. You should find the enum EMaterialShadingModel. Before MSM_Max add a line:
MSM_StylizedShadow UMETA(DisplayName = "Stylized Shadow"),
This will add a new model to our dropdown inside the material editor. You can of course name it however you want just remember the name of the enum.
MaterialShared.cpp
Next we need to tell the shader about our newly added model. At line 1257 add a line below the last shading model.
case MSM_StylizedShadow: OutEnvironment.SetDefine(TEXT("MATERIAL_SHADINGMODEL_STYLIZED_SHADOW"), TEXT("")); break;
Material.cpp
The last thing we want to do is enable a few pins for additional customizing inside of our shader. Scroll down to around line 490. This part of the code defines which pins will be unlocked for the different shading models. Instead of going through the process of creating new pins we will hijack some of the existing ones which aren’t in use. Search for the cases MP_Clearcoat and MP_ClearcoatRoughness and simply change the line below to this:
Active = ShadingModel == MSM_ClearCoat || ShadingModel == MSM_StylizedShadow;
In the Preview Versions those variables should be called something like MP_Custom. This is because they get reused a for different shading models. I decided against adding a new input here as I don’t think it’s good practice to sent more information to the graphics card as necessary. If you want to add another input instead refer to the code changes made by the other toon shading model mentioned above.

Our new shading model
And this should be all. If you would compile now the Material-Editor should show our newly added shading model inside the dropdown menu.
This is the second part of the shading model implementation. In this part we are going to edit a few shader files. Unreal shader files end with a .usf but if you are familiar with hlsl you shouldn’t have any problems. You should also at least understand what deferred rendering means. If you are unfamiliar with that subject take a look at Wikipedia. As this part is mostly about coding there won’t be many pictures. Sorry about that. :<
Alright time to move on.
Look for the Shaders folder directly nested inside the project root of the engine. Editing shader files can be done in any text editor since the compiling will happen once you open the Unreal Editor. On Windows using VisualStudio is a good choice since the compiler tells you were the parser found an error and sometimes even information about what it encountered.
BasePassPixelShader.usf.
Let’s start were our input gets written into the GBuffer. For this open up BasePassPixelShader.usf.
This shader writes all the values acquired from pins inside the Material-Editor into the GBuffer. Keep in mind that this shader will render the Geometry itself.
First let’s take a look at how the GBuffer is build. For now we only need to worry about GBuffer A – D.
- GBuffer A – float3: normals, float: packed alpha
- GBuffer B – float: metallic, specular, roughness, decalMask
- GBuffer C – float3: baseColor, float: ao
- GBuffer D – float: opacity, float3: customData
CustomData in GBuffer D has different uses depending on the shading model.
We will also make use of it later.
You might have noticed that the emissive isn’t listed inside one of the buffers. Unreal calculates lighting by starting from zero and then adding the light.
The emissive value gets written into the basic output instead of a buffer so it will already be there before the light is added.
First go to line 774. Our target is directly under the comment saying “Volume lighting for lit translucency”.
Change the next line to:
#if (MATERIAL_SHADINGMODEL_DEFAULT_LIT || MATERIAL_SHADINGMODEL_SUBSURFACE || MATERIAL_SHADINGMODEL_STYLIZED_SHADOW) && (MATERIALBLENDING_TRANSLUCENT || MATERIALBLENDING_ADDITIVE)
We need to do this so that we actually see something if our blending is set to translucent or additive.
After this jump over to line 879. This is were we specify shading model specific data. Let’s add our own model here:
#elif MATERIAL_SHADINGMODEL_STYLIZED_SHADOW

    GBuffer.ShadingModelID = SHADINGMODELID_STYLIZED_SHADOW;

    float smoothness =  GetMaterialClearCoat(MaterialParameters);

    GBuffer.CustomData.x = smoothness;
We use the CustomData to add our hijacked pins into the GBuffer. We still have the GetMaterialClearCoatRoughness() pin unlocked so if you need another custom input write that to CustomData.y. This is also were you might do changes to all the other GBuffers like baseColor etc. if your shader requires it.
Again in the preview version of the engine the GetMaterialClearCoat() should be called something different like GetMaterialCustomData0().
And that’s all for this shader. Time to move on.
MaterialTemplate.usf
The next step is optional so skip it if you want. What we do here is changing the color with which our shading model is displayed in the Shading Model Buffer Visualization. Go to line 1010 and you will find a list of colors used for the different shading models. Add this to line 1022:
else if (GBuffer.ShadingModelID == SHADINGMODELID_STYLIZED_SHADOW) return float3(0.4f, 0.0f, 0.8f); // Purple
and this to line 1034:
case SHADINGMODELID_STYLIZED_SHADOW: return float3(0.4f, 0.0f, 0.8f); // Purple
DeferredShadingCommon.usf
Next up is setting the definition for our shading model. In the shader at line 227 add this and replace the line saying max number with our new maximum.
#define SHADINGMODELID_STYLIZED_SHADOW 7

#define SHADINGMODELID_NUM 8
ShadingModels.usf
Now that we have our basic setup out of the way let’s get to the interesting part. This file contains information about the shading itself. Take a look at the already defined ones and you will get an idea what’s going on here. The BRDF’s are part of a different file called BRDF.usf so if you want to add a new function for a BRDF you can do that there. If you are unfamiliar with BRDF’s it’s basically how light information get’s handled in this case mainly specular and fresnel. Unreal has a few unused snippets there as well so you could try out replacing the lambert model with the oren nayar one in one of the shading functions in this file etc.
For this shading model I haven’t added anything BRDF related. Instead I made a copy of the SimpleShading() function and made changes to that. The reason behind it is that we only need the specular calculation. In line 69 after the StandardShading() function we add our own:
// Stylized shadow shading model for manipulating the gradient of the specular

float3 StylizedShadowShading( FGBufferData GBuffer, float Roughness, float3 L, float3 V, half3 N, float2 DiffSpecMask )

{

    float range = GBuffer.CustomData.x * 0.5;

    float3 H = normalize(V + L);

    float NoH = saturate( dot(N, H) );

    return GBuffer.DiffuseColor + saturate(smoothstep(0.5 - range, 0.5 + range, D_GGX( Roughness, NoH )) * GBuffer.SpecularColor);

}
This is a very basic shading model that takes the base color and adds the specular on top of it. For this we use the already in BRDF.usf defined D_GGX() function. Here we will use our CustomData for the first time to manipulate how sharp the edges of the specular highlight will be. Again if you are unfamiliar with the smoothstep() function take a look here. A smoothstep of (0, 1, x) would give us the default while one at (0.5, 0.5, x) would be the same as a round(). Going up or down on both sides would shift the resulting gradient in that direction.
After we defined our function we need to tell the shader to actually use it. For this move to line 270 and add a case for our shading model inside the SurfaceShading() function.
case SHADINGMODELID_STYLIZED_SHADOW:

    return StylizedShadowShading( GBuffer, LobeRoughness.y, L, V, N, DiffSpecMask);
We now have added our own custom shading. Let’s get to the last part of this guide: The lighting function. If you just wanted to make changes to the BRDF you can stop now. The next section is only for getting the toony shadow look.
DeferredLightingCommon.usf
The actual lighting for the different light types takes place in DeferredLightPixelShaders.usf but as all the lights use the functions defined here we only need to change this one. We will only make changes to a single big function here with the name GetDynamicLighting(). This one calculates our light and shadow in the deferred rendering pipeline. So what do we do here? It’s simple: We want to remove the NdotL calculation from our models shadows and sharpen the edges (after the engine went through all this work of smoothing them :>).
In line 352 we add a new branch.
float3 Attenuation = ;

// In case we want to stylize the shadow changing it's falloff

BRANCH

if (ShadingModelID == SHADINGMODELID_STYLIZED_SHADOW)

{

    float range = ScreenSpaceData.GBuffer.CustomData.x * 0.5;

    Attenuation = LightColor * ((DistanceAttenuation * LightRadiusMask * SpotFalloff) * smoothstep(0.5 - range, 0.5 + range, SurfaceShadow) * 0.1);

}

else

{

    Attenuation = LightColor * (NoL * SurfaceAttenuation);

}
we also need to need to make changes to the default calculation to make use of our newly added attenuation variable so in lines 372 and 376 change
LightColor * (NoL * SurfaceAttenuation)
to
Attenuation
That’s it. We have everything together for our custom shading model. In case you haven’t done it yet recompile the changed C++ classes and start the engine.
The startup will take some time now as it needs to recompile the shaders. Once all shaders are compiled and your project is opened create a new Material in the Content-Browser and change it’s shading model to our newly created one. Add in a few constants and it should look like this.
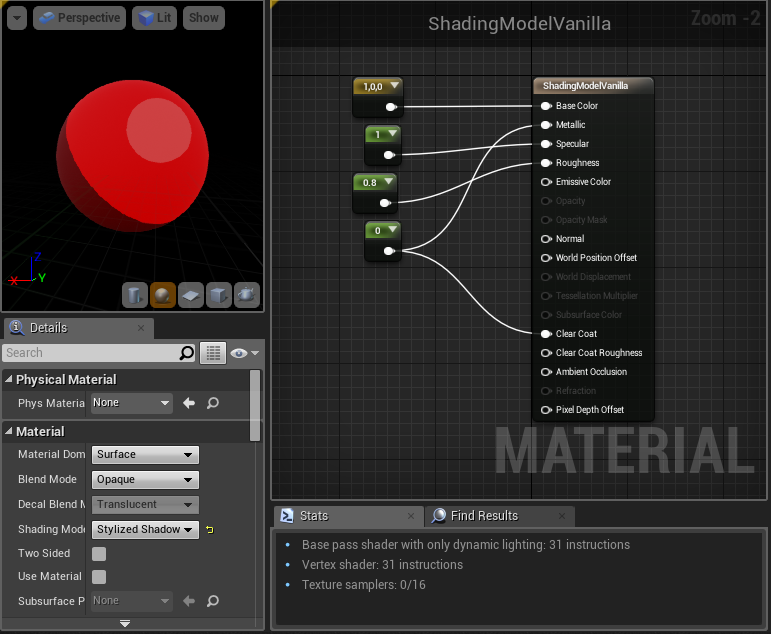
The last and final part will be about adding stuff to the Material and making a Post-Process for a colored outline.

Material instance of the material we are going to make
For the final part of this guide I will write about the few things I added to the material and my approach to do outlines which take in account the base color.
This part is optional you already have everything you need.
If you are still interested continue reading this part will have more pictures in it. :>
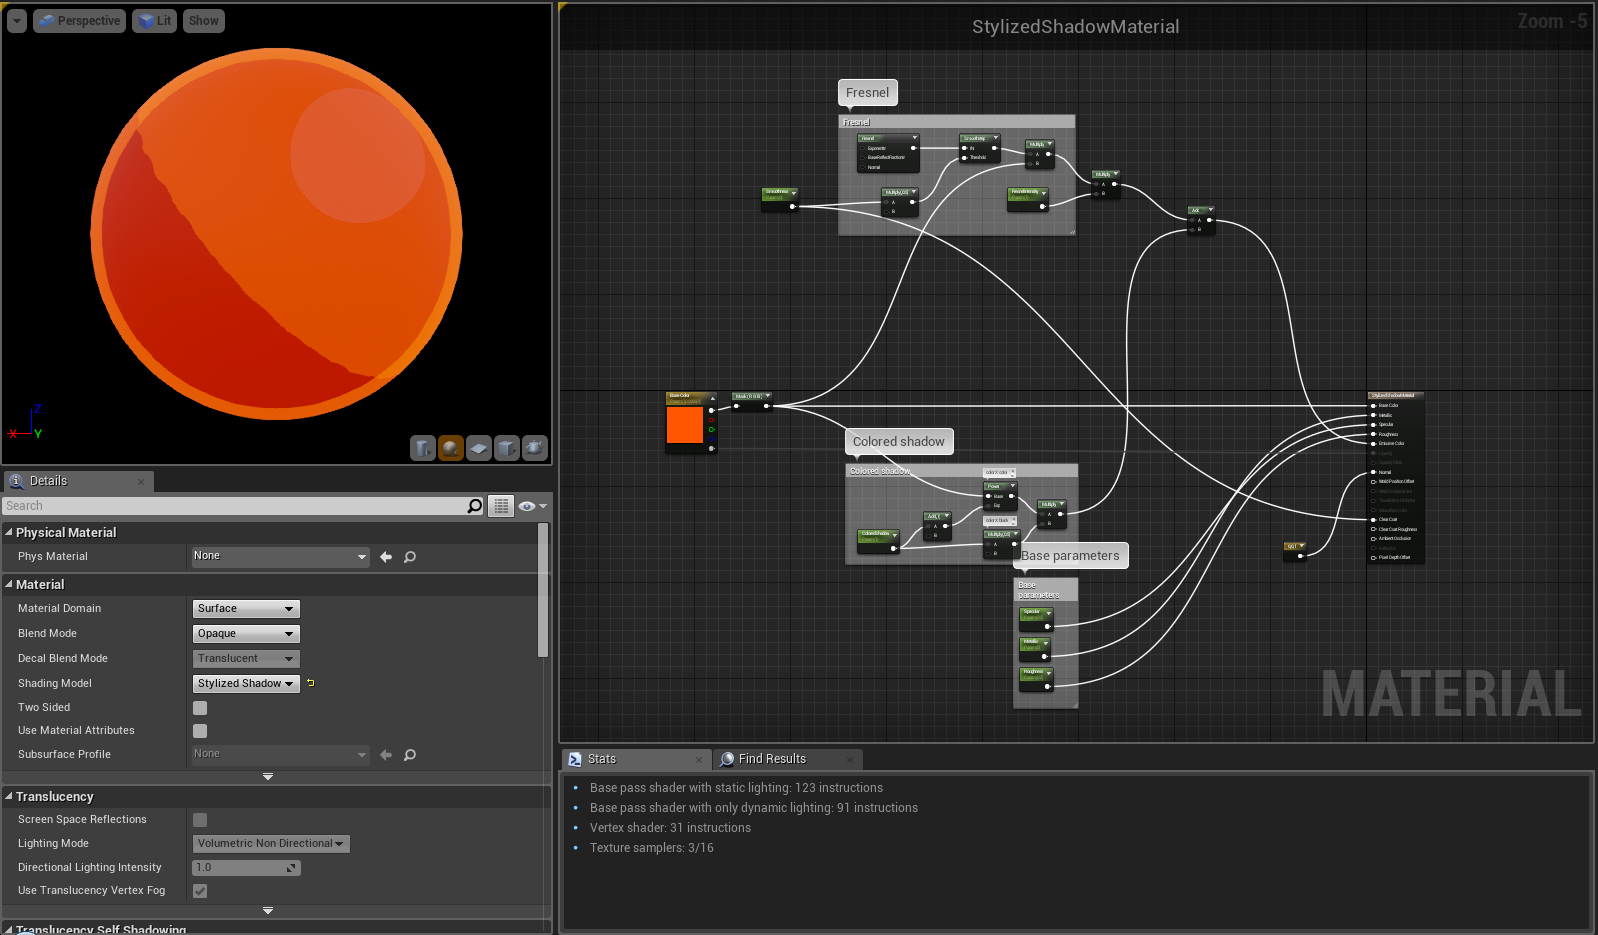
The material
This is the whole basic material. There is not much stuff in it yet and it’s up to you to extend it. On the left side we can see the color parameter or the base texture. Let’s component mask it so we don’t include our alpha in further calculations. The alpha goes directly into opacity / opacity mask. Even if the output pin is deactivated we can still make use of it later by overwriting the blending model inside of the material instance.
For the normal input either plug in a normal map or leave it at default (0, 0, 1). You could also do static switches for baseTexture and normalMap that switch between color input and texture input.
Create parameters for Specular, Metallic, Roughness and Smoothness and plug them into their pins. Smoothness goes into the ClearCoat pin.
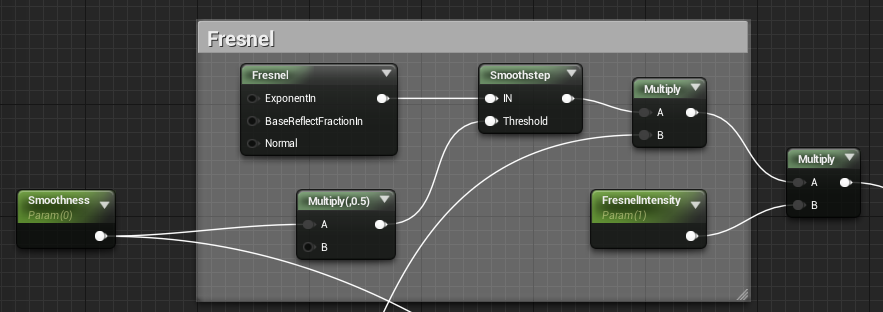
Adding the fresnel
The fresnel gets connected as above. For it’s values I used exponent: 2.0 and base reflect fraction: 0.0. The smoothstep node doesn’t exist so we have to create it ourselves. Add a custom node and set it’s output type to float1. Add two inputs. Add the following code into it:
- return smoothstep(0.5 - Threshold, 0.5 + Threshold, IN);
The multiply after this takes the base color / texture we masked as second input. Also add another scalar parameter called FresnelIntensity so that we can turn down it’s value.
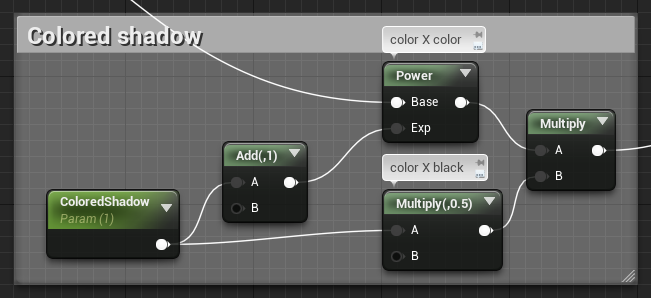
The shadow coloring
For the colored shadow add a scalar parameter called ColoredShadow. This will control how much color will be added to the emissive. Keep in mind the closer rgb gets to 1 the smaller the effect of the power node will be. (Multiplying 1 x 1 = 1) Play around with the exp value of the power node. For me a value of 2.5 looked best for characters having light skin tone textures.
Lastly add the results of fresnel and colored shadow together and plug them into the emissive input. As you might have guessed this will make not only the shadow brighter but also the base texture but for now I don’t know of a better way to colorize shadows except doing that in a post process by somehow faking the calculated light.
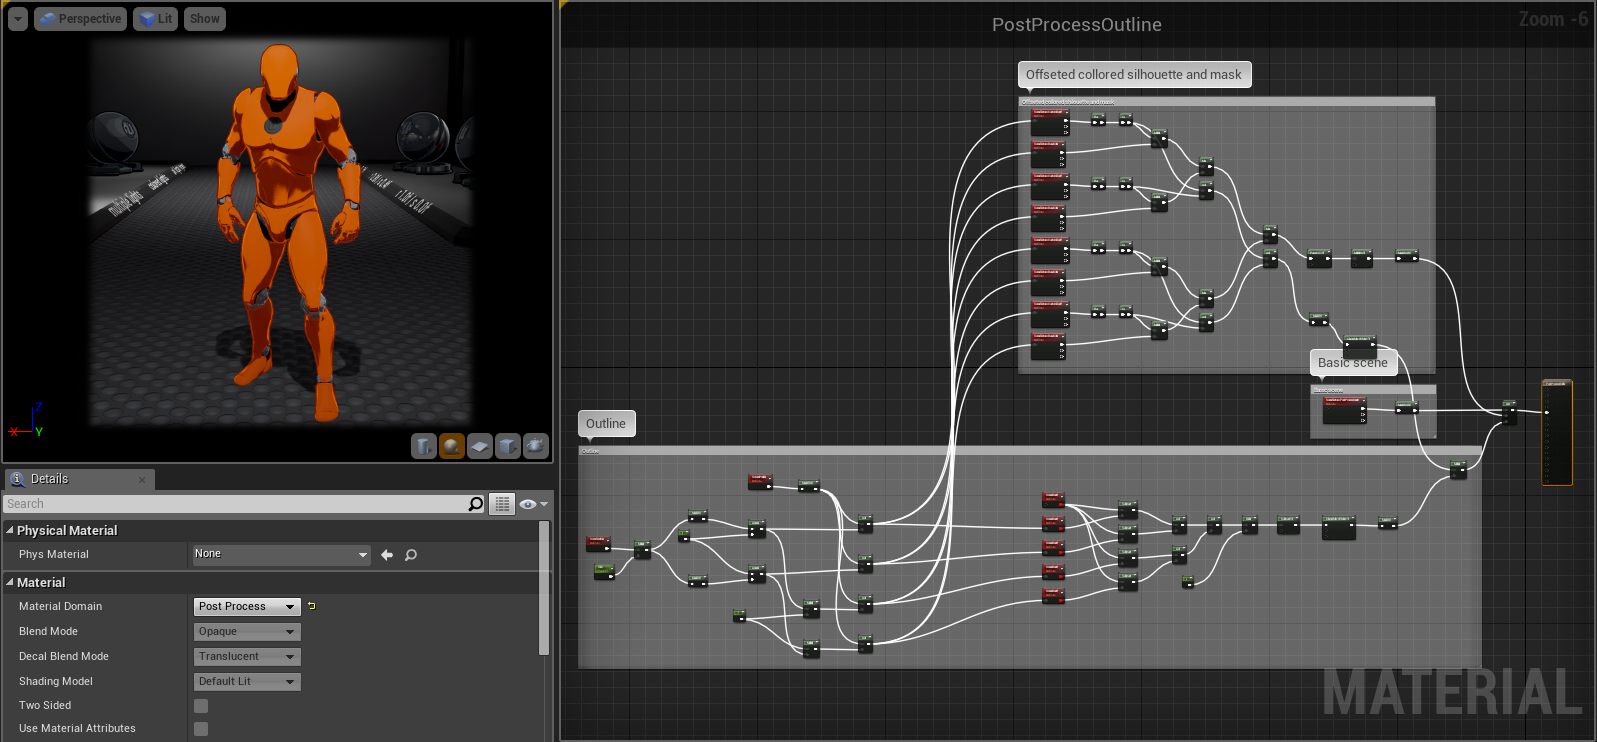
Outline post process overview
Now for the colored outlines. This is basically a modified version of the outline highlighter post process that Epic used in the example content.
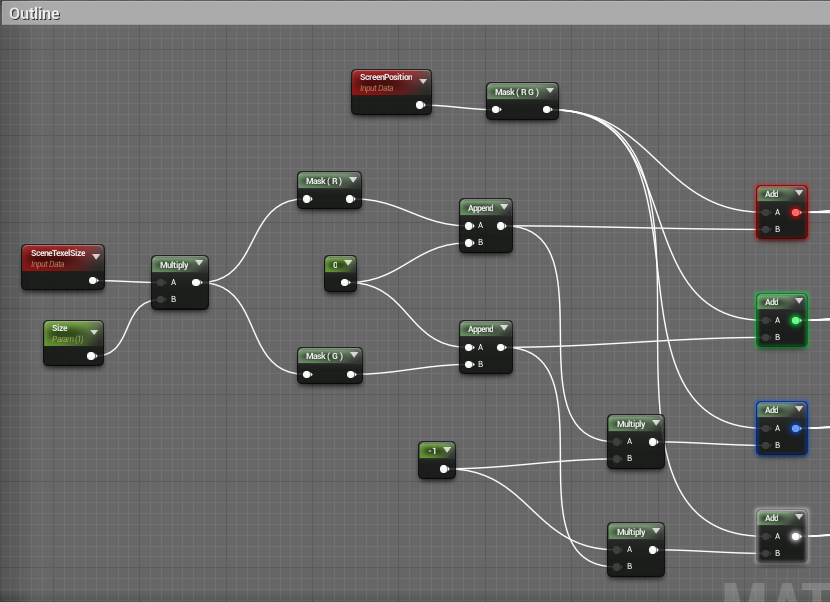
Lower left of the material
This part is for creating the offset of the outline. If you ever did any sobel outline or bluring or something similar you should be familiar with the concept. By comparing the basic renderTexture to offsetted versions of it we can find out the difference between neighbouring pixels.
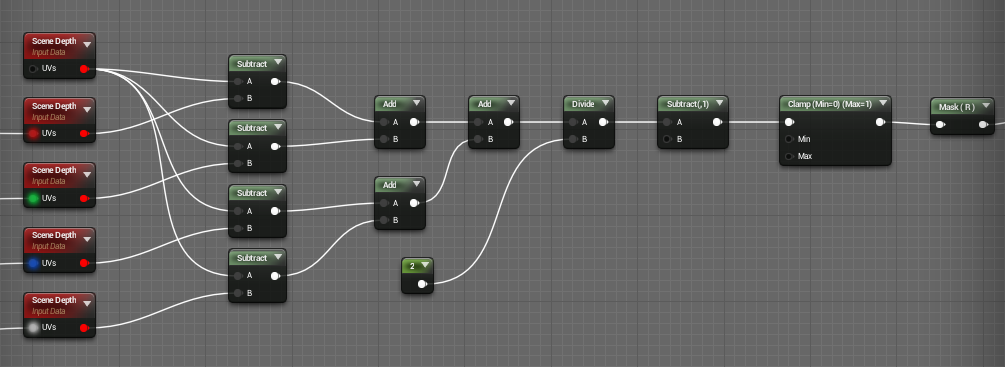
Lower right of the material
Here we will do exactly that to compare the scene depth. We use the scene depth instead of the custom depth so that our outlines are not rendered in front of other geometry.
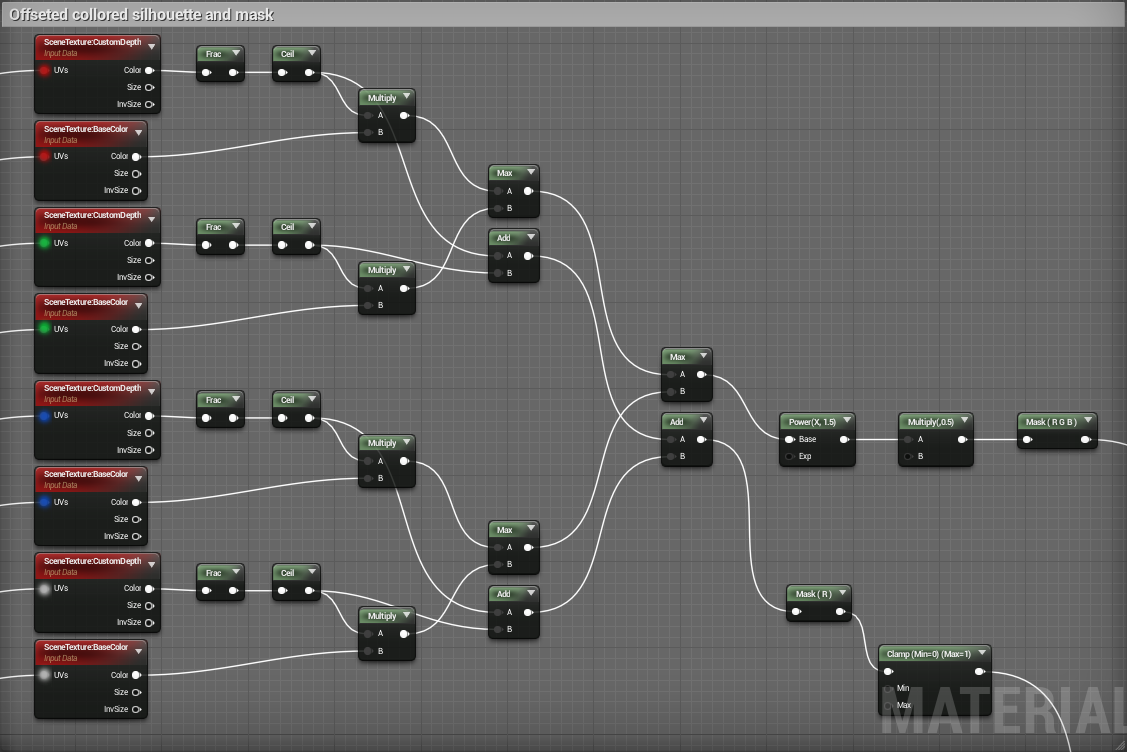
Upper half of the material
This part is quite a mess. We offset the base color and the custom depth. The custom depth is used as a mask for the color so that we can separate the objects that should have the outline from the ones that shouldn’t. I decided to combine the colors by using the max node so that the brighter color will prevail. Once we have the offsetted colored silhouette of the base color we do some calculations to make it darker. We also combine and clamp all the custom depths to make a mask of the colored area. This part is probably not optimal as it uses quite a lot of texture lookups but I don’t now another way around it so if someone has a suggestion feel free to post a comment. :>
The final part of the post process is simple: We multiply the lower half with the custom depth mask we just created and use this as alpha for a lerp between our outline color and a SceneTexture that renders the scene as it is (PostProcessInput0). At the end we plug in everything into our emissive pin.
[UE4] Adding a custom shading model的更多相关文章
- UnrealEngine4 PBR Shading Model 概述
虽然是概述,但内容并还是有些多,写上一篇PBR概念概述后,也在考虑怎么继续下去,最后还是觉得先多写一些东西再慢慢总结,所以还是尽量把这些年PBR相关的Paper精粹沉淀下来吧. 因为UE4 ...
- 基于Shading Model(对光照变化一定不变性)的运动目标检测算法
光照模型(Shading Model)在很多论文中得到了广泛的应用,如robust and illumination invariant change detection based on linea ...
- 【计算机视觉】基于Shading Model(对光照变化一定不变性)的运动目标检测算法
光照模型(Shading Model)在很多论文中得到了广泛的应用,如robust and illumination invariant change detection based on linea ...
- Adding a custom jar as a maven dependency
Using maven in a Java project is great. It manages builds (as customized as you may need), execution ...
- adding validation annotators to model classes 在linq to EntityFrame的Model中添加前台验证validation annotators
The same solution can be applied for LINQ to SQL. The snippet the article shows for using the Metada ...
- Physically Based Shader Development for Unity 2017 Develop Custom Lighting Systems (Claudia Doppioslash 著)
http://www.doppioslash.com/ https://github.com/Apress/physically-based-shader-dev-for-unity-2017 Par ...
- Django Model field reference
===================== Model field reference ===================== .. module:: django.db.models.field ...
- 初探UE4中的Profiling【转】
http://blog.ch-wind.com/ue4-profiling-preview/ Profililng是成品制作过程中非常重要的一个步骤,通过Profiling才能提高运行效率使得作品达到 ...
- UE4材质初探
转自:http://www.unrealchina.net/portal.php?mod=view&aid=233 UE4的材质表面上看起来很简单,可是到了用的时候却总是没有办法实现好的效果. ...
随机推荐
- Objective-C Classes Are also Objects
https://developer.apple.com/library/content/documentation/Cocoa/Conceptual/ProgrammingWithObjectiveC ...
- Windows10 Docker镜像加速
https://dockerhub.azk8s.cn #Azure 中国镜像 https://reg-mirror.qiniu.com #七牛云加速器 https://registry.docker- ...
- node.js – 服务器端的客户端证书验证,DEPTH_ZERO_SELF_SIGNED_CERT错误
我正在使用节点0.10.26并尝试建立与客户端验证的https连接. 服务器代码: var https = require('https'); var fs = require('fs'); proc ...
- 代码块和Java的API及Object类
代码块 局部代码块 特点: 以”{}”划定的代码区域,此时只需要关注作用域的不同即可 方法和类都是以代码块的方式划定边界的 构造代码块 优先于构造方法执行,构造代码块用于执行所有对象均需要的初始化动作 ...
- 压缩、解压命令——gzip、gunzip、tar、zip、bzip2
1.gzip命令与gunzip命令(压缩解压文件): (1)gzip——压缩: 利用touch命令创建一个文件,并向里面写入内容: 对创建的文件进行压缩: (2)解压缩gzip -d或gunzip: ...
- redisql 试用
redisql 是一个redis 模块,可以让redis 支持sql 查询,基于rust编写 具有以下特性 快速,每秒130k的插入 使用标准sql 容易操作,基于redis,使用标准的redis 二 ...
- [RN] React Native Fetch请求设置超时
一.实现思路 根据Promise.race的特性,我们在Promise.race里面添加两个任务,一个是正常的网络请求任务A,另外一个便是网络延时任务B,网络延时可以利用setTimeout方法实现. ...
- nginx 日志之 error_log
Nginx错误日志平时不用太关注,但是一旦出了问题,就需要借助错误日志来判断问题所在. 配置参数格式:error_log /path/to/log level; Nginx错误日志级别 常见的错误日志 ...
- 分布式id的生成方式——雪花算法
雪花算法是twitter开源的一个算法. 由64位0或1组成,其中41位是时间戳,10位工作机器id,12位序列号,该类通过方法nextID()实现id的生成,用Long数据类型去存储. 我们使用id ...
- 多浏览器书签同步插件EverSync
有时上网时会遇到浏览器不能正常显示的问题.(比如我的火狐浏览器无法正确显示微信公众号管理后台,在chrome上可以正常显示),所以我的电脑里安装了chrome和firefox两个浏览器.但是时间长了, ...