5、Web Service-整合CXF
1、工程准备
继续使用之前的服务端:https://www.cnblogs.com/Mrchengs/p/10562458.html
2、jar准备
前去apache官网下载响应的jar:http://cxf.apache.org/download.html
3、在原来的工程中导入jar文件
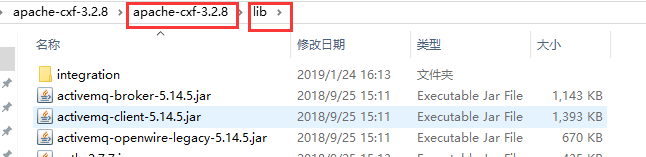
其中提供的jar相对比较多可以根据开发需求去导入相应的jar!
启动服务:

可以看到使用的是jetty服务的
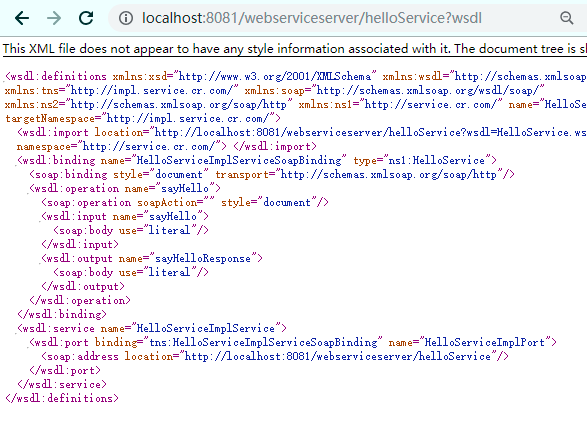
4、查看wsdl
http://localhost:8081/webserviceserver/helloService?wsdl
<wsdl:definitions xmlns:xsd="http://www.w3.org/2001/XMLSchema" xmlns:wsdl="http://schemas.xmlsoap.org/wsdl/" xmlns:tns="http://impl.service.cr.com/" xmlns:soap="http://schemas.xmlsoap.org/wsdl/soap/" xmlns:ns2="http://schemas.xmlsoap.org/soap/http" xmlns:ns1="http://service.cr.com/" name="HelloServiceImplService" targetNamespace="http://impl.service.cr.com/">

<wsdl:import location="http://localhost:8081/webserviceserver/helloService?wsdl=HelloService.wsdl" namespace="http://service.cr.com/"> </wsdl:import>

<wsdl:binding name="HelloServiceImplServiceSoapBinding" type="ns1:HelloService">

<soap:binding style="document" transport="http://schemas.xmlsoap.org/soap/http"/>

<wsdl:operation name="sayHello">

<soap:operation soapAction="" style="document"/>

<wsdl:input name="sayHello">

<soap:body use="literal"/>

</wsdl:input>

<wsdl:output name="sayHelloResponse">

<soap:body use="literal"/>

</wsdl:output>

</wsdl:operation>

</wsdl:binding>

<wsdl:service name="HelloServiceImplService">

<wsdl:port binding="tns:HelloServiceImplServiceSoapBinding" name="HelloServiceImplPort">

<soap:address location="http://localhost:8081/webserviceserver/helloService"/>

</wsdl:port>

</wsdl:service>

</wsdl:definitions>
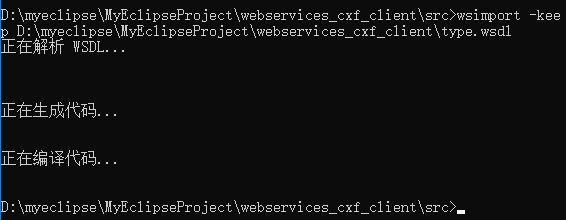
创建新的工程,将其拷贝到新的wsdl文件中进行编译

进行编译使用
环境变量的配置:https://www.cnblogs.com/ChrisMurphy/p/5224160.html
执行命令:

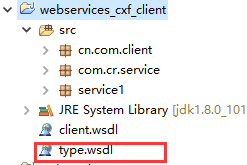
工程目录
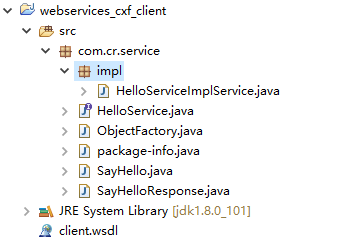
新建测试类:

5、测试类
package cn.com.client;

import com.cr.service.HelloService;

import com.cr.service.impl.HelloServiceImplService;

public class client {

     public static void main(String[] args){

        HelloServiceImplService factory = new HelloServiceImplService();

        HelloService hello = factory.getHelloServiceImplPort();

       String res = hello.sayHello("mr");

        System.out.println(res);

    }

}
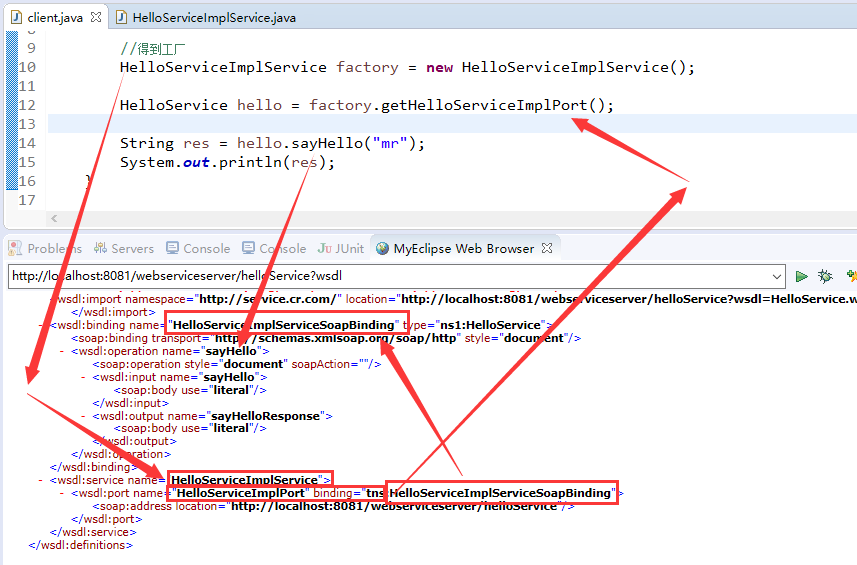
得到的结果如下:

6、分析请求和响应
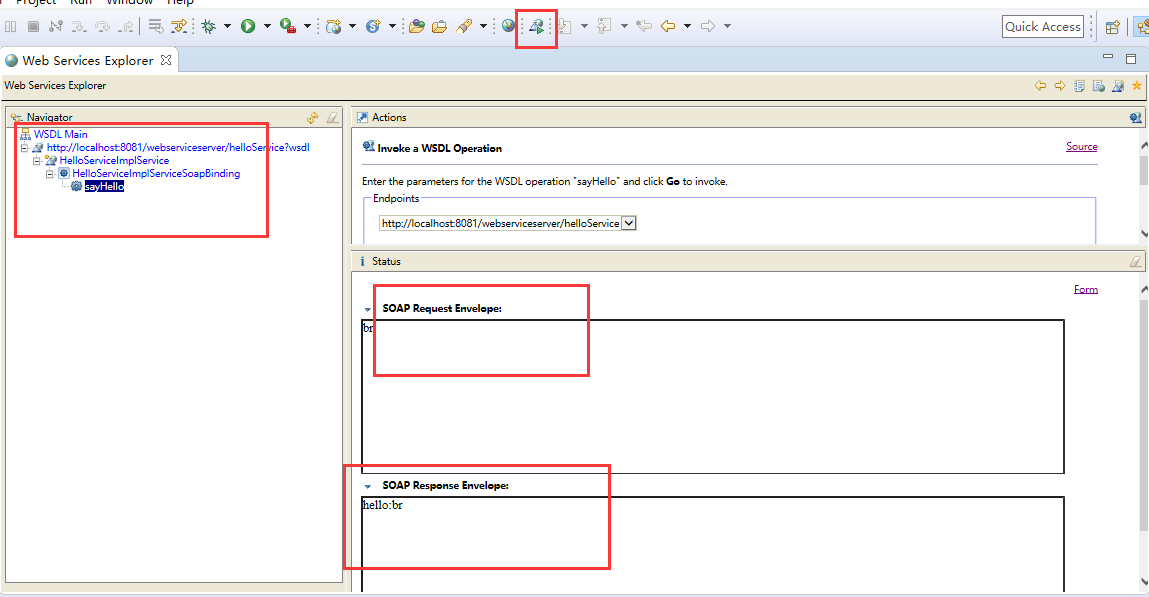
request
<soapenv:Envelope xmlns:soapenv="http://schemas.xmlsoap.org/soap/envelope/"
 xmlns:q0="http://service.cr.com/" xmlns:xsd="http://www.w3.org/2001/XMLSchema"
xmlns:xsi="http://www.w3.org/2001/XMLSchema-instance">

  <soapenv:Body>

    <q0:sayHello>

      <arg0>br</arg0>

    </q0:sayHello>

  </soapenv:Body>

</soapenv:Envelope>
response
<soap:Envelope xmlns:soap="http://schemas.xmlsoap.org/soap/envelope/">

  <soap:Body>

    <ns2:sayHelloResponse xmlns:ns2="http://service.cr.com/">

      <return>hello:br</return>

    </ns2:sayHelloResponse>

  </soap:Body>

</soap:Envelope>
分析:
<?xml version="1.0" encoding="UTF-8"?>
<definitions xmlns:wsu="http://docs.oasis-open.org/wss/2004/01/oasis-200401-wss-wssecurity-utility-1.0.xsd"
xmlns:wsp="http://www.w3.org/ns/ws-policy"
xmlns:wsp1_2="http://schemas.xmlsoap.org/ws/2004/09/policy"
xmlns:wsam="http://www.w3.org/2007/05/addressing/metadata"
xmlns:soap="http://schemas.xmlsoap.org/wsdl/soap/"
xmlns:tns="http://impl.service.cr.com/"
xmlns:xsd="http://www.w3.org/2001/XMLSchema"
xmlns="http://schemas.xmlsoap.org/wsdl/"
targetNamespace="http://impl.service.cr.com/"
name="HelloServiceImplService"> <!--
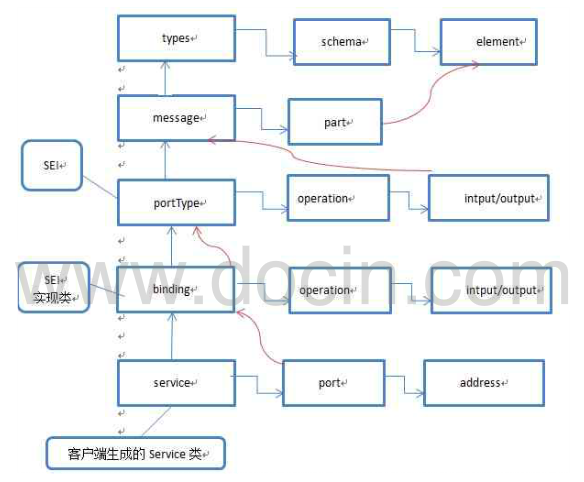
types
schema : 定义了一些标签结构
-->
<types>
<xsd:schema>
<xsd:import namespace="http://impl.service.cr.com/"
schemaLocation="http://localhost:8081/webserviceserver/helloService?xsd=1"></xsd:import>
</xsd:schema>
</types> <!--
message: 用来定义消息的结构 soap消息
part : 指定引用types中定义的标签片断
-->
<message name="sayHello">
<part name="parameters" element="tns:sayHello"></part>
</message>
<message name="sayHelloResponse">
<part name="parameters" element="tns:sayHelloResponse"></part>
</message> <!--
portType: 用来定义服务器端的SEI
operation : 用来指定SEI中的处理请求的方法
input : 指定客户端应用传过来的数据, 会引用上面的定义的<message>
output : 指定服务器端返回给客户端的数据, 会引用上面的定义的<message>
-->
<portType name="HelloServiceImpl">
<operation name="sayHello">
<input wsam:Action="http://impl.service.cr.com/HelloServiceImpl/sayHelloRequest" message="tns:sayHello"></input>
<output wsam:Action="http://impl.service.cr.com/HelloServiceImpl/sayHelloResponse" message="tns:sayHelloResponse"></output>
</operation>
</portType> <!--
binding : 用于定义SEI的实现类
type属性: 引用上面的<portType>
<soap:binding style="document"> : 绑定的数据是一个document(xml)
operation : 用来定义实现的方法
<soap:operation style="document" /> 传输的是document(xml)
input: 指定客户端应用传过来的数据
<soap:body use="literal" /> : 文本数据
output : 指定服务器端返回给客户端的数据
<soap:body use="literal" /> : 文本数据
-->
<binding name="HelloServiceImplPortBinding" type="tns:HelloServiceImpl">
<soap:binding transport="http://schemas.xmlsoap.org/soap/http"
style="document"></soap:binding>
<operation name="sayHello">
<soap:operation soapAction=""></soap:operation>
<input>
<soap:body use="literal"></soap:body>
</input>
<output>
<soap:body use="literal"></soap:body>
</output>
</operation>
</binding> <!--
service : 一个webservice的容器
name属性: 它用一指定客户端容器类
port : 用来指定一个服务器端处理请求的入口(就SEI的实现)
binding属性: 引用上面定义的<binding>
address : 当前webservice的请求地址
-->
<service name="HelloServiceImplService">
<port name="HelloServiceImplPort" binding="tns:HelloServiceImplPortBinding">
<soap:address location="http://localhost:8082/webserviceserver/helloService"></soap:address>
</port>
</service>
</definitions>
同时可以参考地址:https://www.cnblogs.com/yangh965/p/5046841.html
图解:
7、CXF支持的数据类型
1、基本数据类型:int、float、boolean等
2、引用类型
-String
-集合:数组、List、Set、Map
-自定义类型
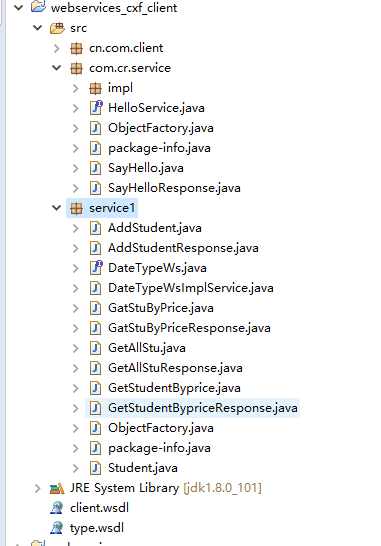
1、工程目录

此时仅仅添加了3个类:DateTypeWs.java DateTypeWsImpl.java Student.java
2、类
Student.java
package com.cr.bean;

public class Student {

    private String name;

    private int price;

        //.....

 }
DateTypeWs.java
package com.cr.service;

import java.util.List;

import java.util.Map;

import javax.jws.WebMethod;

import javax.jws.WebService;

import com.cr.bean.Student;

@WebService

public interface DateTypeWs {

    @WebMethod

    public boolean addStudent(Student stu);

    @WebMethod

    public Student gatStuByPrice(int price);

    @WebMethod

    public List<Student> getStudentByprice(int price);

    @WebMethod

    public Map<Integer, Student> getAllStu();

}
DateTypeWsImpl.java
package com.cr.service.impl;

import java.util.ArrayList;

import java.util.HashMap;

import java.util.List;

import java.util.Map;

import javax.jws.WebService;

import com.cr.bean.Student;

import com.cr.service.DateTypeWs;

@WebService

public class DateTypeWsImpl implements DateTypeWs {

    @Override

    public boolean addStudent(Student stu) {

        // TODO Auto-generated method stub

        System.out.println("addStudent:" + stu);

        return true;

    }

    @Override

    public Student gatStuByPrice(int price) {

        System.out.println("gatStuByPrice:" + price);

        return new Student("Mr",);

    }

    @Override

    public List<Student> getStudentByprice(int price) {

        System.out.println("getStudentByprice:" + price);

        List<Student> list = new ArrayList<Student>();

        Student s1 = new Student("Mr1",);

        Student s2= new Student("Mr2",);

        list.add(s2);

        list.add(s1);

        return list;

    }

    @Override

    public Map<Integer, Student> getAllStu() {

        System.out.println("getAllStu:");

        Map<Integer, Student> map = new HashMap<Integer, Student>();

        map.put(, new Student("Mr11",));

        map.put(, new Student("Mr22",));

        return map;

    }

}
启动服务:
package com.cr.server;

import javax.xml.ws.Endpoint;

import com.cr.service.impl.DateTypeWsImpl;

import com.cr.service.impl.HelloServiceImpl;

//发布service

public class server {

      public static void main(String[] args){

        String address = "http://localhost:8081/webserviceserver/helloService";

        Endpoint.publish(address , new HelloServiceImpl());

        String address1 ="http://localhost:8081/webserviceserver/dateTypeWs" ;

        Endpoint.publish(address1  , new DateTypeWsImpl());

        System.out.println("发布成功....");

    }

}

两个wsdl文件:

3、测试端:
将 保存为:
保存为:
cmd:
最终得到:
4、测试类:
package cn.com.client;

import java.util.List;

import service1.DateTypeWs;

import service1.DateTypeWsImplService;

import service1.Student;

public class client2 {

     public static void main(String[] args){

         DateTypeWsImplService factory = new DateTypeWsImplService();

         DateTypeWs ws = factory.getDateTypeWsImplPort();

         Student stu = new Student();

         stu.setName("mr");

         stu.setPrice();

         boolean sadd = ws.addStudent(stu);

         System.out.println("addStudent(stu):" + sadd);

         Student stu1 =  ws.gatStuByPrice();

         System.out.println(stu1);

         List<Student>  list = ws.getStudentByprice();

         System.out.println(list);

         System.out.println(ws.getAllStu());

    }

}
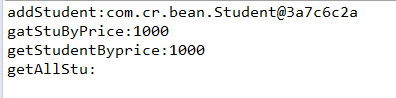
客户端的打印:

服务端的打印
此时可以看出关于CXF支持的数据类型
这里只做了简单的测试
其中Map的使用会有点问题(JDK不支持)
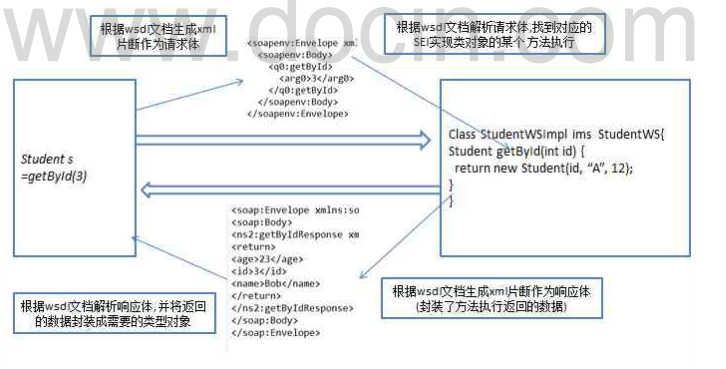
8、一次请求Web Service请求的流程
一次请求web Service请求的本质:
(1)、浏览器向服务器发送一个soap消息(http请求+xml片段)
(2)、服务器端处理晚请求之后,向客户端返回一个soap消息
流程:
5、Web Service-整合CXF的更多相关文章
- Web Service学习-CXF开发Web Service实例demo(一)
Web Service是什么? Web Service不是框架.更甚至不是一种技术. 而是一种跨平台,跨语言的规范 Web Service解决什么问题: 为了解决不同平台,不同语言所编写的应用之间怎样 ...
- Web Service学习-CXF开发Web Service的权限控制(二)
Web Service怎样进行权限控制? 解决思路:server端要求input消息总是携带实username.password信息,假设没实username和password信息.直接拒绝调用 解决 ...
- 【转】基于CXF Java 搭建Web Service (Restful Web Service与基于SOAP的Web Service混合方案)
转载:http://www.cnblogs.com/windwithlife/archive/2013/03/03/2942157.html 一,选择一个合适的,Web开发环境: 我选择的是Eclip ...
- Apache CXF实现Web Service(5)—— GZIP使用
Apache CXF实现Web Service(5)-- GZIP使用 参考来源: CXF WebService整合Spring Apache CXF实现Web Service(1)--不借助重量级W ...
- Apache CXF实战之四 构建RESTful Web Service
Apache CXF实战之一 Hello World Web Service Apache CXF实战之二 集成Sping与Web容器 Apache CXF实战之三 传输Java对象 这篇文章介绍一下 ...
- Web Service学习之一:Web Service原理
一.定义 Web Service 不是框架也不是技术 而是解决远程调用.跨平台调用.跨语言调用问题的一种规范. 二.应用1.同一个公司新.旧系统的整合:比如CRM系统与OA.客服系统相互调用2.不同公 ...
- Visual Studio 2010中创建ASP.Net Web Service
转自:http://blog.csdn.net/xinyaping/article/details/7331375 很多人在论坛里说,在Visual Studio 2010中不能创建“ASP.Net ...
- (转)在 Visual Studio 2010 中创建 ASP.Net Web Service
很多人在论坛里说,在Visual Studio 2010中不能创建“ASP.Net Web Service”这种project了,下面跟帖者云云,有的说这是因为微软已经将Web Service整合进W ...
- Web Service简单入门示例
Web Service简单入门示例 我们一般实现Web Service的方法有非常多种.当中我主要使用了CXF Apache插件和Axis 2两种. Web Service是应用服务商为了解决 ...
- Web Service(下)
4.WSDL文档 <?xml version='1.0' encoding='UTF-8'?> <wsdl:definitions xmlns:xsd="http://ww ...
随机推荐
- SpringBoot 之Quartz的使用
对于Quartz的使用,还是想说一句,SpringBoot真的很好用啊! 第一步:当然是引入依赖啦 <parent> <groupId>org.springframework. ...
- 【SSH网上商城项目实战06】基于DataGrid的数据显示
转自:https://blog.csdn.net/eson_15/article/details/51322262 1. 回顾一下第4节内容 在第4节中,我们使用EasyUI搭建好了左侧菜单栏,并且通 ...
- Eclipse3.2查找jre的问题
前几天遇到一个问题,最开始电脑上使用的是解压的JDK(带jre),但是不能打开jar文件.所以从网上下载了一个jre1.8,然后问题来了,Eclipse打开就报错,弹出一个框,在eclipse的目录下 ...
- svg矢量图标在html中的使用, (知识点:1.通过h5中的css实现点击变色,2.一个svg文件包含多个图标)
svg矢量文件体积小,不变形,比传统的png先进,比现在流行的icon-font灵活.然而在使用过程中还是遇到了很多坑.今天花了一天时间把经验整理出来,以供后来者借鉴.如果您从本文收益,请留言mark ...
- html中的行内元素和块级元素小结
一.首先我们总结下行内元素和块级元素有哪些: 行内元素: <a>标签可定义锚<abbr>表示一个缩写形式<acronym>定义只取首字母缩写<b>字体加 ...
- Python 获得汉字笔画
通过unihan的文件来实现. 只要是unihan中有kTotalStrokes字段,获取其笔画数. Hash也是非常简单清楚的,但想到这些unicode其实会有一个分布规律,就记录了一下, 利用此性 ...
- AdvStringGrid使用小结
结合最近自己做的一些工作,用到了第三方控件AdvStringGrid,这里就常用的一些技巧做个小小的总结 (1)如何设置表格固定的列数,如下图所示: 这里固定的列数为3列,通过设置下面属性来改变固定的 ...
- Docker Toolbox更换镜像源并下载centos7
- Ddos 反射性防护 simple
加固NTP服务: 1.通过Iptables配置只允许信任的IP,访问本机的UDP的123端口,修改配置文件执行echo "disable monitor" >> /et ...
- 前端静态资源版本更新与缓存之——通过gulp 在原html文件上自动化添加js、css版本号
原理 修改js和css文件 通过对js,css文件内容进行hash运算,生成一个文件的唯一hash字符串(如果文件修改则hash号会发生变化) 替换html中的js,css文件名,生成一个带版本号的文 ...