
springboot与swagger2的集成
springboot与swagger2的集成
1、出现的背景
随着互联网技术的发展,现在的网站架构基本都由原来的后端渲染变成了:前端渲染、先后端分离的形态,而前端和后端的唯一联系,变成了API接口;
API文档变成了前后端开发人员联系的纽带,变得越来越重要。包括app开发人员和后端直接的交流都是基于api文档。
手写Api文档的几个痛点:
- 文档需要更新的时候,需要再次发送一份给前端,也就是文档更新交流不及时。
- 接口返回结果不明确
- 不能直接在线测试接口,通常需要使用工具,比如postman
- 接口文档太多,不好管理
- swagger就是一款让你更好的书写API文档的框架。
2、什么是swagger2
编写和维护接口文档是每个程序员的职责,根据Swagger2可以快速帮助我们编写最新的API接口文档,再也不用担心开会前仍忙于整理各种资料了,间接提升了团队开发的沟通效率。
3、swagger2常用注解:
swagger通过注解表明该接口会生成文档,包括接口名、请求方法、参数、返回信息的等等。

    @Api:修饰整个类,描述Controller的作用

    @ApiOperation:描述一个类的一个方法,或者说一个接口

    @ApiParam:单个参数描述

    @ApiModel:用对象来接收参数

    @ApiProperty:用对象接收参数时,描述对象的一个字段

    @ApiResponse:HTTP响应其中1个描述

    @ApiResponses:HTTP响应整体描述

    @ApiIgnore:使用该注解忽略这个API

    @ApiError :发生错误返回的信息

    @ApiImplicitParam:一个请求参数

    @ApiImplicitParams:多个请求参数
@Api:用在请求的类上,表示对类的说明

    tags="说明该类的作用,可以在UI界面上看到的注解"

    value="该参数没什么意义,在UI界面上也看到,所以不需要配置"

@ApiOperation:用在请求的方法上,说明方法的用途、作用

    value="说明方法的用途、作用"

    notes="方法的备注说明"

@ApiImplicitParams:用在请求的方法上,表示一组参数说明

    @ApiImplicitParam:用在@ApiImplicitParams注解中,指定一个请求参数的各个方面

        name:参数名

        value:参数的汉字说明、解释

        required:参数是否必须传

        paramType:参数放在哪个地方

            · header --> 请求参数的获取:@RequestHeader

            · query --> 请求参数的获取:@RequestParam

            · path(用于restful接口)--> 请求参数的获取:@PathVariable

            · body(不常用)

            · form(不常用)

        dataType:参数类型,默认String,其它值dataType="Integer"

        defaultValue:参数的默认值

@ApiResponses:用在请求的方法上,表示一组响应

    @ApiResponse:用在@ApiResponses中,一般用于表达一个错误的响应信息

        code:数字,例如400

        message:信息,例如"请求参数没填好"

        response:抛出异常的类

@ApiModel:用于响应类上,表示一个返回响应数据的信息

            (这种一般用在post创建的时候,使用@RequestBody这样的场景,

            请求参数无法使用@ApiImplicitParam注解进行描述的时候)

    @ApiModelProperty:用在属性上,描述响应类的属性
4、SpringBoot 集成 Swagger2
1)、第一步:导入pom
<!-- Swagger -->

<dependency>

    <groupId>io.springfox</groupId>

    <artifactId>springfox-swagger-ui</artifactId>

    <version>2.8.</version>

</dependency>

<dependency>

    <groupId>io.springfox</groupId>

    <artifactId>springfox-swagger2</artifactId>

    <version>2.8.</version>

</dependency>

<!-- END Swagger -->
2)、编写SwaggerConfig.java配置类
import org.springframework.context.annotation.Bean;

import org.springframework.context.annotation.Configuration;

import springfox.documentation.builders.ApiInfoBuilder;

import springfox.documentation.builders.PathSelectors;

import springfox.documentation.builders.RequestHandlerSelectors;

import springfox.documentation.service.ApiInfo;

import springfox.documentation.spi.DocumentationType;

import springfox.documentation.spring.web.plugins.Docket;

import springfox.documentation.swagger2.annotations.EnableSwagger2;

@Configuration

@EnableSwagger2

public class SwaggerConfig {

    @Bean

    public Docket createRestApi() {

        return new Docket(DocumentationType.SWAGGER_2)

            .apiInfo(apiInfo())

            .select()

            .apis(RequestHandlerSelectors.basePackage("hello"))

            .paths(PathSelectors.any())

            .build();

    }

    private ApiInfo apiInfo() {

        return new ApiInfoBuilder()
        //页面标题

            .title("Spring Boot中使用Swagger2构建RESTful APIs")
        //描述

            .description("欢迎来到java思维导图社区学习")

            .termsOfServiceUrl("http://www.java-mindmap.com/")
        //版本号

            .version("1.0")

            .build();

    }

}
3)、编写测试的controller
package com.springboot.example.Controller;

import com.springboot.example.Service.StudentService;

import com.springboot.example.entity.Student;

import io.swagger.annotations.Api;

import io.swagger.annotations.ApiImplicitParam;

import io.swagger.annotations.ApiOperation;

import org.slf4j.Logger;

import org.slf4j.LoggerFactory;

import org.springframework.beans.factory.annotation.Autowired;

import org.springframework.web.bind.annotation.PathVariable;

import org.springframework.web.bind.annotation.RequestMapping;

import org.springframework.web.bind.annotation.RequestMethod;

import org.springframework.web.bind.annotation.RestController;

/**

 * Created by Administrator on 2017/9/13.

 */

@RestController

@RequestMapping("api")

@Api("swaggerDemoController相关的api")

public class SwaggerDemoController {

    @Autowired

    private StudentService studentService;

    private static final Logger logger= LoggerFactory.getLogger(SwaggerDemoController.class);

    @ApiOperation(value = "根据id查询学生信息", notes = "查询数据库中某个的学生信息")

    @ApiImplicitParam(name = "id", value = "学生ID", paramType = "path", required = true, dataType = "Integer")

    @RequestMapping(value = "/{id}", method = RequestMethod.GET)

    public Student getStudent(@PathVariable int id) {

        logger.info("开始查询某个学生信息");

        return studentService.selectStudentById(id);

    }

}
4)、启动项目 访问
访问路径:http://localhost:8080/swagger-ui.html
5)、查看页面的效果
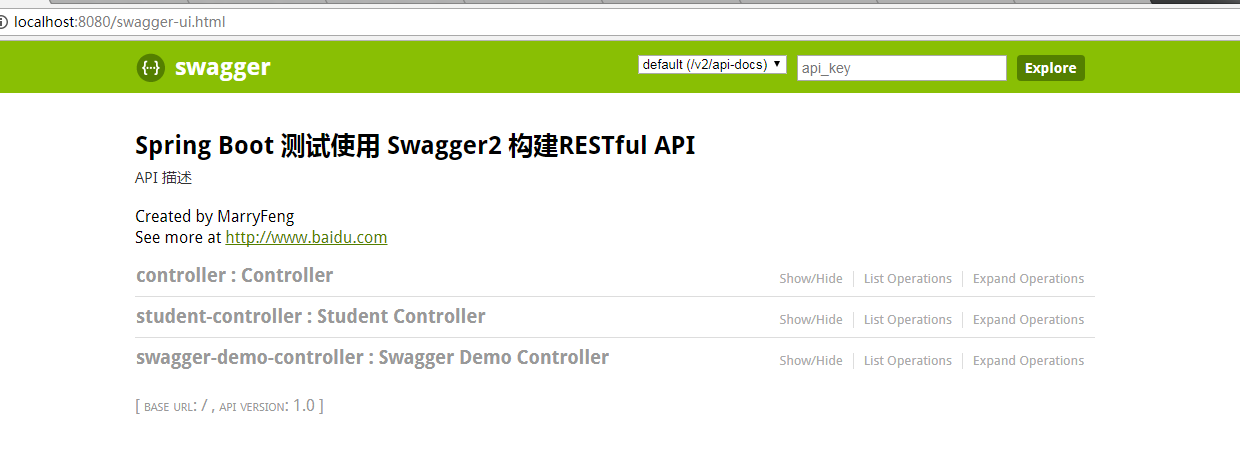

至此 SpringBoot 集成 Swagger2 完成!!!!!!
springboot与swagger2的集成的更多相关文章
- 微服务学习二:springboot与swagger2的集成
现在测试都提倡自动化测试,那我们作为后台的开发人员,也得进步下啊,以前用postman来测试后台接口,那个麻烦啊,一个字母输错就导致测试失败,现在swagger的出现可谓是拯救了这些开发人员,便捷之处 ...
- 微服务:springboot与swagger2的集成
现在测试都提倡自动化测试,那我们作为后台的开发人员,也得进步下啊,以前用postman来测试后台接口,那个麻烦啊,一个字母输错就导致测试失败,现在swagger的出现可谓是拯救了这些开发人员,便捷之处 ...
- Springboot+swagger2.7集成开发
Springboot+swagger2.7集成开发 本篇文章是介绍最新的springboot和swagger2.7集成开发和2.0稍微有一些出入: Springboot集成环境配置 Swagger2. ...
- 【转载】SpringBoot系列——Swagger2
微服务学习二:springboot与swagger2的集成:https://www.cnblogs.com/fengli9998/p/7522973.html 注:需要在启动类加 @EnableSwa ...
- SpringBoot | 第十章:Swagger2的集成和使用
前言 前一章节介绍了mybatisPlus的集成和简单使用,本章节开始接着上一章节的用户表,进行Swagger2的集成.现在都奉行前后端分离开发和微服务大行其道,分微服务及前后端分离后,前后端开发的沟 ...
- SpringBoot与Swagger2整合
一.Swagger简介与优势 相信各位在公司写API文档数量应该不少,当然如果你还处在自己一个人开发前后台的年代,当我没说,如今为了前后台更好的对接,还为了以后交接方便,都有要求写API文档. Swa ...
- SpringBoot(七):SpringBoot整合Swagger2
原文地址:https://blog.csdn.net/saytime/article/details/74937664 手写Api文档的几个痛点: 文档需要更新的时候,需要再次发送一份给前端,也就是文 ...
- spring-boot+mybatisPlus+shiro的集成demo 我用了5天
spring-boot + mybatis-plus + shiro 的集成demo我用了五天 关于shiro框架,我还是从飞机哪里听来的,就连小贱都知道,可我母鸡啊.简单百度了下,结论很好上手,比s ...
- springboot新增swagger2配置
转自http://www.cnblogs.com/jtlgb/p/8532433.html SpringBoot整合Swagger2 相信各位在公司写API文档数量应该不少,当然如果你还处在自己一个人 ...
随机推荐
- JavaScript RegExp.test() 方法
定义和用法: test() 方法用于检测一个字符串是否匹配某个模式. 语法: RegExpObject.test(string); RegExpObject:正则表达式; string:必须参数,要检 ...
- An interview question from MicroStrategy
去年校招时的一道面试题,觉得蛮有意思,贴出来. Question: Spy start at a, during an interval he moves |b| to right when b &g ...
- java如何集成支付宝移动快捷支付功能
项目需要,需要在客户端集成支付宝接口.第一次集成,过程还是挺简单的,不过由于支付宝官方文档写的不够清晰,也是走了一些弯路,下面把过程写出来分享给大家.就研究了一下:因为使用支付宝接口,就需要到支付宝官 ...
- 我们常说的CDN到底是什么?
程序员每天提及的无数词当中,有一个是「CDN」,Ta的中文名是「内容分发网络」,读中文是令人蒙逼的,英文名是Content Delivery Network. CDN有啥用呢?它主要用来解决什么问题呢 ...
- win10自带虚拟机安装CentOS7系统(转)
出处:http://blog.csdn.net/bimabushihaodongxi/article/details/53677490 话说工欲善其事,必先利其器,在我准备学习Linux之前先要完成l ...
- 图形查询属性(IdentifyTask实现查询)//查询本地服务
主页代码: <!DOCTYPE html> <html> <head> <meta charset="utf-8"> <tit ...
- Kinect相机位姿
可以直接得到吧 还是要反求 pose.txt 里面一共有5个七参数.正好对应5幅图片.
- (广搜)可口可乐 -- hdu -- 1495
链接: http://acm.hdu.edu.cn/showproblem.php?pid=1495 Time Limit: 2000/1000 MS (Java/Others) Memory ...
- Python + Robotframework + Appium 之APP自动化测试小试牛刀(Android)
Robotframework如何好?这里先不说了~ Python更不用说了~ Appium前面的文章有介绍~ 今天直接来Python+Robotframework+Appium 三者结合起来,对And ...
- 百度地图api描绘车辆历史轨迹图
最近公司在做项目需需求:车辆定位后在地图显示历史轨迹的功能 一开始使用了google的地图api,但是发现会一直关闭,索性支持下国产,使用了百度地图api search方法把两个点连接成线后,会出现起 ...