
webpack实践(四)- html-webpack-plugin
webpack系列博客中代码均在github上:https://github.com/JEmbrace/webpack-practice
《webpack实践(三)- html-webpack-plugin》
《webpack实践(四)- html-webpack-plugin》
一.前言
在上一篇 《webpack实践(三)- html-webpack-plugin》文章中,我们简单的使用了一下html-webpack-pluin这个插件:创建实例并传入template选项,并且演示了插件生成一个新模板并将打包后的脚本自动引入到模板文件中和插件使用原有模板并将打包后的脚本自动引入到模板文件中这两个功能。
那对于html-webpack-plugin这个插件来说,除了前面演示过的template配置项之外,它还有很多可配置的选项。
接下来我们就来研究一下html-webpack-plugin这个插件其他可选的配置项。
二.title
title配置项可用于生成html的标题,基本语法: title:{String}
webpack.config.js
// 第一步:引入

var htmlWepackPlugin = require('html-webpack-plugin')

var path = require('path');

module.exports = {

  mode: 'development',

  entry: {

    main: './index.js'

  },

  output: {

    path: path.resolve(__dirname,'dist'),

    filename: 'index.bundle.js'

  },

  // 第二步:创建html-webpack-plugin的实例,配置到plugins选项中

  plugins:[

    new htmlWepackPlugin({

      // title配置项可用于生成html的标题

      title: 'webpack实践(四)- html-webpack-plugin',

      template: './index.html'

    })

  ]

};
使用webpack打包后的结果文件dist/index.html
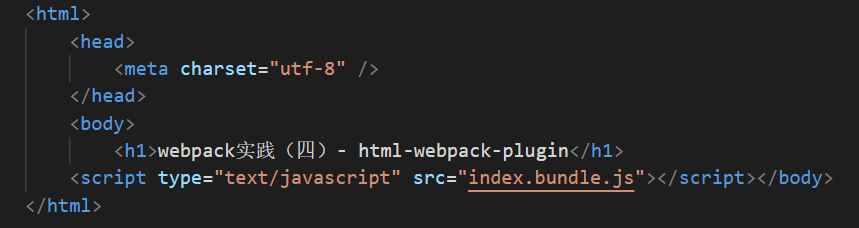
我们发现打包后的结果文件并没有生成相应的title,那实际上要想模板文件正常显示配置的title这里有两种办法:
第一种就是不使用我们自己编写的index.html模板,即不配置template选项,让html-webpack-plugin帮我们生成一个模板文件
我们将webpack.config.js中的template选项注释掉
webpack.config.js
// 第一步:引入

var htmlWepackPlugin = require('html-webpack-plugin')

var path = require('path');

module.exports = {

  mode: 'development',

  entry: {

    main: './index.js'

  },

  output: {

    path: path.resolve(__dirname,'dist'),

    filename: 'index.bundle.js'

  },

  // 第二步:创建html-webpack-plugin的实例,配置到plugins选项中

  plugins:[

    new htmlWepackPlugin({

      // title配置项可用于生成html的标题

      title: 'webpack实践(四)- html-webpack-plugin',

      // template: './index.html'

    })

  ]

};
重新打包查看dist/index.html 结果:

可以看到title已经成功显示。
那第二种就是当我们需要使用我们自己的模板,即有template配置选项的时候。那么这个时候我们就需要在模板中使用 <%= htmlWebpackPlugin.options.title%>这样的语法去获取title并且展示到模板中。
我们先将刚刚注释的template放开
webpack.config.js
// 第一步:引入

var htmlWepackPlugin = require('html-webpack-plugin')

var path = require('path');

module.exports = {

  mode: 'development',

  entry: {

    main: './index.js'

  },

  output: {

    path: path.resolve(__dirname,'dist'),

    filename: 'index.bundle.js'

  },

  // 第二步:创建html-webpack-plugin的实例,配置到plugins选项中

  plugins:[

    new htmlWepackPlugin({

      // title配置项可用于生成html的标题

      title: 'webpack实践(四)- html-webpack-plugin',

      template: './index.html'

    })

  ]

};
然后在修改根目录下我们的模板文件index.html
<html>

    <head>

        <meta charset="utf-8" />

        <title><%= htmlWebpackPlugin.options.title %></title>

    </head>

    <body>

        <h1>webpack实践(四)- html-webpack-plugin</h1>

    </body>

</html>
打包查看dist/index.html结果文件

可以看到,这次使用了我们自己的模板,并且将title成功的应用到了打包后的结果模板中。
三.filename
filename表示的是我们最终打包后的模板文件名,基本语法: filename:{String}
前面的配置中,我们没有指定filename,生成后的模板名都是index.html,也可知当该参数缺省时,生成的模板文件名默认为index.html。
接着,我们加入这个配置项
webpack.config.js
// 第一步:引入

var htmlWepackPlugin = require('html-webpack-plugin')

var path = require('path');

module.exports = {

  mode: 'development',

  entry: {

    main: './index.js'

  },

  output: {

    path: path.resolve(__dirname,'dist'),

    filename: 'index.bundle.js'

  },

  // 第二步:创建html-webpack-plugin的实例,配置到plugins选项中

  plugins:[

    new htmlWepackPlugin({

      // title配置项可用于生成html的标题

      title: 'webpack实践(四)- html-webpack-plugin',

      template: './index.html',

      filename: 'resultIndex.html'

    })

  ]

};
打包查看生成的目录和文件
备注:本次的打包结果不会覆盖上次的结果,因此为了看清楚本次结果,最好将上次打包后的dist目录删除。
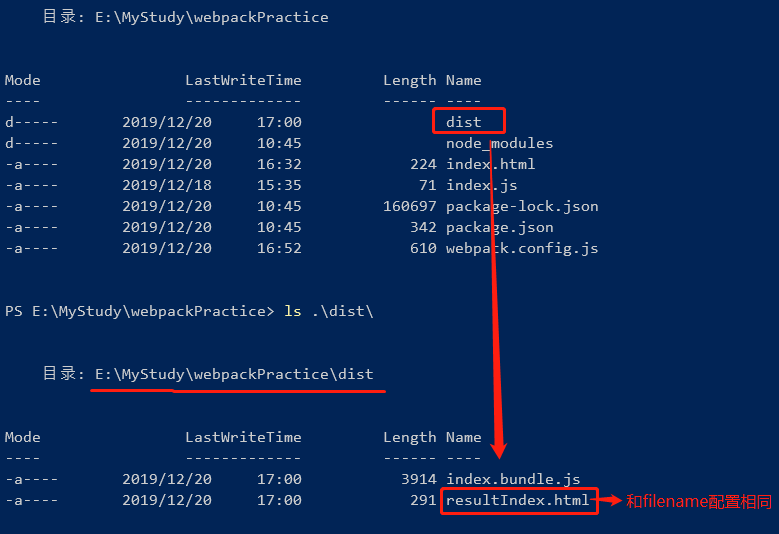
可以看到打包后的结果文件已经和fielname的配置一致。
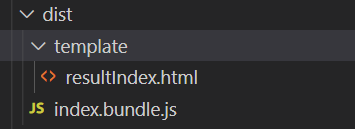
那么filename的值还可以是一个路径
webpack.config.js
// 第一步:引入

var htmlWepackPlugin = require('html-webpack-plugin')

var path = require('path');

module.exports = {

  mode: 'development',

  entry: {

    main: './index.js'

  },

  output: {

    path: path.resolve(__dirname,'dist'),

    filename: 'index.bundle.js'

  },

  // 第二步:创建html-webpack-plugin的实例,配置到plugins选项中

  plugins:[

    new htmlWepackPlugin({

      // title配置项可用于生成html的标题

      title: 'webpack实践(四)- html-webpack-plugin',

      template: './index.html',

      filename: 'template/resultIndex.html'

    })

  ]

};
打包后的结果
四.inject
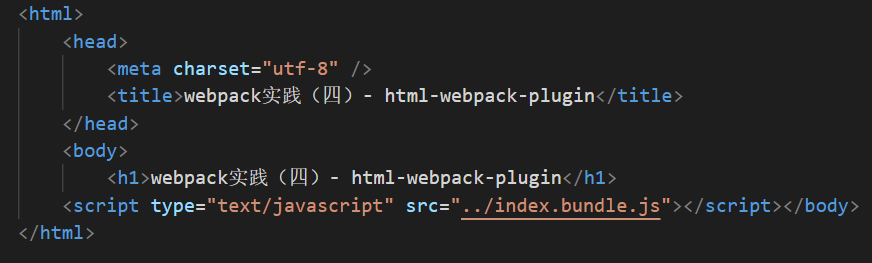
inject配置项用于指定打包后的javascript资源引入位置,基本语法: inject:{Boolean|String}。其中Boolean有两个值可配置:true和false;String类型也有两个值可选:‘body’和‘head’。对于Boolean类型的true值和String类型的body值,会指定将打包后的javascript资源引入位置放到body元素的底部;而false指定模板不引入javascript资源;head则指定将资源引入位置放到head元素中。
那么接下来我们将inject的值分别配置为true、false、body和head这四个值。
1.inject:true
webpack.config.js
// 第一步:引入

var htmlWepackPlugin = require('html-webpack-plugin')

var path = require('path');

module.exports = {

  mode: 'development',

  entry: {

    main: './index.js'

  },

  output: {

    path: path.resolve(__dirname,'dist'),

    filename: 'index.bundle.js'

  },

  // 第二步:创建html-webpack-plugin的实例,配置到plugins选项中

  plugins:[

    new htmlWepackPlugin({

      // title配置项可用于生成html的标题

      title: 'webpack实践(四)- html-webpack-plugin',

      template: './index.html',

      filename: 'template/resultIndex.html',

      inject: true

    })

  ]

};
结果文件
dist/template/resultIndex.html

2.inject:false
webpack.config.js
// 第一步:引入

var htmlWepackPlugin = require('html-webpack-plugin')

var path = require('path');

module.exports = {

  mode: 'development',

  entry: {

    main: './index.js'

  },

  output: {

    path: path.resolve(__dirname,'dist'),

    filename: 'index.bundle.js'

  },

  // 第二步:创建html-webpack-plugin的实例,配置到plugins选项中

  plugins:[

    new htmlWepackPlugin({

      // title配置项可用于生成html的标题

      title: 'webpack实践(四)- html-webpack-plugin',

      template: './index.html',

      filename: 'template/resultIndex.html',

      inject: false

    })

  ]

};
结果文件
dist/template/resultIndex.html

3.inject:body
webpack.config.js
// 第一步:引入

var htmlWepackPlugin = require('html-webpack-plugin')

var path = require('path');

module.exports = {

  mode: 'development',

  entry: {

    main: './index.js'

  },

  output: {

    path: path.resolve(__dirname,'dist'),

    filename: 'index.bundle.js'

  },

  // 第二步:创建html-webpack-plugin的实例,配置到plugins选项中

  plugins:[

    new htmlWepackPlugin({

      // title配置项可用于生成html的标题

      title: 'webpack实践(四)- html-webpack-plugin',

      template: './index.html',

      filename: 'template/resultIndex.html',

      inject: 'body'

    })

  ]

};
结果文件
dist/template/resultIndex.html
4.inject:head
webpack.config.js
// 第一步:引入

var htmlWepackPlugin = require('html-webpack-plugin')

var path = require('path');

module.exports = {

  mode: 'development',

  entry: {

    main: './index.js'

  },

  output: {

    path: path.resolve(__dirname,'dist'),

    filename: 'index.bundle.js'

  },

  // 第二步:创建html-webpack-plugin的实例,配置到plugins选项中

  plugins:[

    new htmlWepackPlugin({

      // title配置项可用于生成html的标题

      title: 'webpack实践(四)- html-webpack-plugin',

      template: './index.html',

      filename: 'template/resultIndex.html',

      inject: 'head'

    })

  ]

};
结果文件
dist/template/resultIndex.html

五.minify
minify的作用就是对打包后的html进行压缩配置,基本语法为:minify:{Boolean|Object}
minify的默认值为Boolean类型的false值,表示不对html结果进行压缩;
对于Object类型的,minify也有很多可选的配置项。
1.caseSensitive
是否以区分大小写的方式处理自定义HTML标签的属性,默认值为fasle,表示不区分大小写(不区分大小写即源文件中的包含大小写的属性会被转化为小写)。
设置minify.caseSensitive为fasle
webpack.config.js

源文件和打包后的结果文件对比
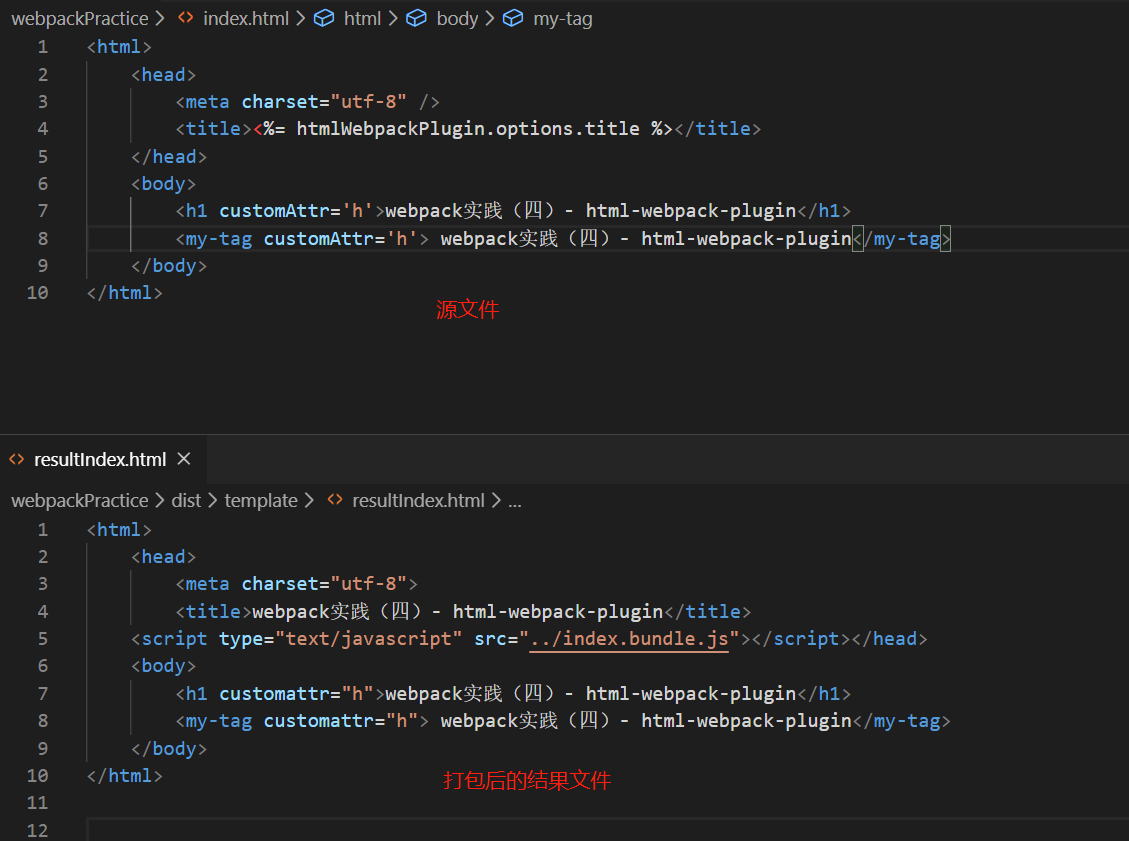
可以看到,当minify设置为false的时候,不管是自定义标签的属性,还是HTML原有的标签属性,都会全部转化为小写(这里的结果和官方文档的说法有些出入)
设置minify.caseSensitive为true
webpack.config.js
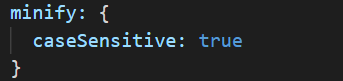
源文件和打包后的结果文件对比

minify设置为true即表示区分大小写,因此可看到源文件中大写的属性在结果文件中保持不变。
2.minifyCSS
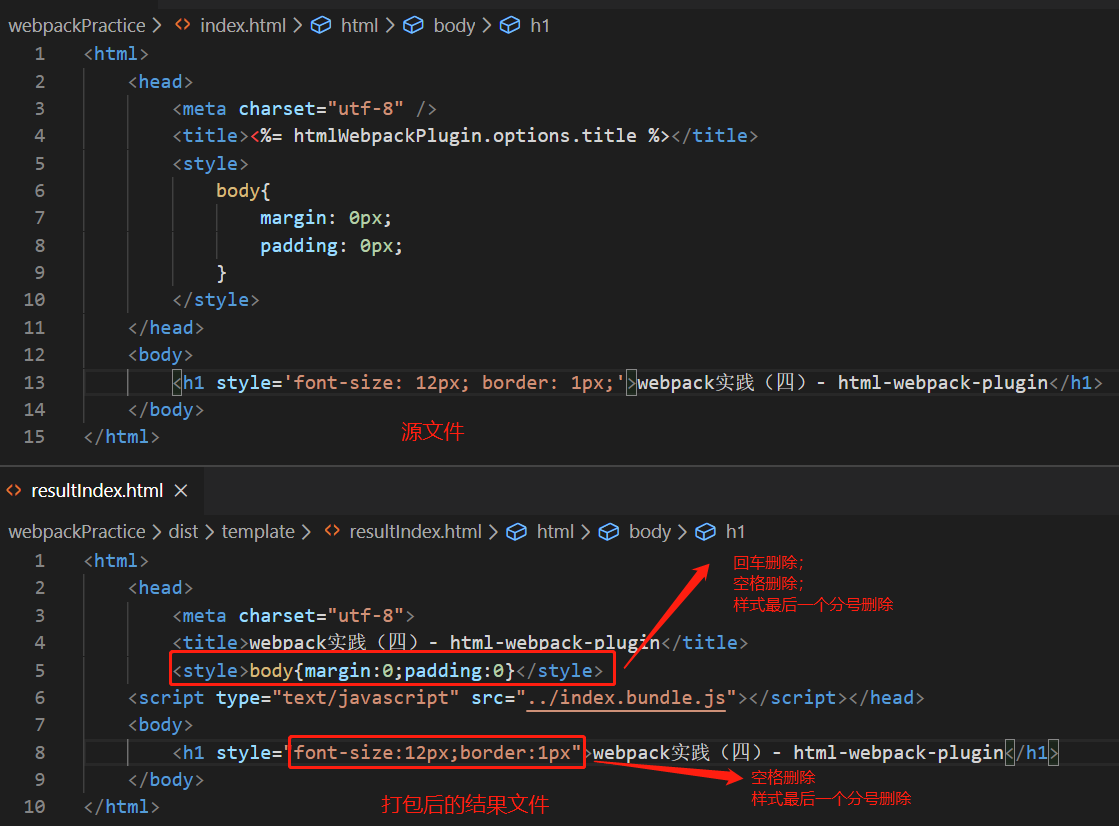
minifyCSS表示是否压缩html中的样式,其中样式包括style标签内部的样式和写在元素上的样式。其默认值为false,表示不对这些样式做额外处理,这里不演示值为false的配置。
webpack.config.js
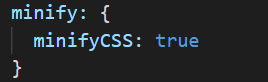
源文件和打包后的结果文件对比
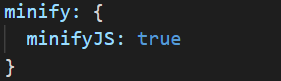
3.minifyJS
压缩html中的JavaScript代码。
webpack.config.js
源模板文件
<html>

    <head>

        <meta charset="utf-8" />

        <title><%= htmlWebpackPlugin.options.title %></title>

    </head>

    <body>

        <h1>webpack实践(四)- html-webpack-plugin</h1>

        <script type="text/javascript">

            var h1Ele = document.getElementsByTagName('h1')[0];

            var innerHTML = h1Ele.innerHTML;

            console.log(innerHTML);

        </script>

    </body>

</html>
打包后的模板文件
<html>

    <head>

        <meta charset="utf-8">

        <title>webpack实践(四)- html-webpack-plugin</title>

    <script type="text/javascript" src="../index.bundle.js"></script></head>

    <body>

        <h1>webpack实践(四)- html-webpack-plugin</h1>

        <script type="text/javascript">var h1Ele=document.getElementsByTagName("h1")[0],innerHTML=h1Ele.innerHTML;console.log(innerHTML)</script>

    </body>

</html>
可以看到minifyJS对JavaScript代码不仅进行了空格、换行和最后一行代码分号的进行了删除,同时在变量的定义也和源代码有些差异。
4.removeComments
这个从字面意思就能看出来是删除HTML模板中的注释代码,默认值为false,表示不删除注释。
而且当该项配置设置为true时,仅删除html代码中的注释,不删除style和javascript代码片段中的注释。
webpack.config.js

源文件
<html>

    <head>

        <meta charset="utf-8" />

        <title><%= htmlWebpackPlugin.options.title %></title>

        <style>

            /* 写点样式 */

            h1{

                font-size: 12px;

                color: #ccc;

            }

        </style>

    </head>

    <body>

        <!-- 这里是h1标签 -->

        <h1>webpack实践(四)- html-webpack-plugin</h1>

        <script type="text/javascript">

            // 获取h1元素,并打印h1元素的innerHTML

            var h1Ele = document.getElementsByTagName('h1')[0];

            var innerHTML = h1Ele.innerHTML;

            console.log(innerHTML);

        </script>

    </body>

</html>
打包后的结果文件
<html>

    <head>

        <meta charset="utf-8">

        <title>webpack实践(四)- html-webpack-plugin</title>

        <style>

            /* 写点样式 */

            h1{

                font-size: 12px;

                color: #ccc;

            }

        </style>

    <script type="text/javascript" src="../index.bundle.js"></script></head>

    <body>

        <h1>webpack实践(四)- html-webpack-plugin</h1>

        <script type="text/javascript">

            // 获取h1元素,并打印h1元素的innerHTML

            var h1Ele = document.getElementsByTagName('h1')[0];

            var innerHTML = h1Ele.innerHTML;

            console.log(innerHTML);

        </script>

    </body>

</html>
从源文件中可以看到,我们给html代码中、style和javascript代码中均添加了注释,而打包后的结果文件中只有html中的注释被移除。
六.总结
本篇文章总结了html-webpack-plugins插件中常用的一些可选配置项,分别为:title、filename、inject和minify。
而实际上还有一些常见的可选配置项没有列出来,后续若能在实际需求中用到,在继续补充。

webpack实践(四)- html-webpack-plugin的更多相关文章
- webpack入门(四)——webpack loader 和plugin
什么是loader loaders是你用在app源码上的转换元件.他们是用node.js运行的,把源文件作为参数,返回新的资源的函数. 例如,你可以用loaders告诉webpack加载 coffee ...
- webpack实践总结
一.Loader写法及执行顺序 从webpack2起,loader的格式如下: module: { rules: [ {test: /\.css$/, use: ['style-loader','cs ...
- webpack实践(一)- 先入个门
一.前言 webpack是个啥呢?看官网的这段描述. webpack 是一个现代 JavaScript 应用程序的静态模块打包器(module bundler) 在我以前做纯html.css. ...
- webpack实践(三)- html-webpack-plugin
webpack系列博客中代码均在github上:https://github.com/JEmbrace/webpack-practice <webpack实践(一)- 先入个门> < ...
- webpack实践(二)- webpack配置文件
webpack系列博客中代码均在github上:https://github.com/JEmbrace/webpack-practice <webpack实践(一)- 先入个门> < ...
- npm scripts + webpack 实践经验(React、Nodejs)
最近用Webpack+npm scripts+Mongodb+Nodejs+React写了个后台项目,在用Webpack构建过程中遇到了许多坑,就写出来分享一下. 构建工具五花八门,想当年刚学会Gru ...
- webpack4 系列教程(十四):Clean Plugin and Watch Mode
作者按:因为教程所示图片使用的是 github 仓库图片,网速过慢的朋友请移步<webpack4 系列教程(十四):Clean Plugin and Watch Mode>原文地址.更欢迎 ...
- [Webpack] Use the Webpack Dashboard to Monitor Webpack Operations
Learn how to use the new Webpack Dashboard from Formidable Labs to display a pretty, useful output f ...
- 每天记录一点:NetCore获得配置文件 appsettings.json vue-router页面传值及接收值 详解webpack + vue + node 打造单页面(入门篇) 30分钟手把手教你学webpack实战 vue.js+webpack模块管理及组件开发
每天记录一点:NetCore获得配置文件 appsettings.json 用NetCore做项目如果用EF ORM在网上有很多的配置连接字符串,读取以及使用方法 由于很多朋友用的其他ORM如S ...
随机推荐
- windows系统与SQL SERVER 2008数据库服务性能监控分析简要
软件系统性能测试体系流程介绍之windows系统与SQL SERVER 2008数据库服务性能监控分析简要 目前大部分测试人员对操作系统资源.中间件.数据库等性能监控分析都是各自分析各自的监控指标方式 ...
- kali linux 修改更新源和更新命令
1.修改sources.list源文件: vim /etc/apt/sources.list #aliyun 阿里云 deb http://mirrors.aliyun.com/kali kali-r ...
- python3 pip报错 TypeError: 'module' object is not callable
使用命令:python -m pip install xx即可,需要在pip前加python -m
- 图解AQS的设计与实现,手摸手带你实现一把互斥锁!
AQS是并发编程中非常重要的概念,它是juc包下的许多并发工具类,如CountdownLatch,CyclicBarrier,Semaphore 和锁, 如ReentrantLock, ReaderW ...
- Linux -- 进程管理之僵尸进程
UNIX 存在一种机制:在每个进程退出的同时,操作系统释放该进程所有资源,但仍然保留一定的信息(PID / Status / runtime),直到父进程执行 wait() / waitpid(),以 ...
- Erlang/Elixir精选-第1期
第1期(20191202) 文章 A short guide to the structure and internals of the Erlang distributed messaging fa ...
- Slickflow.Graph 开源工作流引擎快速入门之四: 图形编码建模工具使用手册
前言: 业务人员绘制流程时,通常使用图形GUI界面交互操作来完成,然而对于需要频繁操作或者管理较多流程的系统管理用户,就需要一款辅助工具,来帮助他们快速完成流程的创建和编辑更新.Slickflow.G ...
- 个人收藏--未整理—C# http/https 上传下载文件
c# HTTP/HTTPS 文件上传. 分类: .net 2015-02-03 08:36 541人阅读 评论(0) 收藏 举报 方法主体 [csharp] view plaincopy public ...
- SpringBoot项目集成Hystrix
Hystrix Hystrix是由Netflix开源的一个服务隔离组件,通过服务隔离来避免由于依赖延迟.异常,引起资源耗尽导致系统不可用的解决方案. 1.什么是服务熔断 服务熔断就是对该服务的调用 ...
- 【Java并发系列】----JUC之Lock
显式锁 Lock 在Java 5.0之前,协调共享对象的访问时可以使用的机制只有synchronized和volatile.Java 5.0后增加了一些新的机制,但并不是一种替代内置锁的方法,而是当内 ...