
ibatis入门实例(完整)
一:首先展示一下我的web文件结构,首先导入Ibatis所需jar和数据库驱动,从第二步开始跟着笔者一步步来
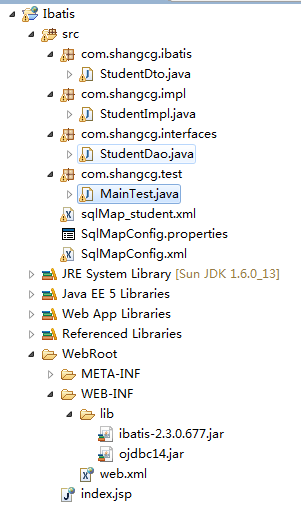
二:数据库建测试表
CREATE TABLE STUDENT (
ID NUMBER(5),
NAME VARCHAR2(10),
SEX VARCHAR2(10),
AGE NUMBER(10),
ADDRESS VARCHAR2(10),
CONSTRAINT PK_ID PRIMARY KEY(ID)
);
三:创建SqlMapConfig.xml文件
<?xml version="1.0" encoding="UTF-8" ?>

<!DOCTYPE sqlMapConfig PUBLIC "-//iBATIS.com//DTD SQL Map Config 2.0//EN"  "http://www.ibatis.com/dtd/sql-map-config-2.dtd">

<sqlMapConfig>

    <properties resource="SqlMapConfig.properties" />

    <transactionManager type="JDBC">

        <dataSource type="SIMPLE">

            <property name="JDBC.Driver" value="${driver}" />

            <property name="JDBC.ConnectionURL" value="${url}" />

            <property name="JDBC.Username" value="${username}" />

            <property name="JDBC.Password" value="${password}" />

        </dataSource>

    </transactionManager>

    <sqlMap resource="sqlMap_student.xml" />

</sqlMapConfig>
四:创建SqlMapConfig.properties,将用户名和密码改成自己的
driver=oracle.jdbc.driver.OracleDriver

url=jdbc:oracle:thin:@localhost:1521:orcl

username=ynsb1

password=1
五 创建sqlMap_student.xml映射文件,注意parameterClass要改成自己的pojo类
<?xml version="1.0" encoding="UTF-8"?>

<!DOCTYPE sqlMap PUBLIC "-//iBATIS.com//DTD SQL Map 2.0//EN" "http://www.ibatis.com/dtd/sql-map-2.dtd">

<sqlMap namespace="Test">

    <statement id="insert_student"

        parameterClass="com.shangcg.ibatis.StudentDto">

        insert into student(

        id,name,age,sex,address) values(

        #id#,#name#,#age#,#sex#,#address# )

    </statement>

    <statement id="delete_all_student"

        parameterClass="com.shangcg.ibatis.StudentDto">

        delete from student

    </statement>

    <statement id="deleteByID_student"

        parameterClass="com.shangcg.ibatis.StudentDto">

        delete from student where

        id = #id#

    </statement>

    <statement id="updataStudent_test"

        parameterClass="com.shangcg.ibatis.StudentDto">

        update student set

        name=#name#,sex=#sex#,age=#age#,address=#address#

        where id = #id#

    </statement>

    <statement id="select_all_student"

        resultClass="com.shangcg.ibatis.StudentDto">

        select * from student order by id

    </statement>

    <statement id="selectByID_student"

        parameterClass="com.shangcg.ibatis.StudentDto"

        resultClass="com.shangcg.ibatis.StudentDto">

        select * from student

        where id = #id#

        order by id

    </statement>

</sqlMap>
六:配置文件创建完成,接下来创建java类
1)创建StudentDto
import java.sql.Date;

public class StudentDto {

    // 注意这里需要保证有一个无参构造方法,因为包括Hibernate在内的映射都是使用反射的,如果没有无参构造可能会出现问题

     //学生ID

    private int id = 0;

    //学生姓名

    private String name = "";

    //学生性别

    private String sex = "";

    //学生年龄

    private int age = 0;

    //学生地址

    private String address = "";

    public int getId() {

        return id;

    }

    public void setId(int id) {

        this.id = id;

    }

    public String getName() {

        return name;

    }

    public void setName(String name) {

        this.name = name;

    }

    public String getSex() {

        return sex;

    }

    public void setSex(String sex) {

        this.sex = sex;

    }

    public int getAge() {

        return age;

    }

    public void setAge(int age) {

        this.age = age;

    }

    public String getAddress() {

        return address;

    }

    public void setAddress(String address) {

        this.address = address;

    }

}
2)创建接口StudentDao
import java.util.ArrayList;

import com.ibatis.sqlmap.client.SqlMapClient;

import com.shangcg.ibatis.StudentDto;

public interface StudentDao {

     //添加student表的数据

    public void addStudent(SqlMapClient sqlMap,StudentDto studentdto);

    //删除student表的数据

    public void delStudent(SqlMapClient sqlMap);

    //删除student表的指定ID数据

    public void delStudentByID(SqlMapClient sqlMap,StudentDto studentdto);

    //更新student表的数据

    public void updataStudent(SqlMapClient sqlMap,StudentDto studentdto);

    //查询student表的所有数据

    public ArrayList selectStudent(SqlMapClient sqlMap);

    //查询student表的指定ID数据

    public StudentDto selectStudentByID(SqlMapClient sqlMap,StudentDto studentdto);

}
3)创建实现类StudentImpl
import java.sql.SQLException;

import java.util.ArrayList;

import com.ibatis.sqlmap.client.SqlMapClient;

import com.shangcg.ibatis.StudentDto;

import com.shangcg.interfaces.StudentDao;

public class StudentImpl implements StudentDao {

     //添加student表的数据

    public void addStudent(SqlMapClient sqlMap, StudentDto studentdto) {

        try {

            sqlMap.insert("insert_student", studentdto);

        } catch (SQLException e) {

            e.printStackTrace();

        }

    }

    //删除student表的数据

    public void delStudent(SqlMapClient sqlMap) {

        try {

            sqlMap.delete("delete_all_student", null);

        } catch (SQLException e) {

            e.printStackTrace();

        }

    }

    //删除student表的指定ID数据

    public void delStudentByID(SqlMapClient sqlMap, StudentDto studentdto) {

        try {

            sqlMap.delete("deleteByID_student",studentdto );

        } catch (SQLException e) {

            e.printStackTrace();

        }

    }

    //更新student表的数据

    public void updataStudent(SqlMapClient sqlMap, StudentDto studentdto) {

        try {

            sqlMap.update("updataStudent_test",studentdto );

        } catch (SQLException e) {

            e.printStackTrace();

        }

    }

    //查询student表的所有数据

    public ArrayList selectStudent(SqlMapClient sqlMap) {

        //保存查询结果

        ArrayList rsList = new ArrayList();

        try {

            rsList = (ArrayList)sqlMap.queryForList("select_all_student","");

        } catch (SQLException e) {

            e.printStackTrace();

        }

        return rsList;

    }

    //查询student表的指定ID数据

    public StudentDto selectStudentByID(SqlMapClient sqlMap, StudentDto studentdto) {

        //返回后保存在info中

        StudentDto info = new StudentDto();

        try {

            info = (StudentDto)sqlMap.queryForObject("selectByID_student", studentdto);

        } catch (SQLException e) {

            e.printStackTrace();

        }

        return info;

    }

}
4)创建MainTest 测试类
import java.io.IOException;

import java.io.Reader;

import java.util.ArrayList;

import com.ibatis.common.resources.Resources;

import com.ibatis.sqlmap.client.SqlMapClient;

import com.ibatis.sqlmap.client.SqlMapClientBuilder;

import com.shangcg.ibatis.StudentDto;

import com.shangcg.impl.StudentImpl;

public class MainTest {

     public StudentImpl impl = new StudentImpl();

        public StudentDto info = new StudentDto();

        public static SqlMapClient sqlmapclient = null;

        static {

            try {

                //读取xml文件

                Reader reader = Resources.getResourceAsReader("SqlMapConfig.xml");

                sqlmapclient = SqlMapClientBuilder.buildSqlMapClient(reader);

                reader.close();

            } catch (IOException e) {

                e.printStackTrace();

            }

        }

        public static void main(String []args){

            MainTest stu = new MainTest();

            System.out.println("------------------------------- start ------------------------------");

            //以下为各种方法测试

            //添加student表的数据

            stu.addStudent_test();

            //删除student表的数据

            //stu.delStudent_test();

            //删除student表的指定ID数据

            //stu.delStudentByID_test();

            //更新student表的数据

            //stu.updataStudent_test();

            //查询student表的所有数据

            //stu.selectStudent_test();

            //查询student表的所有数据

            //stu.selectStudentByID_test();

            System.out.println("-------------------------------  end  ------------------------------");

        }

        //添加student表的数据

        public void addStudent_test(){

            //把要插入的数据填入info对象中

            info.setId(5);

            info.setName("zh2208");

            info.setSex("男");

            info.setAge(24);

            info.setAddress("上海");

            impl.addStudent(sqlmapclient, info);  //参数就是sqlMap_student.xml中配置对应的id

        }

        //删除student表的数据

        public void delStudent_test(){

            impl.delStudent(sqlmapclient);

        }

        //删除student表的指定ID数据

        public void delStudentByID_test(){

            //指定ID

            info.setId(1);

            impl.delStudentByID(sqlmapclient,info);

        }

        //更新student表的数据

        public void updataStudent_test(){

            //把要更新的数据填入info对象中

            info.setId(6);

            info.setName("zh2208up");

            info.setSex("男");

            info.setAge(20);

            info.setAddress("上海up");

            impl.updataStudent(sqlmapclient, info);

        }

        //查询student表的所有数据

        public void selectStudent_test(){

            StudentDto stu_dto = new StudentDto();

            //检索结果保存到list中

            ArrayList resultList = impl.selectStudent(sqlmapclient);

            for(int i = 0; i < resultList.size();i++){

                stu_dto = (StudentDto) resultList.get(i);

                //打印对象中的信息

                show(stu_dto);

            }

        }

        //查询student表的指定ID数据

        public void selectStudentByID_test(){

            StudentDto stu_dto = new StudentDto();

            info.setId(1);

            stu_dto = impl.selectStudentByID(sqlmapclient,info);

            if(stu_dto != null){

                show(stu_dto);

            }else{

                System.out.println("no data!!!!");

            }

        }

        //打印查询结果

        public void show(StudentDto stu_dto){

            System.out.print("学生ID :" + stu_dto.getId() + " ; ");

            System.out.print("学生姓名 :" + stu_dto.getName() + " ; ");

            System.out.print("学生性别 :" + stu_dto.getSex() + " ; ");

            System.out.print("学生年龄 :" + stu_dto.getAge() + " ; ");

            System.out.print("学生地址 :" + stu_dto.getAddress());

            System.out.println();

        }

}
ibatis入门实例(完整)的更多相关文章
- mybatis 详解(二)------入门实例(基于XML)
通过上一小节,mybatis 和 jdbc 的区别:http://www.cnblogs.com/ysocean/p/7271600.html,我们对 mybatis有了一个大致的了解,下面我们通过一 ...
- mybatis 详解(三)------入门实例(基于注解)
1.创建MySQL数据库:mybatisDemo和表:user 详情参考:mybatis 详解(二)------入门实例(基于XML) 一致 2.建立一个Java工程,并导入相应的jar包,具体目录如 ...
- SoapUI简介和入门实例解析
SoapUI简介 SoapUI是一个开源测试工具,通过soap/http来检查.调用.实现Web Service的功能/负载/符合性测试.该工具既可作为一个单独的测试软件使用,也可利用插件集成到Ecl ...
- 【React】入门实例
React 可以灵活的应用在各种各样的项目中.你可以用它来创建新的应用程序,你也可以逐步引用而不改变现有的代码库. React 起源于 Facebook 的内部项目,因为该公司对市场上所有 JavaS ...
- React 入门实例
React 入门实例教程 一.安装 React 的安装包,可以到官网下载. $ git clone git@github.com:ruanyf/react-demos.git 如果你没安装 git, ...
- Spring入门1. IoC入门实例
Spring入门1. IoC入门实例 Reference:Java EE轻量级解决方案——S2SH 前言: 之前学习过关于Spring的一点知识,曾经因为配置出现问题,而总是被迫放弃学习这些框架技术, ...
- Lucene建立索引搜索入门实例
第一部分:Lucene建立索引 Lucene建立索引主要有以下两步:第一步:建立索引器第二步:添加索引文件准备在f盘建立lucene文件夹,然后 ...
- 1. mybatis 的入门实例
mybatis 的入门实例 1.创建一个普通的Java项目 1.加入jar包(所有mybatis 和mysql) 2.加入配置文件 src 目录下 (1) db.properties mysql.us ...
- Vue项目入门实例
前言 本文记录Vue2.x + Element-UI + TypeScript语法入门实例 为什么要用TypeScript? 1.TypeScript是JavaScript的超集,利用es6语法,实现 ...
随机推荐
- Vue中Form表单验证无法消除验证问题
iView的表单api给出了一个resetFields方法,用于重置整个表单输入的内容并清除验证提示. 但是有时候需要只消除部分的iview的resetFields方法源码是这样的resetField ...
- 【Java】Windows配置Java环境变量
一.配置环境变量 1.新建系统变量 JAVA_HOME和CLASSPATH 变量名:JAVA_HOME 变量值:D:\jdk\jdk1.7.0_80 变量名:CLASSPATH 变量值:.;%JAVA ...
- mysql 5.6.44 zip 安装教程(基于windows )
首先我们从官网下载最新版本的mysql 5.6.44版本,网页地址: ,我的电脑是64位的版本,所以我选择的是64位版本,如果是32位,根据实际情况下载所需要的安装包.
- CSPS模拟 50
收获很多,良心出题人 T1 施工 研究半天,最后30分暴力走人 考后看了题解,稍神仙这题弃对了...... 要拿30+,必须发现要填的话一定是填一个坑使它底部变平,最终底部高度小于等于两边 为什么是坑 ...
- CSPS模拟 44
状态不是很好吧 这套和前边是一套的, skyh在我旁边AK,好像开了三个对拍又在拼小人 T3 正解没调出来,暴力又忘交了qwq 当时心情都要爆炸了 T1 区间$gcd$乘区间长度的最大值 暴力是$n^ ...
- WeihanLi.Npoi 近期更新
WeihanLi.Npoi 近期更新 Intro 最近对我的 NPOI 扩展做了一些改变,一方面提高性能,一方面修复bug,增加一些新的功能来让它更加好用,前几天发布了 1.5.0 版本,下面来介绍一 ...
- sshd服务及基于密钥远程登陆(无需密码)
上一条博客说明了用sshd服务远程登陆另一个系统,但是需要密码,如果不用密码呢?有没有简便的方法呢?下面为大家介绍一下,也就是基于密钥的安全验证:需要在本地生成”密钥对“后将公钥传送至服务端,进行公共 ...
- 史上最详细的C语言冒泡排序算法
未经同意,请勿转载. void bubbing(){ ] = {,,,,,,,,,};//define init the array //going to the exinternal loop,st ...
- 网站搭建-windows 系统 本地 网站搭建 - IIS
上一章有提到IIS安装,现在打开它: 点击浏览,如果没有启动的话,先点击启动. ip先选好,第一个吧,本机的(IIS自己提供了初始网页的东西). 然后可以自己去https://www.freemoba ...
- W5500
W5500 芯片是一款韩国全硬件TCP/IP协议栈以太网接口芯片, 最近发现我们国内也有和W5500 芯片一样芯片 介绍给大家 如下图 :