Spring Cloud Gateway-自定义异常处理
前提
我们平时在用SpringMVC的时候,只要是经过DispatcherServlet处理的请求,可以通过@ControllerAdvice和@ExceptionHandler自定义不同类型异常的处理逻辑,具体可以参考ResponseEntityExceptionHandler和DefaultHandlerExceptionResolver,底层原理很简单,就是发生异常的时候搜索容器中已经存在的异常处理器并且匹配对应的异常类型,匹配成功之后使用该指定的异常处理器返回结果进行Response的渲染,如果找不到默认的异常处理器则用默认的进行兜底(个人认为,Spring在很多功能设计的时候都有这种“有则使用自定义,无则使用默认提供”这种思想十分优雅)。
SpringMVC中提供的自定义异常体系在Spring-WebFlux中并不适用,其实原因很简单,两者底层的运行容器并不相同。WebExceptionHandler是Spring-WebFlux的异常处理器顶层接口,因此追溯到子类可以追踪到DefaultErrorWebExceptionHandler是Spring Cloud Gateway的全局异常处理器,配置类是ErrorWebFluxAutoConfiguration。
为什么要自定义异常处理
先画一个假想但是贴近实际架构图,定位一下网关的作用:
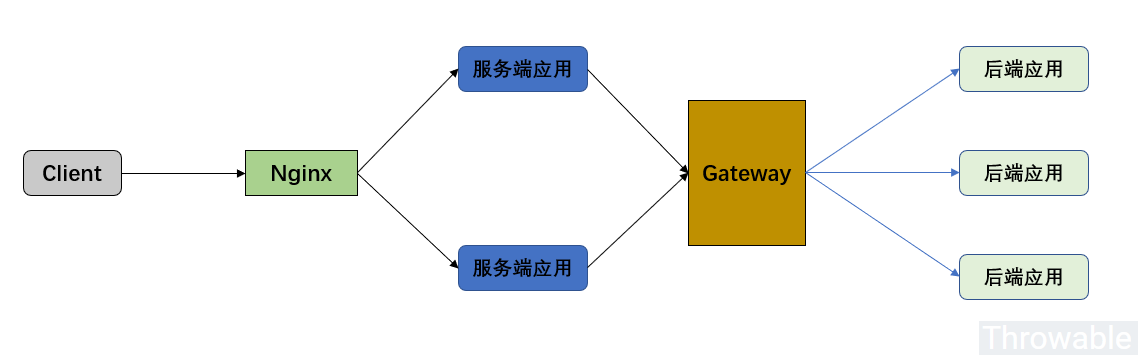
网关在整个架构中的作用是:
- 路由服务端应用的请求到后端应用。
- (聚合)后端应用的响应转发到服务端应用。
假设网关服务总是正常的前提下:
对于第1点来说,假设后端应用不能平滑无损上线,会有一定的几率出现网关路由请求到一些后端的“僵尸节点(请求路由过去的时候,应用更好在重启或者刚好停止)”,这个时候会路由会失败抛出异常,一般情况是Connection Refuse。
对于第2点来说,假设后端应用没有正确处理异常,那么应该会把异常信息经过网关转发回到服务端应用,这种情况理论上不会出现异常。
其实还有第3点隐藏的问题,网关如果不单单承担路由的功能,还包含了鉴权、限流等功能,如果这些功能开发的时候对异常捕获没有做完善的处理甚至是逻辑本身存在BUG,有可能导致异常没有被正常捕获处理,走了默认的异常处理器DefaultErrorWebExceptionHandler,默认的异常处理器的处理逻辑可能并不符合我们预期的结果。
如何自定义异常处理
我们可以先看默认的异常处理器的配置类ErrorWebFluxAutoConfiguration:
@Configuration

@ConditionalOnWebApplication(type = ConditionalOnWebApplication.Type.REACTIVE)

@ConditionalOnClass(WebFluxConfigurer.class)

@AutoConfigureBefore(WebFluxAutoConfiguration.class)

@EnableConfigurationProperties({ ServerProperties.class, ResourceProperties.class })

public class ErrorWebFluxAutoConfiguration {

	private final ServerProperties serverProperties;

	private final ApplicationContext applicationContext;

	private final ResourceProperties resourceProperties;

	private final List<ViewResolver> viewResolvers;

	private final ServerCodecConfigurer serverCodecConfigurer;

	public ErrorWebFluxAutoConfiguration(ServerProperties serverProperties,

			ResourceProperties resourceProperties,

			ObjectProvider<ViewResolver> viewResolversProvider,

			ServerCodecConfigurer serverCodecConfigurer,

			ApplicationContext applicationContext) {

		this.serverProperties = serverProperties;

		this.applicationContext = applicationContext;

		this.resourceProperties = resourceProperties;

		this.viewResolvers = viewResolversProvider.orderedStream()

				.collect(Collectors.toList());

		this.serverCodecConfigurer = serverCodecConfigurer;

	}

	@Bean

	@ConditionalOnMissingBean(value = ErrorWebExceptionHandler.class,

			search = SearchStrategy.CURRENT)

	@Order(-1)

	public ErrorWebExceptionHandler errorWebExceptionHandler(

			ErrorAttributes errorAttributes) {

		DefaultErrorWebExceptionHandler exceptionHandler = new DefaultErrorWebExceptionHandler(

				errorAttributes, this.resourceProperties,

				this.serverProperties.getError(), this.applicationContext);

		exceptionHandler.setViewResolvers(this.viewResolvers);

		exceptionHandler.setMessageWriters(this.serverCodecConfigurer.getWriters());

		exceptionHandler.setMessageReaders(this.serverCodecConfigurer.getReaders());

		return exceptionHandler;

	}

	@Bean

	@ConditionalOnMissingBean(value = ErrorAttributes.class,

			search = SearchStrategy.CURRENT)

	public DefaultErrorAttributes errorAttributes() {

		return new DefaultErrorAttributes(

				this.serverProperties.getError().isIncludeException());

	}

}
注意到两个Bean实例ErrorWebExceptionHandler和DefaultErrorAttributes都使用了@ConditionalOnMissingBean注解,也就是我们可以通过自定义实现去覆盖它们。先自定义一个CustomErrorWebFluxAutoConfiguration(除了ErrorWebExceptionHandler的自定义实现,其他直接拷贝ErrorWebFluxAutoConfiguration):
@Configuration

@ConditionalOnWebApplication(type = ConditionalOnWebApplication.Type.REACTIVE)

@ConditionalOnClass(WebFluxConfigurer.class)

@AutoConfigureBefore(WebFluxAutoConfiguration.class)

@EnableConfigurationProperties({ServerProperties.class, ResourceProperties.class})

public class CustomErrorWebFluxAutoConfiguration {

    private final ServerProperties serverProperties;

    private final ApplicationContext applicationContext;

    private final ResourceProperties resourceProperties;

    private final List<ViewResolver> viewResolvers;

    private final ServerCodecConfigurer serverCodecConfigurer;

    public CustomErrorWebFluxAutoConfiguration(ServerProperties serverProperties,

                                               ResourceProperties resourceProperties,

                                               ObjectProvider<ViewResolver> viewResolversProvider,

                                               ServerCodecConfigurer serverCodecConfigurer,

                                               ApplicationContext applicationContext) {

        this.serverProperties = serverProperties;

        this.applicationContext = applicationContext;

        this.resourceProperties = resourceProperties;

        this.viewResolvers = viewResolversProvider.orderedStream()

                .collect(Collectors.toList());

        this.serverCodecConfigurer = serverCodecConfigurer;

    }

    @Bean

    @ConditionalOnMissingBean(value = ErrorWebExceptionHandler.class,

            search = SearchStrategy.CURRENT)

    @Order(-1)

    public ErrorWebExceptionHandler errorWebExceptionHandler(ErrorAttributes errorAttributes) {

        // TODO 这里完成自定义ErrorWebExceptionHandler实现逻辑

        return null;

    }

    @Bean

    @ConditionalOnMissingBean(value = ErrorAttributes.class, search = SearchStrategy.CURRENT)

    public DefaultErrorAttributes errorAttributes() {

        return new DefaultErrorAttributes(this.serverProperties.getError().isIncludeException());

    }

}
ErrorWebExceptionHandler的实现,可以直接参考DefaultErrorWebExceptionHandler,甚至直接继承DefaultErrorWebExceptionHandler,覆盖对应的方法即可。这里直接把异常信息封装成下面格式的Response返回,最后需要渲染成JSON格式:
{

  "code": 200,

  "message": "描述信息",

  "path" : "请求路径",

  "method": "请求方法"

}
我们需要分析一下DefaultErrorWebExceptionHandler中的一些源码:
// 封装异常属性

protected Map<String, Object> getErrorAttributes(ServerRequest request, boolean includeStackTrace) {

	return this.errorAttributes.getErrorAttributes(request, includeStackTrace);

}

// 渲染异常Response

protected Mono<ServerResponse> renderErrorResponse(ServerRequest request) {

	boolean includeStackTrace = isIncludeStackTrace(request, MediaType.ALL);

	Map<String, Object> error = getErrorAttributes(request, includeStackTrace);

	return ServerResponse.status(getHttpStatus(error))

			.contentType(MediaType.APPLICATION_JSON_UTF8)

			.body(BodyInserters.fromObject(error));

}

// 返回路由方法基于ServerResponse的对象

@Override

protected RouterFunction<ServerResponse> getRoutingFunction(ErrorAttributes errorAttributes) {

	return route(acceptsTextHtml(), this::renderErrorView).andRoute(all(), this::renderErrorResponse);

}

// HTTP响应状态码的封装,原来是基于异常属性的status属性进行解析的

protected HttpStatus getHttpStatus(Map<String, Object> errorAttributes) {

	int statusCode = (int) errorAttributes.get("status");

	return HttpStatus.valueOf(statusCode);

}
确定三点:
- 最后封装到响应体的对象来源于
DefaultErrorWebExceptionHandler#getErrorAttributes(),并且结果是一个Map<String, Object>实例转换成的字节序列。 - 原来的
RouterFunction实现只支持HTML格式返回,我们需要修改为JSON格式返回(或者说支持所有格式返回)。 DefaultErrorWebExceptionHandler#getHttpStatus()是响应状态码的封装,原来的逻辑是基于异常属性getErrorAttributes()的status属性进行解析的。
自定义的JsonErrorWebExceptionHandler如下:
public class JsonErrorWebExceptionHandler extends DefaultErrorWebExceptionHandler {

    public JsonErrorWebExceptionHandler(ErrorAttributes errorAttributes,

                                        ResourceProperties resourceProperties,

                                        ErrorProperties errorProperties,

                                        ApplicationContext applicationContext) {

        super(errorAttributes, resourceProperties, errorProperties, applicationContext);

    }

    @Override

    protected Map<String, Object> getErrorAttributes(ServerRequest request, boolean includeStackTrace) {

        // 这里其实可以根据异常类型进行定制化逻辑

        Throwable error = super.getError(request);

        Map<String, Object> errorAttributes = new HashMap<>(8);

        errorAttributes.put("message", error.getMessage());

        errorAttributes.put("code", HttpStatus.INTERNAL_SERVER_ERROR.value());

        errorAttributes.put("method", request.methodName());

        errorAttributes.put("path", request.path());

        return errorAttributes;

    }

    @Override

    protected RouterFunction<ServerResponse> getRoutingFunction(ErrorAttributes errorAttributes) {

        return RouterFunctions.route(RequestPredicates.all(), this::renderErrorResponse);

    }

    @Override

    protected HttpStatus getHttpStatus(Map<String, Object> errorAttributes) {

        // 这里其实可以根据errorAttributes里面的属性定制HTTP响应码

        return HttpStatus.INTERNAL_SERVER_ERROR;

    }

}
配置类CustomErrorWebFluxAutoConfiguration添加JsonErrorWebExceptionHandler:
@Bean

@ConditionalOnMissingBean(value = ErrorWebExceptionHandler.class, search = SearchStrategy.CURRENT)

@Order(-1)

public ErrorWebExceptionHandler errorWebExceptionHandler(ErrorAttributes errorAttributes) {

    JsonErrorWebExceptionHandler exceptionHandler = new JsonErrorWebExceptionHandler(

                errorAttributes,

                resourceProperties,

                this.serverProperties.getError(),

                applicationContext);

    exceptionHandler.setViewResolvers(this.viewResolvers);

    exceptionHandler.setMessageWriters(this.serverCodecConfigurer.getWriters());

    exceptionHandler.setMessageReaders(this.serverCodecConfigurer.getReaders());

    return exceptionHandler;

}
很简单,这里把异常的HTTP响应状态码统一为HttpStatus.INTERNAL_SERVER_ERROR(500),改造的东西并不多,只要了解原来异常处理的上下文逻辑即可。
测试
测试场景一:只启动网关,下游服务不启动的情况下直接调用下游服务:
curl http://localhost:9090/order/host

// 响应结果

{"path":"/order/host","code":500,"message":"Connection refused: no further information: localhost/127.0.0.1:9091","method":"GET"}
测试场景二:下游服务正常启动和调用,网关自身抛出异常。
在网关应用自定义一个全局过滤器并且故意抛出异常:
@Component

public class ErrorGlobalFilter implements GlobalFilter {

    @Override

    public Mono<Void> filter(ServerWebExchange exchange, GatewayFilterChain chain) {

        int i = 1/0;

        return chain.filter(exchange);

    }

}
curl http://localhost:9090/order/host

// 响应结果

{"path":"/order/host","code":500,"message":"/ by zero","method":"GET"}
响应结果和定制的逻辑一致,并且后台的日志也打印了对应的异常堆栈。
小结
笔者一直认为,做异常分类和按照分类处理是工程里面十分重要的一环。笔者在所在公司负责的系统中,坚持实现异常分类捕获,主要是需要区分可以重试补偿以及无法重试需要及时预警的异常,这样子才能针对可恢复异常定制自愈逻辑,对不能恢复的异常及时预警和人为介入。所以,Spring Cloud Gateway这个技术栈也必须调研其自定义异常的处理逻辑。
原文链接
- GitHub Page:http://www.throwable.club/2019/05/11/spring-cloud-gateway-custom-exception-handler
- Coding Page:http://throwable.coding.me/2019/05/11/spring-cloud-gateway-custom-exception-handler
(本文完 c-1-d e-a-20190511)
Spring Cloud Gateway-自定义异常处理的更多相关文章
- Spring Cloud Gateway自定义异常处理Exception Handler
版本: Spring Cloud 2020.0.3 常见的方法有 实现自己的 DefaultErrorWebExceptionHandler 或 仅实现ErrorAttributes. 方法1: Er ...
- spring cloud gateway自定义过滤器
在API网关spring cloud gateway和负载均衡框架ribbon实战文章中,主要实现网关与负载均衡等基本功能,详见代码.本节内容将继续围绕此代码展开,主要讲解spring cloud g ...
- Spring Cloud Gateway中异常处理
最近我们的项目在考虑使用Gateway,考虑使用Spring Cloud Gateway,发现网关的异常处理和spring boot 单体应用异常处理还是有很大区别的.让我们来回顾一下异常. 关于异常 ...
- Spring Cloud Alibaba学习笔记(21) - Spring Cloud Gateway 自定义全局过滤器
在前文中,我们介绍了Spring Cloud Gateway内置了一系列的全局过滤器,本文介绍如何自定义全局过滤器. 自定义全局过滤需要实现GlobalFilter 接口,该接口和 GatewayFi ...
- Spring Cloud Alibaba学习笔记(19) - Spring Cloud Gateway 自定义过滤器工厂
在前文中,我们介绍了Spring Cloud Gateway内置了一系列的内置过滤器工厂,若Spring Cloud Gateway内置的过滤器工厂无法满足我们的业务需求,那么此时就需要自定义自己的过 ...
- Spring Cloud Alibaba学习笔记(17) - Spring Cloud Gateway 自定义路由谓词工厂
在前文中,我们介绍了Spring Cloud Gateway内置了一系列的路由谓词工厂,但是如果这些内置的路由谓词工厂不能满足业务需求的话,我们可以自定义路由谓词工厂来实现特定的需求. 例如有某个服务 ...
- Spring cloud gateway自定义filter以及负载均衡
自定义全局filter package com.example.demo; import java.nio.charset.StandardCharsets; import org.apache.co ...
- spring cloud gateway 自定义GatewayFilterFactory
spring cloud gateway提供了很多内置的过滤器,那么因为需求的关系,需要自定义实现,并且要可配置,在一番折腾之后,总算是解决了,那么久记录下来 对于自定义的factory,我们可以选择 ...
- Spring Cloud Gateway自定义过滤器实战(观测断路器状态变化)
欢迎访问我的GitHub https://github.com/zq2599/blog_demos 内容:所有原创文章分类汇总及配套源码,涉及Java.Docker.Kubernetes.DevOPS ...
- 微服务网关实战——Spring Cloud Gateway
导读 作为Netflix Zuul的替代者,Spring Cloud Gateway是一款非常实用的微服务网关,在Spring Cloud微服务架构体系中发挥非常大的作用.本文对Spring Clou ...
随机推荐
- Vue+Vuex初体验
首先: 安装vuex npm install vuex -S 需要有两个组件(HelloWord.vue 和 HelloDemo.vue)[组件自定义] 注册路由 注册store 测试 一.需要有两个 ...
- 数据库语言-SQL
SQL语言的功能概述 DDL语句引导词:Create(建立),Alter(修改),Drop(撤销) DML语句引导词:Insert,Delete,Update,Select DCL语句引导词:Gran ...
- 使用admin的步骤、必知必会13条、单表的双下划线、外键的操作、多对多的操作:
MVC M: model 模型 与数据库交互 V: view 视图 HTML C:controller 控制器 流程 和 业务逻辑 MTV M:model ORM T:template 模板 HTML ...
- Java之Calendar类
Calendar类概述 java.util.Calendar 是日历类,在Date后出现,替换掉了许多Date的方法.该类将所有可能用到的时间信息封装为静态成员变量,方便获取.日历类就是方便获取各个时 ...
- 浅谈C++ STL string容器
浅谈C++ STL string容器 本篇随笔简单讲解一下\(C++STL\)中\(string\)容器的使用方法及技巧. string容器的概念 其实\(string\)并不是\(STL\)的一种容 ...
- PyCharm 2019 2.3 软件安装教程(1.补丁破解2.破解码)
一:补丁破解 PyCharm 2019 2.3 下载地址 https://pan.baidu.com/s/1HaWFcbO-x4vZuT6mVC0AGA 提取码:elu7 更多破解教程微信公众号关注“ ...
- 真正的RISC-V开发板——VEGA织女星开发板开箱评测
前言 由于最近ARM公司要求员工"停止所有与华为及其子公司正在生效的合约.支持及未决约定",即暂停与华为的相关合作,大家纷纷把注意力投向了另一个的处理器架构RISC-V,它是基于精 ...
- Python 从入门到进阶之路(六)
之前的文章我们简单介绍了一下 Python 的面向对象,本篇文章我们来看一下 Python 中异常处理. 我们在写程序时,有可能会出现程序报错,但是我们想绕过这个错误执行操作.即使我们的程序写的没问题 ...
- 使用Navicat Premium 比较PostgreSql数据库 dev环境与test环境差异
Navicat Premium 功能很强大,支持不同数据库客户端的连接,并且使用工具可以生成两个库差异的sql脚本,方便dev与test环境表结构同步,具体操作方法如下 单击运行,实现两个库中模式表结 ...
- QT防止程序多次启动
Question:最近在linux下作的一个项目,设置了crontab自启动,但是经常出现启动多个进程的原因,针对这种情况,我做了如下处理: QLockFile *lockFile = new QLo ...