vue之手把手教你写日历组件
---恢复内容开始---
1.日历组件
1.分析功能:日历基本功能,点击事件改变日期,样式的改变
1.结构分析:html
1.分为上下两个部分
2.上面分为左按钮,中间内容展示,右按钮
下面分为周几展示和日期展示
3.基本结构页面html书写
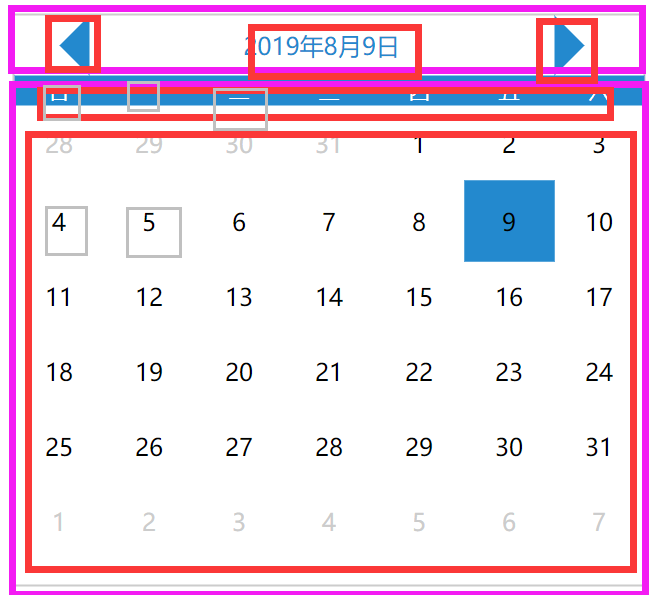
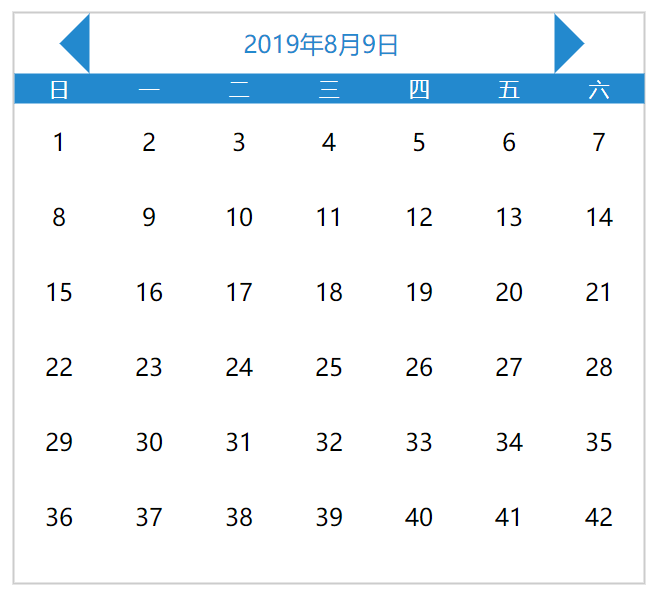
<template>
    <div class="calender2">
        <div class="date-header">
            <div class="pre-month"></div>
            <div class="show-date">2019年8月9日</div>
            <div class="next-month"></div>
        </div>
        <div class="date-content">
            <div class="week-header">
                <div
                v-for="item in ['日','一','二','三','四','五','六']"
                :key= item
                >{{ item }}</div>
            </div>
            <div class="week-day">
                <div
                class="every-day"
                v-for="item in 42"
                :key="item"
                >{{ item }}</div>
            </div>
        </div>
    </div>
</template>
*{
    margin: 0px;
    border: 0px;
    list-style: none;
}
.calender2{
    position: absolute;
    top: 50%;
    left: 50%;
    transform: translate(-50%,-50%);
    height:380px;
    width:420px;
    border: 1px solid #ccc;
}
.date-header{
    margin-left: 10px;
    height: 40px;
    width: 350px;
    line-height: 40px;
    text-align: center;
}
.pre-month{
    position: absolute;
    display: inline-block;
    height: 0px;
    width:0px;
    border:20px solid ;
    border-color: transparent rgb(35, 137, 206) transparent transparent;
}
.next-month{
    position: absolute;
    display: inline-block;
    height: 0px;
    width:0px;
    border:20px solid ;
    border-color: transparent transparent transparent  rgb(35, 137, 206);
}
.show-date{
    margin-left: 40px;
    margin-top: 0px;
    display: inline-block;
    line-height: 40px;
    text-align: center;
    width: 310px;
    color: rgb(35, 137, 206);
}
.week-header{
    background: rgb(35, 137, 206);
    color: #fff;
    font-size: 14px;
    text-align: center;
    line-height: 20px;
}
.week-header div{
    margin: 0;
    padding: 0;
    display: inline-block;
    height: 20px;
    width: 60px;
}
.every-day{
    display: inline-block;
    height: 50px;
    width: 60px;
    text-align: center;
    line-height: 50px;
}
.other-day{
    color: #ccc;
}
.now-day{
    background: rgb(35, 137, 206);
}
.active-day{
    /* padding: 2px */
    /* border-sizing:content-box; */
    border: 2px solid rgb(35, 137, 206);
}
</style>
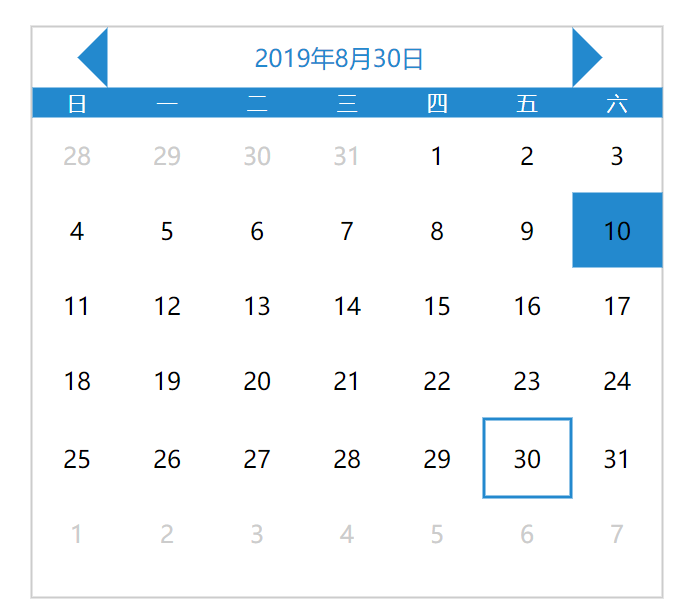
4.一些事件以及逻辑
1.使得当前的日期为今天的日期
<div class="show-date">{{ year }}年{{ month }}月{{ day }}日</div>
data(){
        return{
            year:null,
            month:null,
            day:null
        }
    },
    created(){
        this.getInitDate();
    },
    methods:{
        getInitDate(){
            const date = new Date();
            this.year = date.getFullYear();
            this.month = date.getUTCMonth() + 1;
            this.day = date.getDate();
        }
    }
2.设置该月日期起始值(找到一号是在哪里)
beginDay(){
    return new Date(this.year, this.mounth - 1, 1).getDay();
}
3.当月天数字体正常显示
<div
v-if="item - beginDay >= 0 && item - beginDay <= curDays"
>{{ item - beginDay }}</div>
4.当月天数之前的部分变灰,外加正常显示日期
注意几个数学问题:
1.当前月天数日期
2.上月剩余天数
3.此月显示的下月天数
<div
     v-if="item - beginDay > 0 && item - beginDay <= curDays"
     >{{ item - beginDay }}</div>
<div
     class="other-day"
     v-else-if="item - beginDay <= 0"
     >{{ item - beginDay + prevDays }}</div>
<div
     class="other-day"
     v-else>{{ item - beginDay -curDays }}</div>
5.能知道当前日期,能点击其他日期,并且会有相应的变化
知道当前日期:
this.curDate = `${this.year}-${this.month}-${this.day}`
判断今天是不是当前日期,并且给一个样式:
'now-day':`${year}-${month}-${item - beginDays}` == curDate
当点击当月有的日期的时候会根据你的点击显示的日期发生变化
判断是点击的那一天:
'active-day':`${year}-${month}-${item - beginDay}` === `${year}-${month}-${day}`
点击这一天,绑定点击事件
@click="handleClickDay(item - beginDay)"
handleClickDay(day){
    this.day = day
}
6.前后两个按钮的功能
            <div class="pre-month" @click="handlePrev"></div>
            <div class="next-month" @click="handleNext"></div>
handlePrev(){
            if(this.month == 1){
                this.month = 12
                this.year--
            }else{
                this.month--
            }
        },
        handleNext(){
            if(this.month == 12){
                this.month = 1
                this.year++
            }else{
                this.month++
            }
        }
7.判断点击的是否为当月的最后一天
computedDay(){
            const allDay = new Date(this.year, this.month, 0).getDate();
            if(this.day > allDay){
                this.day = allDay;
            }
        }
将这个函数分别在handlePrev(),handleNext()里面执行-------注意是this.computedDay();
完成
---恢复内容结束---
1.日历组件
1.分析功能:日历基本功能,点击事件改变日期,样式的改变
1.结构分析:html
1.分为上下两个部分
2.上面分为左按钮,中间内容展示,右按钮
下面分为周几展示和日期展示
3.基本结构页面html书写
<template>
    <div class="calender2">
        <div class="date-header">
            <div class="pre-month"></div>
            <div class="show-date">2019年8月9日</div>
            <div class="next-month"></div>
        </div>
        <div class="date-content">
            <div class="week-header">
                <div
                v-for="item in ['日','一','二','三','四','五','六']"
                :key= item
                >{{ item }}</div>
            </div>
            <div class="week-day">
                <div
                class="every-day"
                v-for="item in 42"
                :key="item"
                >{{ item }}</div>
            </div>
        </div>
    </div>
</template>
*{
    margin: 0px;
    border: 0px;
    list-style: none;
}
.calender2{
    position: absolute;
    top: 50%;
    left: 50%;
    transform: translate(-50%,-50%);
    height:380px;
    width:420px;
    border: 1px solid #ccc;
}
.date-header{
    margin-left: 10px;
    height: 40px;
    width: 350px;
    line-height: 40px;
    text-align: center;
}
.pre-month{
    position: absolute;
    display: inline-block;
    height: 0px;
    width:0px;
    border:20px solid ;
    border-color: transparent rgb(35, 137, 206) transparent transparent;
}
.next-month{
    position: absolute;
    display: inline-block;
    height: 0px;
    width:0px;
    border:20px solid ;
    border-color: transparent transparent transparent  rgb(35, 137, 206);
}
.show-date{
    margin-left: 40px;
    margin-top: 0px;
    display: inline-block;
    line-height: 40px;
    text-align: center;
    width: 310px;
    color: rgb(35, 137, 206);
}
.week-header{
    background: rgb(35, 137, 206);
    color: #fff;
    font-size: 14px;
    text-align: center;
    line-height: 20px;
}
.week-header div{
    margin: 0;
    padding: 0;
    display: inline-block;
    height: 20px;
    width: 60px;
}
.every-day{
    display: inline-block;
    height: 50px;
    width: 60px;
    text-align: center;
    line-height: 50px;
}
.other-day{
    color: #ccc;
}
.now-day{
    background: rgb(35, 137, 206);
}
.active-day{
    /* padding: 2px */
    /* border-sizing:content-box; */
    border: 2px solid rgb(35, 137, 206);
}
</style>
4.一些事件以及逻辑
1.使得当前的日期为今天的日期
<div class="show-date">{{ year }}年{{ month }}月{{ day }}日</div>
data(){
        return{
            year:null,
            month:null,
            day:null
        }
    },
    created(){
        this.getInitDate();
    },
    methods:{
        getInitDate(){
            const date = new Date();
            this.year = date.getFullYear();
            this.month = date.getUTCMonth() + 1;
            this.day = date.getDate();
        }
    }
2.设置该月日期起始值(找到一号是在哪里)
beginDay(){
    return new Date(this.year, this.mounth - 1, 1).getDay();
}
3.当月天数字体正常显示
<div
v-if="item - beginDay >= 0 && item - beginDay <= curDays"
>{{ item - beginDay }}</div>
4.当月天数之前的部分变灰,外加正常显示日期
注意几个数学问题:
1.当前月天数日期
2.上月剩余天数
3.此月显示的下月天数
<div
     v-if="item - beginDay > 0 && item - beginDay <= curDays"
     >{{ item - beginDay }}</div>
<div
     class="other-day"
     v-else-if="item - beginDay <= 0"
     >{{ item - beginDay + prevDays }}</div>
<div
     class="other-day"
     v-else>{{ item - beginDay -curDays }}</div>
5.能知道当前日期,能点击其他日期,并且会有相应的变化
知道当前日期:
this.curDate = `${this.year}-${this.month}-${this.day}`
判断今天是不是当前日期,并且给一个样式:
'now-day':`${year}-${month}-${item - beginDays}` == curDate
当点击当月有的日期的时候会根据你的点击显示的日期发生变化
判断是点击的那一天:
'active-day':`${year}-${month}-${item - beginDay}` === `${year}-${month}-${day}`
点击这一天,绑定点击事件
@click="handleClickDay(item - beginDay)"
handleClickDay(day){
    this.day = day
}
6.前后两个按钮的功能
            <div class="pre-month" @click="handlePrev"></div>
            <div class="next-month" @click="handleNext"></div>
handlePrev(){
            if(this.month == 1){
                this.month = 12
                this.year--
            }else{
                this.month--
            }
        },
        handleNext(){
            if(this.month == 12){
                this.month = 1
                this.year++
            }else{
                this.month++
            }
        }
7.判断点击的是否为当月的最后一天
computedDay(){
            const allDay = new Date(this.year, this.month, 0).getDate();
            if(this.day > allDay){
                this.day = allDay;
            }
        }
将这个函数分别在handlePrev(),handleNext()里面执行-------注意是this.computedDay();
完成
vue之手把手教你写日历组件的更多相关文章
- [原创]手把手教你写网络爬虫(4):Scrapy入门
手把手教你写网络爬虫(4) 作者:拓海 摘要:从零开始写爬虫,初学者的速成指南! 封面: 上期我们理性的分析了为什么要学习Scrapy,理由只有一个,那就是免费,一分钱都不用花! 咦?怎么有人扔西红柿 ...
- [原创]手把手教你写网络爬虫(5):PhantomJS实战
手把手教你写网络爬虫(5) 作者:拓海 摘要:从零开始写爬虫,初学者的速成指南! 封面: 大家好!从今天开始,我要与大家一起打造一个属于我们自己的分布式爬虫平台,同时也会对涉及到的技术进行详细介绍.大 ...
- 手把手教你写Kafka Streams程序
本文从以下四个方面手把手教你写Kafka Streams程序: 一. 设置Maven项目 二. 编写第一个Streams应用程序:Pipe 三. 编写第二个Streams应用程序:Line Split ...
- 手把手教你写DI_0_DI是什么?
DI是什么? Dependency Injection 常常简称为:DI. 它是实现控制反转(Inversion of Control – IoC)的一个模式. fowler 大大大神 "几 ...
- 手把手教你写Sublime中的Snippet
手把手教你写Sublime中的Snippet Sublime Text号称最性感的编辑器, 并且越来越多人使用, 美观, 高效 关于如何使用Sublime text可以参考我的另一篇文章, 相信你会喜 ...
- 手把手教你写LKM rookit! 之 第一个lkm程序及模块隐藏(一)
唉,一开始在纠结起个什么名字,感觉名字常常的很装逼,于是起了个这<手把手教你写LKM rookit> 我觉得: 你们觉得:...... 开始之前,我们先来理解一句话:一切的操作都是系统调用 ...
- 手把手教你写电商爬虫-第三课 实战尚妆网AJAX请求处理和内容提取
版权声明:本文为博主原创文章,未经博主允许不得转载. 系列教程: 手把手教你写电商爬虫-第一课 找个软柿子捏捏 手把手教你写电商爬虫-第二课 实战尚妆网分页商品采集爬虫 看完两篇,相信大家已经从开始的 ...
- 手把手教你写电商爬虫-第四课 淘宝网商品爬虫自动JS渲染
版权声明:本文为博主原创文章,未经博主允许不得转载. 系列教程: 手把手教你写电商爬虫-第一课 找个软柿子捏捏 手把手教你写电商爬虫-第二课 实战尚妆网分页商品采集爬虫 手把手教你写电商爬虫-第三课 ...
- 只有20行Javascript代码!手把手教你写一个页面模板引擎
http://www.toobug.net/article/how_to_design_front_end_template_engine.html http://barretlee.com/webs ...
随机推荐
- JAVA 实现 GET、POST、PUT、DELETE HTTP请求
1.get 2.put 3.post 4.delete
- HDU 2089:不要62(数位DP)
http://acm.hdu.edu.cn/showproblem.php?pid=2089 不要62 Problem Description 杭州人称那些傻乎乎粘嗒嗒的人为62(音:laoer) ...
- Vue技术点整理-前言
前言 Vue版本说明:本文档编写时,Vue稳定版本为 2.6.10 本文档编写目的为:整理Vue相关生态的技术点.和开发中经常使用到的技术点,让开发者快速上手开发,提升开发效率 一,Vue开发工具:本 ...
- django基础知识之模板继承:
模板继承 模板继承可以减少页面内容的重复定义,实现页面内容的重用 典型应用:网站的头部.尾部是一样的,这些内容可以定义在父模板中,子模板不需要重复定义 block标签:在父模板中预留区域,在子模板中填 ...
- scrapy基础知识之 使用FormRequest.from_response()方法模拟用户登录:
通常网站通过 实现对某些表单字段(如数据或是登录界面中的认证令牌等)的预填充 使用Scrapy抓取网页时,如果想要预填充或重写像用户名.用户密码这些表单字段, 可以使用 FormRequest.fro ...
- NetCore 中间件获取请求报文和返回报文
using System; using System.IO; namespace WebApi.Restful.Middlewares { public class MemoryWrappedHttp ...
- Docker学习第二天
CentOS 系列安装 Docker Docker 支持 CentOS6 及以后的版本. CentOS6 对于 CentOS6,可以使用 EPEL 库安装 Docker,命令如下 [root@MSJT ...
- CDQZ集训DAY8 日记
又一次翻车…… 先提一句昨晚的事.昨天晚上身后一帮成都七中的人用十分戏谑的语气交出了达哥的名字,看着NOI2017的获奖名单,如果他们真的是在嘲笑的话,真的挺想上去干他们一顿的…… 上午考试第一题一脸 ...
- android_layout_linearlayout(二)
android的线性布局linearlayout的研究没有尽头.看了官网关于线性布局的一个例子,捣鼓一阵,发现的迷惑记录在此. 一.先看看官网xml <?xml version="1. ...
- tmux终端复用神器简单使用
创建命名Tmux会话(tmux new -s session_name)tmux new -s session_name chongchong 暂退Tmux会话(Ctrl + a d)直接关窗口 返回 ...