微信小程序动画之弹出菜单
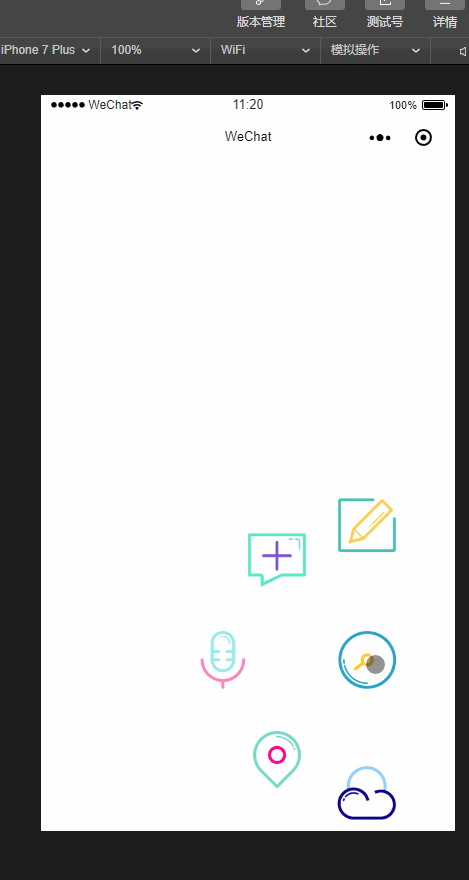
用微信小程序做了一个动画,效果如上图:
代码:
js:
Page({

  data: {

    isPopping: false,

    animPlus: {},

    animCollect: {},

    animTranspond: {},

    animInput: {},

    animCloud:{},

    aninWrite:{},

  },

  //点击弹出

  plus: function () {

    if (this.data.isPopping) {

      //缩回动画

      this.popp();

      this.setData({

        isPopping: false

      })

    } else if (!this.data.isPopping) {

      //弹出动画

      this.takeback();

      this.setData({

        isPopping: true

      })

    }

  },

  input: function () {

    console.log("input")

  },

  transpond: function () {

    console.log("transpond")

  },

  collect: function () {

    console.log("collect")

  },

  cloud:function(){

    console.log("cloud")

  },

  write: function () {

    console.log("cloud")

  },

  //弹出动画

  popp: function () {

    //plus顺时针旋转

    var animationPlus = wx.createAnimation({

      duration: 400,

      timingFunction: 'ease-out'

    })

    var animationcollect = wx.createAnimation({

      duration: 400,

      timingFunction: 'ease-out'

    })

    var animationTranspond = wx.createAnimation({

      duration: 400,

      timingFunction: 'ease-out'

    })

    var animationInput = wx.createAnimation({

      duration: 400,

      timingFunction: 'ease-out'

    })

    var animationCloud = wx.createAnimation({

      duration: 400,

      timingFunction: 'ease-out'

    })

    var animationWrite = wx.createAnimation({

      duration: 400,

      timingFunction: 'ease-out'

    })

    animationPlus.rotateZ(180).step();

    animationcollect.translate(-90, -100).rotateZ(180).opacity(1).step();

    animationTranspond.translate(-140, 0).rotateZ(180).opacity(1).step();

    animationInput.translate(-90, 100).rotateZ(180).opacity(1).step();

    animationCloud.translate(0, 135).rotateZ(180).opacity(1).step();

    animationWrite.translate(0, -135).rotateZ(180).opacity(1).step();

    this.setData({

      animPlus: animationPlus.export(),

      animCollect: animationcollect.export(),

      animTranspond: animationTranspond.export(),

      animInput: animationInput.export(),

      animCloud: animationCloud.export(),

      animWrite: animationWrite.export(),

    })

  },

  //收回动画

  takeback: function () {

    //plus逆时针旋转

    var animationPlus = wx.createAnimation({

      duration: 400,

      timingFunction: 'ease-out'

    })

    var animationcollect = wx.createAnimation({

      duration: 400,

      timingFunction: 'ease-out'

    })

    var animationTranspond = wx.createAnimation({

      duration: 400,

      timingFunction: 'ease-out'

    })

    var animationInput = wx.createAnimation({

      duration: 400,

      timingFunction: 'ease-out'

    })

    var animationCloud = wx.createAnimation({

      duration: 400,

      timingFunction: 'ease-out'

    })

    var animationWrite = wx.createAnimation({

      duration: 400,

      timingFunction: 'ease-out'

    })

    animationPlus.rotateZ(0).step();

    animationcollect.translate(0, 0).rotateZ(0).opacity(0).step();

    animationTranspond.translate(0, 0).rotateZ(0).opacity(0).step();

    animationInput.translate(0, 0).rotateZ(0).opacity(0).step();

    animationCloud.translate(0, 0).rotateZ(0).opacity(0).step();

    animationWrite.translate(0, 0).rotateZ(0).opacity(0).step();

    this.setData({

      animPlus: animationPlus.export(),

      animCollect: animationcollect.export(),

      animTranspond: animationTranspond.export(),

      animInput: animationInput.export(),

      animCloud: animationCloud.export(),

      animWrite: animationWrite.export(),

    })

  },

  onLoad: function (options) {

    // 生命周期函数--监听页面加载

  },

  onReady: function () {

    // 生命周期函数--监听页面初次渲染完成

  },

  onShow: function () {

    // 生命周期函数--监听页面显示

  },

  onHide: function () {

    // 生命周期函数--监听页面隐藏

  },

  onUnload: function () {

    // 生命周期函数--监听页面卸载

  },

  onPullDownRefresh: function () {

    // 页面相关事件处理函数--监听用户下拉动作

  },

  onReachBottom: function () {

    // 页面上拉触底事件的处理函数

  },

  onShareAppMessage: function () {

    // 用户点击右上角分享

    return {

      title: 'title', // 分享标题

      desc: 'desc', // 分享描述

      path: 'path' // 分享路径

    }

  }

})
wxml:
<view>

  <image src="../../image/1.png" class="img-style" animation="{{animWrite}}" bindtap="write"></image>

  <image src="../../image/4.png" class="img-style" animation="{{animCollect}}" bindtap="collect"></image>

  <image src="../../image/2.png" class="img-style" animation="{{animTranspond}}" bindtap="transpond"></image>

  <image src="../../image/3.png" class="img-style" animation="{{animInput}}" bindtap="input"></image>

  <image src="../../image/5.png" class="img-style" animation="{{animCloud}}" bindtap="cloud"></image>

  <image src="../../image/6.png" class="img-switch-style" animation="{{animPlus}}" bindtap="plus"></image>

</view>
wxss:
.img-switch-style {

  height: 120rpx;

  width: 120rpx;

  position: absolute;

  bottom: 250rpx;

  right: 100rpx;

  z-index: 100;

}

.img-style {

  height: 120rpx;

  width: 120rpx;

  position: absolute;

  bottom: 250rpx;

  right: 100rpx;

  opacity: 0;

}
微信小程序动画之弹出菜单的更多相关文章
- 微信小程序组件 自定义弹出框
<!-- 点击立即抢拼弹出框 --> <view class='add-rob' bindtap="setModalStatus" data-status=&qu ...
- 微信小程序日期定位弹出框遮挡问题
只需要用bindtap绑定一个点击后的操作(隐藏键盘): wx.hideKeyboard()
- 微信小程序之底部弹框预约插件
代码地址如下:http://www.demodashi.com/demo/13982.html 一.前期准备工作: 软件环境:微信开发者工具 官方下载地址:https://mp.weixin.qq.c ...
- 微信小程序动画:高度渐变,left渐变
今天在测试微信小程序动画的时候遇到了坑,需求是这样的点击时子元素从外部滑动回来,父元素的高度跟随子元素的高度改变. 实现子元素left为0并不复杂,但是改变父元素box的高度的时候却遇到了坑,因为是需 ...
- 微信小程序开发视频教程新鲜出炉
微信小程序开发公测了,可是对于新手来说,不同的框架不同的开发机制,如何快速适应呢?微信小程序开发视频教程新鲜出炉了,从零开始一步一步搭建微信小程序,每个章节都会涉及到不同的知识点,等教程学习完你不但掌 ...
- 微信小程序动画之圆形进度条
微信小程序动画之圆形进度条 上图: js: //获取应用实例 var app = getApp() var interval; var varName; var ctx = wx.createCanv ...
- 微信小程序动画实现(API,css)
微信小程序动画API实现 index.js clicktap:function(){ var Animation=wx.createAnimation({ duration: 2000, }) Ani ...
- win32进阶之路:程序托盘图标+右键弹出菜单
开场白 本次介绍两个非常棒且实用的技巧:程序托盘图标和右键弹出菜单,效果如下图. 程序托盘图标用了迅雷的图标,右键点击时候会弹出三个选项的菜单. 程序托盘图标设置 我会用尽可能清晰明了的步骤介绍方式 ...
- 微信小程序如何自动弹出提示微信授权?
我想在一进入页面的时候就进行判断提示并且弹出提示授权!请问该如何处理比较合理 wx.authorize({}) //可以通过 wx.getSetting 先查询一下用户是否授权了 "scop ...
随机推荐
- IO相关Demo
这几天复习了IO相关知识 只为记录,好记性不如烂笔头 有误请指正 ありがとうございます. 我的公众号 作者:晨钟暮鼓c个人微信公众号:程序猿的月光宝盒 1.判断存在,存在改名,并延迟删除,不存在新建 ...
- DataPump遭遇ORA-06512&ORA-39080&ORA-01403错误案例
最近使用数据泵(DataPump)比较多,遇到了奇奇怪怪的问题,似乎Apply了补丁PSU 10.2.0.5.180717后,DataPump的问题就格外多.如下所示: expdp system/xx ...
- Mysql—下载安装与使用
一.安装前准备 检查是否已经安装过mysql,执行命令,显示结果为:bt-mysql57-5.7.26-1.el7.x86_64 [root@localhost ~]# rpm -qa | grep ...
- Linxu:进程的管理与进程的延迟性&周期性调度
进程的延迟与周期调度 进程的概念 进程:开始执行但是还没有结束的程序的实例 程序:包含可执行代码的文件 进程由程序产生,是一个运行着的.要占系统资源的程序,进程不等于程序. 进程分为:交互进程.批处理 ...
- 「MacOS」将网站转换为应用程序,只需一个Unite
unite mac有着非常强大的功能,能够轻松的将网站转换为macOS上的应用程序,除了现代化的网页浏览功能以外,Unite for Mac下载还包括特定于macOS的功能,通知,TouchBar支持 ...
- 图解JVM垃圾内存回收算法
图解JVM垃圾内存回收算法 这篇文章主要介绍了图解JVM垃圾内存回收算法,由于年轻代堆空间的垃圾回收会很频繁,因此其垃圾回收算法会更加重视回收效率,下面博主和大家来一起学习一下吧 前言 首先,我们要讲 ...
- CSS中层叠和继承的概念。
继承 CSS的某些样式是具有继承性的,那么什么是继承呢?继承是一种规则,它允许样式不仅应用于某个特定html标签元素,而且应用于其后代.比如下面代码: 1 2 3 4 5 6 7 8 9 <ht ...
- 80道最新java基础部分面试题(七)
自己整理的面试题,希望可以帮到大家,需要更多资料的可以私信我哦,大家一起学习进步! 70.TreeSet里面放对象,如果同时放入了父类和子类的实例对象,那比较时使用的是父类的compareTo方法,还 ...
- AntzOs系列导航
Antz操作系统 一个自制的操作系统,Antz .半图形化半命令式系统,同时嵌入Antzscript脚本语言(写在之后). 自制操作系统Antz(1)——Boot Sector 自制操作系统Antz( ...
- 《转》sql处理百万级以上的数据提高查询速度的方法
处理百万级以上的数据提高查询速度的方法: 1.应尽量避免在 where 子句中使用!=或<>操作符,否则将引擎放弃使用索引而进行全表扫描. 2.对查询进行优化,应尽量避免全表扫描,首先应考 ...