SpringBoot 源码解析 (三)----- Spring Boot 精髓:启动时初始化数据
在我们用 springboot 搭建项目的时候,有时候会碰到在项目启动时初始化一些操作的需求 ,针对这种需求 spring boot为我们提供了以下几种方案供我们选择:
ApplicationRunner与CommandLineRunner接口Spring容器初始化时InitializingBean接口和@PostConstructSpring的事件机制
ApplicationRunner与CommandLineRunner
我们可以实现 ApplicationRunner 或 CommandLineRunner 接口, 这两个接口工作方式相同,都只提供单一的run方法,该方法在SpringApplication.run(…)完成之前调用,不知道大家还对我上一篇文章结尾有没有印象,我们先来看看这两个接口
public interface ApplicationRunner {

    void run(ApplicationArguments var1) throws Exception;

}

public interface CommandLineRunner {

    void run(String... var1) throws Exception;

}
都只提供单一的run方法,接下来我们来看看具体的使用
ApplicationRunner
构造一个类实现ApplicationRunner接口
//需要加入到Spring容器中

@Component

public class ApplicationRunnerTest implements ApplicationRunner {

    @Override

    public void run(ApplicationArguments args) throws Exception {

        System.out.println("ApplicationRunner");

    }

}
很简单,首先要使用@Component将实现类加入到Spring容器中,为什么要这样做我们待会再看,然后实现其run方法实现自己的初始化数据逻辑就可以了
CommandLineRunner
对于这两个接口而言,我们可以通过Order注解或者使用Ordered接口来指定调用顺序, @Order() 中的值越小,优先级越高
//需要加入到Spring容器中

@Component

@Order(1)

public class CommandLineRunnerTest implements CommandLineRunner {

    @Override

    public void run(String... args) throws Exception {

        System.out.println("CommandLineRunner...");

    }

}
同样需要加入到Spring容器中,CommandLineRunner的参数是最原始的参数,没有进行任何处理,ApplicationRunner的参数是ApplicationArguments,是对原始参数的进一步封装
源码分析
大家回顾一下我上一篇文章,也就是SpringApplication.run方法的最后一步第八步:执行Runners,这里我直接把代码复制过来
private void callRunners(ApplicationContext context, ApplicationArguments args) {

    List<Object> runners = new ArrayList<Object>();

    //获取容器中所有的ApplicationRunner的Bean实例

    runners.addAll(context.getBeansOfType(ApplicationRunner.class).values());

    //获取容器中所有的CommandLineRunner的Bean实例

    runners.addAll(context.getBeansOfType(CommandLineRunner.class).values());

    AnnotationAwareOrderComparator.sort(runners);

    for (Object runner : new LinkedHashSet<Object>(runners)) {

        if (runner instanceof ApplicationRunner) {

            //执行ApplicationRunner的run方法

            callRunner((ApplicationRunner) runner, args);

        }

        if (runner instanceof CommandLineRunner) {

            //执行CommandLineRunner的run方法

            callRunner((CommandLineRunner) runner, args);

        }

    }

}
很明显,是直接从Spring容器中获取ApplicationRunner和CommandLineRunner的实例,并调用其run方法,这也就是为什么我要使用@Component将ApplicationRunner和CommandLineRunner接口的实现类加入到Spring容器中了。
InitializingBean
在spring初始化bean的时候,如果bean实现了 InitializingBean 接口,在对象的所有属性被初始化后之后才会调用afterPropertiesSet()方法
@Component

public class InitialingzingBeanTest implements InitializingBean {

    @Override

    public void afterPropertiesSet() throws Exception {

        System.out.println("InitializingBean..");

    }

}
我们可以看出spring初始化bean肯定会在 ApplicationRunner和CommandLineRunner接口调用之前。
@PostConstruct
@Component

public class PostConstructTest {

    @PostConstruct

    public void postConstruct() {

        System.out.println("init...");

    }

}
我们可以看到,只用在方法上添加@PostConstruct注解,并将类注入到Spring容器中就可以了。我们来看看@PostConstruct注解的方法是何时执行的
在Spring初始化bean时,对bean的实例赋值时,populateBean方法下面有一个initializeBean(beanName, exposedObject, mbd)方法,这个就是用来执行用户设定的初始化操作。我们看下方法体:
protected Object initializeBean(final String beanName, final Object bean, @Nullable RootBeanDefinition mbd) {

    if (System.getSecurityManager() != null) {

        AccessController.doPrivileged((PrivilegedAction<Object>) () -> {

            // 激活 Aware 方法

            invokeAwareMethods(beanName, bean);

            return null;

        }, getAccessControlContext());

    }

    else {

        // 对特殊的 bean 处理:Aware、BeanClassLoaderAware、BeanFactoryAware

        invokeAwareMethods(beanName, bean);

    }

    Object wrappedBean = bean;

    if (mbd == null || !mbd.isSynthetic()) {

        // 后处理器

        wrappedBean = applyBeanPostProcessorsBeforeInitialization(wrappedBean, beanName);

    }

    try {

        // 激活用户自定义的 init 方法

        invokeInitMethods(beanName, wrappedBean, mbd);

    }

    catch (Throwable ex) {

        throw new BeanCreationException(

                (mbd != null ? mbd.getResourceDescription() : null),

                beanName, "Invocation of init method failed", ex);

    }

    if (mbd == null || !mbd.isSynthetic()) {

        // 后处理器

        wrappedBean = applyBeanPostProcessorsAfterInitialization(wrappedBean, beanName);

    }

    return wrappedBean;

}
我们看到会先执行后处理器然后执行invokeInitMethods方法,我们来看下applyBeanPostProcessorsBeforeInitialization
public Object applyBeanPostProcessorsBeforeInitialization(Object existingBean, String beanName)

        throws BeansException {

    Object result = existingBean;

    for (BeanPostProcessor beanProcessor : getBeanPostProcessors()) {

        result = beanProcessor.postProcessBeforeInitialization(result, beanName);

        if (result == null) {

            return result;

        }

    }

    return result;

}

public Object applyBeanPostProcessorsAfterInitialization(Object existingBean, String beanName)

        throws BeansException {

    Object result = existingBean;

    for (BeanPostProcessor beanProcessor : getBeanPostProcessors()) {

        result = beanProcessor.postProcessAfterInitialization(result, beanName);

        if (result == null) {

            return result;

        }

    }

    return result;

}
获取容器中所有的后置处理器,循环调用后置处理器的postProcessBeforeInitialization方法,这里我们来看一个BeanPostProcessor
public class CommonAnnotationBeanPostProcessor extends InitDestroyAnnotationBeanPostProcessor implements InstantiationAwareBeanPostProcessor, BeanFactoryAware, Serializable {

    public CommonAnnotationBeanPostProcessor() {

        this.setOrder(2147483644);

        //设置初始化参数为PostConstruct.class

        this.setInitAnnotationType(PostConstruct.class);

        this.setDestroyAnnotationType(PreDestroy.class);

        this.ignoreResourceType("javax.xml.ws.WebServiceContext");

    }

    //略...

}
在构造器中设置了一个属性为PostConstruct.class,再次观察CommonAnnotationBeanPostProcessor这个类,它继承自InitDestroyAnnotationBeanPostProcessor。InitDestroyAnnotationBeanPostProcessor顾名思义,就是在Bean初始化和销毁的时候所作的一个前置/后置处理器。查看InitDestroyAnnotationBeanPostProcessor类下的postProcessBeforeInitialization方法:
public Object postProcessBeforeInitialization(Object bean, String beanName) throws BeansException {

   LifecycleMetadata metadata = findLifecycleMetadata(bean.getClass());

   try {

       metadata.invokeInitMethods(bean, beanName);

   }

   catch (InvocationTargetException ex) {

       throw new BeanCreationException(beanName, "Invocation of init method failed", ex.getTargetException());

   }

   catch (Throwable ex) {

       throw new BeanCreationException(beanName, "Couldn't invoke init method", ex);

   }

    return bean;

}

private LifecycleMetadata buildLifecycleMetadata(final Class clazz) {

       final LifecycleMetadata newMetadata = new LifecycleMetadata();

       final boolean debug = logger.isDebugEnabled();

       ReflectionUtils.doWithMethods(clazz, new ReflectionUtils.MethodCallback() {

           public void doWith(Method method) {

              if (initAnnotationType != null) {

                   //判断clazz中的methon是否有initAnnotationType注解,也就是PostConstruct.class注解

                  if (method.getAnnotation(initAnnotationType) != null) {

                     //如果有就将方法添加进LifecycleMetadata中

                     newMetadata.addInitMethod(method);

                     if (debug) {

                         logger.debug("Found init method on class [" + clazz.getName() + "]: " + method);

                     }

                  }

              }

              if (destroyAnnotationType != null) {

                    //判断clazz中的methon是否有destroyAnnotationType注解

                  if (method.getAnnotation(destroyAnnotationType) != null) {

                     newMetadata.addDestroyMethod(method);

                     if (debug) {

                         logger.debug("Found destroy method on class [" + clazz.getName() + "]: " + method);

                     }

                  }

              }

           }

       });

       return newMetadata;

}
在这里会去判断某方法是否有PostConstruct.class注解,如果有,则添加到init/destroy队列中,后续一一执行。@PostConstruct注解的方法会在此时执行,我们接着来看invokeInitMethods
protected void invokeInitMethods(String beanName, final Object bean, @Nullable RootBeanDefinition mbd)

        throws Throwable {

    // 是否实现 InitializingBean

    // 如果实现了 InitializingBean 接口,则只掉调用bean的 afterPropertiesSet()

    boolean isInitializingBean = (bean instanceof InitializingBean);

    if (isInitializingBean && (mbd == null || !mbd.isExternallyManagedInitMethod("afterPropertiesSet"))) {

        if (logger.isDebugEnabled()) {

            logger.debug("Invoking afterPropertiesSet() on bean with name '" + beanName + "'");

        }

        if (System.getSecurityManager() != null) {

            try {

                AccessController.doPrivileged((PrivilegedExceptionAction<Object>) () -> {

                    ((InitializingBean) bean).afterPropertiesSet();

                    return null;

                }, getAccessControlContext());

            }

            catch (PrivilegedActionException pae) {

                throw pae.getException();

            }

        }

        else {

            // 直接调用 afterPropertiesSet()

            ((InitializingBean) bean).afterPropertiesSet();

        }

    }

    if (mbd != null && bean.getClass() != NullBean.class) {

        // 判断是否指定了 init-method(),

        // 如果指定了 init-method(),则再调用制定的init-method

        String initMethodName = mbd.getInitMethodName();

        if (StringUtils.hasLength(initMethodName) &&

                !(isInitializingBean && "afterPropertiesSet".equals(initMethodName)) &&

                !mbd.isExternallyManagedInitMethod(initMethodName)) {

            // 利用反射机制执行

            invokeCustomInitMethod(beanName, bean, mbd);

        }

    }

}
首先检测当前 bean 是否实现了 InitializingBean 接口,如果实现了则调用其 afterPropertiesSet(),然后再检查是否也指定了 init-method(),如果指定了则通过反射机制调用指定的 init-method()。
我们也可以发现@PostConstruct会在实现 InitializingBean 接口的afterPropertiesSet()方法之前执行
Spring的事件机制
基础概念
Spring的事件驱动模型由三部分组成
- 事件:
ApplicationEvent,继承自JDK的EventObject,所有事件都要继承它,也就是被观察者 - 事件发布者:
ApplicationEventPublisher及ApplicationEventMulticaster接口,使用这个接口,就可以发布事件了 - 事件监听者:
ApplicationListener,继承JDK的EventListener,所有监听者都继承它,也就是我们所说的观察者,当然我们也可以使用注解@EventListener,效果是一样的
事件
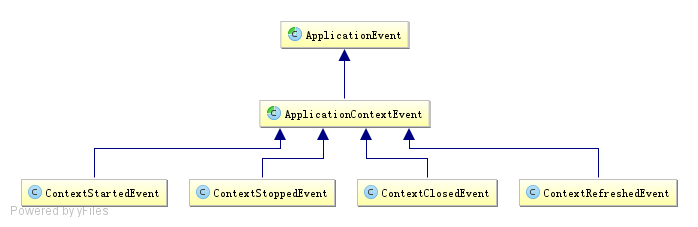
在Spring框架中,默认对ApplicationEvent事件提供了如下支持:
- ContextStartedEvent:ApplicationContext启动后触发的事件
- ContextStoppedEvent:ApplicationContext停止后触发的事件
- ContextRefreshedEvent: ApplicationContext初始化或刷新完成后触发的事件 ;(容器初始化完成后调用,所以我们可以利用这个事件做一些初始化操作)
- ContextClosedEvent:ApplicationContext关闭后触发的事件;(如 web 容器关闭时自动会触发spring容器的关闭,如果是普通 java 应用,需要调用ctx.registerShutdownHook();注册虚拟机关闭时的钩子才行)
构造一个类继承ApplicationEvent
public class TestEvent extends ApplicationEvent {

    private String message;

    public TestEvent(Object source) {

        super(source);

    }

    public void getMessage() {

        System.out.println(message);

    }

    public void setMessage(String message) {

        this.message = message;

    }

}
创建事件监听者
有两种方法可以创建监听者,一种是直接实现ApplicationListener的接口,一种是使用注解 @EventListener , 注解是添加在监听方法上的 ,下面的例子是直接实现的接口
@Component

public class ApplicationListenerTest implements ApplicationListener<TestEvent> {

    @Override

    public void onApplicationEvent(TestEvent testEvent) {

        testEvent.getMessage();

    }

}
事件发布
对于事件发布,代表者是 ApplicationEventPublisher 和 ApplicationEventMulticaster ,ApplicationContext接口继承了ApplicationEventPublisher,并在AbstractApplicationContext实现了具体代码,实际执行是委托给ApplicationEventMulticaster(可以认为是多播)
下面是一个事件发布者的测试实例:
@RunWith(SpringRunner.class)

@SpringBootTest

public class EventTest {

    @Autowired

    private ApplicationContext applicationContext;

    @Test

    public void publishTest() {

        TestEvent testEvent = new TestEvent("");

        testEvent.setMessage("hello world");

        applicationContext.publishEvent(testEvent);

    }

}
利用ContextRefreshedEvent事件进行初始化操作
利用 ContextRefreshedEvent 事件进行初始化,该事件是 ApplicationContext 初始化完成后调用的事件,所以我们可以利用这个事件,对应实现一个 监听器 ,在其 onApplicationEvent() 方法里初始化操作
@Component

public class ApplicationListenerTest implements ApplicationListener<ContextRefreshedEvent> {

    @Override

    public void onApplicationEvent(ContextRefreshedEvent event) {

        System.out.println("容器刷新完成后,我被调用了..");

    }

}
SpringBoot 源码解析 (三)----- Spring Boot 精髓:启动时初始化数据的更多相关文章
- springboot源码解析-管中窥豹系列之Runner(三)
一.前言 Springboot源码解析是一件大工程,逐行逐句的去研究代码,会很枯燥,也不容易坚持下去. 我们不追求大而全,而是试着每次去研究一个小知识点,最终聚沙成塔,这就是我们的springboot ...
- SpringBoot源码解析系列文章汇总
相信我,你会收藏这篇文章的 本篇文章是这段时间撸出来的SpringBoot源码解析系列文章的汇总,当你使用SpringBoot不仅仅满足于基本使用时.或者出去面试被面试官虐了时.或者说想要深入了解一下 ...
- springboot源码解析-管中窥豹系列之项目类型(二)
一.前言 Springboot源码解析是一件大工程,逐行逐句的去研究代码,会很枯燥,也不容易坚持下去. 我们不追求大而全,而是试着每次去研究一个小知识点,最终聚沙成塔,这就是我们的springboot ...
- springboot源码解析-管中窥豹系列之Initializer(四)
一.前言 Springboot源码解析是一件大工程,逐行逐句的去研究代码,会很枯燥,也不容易坚持下去. 我们不追求大而全,而是试着每次去研究一个小知识点,最终聚沙成塔,这就是我们的springboot ...
- springboot源码解析-管中窥豹系列之web服务器(七)
一.前言 Springboot源码解析是一件大工程,逐行逐句的去研究代码,会很枯燥,也不容易坚持下去. 我们不追求大而全,而是试着每次去研究一个小知识点,最终聚沙成塔,这就是我们的springboot ...
- springboot源码解析-管中窥豹系列之自动装配(九)
一.前言 Springboot源码解析是一件大工程,逐行逐句的去研究代码,会很枯燥,也不容易坚持下去. 我们不追求大而全,而是试着每次去研究一个小知识点,最终聚沙成塔,这就是我们的springboot ...
- springboot源码解析-管中窥豹系列之BeanDefine如何加载(十三)
一.前言 Springboot源码解析是一件大工程,逐行逐句的去研究代码,会很枯燥,也不容易坚持下去. 我们不追求大而全,而是试着每次去研究一个小知识点,最终聚沙成塔,这就是我们的springboot ...
- springboot源码解析-管中窥豹系列之总体结构(一)
一.简介 Springboot源码解析是一件大工程,逐行逐句的去研究代码,会很枯燥,也不容易坚持下去. 我们不追求大而全,而是试着每次去研究一个小知识点,最终聚沙成塔,这就是我们的springboot ...
- springboot源码解析-管中窥豹系列之排序(五)
一.前言 Springboot源码解析是一件大工程,逐行逐句的去研究代码,会很枯燥,也不容易坚持下去. 我们不追求大而全,而是试着每次去研究一个小知识点,最终聚沙成塔,这就是我们的springboot ...
- springboot源码解析-管中窥豹系列之aware(六)
一.前言 Springboot源码解析是一件大工程,逐行逐句的去研究代码,会很枯燥,也不容易坚持下去. 我们不追求大而全,而是试着每次去研究一个小知识点,最终聚沙成塔,这就是我们的springboot ...
随机推荐
- Cohen-Sutherland算法
Cohen-Sutherland算法 本算法又称为编码裁剪算法,算法的基本思想是对每 条直线段分三种情况处理: (1)若点p1和p 2完全在裁剪窗口内 “简取”之 (2)若点p1(x1,y1)和p2( ...
- Flash XSS漏洞快速上手
0x01 Flash XSS xss一是指执行恶意js,那么为什么说flash xss呢?是因为flash有可以调用js的函数,也就是可以和js通信,因此这些函数如果使用不当就会造成xss.常见的 ...
- Web安全之CSRF漏洞整理总结
这两天整理和编写了csrf的靶场,顺便也复习了以前学习csrf的点,这里记录下学习的总结点. 0x01 关于CSRF 跨站请求伪造 CSRF(Cross-site request forgery)跨站 ...
- 常用windows命令
目录 本教程概述 用到的工具 标签 简介 1.cmd的一些规则 2.cd切换目录命令 3.dir显示目录命令 4.type显示文本内容 5.del 删除文件 6.查看IP地址 7.net 命令 8.n ...
- opencv::模板匹配(Template Match)
模板匹配介绍 模板匹配就是在整个图像区域发现与给定子图像匹配的小块区域. 所以模板匹配首先需要一个模板图像T(给定的子图像) 另外需要一个待检测的图像-源图像S 工作方法,在带检测图像上,从左到右,从 ...
- 百万年薪python之路 -- JS的BOM与DOM对象
BOM对象 location对象 location.href 获取URL location.href="URL" // 跳转到指定页面 location.reload() 重新加载 ...
- 百万年薪python之路 -- 并发编程之 协程
协程 一. 协程的引入 本节的主题是基于单线程来实现并发,即只用一个主线程(很明显可利用的cpu只有一个)情况下实现并发,为此我们需要先回顾下并发的本质:切换+保存状态 cpu正在运行一个任务,会在两 ...
- win7更新,360手机安装谷歌框架
这两天把11平台被卸载了,不能打竞技场了,很伤心. 成年男子,总要找点有趣的事情去做.我准备洗心革面,好好学习.(巴拉巴拉巴拉一万字.) 首先第一件事情就是重装系统,(由于买了个假显卡,win10以上 ...
- Spark执行流程(转)
原文地址:http://blog.jobbole.com/102645/ 我们使用spark-submit提交一个Spark作业之后,这个作业就会启动一个对应的Driver进程.根据你使 ...
- bash_history文件怎么删除
Bash shell在“~/.bash_history”(“~/”表示用户目录)文件中保存了500条使用过的命令,这样可以使你输入使用过的长命令变得容易.每个在系统中拥有账号的用户在他的目录下都有一个 ...