
React搭建项目(全家桶)
- 安装React脚手架:
npm install -g create-react-app
- 创建项目:
create-react-app app
app:为该项目名称
或者跳过以上两步直接使用:
npx create-react-app app
- 启动项目:
cd app
npm start
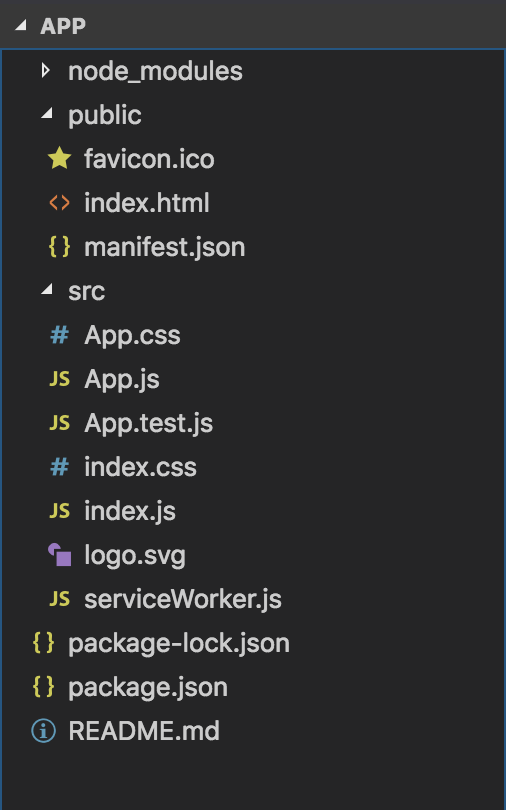
项目创建完成,目录如下:
- 安装 Ant Design:API Docs
npm install antd --save

或
cnpm install antd --save
cnpm i antd -S
没有权限请使用 sudo
- 配置 Ant Design 按需加载:配置文档
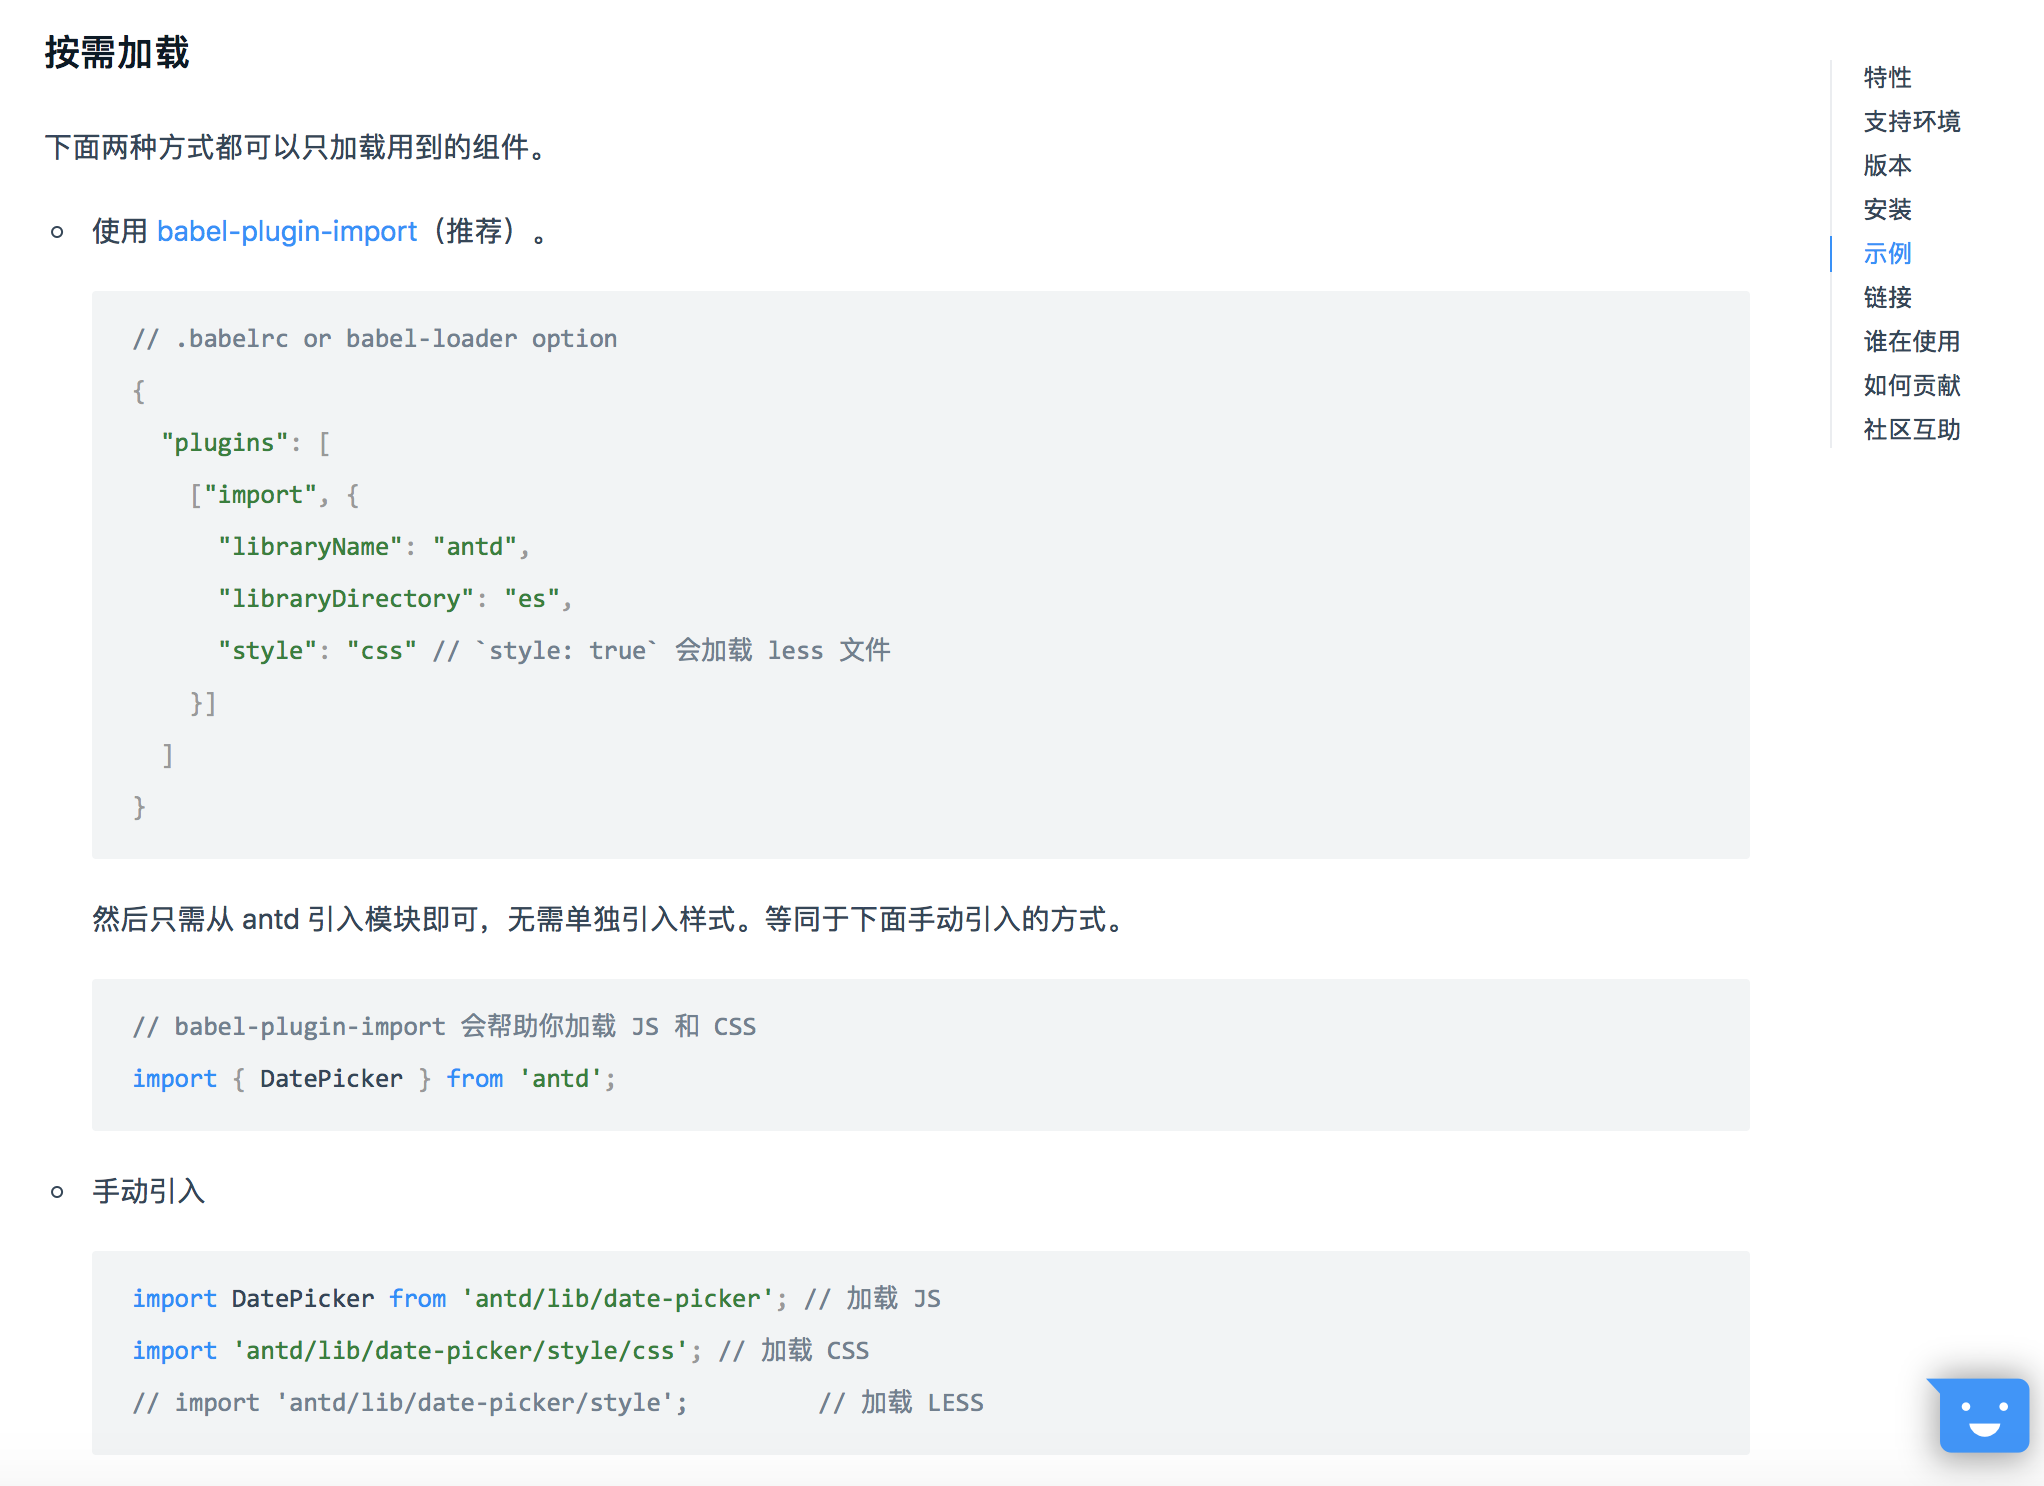
使用 babel-plugin-import(推荐)。
- 首先暴露配置文件:
npm run eject
NOTE: Create React App 2+ supports TypeScript, Sass, CSS Modules and more without ejecting: https://reactjs.org/blog/2018/10/01/create-react-app-v2.html
该操作为永久性,不可逆的。
- 在 package.json 中配置 babel (需要安装 babel-plugin-import )
Error: Cannot find module 'babel-plugin-import'
需要安装 babel-plugin-import
npm install babel-plugin-import --save-dev

或

cnpm install babel-plugin-import --save-dev
cnpm i babel-plugin-import -D
babel 配置如下:
"babel": {

    "presets": [

      "react-app"

    ],

    "plugins": [

      [

        "import",

        {

          "libraryName": "antd",

          "libraryDirectory": "es",

          "style": true

        }

      ]

    ]

}
使用 babel-plugin-import 的
style配置来引入样式,需要将配置值从 'style':'css'改为 'style':true,这样会引入 less 文件。 - 配置 Ant Design 中文语言(默认文案是英文):配置文档
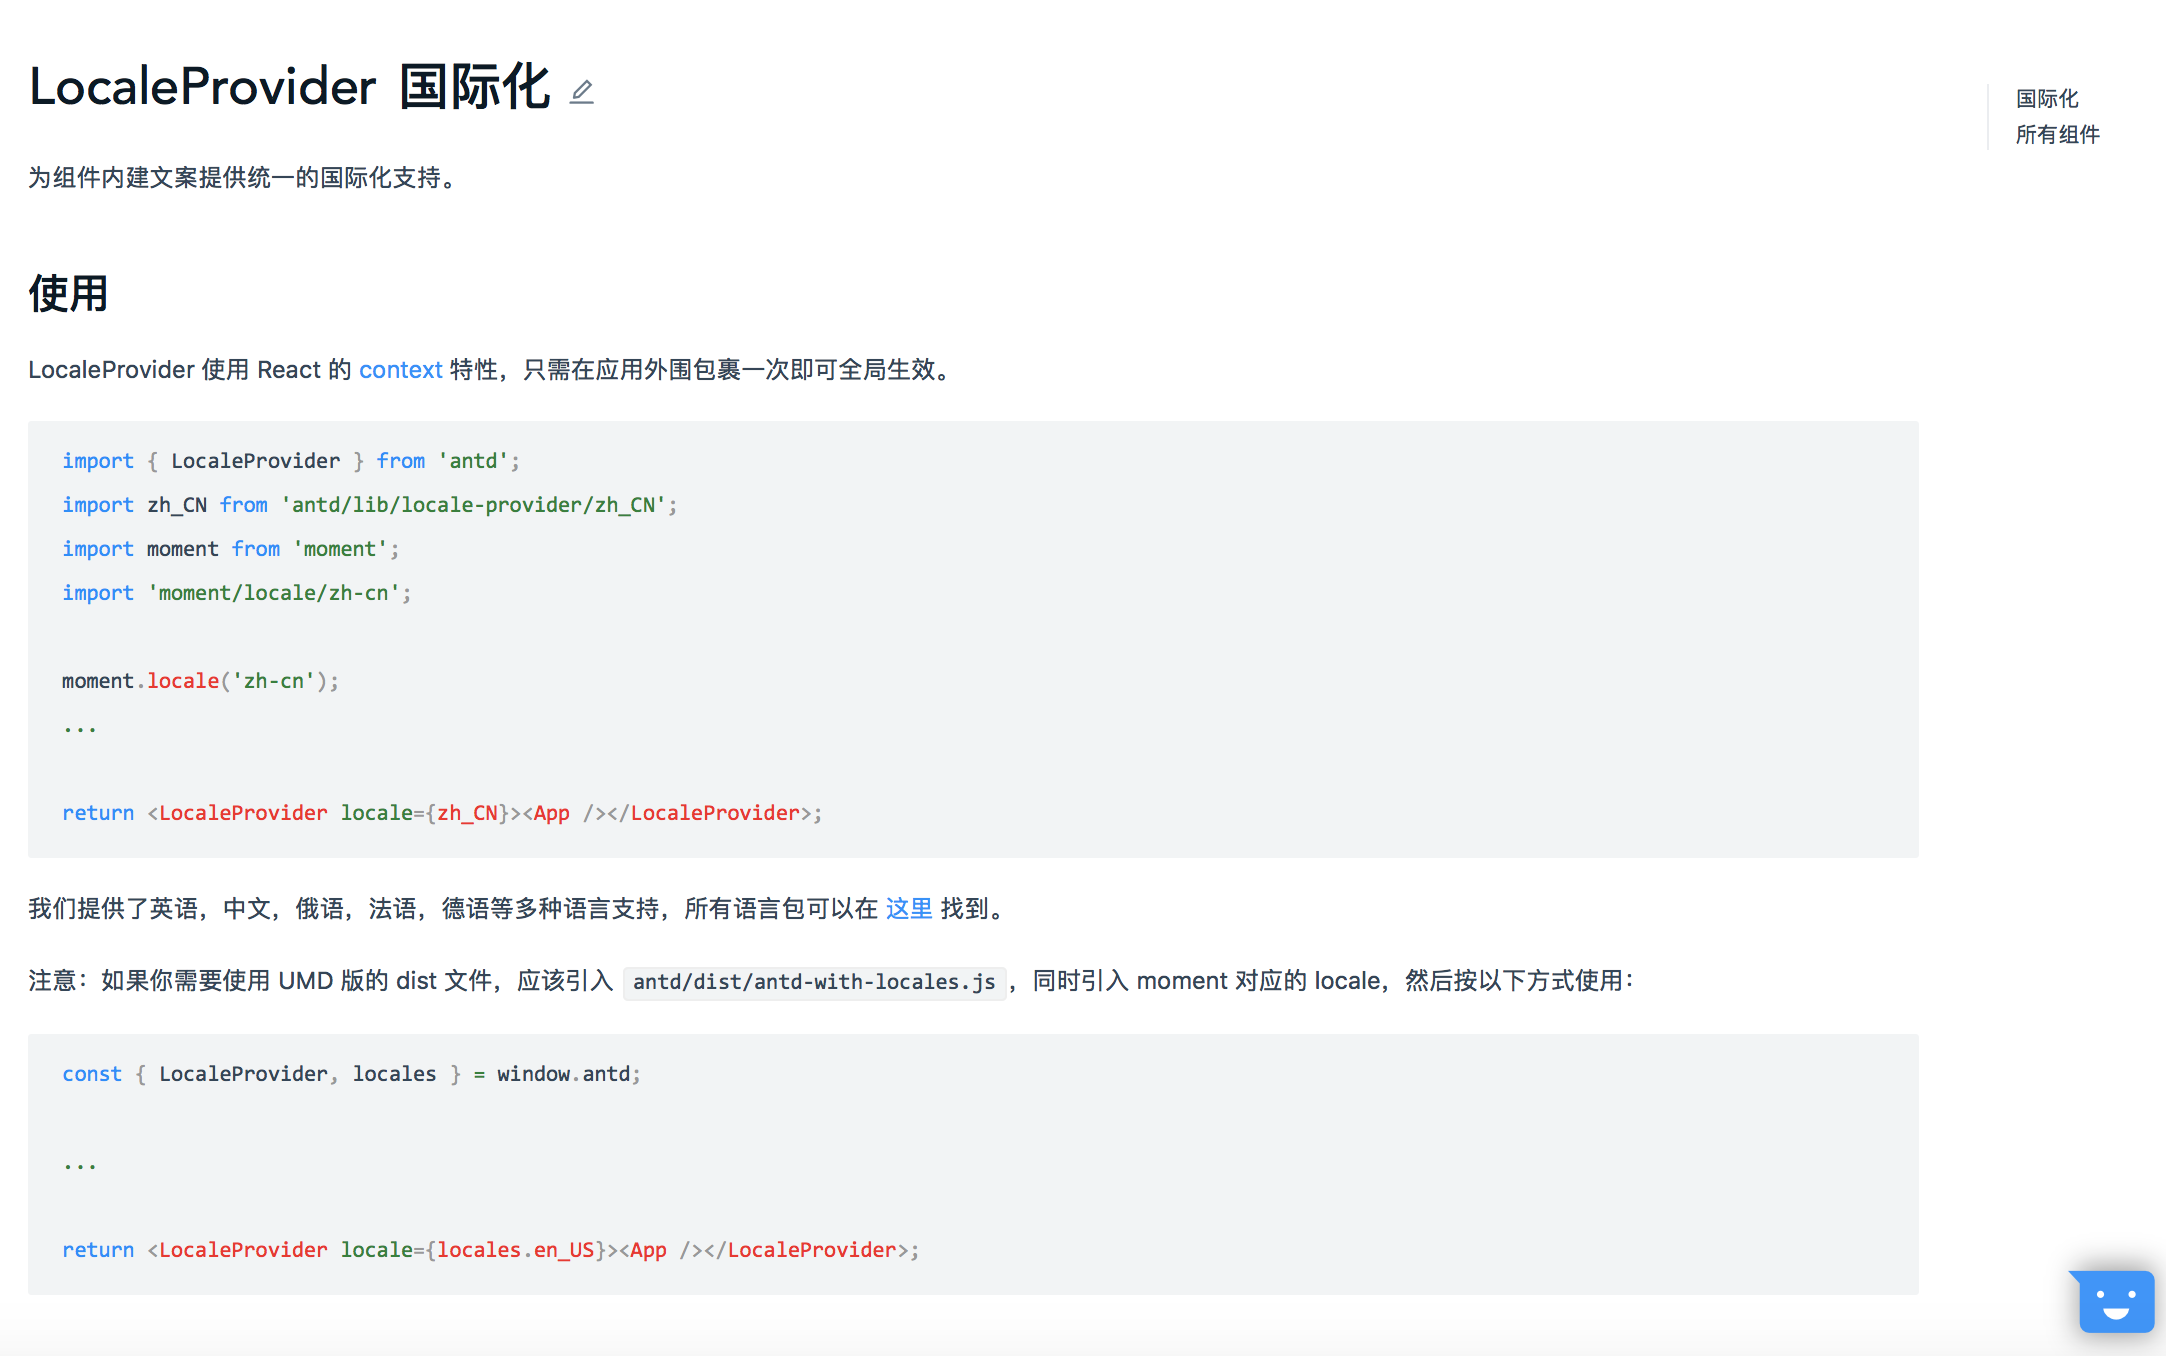
在入口文件index.js中配置:import { ConfigProvider } from 'antd';
import zh_CN from 'antd/lib/locale-provider/zh_CN';
import moment from 'moment';
import 'moment/locale/zh-cn'; moment.locale('zh-cn');语言列表请参照:Ant Design 国际化
另外需要使用 ConfigProvider 组件把 根组件 包裹起来:
<ConfigProvider locale={zhCN}>

  <App />

</ConfigProvider>
- 安装配置 less 预处理器 && 配置 Ant Design 主题: 配置文档
npm install less less-loader --save-dev
或
cnpm install less less-loader --save-dev
cnpm i less less-loader -D
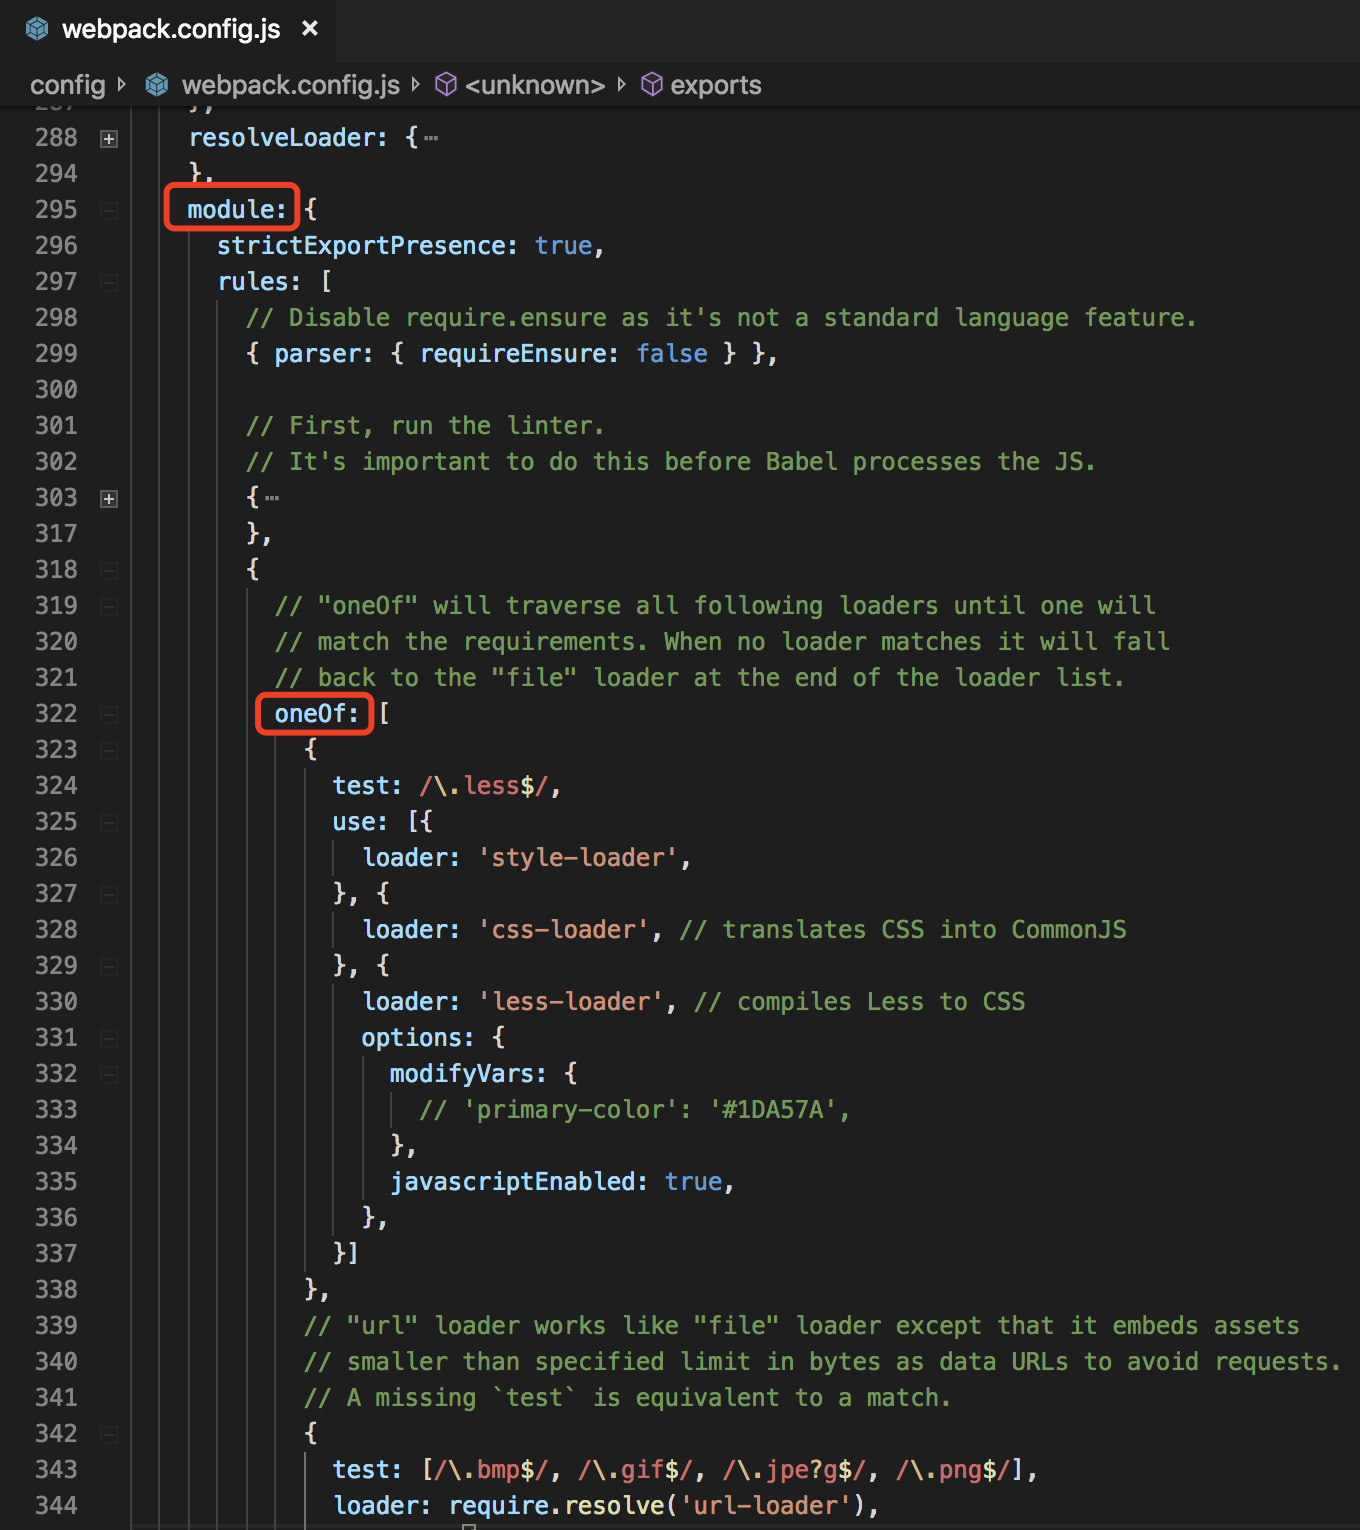
在 config/webpack.config.js 中配置 less:
{

  test: /\.less$/,

  use: [{

    loader: 'style-loader',

  }, {

    loader: 'css-loader', // translates CSS into CommonJS

  }, {

    loader: 'less-loader', // compiles Less to CSS

    options: {

      modifyVars: {

        'primary-color': '#1DA57A',

        'link-color': '#1DA57A',

        'border-radius-base': '2px',

        // or

        'hack': `true; @import "your-less-file-path.less";`, // Override with less file

      },

      javascriptEnabled: true,

    },

  }]

}
配置位置如下:
Ant Design 官网给出的可配置项:
@primary-color: #1890ff; // 全局主色

@link-color: #1890ff; // 链接色

@success-color: #52c41a; // 成功色

@warning-color: #faad14; // 警告色

@error-color: #f5222d; // 错误色

@font-size-base: 14px; // 主字号

@heading-color: rgba(, , , 0.85); // 标题色

@text-color: rgba(, , , 0.65); // 主文本色

@text-color-secondary : rgba(, , , .); // 次文本色

@disabled-color : rgba(, , , .); // 失效色

@border-radius-base: 4px; // 组件/浮层圆角

@border-color-base: #d9d9d9; // 边框色

@box-shadow-base: 2px 8px rgba(, , , 0.15); // 浮层阴影- 安装 CSS resets: Normalize.css ( 样式重置 )
npm install normalize.css --save
或
cnpm install normalize.css --save
cnpm i normalize.css -S
安装完成后在入口文件index.js中引入即可。
import 'normalize.css';
- 安装配置 axios、qs :
npm install axios qs --save
或
cnpm install axios qs --save
cnpm i axios qs -S
配置请求拦截器、响应拦截器:
service.js:import axios from 'axios'; const service = axios.create({
// baseURL: window.location.origin,
timeout: ,
/*headers: {
'Cache-Control': 'no-cache'
}*/
}); /* 请求拦截器 */
service.interceptors.request.use((config) => {
// 在这里配置请求 config
return config;
}, (err) => {
console.error('请求发生了错误', err);
return Promise.reject(err);
}); /* 响应拦截器 */
service.interceptors.response.use((res) => {
// 在这里配置响应拦截器
return res;
}, (err) => {
console.error('响应发生了错误', err);
return Promise.reject(err);
}); export default service;配置API调用方法:
// 引入 axios 配置

import service from './service';

import qs from "qs";

// post 请求

export function apiPost(data = {}) {

  return service({

    url: "接口url",

    method: 'post',

    data: qs.stringify(data),

  });

}

// get 请求

export function apiGet(params = {}) {

  return service({

    url: "接口url",

    method: 'get',

    params: params,

  });

} - 配置跨域: Docs

前面配置中 npm run eject 已经将配置暴露出来了
npm install http-proxy-middleware --save

或

cnpm i http-proxy-middleware -S
在 src 下新建 setupProxy.js
const proxy = require('http-proxy-middleware');

module.exports = function(app) {

  app.use(proxy('/api', { target: 'http://localhost:5000/' }));

}; - 安装配置路由 React-router:API Docs
npm install react-router-dom --save

或

cnpm install react-router-dom --save

cnpm i react-router-dom -S
单独新建一个 router.js:( 或者在入口文件 index.js 中写路由视图)
import React from 'react';

import { BrowserRouter as Router, Route } from 'react-router-dom';

import YourComponent from 'your-component-path';

export default function () {

  return (

    <Router>

      <Route path='/' component={YourComponent} />

    </Router>

  );

}
然后在index.js里引用使用这个router.js:
import Router from './path/router.js';

export default function Index() {

  return <Router />;

}
在哪个文件引用 router.js ,看个人项目构建喜好了,我是把 redux 和 antd 的配置 在 index.js 中引用的,把 router.js 在 app.js 中引用的,然后再把 app.js 引入到 index.js 中。
可以看我 GitHub 的 mixins-demo - 安装配置 redux react-redux Docs、redux Docs、中文Docs
npm install redux redux-thunk react-redux --save

或

cnpm install redux redux-thunk react-redux --save

cnpm i redux redux-thunk react-redux -S
在src目录下新建 redux 文件夹,作为配置 redux 的目录:
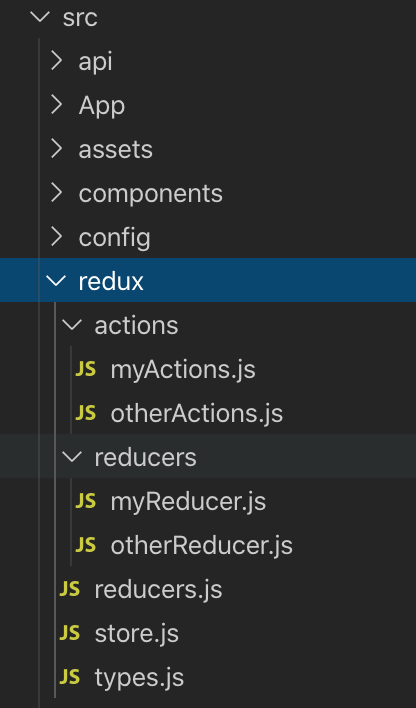
actions: 针对不同功能模块进行配置的 actions 文件放在此目录
reducers: 针对不同功能模块进行配置的 reducers 文件放在此目录
reducers.js: 把所有reducers 结合起来
store.js: 对 redux 的配置文件
types.js: 存放Actions中所需要的 type 属性值各文件代码:
types.js:export const MYTODO = 'MYTODO';
export const MYLIST = 'MYLIST';
export const OTHERTODO = 'OTHERTODO';
export const OTHERLIST = 'OTHERLIST';myReducer.js:
import { MYTODO, MYLIST } from '../types';

const initState = {

  myTodos: [],

  list: [],

  // ...etc.

};

export default function (state = initState, action) {

  switch (action.type) {

    case MYTODO:

      return {

        ...state,

        myTodos: action.payload

      };

    case MYLIST:

      return {

        ...state,

        list: action.payload

      };

    default:

      return state;

  }

}
myActions.js:
import { MYTODO, MYLIST } from "../types";

export const myTodos = (params) => (dispatch, getState) => {

  // const { myState, otherState } = getState();

  dispatch({

    type: MYTODO,

    payload: params

  });

};

export const handleMyList = (params) => (dispatch, getState) => {

  // const { myState, otherState } = getState();

  dispatch({

    type: MYLIST,

    payload: params

  });

};
otherReducer.js:
import { OTHERTODO, OTHERLIST } from '../types';

const initState = {

  otherTodos: [],

  list: [],

  // ...etc.

};

export default function (state = initState, action) {

  switch (action.type) {

    case OTHERTODO:

      return {

        ...state,

        otherTodos: action.payload

      };

    case OTHERLIST:

      return {

        ...state,

        list: action.payload

      };

    default:

      return state;

  }

}
otherActions.js:
import { OTHERTODO, OTHERLIST } from "../types";

export const otherTodos = (params) => (dispatch, getState) => {

  // const { myState, otherState } = getState();

  dispatch({

    type: OTHERTODO,

    payload: params

  });

};

export const handleOtherList = (params) => (dispatch, getState) => {

  // const { myState, otherState } = getState();

  dispatch({

    type: OTHERLIST,

    payload: params

  });

};
reducers.js:
import { combineReducers } from 'redux';

import myReducer from './reducers/myReducer';

import otherReducer from './reducers/otherReducer';

export default combineReducers({

  myState: myReducer,

  otherState: otherReducer,

});
store.js:
import { createStore, applyMiddleware, compose } from 'redux';

import thunk from 'redux-thunk';

import reducers from './reducers';

const initState = {};

const middleware = [thunk];

const composeEnhancers =

  typeof window === 'object' && window.__REDUX_DEVTOOLS_EXTENSION_COMPOSE__

    ? window.__REDUX_DEVTOOLS_EXTENSION_COMPOSE__({})

    : compose;

const enhancer =

  process.env.NODE_ENV === 'development'

    ? composeEnhancers(applyMiddleware(...middleware))

    : applyMiddleware(...middleware);

export const store = createStore(reducers, initState, enhancer);
以上Redux基本配置完成,下面是调用方法:
import React, { useEffect } from 'react';

import PropTypes from 'prop-types';

import { connect } from 'react-redux';

import { myTodos, handleMyList } from './path/redux/actions/myActions';

function MyTodosComponent() {

  useEffect(() => {

    // 通过this.props 访问 state

    console.log(this.props.myTodos);

    console.log(this.props.list);

    // 调用 actions

    const todos = [

      {

        id: 1,

        todo: 'say hello world'

      }

    ];

    this.props.myTodos(todos);

    const list = [

      {

        id: 1,

        text: 'test',

      },

    ];

    this.props.handleMyList(list);

  }, []);

  return (

    <div>

      {

        this.props.todos.map((item, index) => {

          return (

            <div>id:{item.id}, todo:{item.todo}</div>

          );

        })

      }

    </div>

  );

}

// 类型检查

MyTodosComponent.propTypes = {

  myTodos: PropTypes.array.isRequired,

  list: PropTypes.array.isRequired,

};

// 把redux中的state绑定到组件的props上

const mapStateToProps = (state) => {

  const { myTodos, list } = state.myState;

  return {

    myTodos,

    list,

  };

};

// 把redux和组件结合起来,使组件能在props中访问到state和actions

export default connect(

  mapStateToProps,

  {

    myTodos,

    handleMyList,

  },

)(MyTodosComponent);
以上代码只是示例,只需要关注配置和使用方法即可
更多demo示例请看我的GitHub
React搭建项目(全家桶)的更多相关文章
- react 项目全家桶构件流程
资源:create-react-app.react.react-dom.redux.react-redux.redux-thunk.react-router-dom.antd-mobile/antd. ...
- 如何使用React搭建项目
1.首先说明node.js.npm.cnpm分别是做什么的? node.js简单的说 Node.js 就是运行在服务端的 JavaScript,安装了node.js默认安装了npm,可以使用npm - ...
- 使用webpack和react搭建项目
看了N多博客,日志,一边迷茫一边摸索.本文记录流程.我怕自己忘了...并且修复了博客园首页推荐那个日志中遇到的bug 1.webstorm新建一个空白项目,比如webpack_demo 2.因为要用r ...
- 搭建vue全家桶
1.直接利用vue-cli脚手架快速搭建 (1)全局安装vue-cli npm install -g vue-cli (2)创建项目 vue init webpack-simple my-projec ...
- react搭建项目
1.创建react项目 使用react脚手架create-react-app npm install -g create-react-app create-react-app my-app cd my ...
- react全家桶从0搭建一个完整的react项目(react-router4、redux、redux-saga)
react全家桶从0到1(最新) 本文从零开始,逐步讲解如何用react全家桶搭建一个完整的react项目.文中针对react.webpack.babel.react-route.redux.redu ...
- 使用React全家桶搭建一个后台管理系统
引子 学生时代为了掌握某个知识点会不断地做习题,做总结,步入岗位之后何尝不是一样呢?做业务就如同做习题,如果‘课后’适当地进行总结,必然更快地提升自己的水平. 由于公司采用的react+node的技术 ...
- react-music React全家桶项目,精品之作!
React-Music 全家桶项目,精品之作! 一.简介 该项目是基于React全家桶开发的一个音乐播放器,技术栈采用:Webpack + React + React-redux + React-ro ...
- 【实战】Vue全家桶(vue + axios + vue-router + vuex)搭建移动端H5项目
使用Vue全家桶开发移动端页面. 本博文默认已安装node.js. github链接 一.准备工作 安装vue npm install vue 安装脚手架vue-cli npm install -g ...
随机推荐
- ganglia 客户端部署
#!/bin/bash #配置参数 #serverIP=192.168.1.16 #network=ens32 #关闭selinux #setenforce #sed -i 's/SELINUX=en ...
- .NET Core 跨平台 GUI 开发之 GTtkSharp 初级篇
.NET Core 跨平台 GUI 开发之 GTtkSharp 初级篇 本文作为初级篇,适合已经安装好.NET Core 环境以及 Gtk 环境,并具备了 C#开发基础知识,能跑一些简单的例子,希望更 ...
- NSURLConnection发送GET请求
// ViewController.m // 04-掌握-NSURLConnection发送GET请求 // // Created by xiaomage on 16/2/22. // Copyrig ...
- 记录我的 python 学习历程-Day02-while 循环/格式化输出/运算符/编码的初识
一.流程控制之--while 循环 循环就是重复做同一件事,它可以终止当前循环,也可以跳出这一次循环,继续下一次循环. 基本结构(基本循环) while 条件: 循环体 示例 # 这是一个模拟音乐循环 ...
- for循环使用element的折叠面板遇到的问题-3
需求:for循环渲染上去的表单怎么使用element的表单校验 之前做这个的时候,死活绑不上去,不知道哪里出了问题,后来解决办法是prop要注意用拼接,使它和索引的变量一致 <el-form-i ...
- 【Python成长之路】从零学GUI -- 制作智能聊天机器人
[写在前面] 鹏哥:最近老惹小燕同学不开心,结果都没人陪我聊天了.哎,好无聊呀! 肥宅男:女朋友什么的最无聊了,还没我的图灵机器人好玩. 鹏哥:图灵?好巧,和我部门同名. [效果如下] [实现过程] ...
- 谁说微服务是Spring Cloud的独角戏?Service Mesh了解一下?
Service Mesh 的概念自 2017 年初提出之后,受到了业界的广泛关注,作为微服务的下一代发展架构在社区迅速发酵,并且孵化出了诸如 Istio 等广受业界关注的面向于云原生 (Cloud N ...
- Webstorm相关设置
[1.快速激活Webstorm] http://jingyan.baidu.com/article/9f63fb919674f2c8400f0e9a.html [2.webstorm 2017 激活破 ...
- 使用java理解程序逻辑 试题分析
1.编译Java Applet源程序文件产生的字节码文件的扩展名为() A:.java B..class C:Html D:Exe 正确答案:B 试题分析: 本题考查的是Java程序的开发过程.J ...
- JavaEE基础(03):Http请求详解,握手挥手流程简介
本文源码:GitHub·点这里 || GitEE·点这里 一.Http协议简介 1.概念说明 HTTP超文本传输协议,是用于从万维网服务器传输超文本到本地浏览器的传送协议,基于TCP/IP通信协议来传 ...