
深度学习框架Tensorflow应用(Google工程师)
首先在这里给大家分享Google工程师亲授 Tensorflow2.0-入门到进阶教程

有需要的小伙伴可点击进入扣群下载,群内不定期的会分享资料教程,点击直达链接:https://jq.qq.com/?_wv=1027&k=55fzJrT
#!/usr/bin/env python3.6
# -*- coding: utf-8 -*-
#fetch
import tensorflow as tf
import numpy as np
import matplotlib.pyplot as plt
#实用numpy在-0.5和0.5之间来生成200个均匀分布样本点,[:,np.newaxis]把一行转化为200行一列
x_data = np.linspace(-0.5,0.5,10)[:,np.newaxis]
#noise随机生成
noise = np.random.normal(0,0.02,x_data.shape)
y_data = np.square(x_data) + noise
#定义两个placeholder,[None,1]定义形状,None行不确定,1一列
x = tf.placeholder(tf.float32,[None,1])
y = tf.placeholder(tf.float32,[None,1])
#构建一个简单的神经网络,输入一个X,经过神经网络计算得到一个y,希望预测和真实值接近说明网络构建成功
#定义神经网络中间层权值,形状一行10列,1代表一个输入,中间层10个神经元
Weights_L1 = tf.Variable(tf.random_normal([1,10]))
#偏置值初始化为0
biases_L1 = tf.Variable(tf.zeros([1,10]))
# x输入,weights_L1都是矩阵,biases_L1偏置值
Wx_plus_b_L1 = tf.matmul(x,Weights_L1) + biases_L1
#L1中间层的输出,激活函数tanh,Wx_plus_b_L1中间层输出
L1 = tf.nn.tanh(Wx_plus_b_L1)
#输出层
Weights_L2 = tf.Variable(tf.random_normal([10, 1]))
biases_L2 = tf.Variable(tf.zeros([1, 1]))
#信号的总和,上一层的输出即下一层的输入
Wx_plus_b_L2 = tf.matmul(L1, Weights_L2) + biases_L2
#预测经过一个激活函数
prediction = tf.nn.tanh(Wx_plus_b_L2)
#二次代价函数
loss = tf.reduce_mean(tf.square(y-prediction))
#实用梯度下降法训练
train_step = tf.train.GradientDescentOptimizer(0.1).minimize(loss)
with tf.Session() as sess:
#变量初始化
sess.run(tf.global_variables_initializer())
#训练
for _ in range(2000):
sess.run(train_step, feed_dict={x: x_data, y: y_data})
#获得预测值
prediction_value = sess.run(prediction,feed_dict={x:x_data})
#画图方式展示
plt.figure()
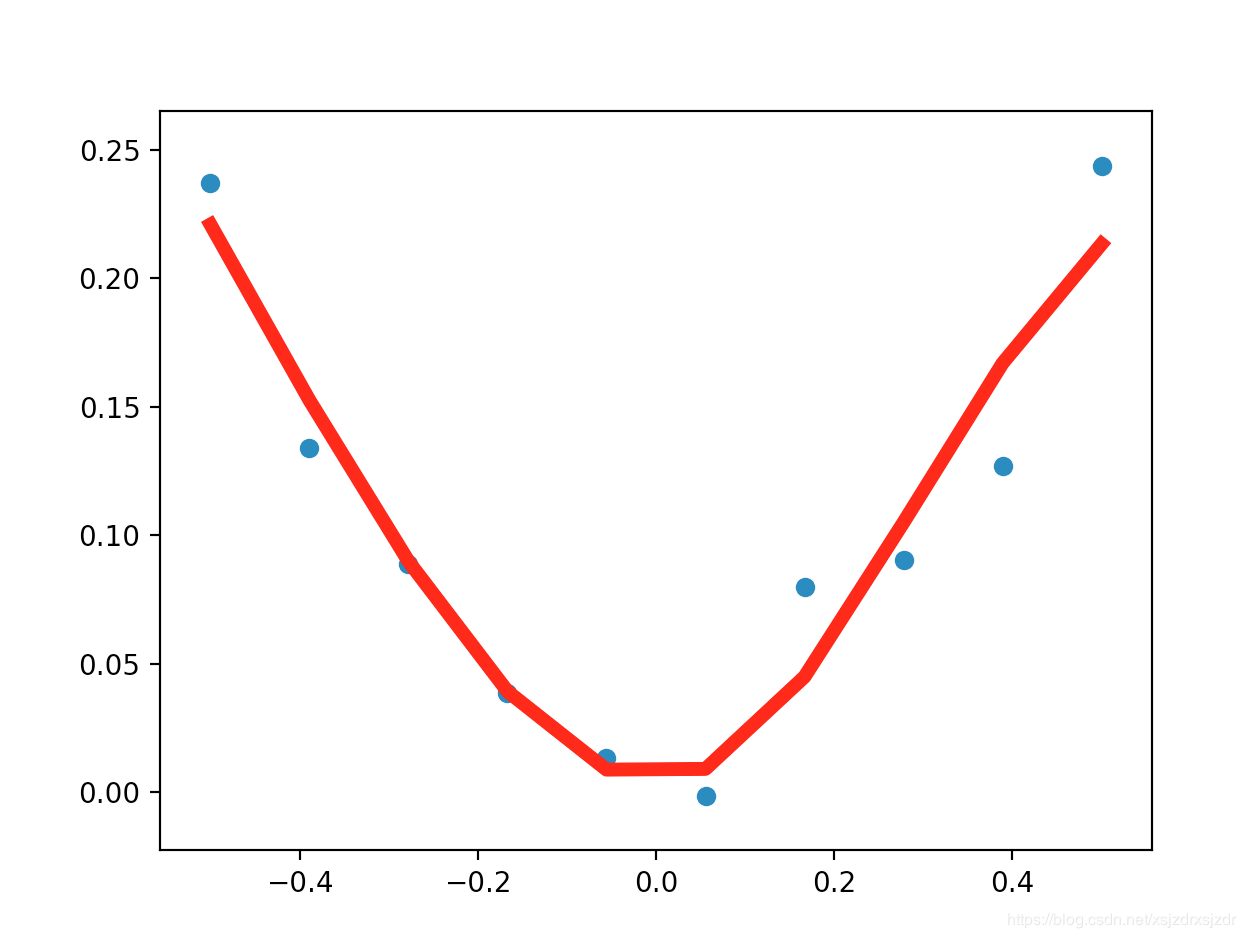
plt.scatter(x_data,y_data)
plt.plot(x_data,prediction_value,'r-',lw=5)#红色实线,线宽为5
plt.show()
运行结果展示:
MNIST手写数字数据集下载地址: http://yann.lecun.com/exdb/mnist/
train-images-idx3-ubyte.gz: 训练集的数据
train-labels-idx1-ubyte.gz: 训练集的标签
t10k-images-idx3-ubyte.gz: 测试集的数据
t10k-labels-idx1-ubyte.gz: 测试集的标签
下载下来的数据集被分为两部分:60000行的训练数据集(mnist.train)和10000行的测试数据集(mnist.test)都是手写的数字
每一张图片包含28*28个像素,我们把这一个数组展开成一个向量,长度是28*28=784.因此在MNIST训练数据集中mnist.train.images时一个形状为[60000,784]的张量,第一个维度数字用来索引图片,第二个维度数字用来素音每张图片中的像素点。图片里的某个像素的强度值介于0-1之间
代码
# coding: utf-8
# In[2]:
import tensorflow as tf
from tensorflow.examples.tutorials.mnist import input_data
# In[3]:
# 载入数据集,加入数据集,MNIST_DATA路径为当前路径,,会从网上下载数据集,
# one_hot=True把标签转换为只有0.1的格式,某一位是1,其它位为0
mnist = input_data.read_data_sets("MNIST_data", one_hot=True)
# 每个批次的大小,训练模型时候不是一张一张放入,而是一次放入100个批次,即一次性放入100张图片,以矩阵形式
batch_size = 100
# 计算一共有多少个批次
n_batch = mnist.train.num_examples // batch_size #//代表整出的意思
# 定义两个placeholder, None代表任意的值,一会会变成100, 784=28*28
x = tf.placeholder(tf.float32, [None, 784])
#数字从0到9,总共10个数字
y = tf.placeholder(tf.float32, [None, 10])
# 创建一个简单的神经网络,在这里总共2个层,即一个输入层一个输出层,不加隐藏层
# #输出总共10个数,即10个神经元
# #权值W,
W = tf.Variable(tf.zeros([784, 10]))
#偏置值
b = tf.Variable(tf.zeros([10]))
#偏置值
prediction = tf.nn.softmax(tf.matmul(x, W) + b)
# 二次代价函数
loss = tf.reduce_mean(tf.square(y - prediction))
# 使用梯度下降法,0.2的学习率,最小化loss
train_step = tf.train.GradientDescentOptimizer(0.2).minimize(loss)
# 初始化变量
init = tf.global_variables_initializer()
# 结果存放在一个布尔型列表中
#测试集群的准确率,equal比较两个参数的大小,相同的为true,不同为false,argmax(y,1)求两个值的最大值
#tf.argmax(y,1) ,里面要么为0,要么为1, 如果是1则范围1的位置
#tf.argmax(prediction,1)
#结果存放在一个布尔型列表中,预测值和真实值形成对比
correct_prediction = tf.equal(tf.argmax(y, 1), tf.argmax(prediction, 1)) # argmax返回一维张量中最大的值所在的位置
# 求准确率
#cast把预测的进行对比,把预测结果进行格式转化一下,把bool型转化为float32类型,然后再求平均值
accuracy = tf.reduce_mean(tf.cast(correct_prediction, tf.float32))
with tf.Session() as sess:
sess.run(init)
for epoch in range(21):#迭代21个周期,所有图片循环21次
for batch in range(n_batch):
batch_xs, batch_ys = mnist.train.next_batch(batch_size)
sess.run(train_step, feed_dict={x: batch_xs, y: batch_ys})
acc = sess.run(accuracy, feed_dict={x: mnist.test.images, y: mnist.test.labels})
print("Iter " + str(epoch) + ",Testing Accuracy " + str(acc))
# In[ ]:
运行结果展示:
[tensorflow@zhangjinyutensorflow ~]$ python3.6 MNIST.py
/home/tensorflow/anaconda3/lib/python3.6/site-packages/h5py/__init__.py:36: FutureWarning: Conversion of the second argument of issubdtype from `float` to `np.floating` is deprecated. In future, it will be treated as `np.float64 == np.dtype(float).type`.
from ._conv import register_converters as _register_converters
WARNING:tensorflow:From MNIST.py:12: read_data_sets (from tensorflow.contrib.learn.python.learn.datasets.mnist) is deprecated and will be removed in a future version.
Instructions for updating:
Please use alternatives such as official/mnist/dataset.py from tensorflow/models.
WARNING:tensorflow:From /home/tensorflow/anaconda3/lib/python3.6/site-packages/tensorflow/contrib/learn/python/learn/datasets/mnist.py:260: maybe_download (from tensorflow.contrib.learn.python.learn.datasets.base) is deprecated and will be removed in a future version.
Instructions for updating:
Please write your own downloading logic.
WARNING:tensorflow:From /home/tensorflow/anaconda3/lib/python3.6/site-packages/tensorflow/contrib/learn/python/learn/datasets/mnist.py:262: extract_images (from tensorflow.contrib.learn.python.learn.datasets.mnist) is deprecated and will be removed in a future version.
Instructions for updating:
Please use tf.data to implement this functionality.
Extracting MNIST_data/train-images-idx3-ubyte.gz
WARNING:tensorflow:From /home/tensorflow/anaconda3/lib/python3.6/site-packages/tensorflow/contrib/learn/python/learn/datasets/mnist.py:267: extract_labels (from tensorflow.contrib.learn.python.learn.datasets.mnist) is deprecated and will be removed in a future version.
Instructions for updating:
Please use tf.data to implement this functionality.
Extracting MNIST_data/train-labels-idx1-ubyte.gz
WARNING:tensorflow:From /home/tensorflow/anaconda3/lib/python3.6/site-packages/tensorflow/contrib/learn/python/learn/datasets/mnist.py:110: dense_to_one_hot (from tensorflow.contrib.learn.python.learn.datasets.mnist) is deprecated and will be removed in a future version.
Instructions for updating:
Please use tf.one_hot on tensors.
Extracting MNIST_data/t10k-images-idx3-ubyte.gz
Extracting MNIST_data/t10k-labels-idx1-ubyte.gz
WARNING:tensorflow:From /home/tensorflow/anaconda3/lib/python3.6/site-packages/tensorflow/contrib/learn/python/learn/datasets/mnist.py:290: DataSet.__init__ (from tensorflow.contrib.learn.python.learn.datasets.mnist) is deprecated and will be removed in a future version.
Instructions for updating:
Please use alternatives such as official/mnist/dataset.py from tensorflow/models.
2018-11-06 09:07:50.440732: I tensorflow/core/common_runtime/process_util.cc:69] Creating new thread pool with default inter op setting: 2. Tune using inter_op_parallelism_threads for best performance.
Iter 0,Testing Accuracy 0.8301
Iter 1,Testing Accuracy 0.8708
Iter 2,Testing Accuracy 0.8809
Iter 3,Testing Accuracy 0.8875
Iter 4,Testing Accuracy 0.894
Iter 5,Testing Accuracy 0.8969
Iter 6,Testing Accuracy 0.8988
Iter 7,Testing Accuracy 0.9015
Iter 8,Testing Accuracy 0.9037
Iter 9,Testing Accuracy 0.9051
Iter 10,Testing Accuracy 0.9062
Iter 11,Testing Accuracy 0.9073
Iter 12,Testing Accuracy 0.9077
Iter 13,Testing Accuracy 0.9088
Iter 14,Testing Accuracy 0.9096
Iter 15,Testing Accuracy 0.9107
Iter 16,Testing Accuracy 0.9113
Iter 17,Testing Accuracy 0.9128
Iter 18,Testing Accuracy 0.9125
Iter 19,Testing Accuracy 0.9134
Iter 20,Testing Accuracy 0.9141
[tensorflow@zhangjinyutensorflow ~]$ ls
anaconda3 MNIST_data MNIST.py package
[tensorflow@zhangjinyutensorflow ~]$ ls MNIST_data/
a.sh t10k-images-idx3-ubyte.gz t10k-labels-idx1-ubyte.gz train-images-idx3-ubyte.gz train-labels-idx1-ubyte.gz
[tensorflow@zhangjinyutensorflow ~]$
深度学习框架Tensorflow应用(Google工程师)的更多相关文章
- 截图:【炼数成金】深度学习框架Tensorflow学习与应用
创建图.启动图 Shift+Tab Tab 变量介绍: F etch Feed 简单的模型构造 :线性回归 MNIST数据集 Softmax函数 非线性回归神经网络 MINIST数据集分类器简单版 ...
- Ubuntu16.04搭建深度学习框架——TensorFlow
TensorFlow是一个采用数据流图(data flow graphs),用于数值计算的开源软件库,说白了,就是一个库. 小编自己在Ubuntu搭建了深度学习框架TensorFlow,感觉挺简单,现 ...
- 金玉良缘易配而木石前盟难得|M1 Mac os(Apple Silicon)天生一对Python3开发环境搭建(集成深度学习框架Tensorflow/Pytorch)
原文转载自「刘悦的技术博客」https://v3u.cn/a_id_189 笔者投入M1的怀抱已经有一段时间了,俗话说得好,但闻新人笑,不见旧人哭,Intel mac早已被束之高阁,而M1 mac已经 ...
- 深度学习框架TensorFlow在Kubernetes上的实践
什么是TensorFlow TensorFlow是谷歌在去年11月份开源出来的深度学习框架.开篇我们提到过AlphaGo,它的开发团队DeepMind已经宣布之后的所有系统都将基于TensorFlow ...
- 关于深度学习框架 TensorFlow、Theano 和 Keras
[TensorFlow] ——( https://morvanzhou.github.io/tutorials/machine-learning/tensorflow/) 1.TensorFlow是啥 ...
- 一文全解:利用谷歌深度学习框架Tensorflow识别手写数字图片(初学者篇)
笔记整理者:王小草 笔记整理时间2017年2月24日 原文地址 http://blog.csdn.net/sinat_33761963/article/details/56837466?fps=1&a ...
- 转:TensorFlow和Caffe、MXNet、Keras等其他深度学习框架的对比
http://geek.csdn.net/news/detail/138968 Google近日发布了TensorFlow 1.0候选版,这第一个稳定版将是深度学习框架发展中的里程碑的一步.自Tens ...
- TensorFlow与主流深度学习框架对比
引言:AlphaGo在2017年年初化身Master,在弈城和野狐等平台上横扫中日韩围棋高手,取得60连胜,未尝败绩.AlphaGo背后神秘的推动力就是TensorFlow--Google于2015年 ...
- 28款GitHub最流行的开源机器学习项目,推荐GitHub上10 个开源深度学习框架
20 个顶尖的 Python 机器学习开源项目 机器学习 2015-06-08 22:44:30 发布 您的评价: 0.0 收藏 1收藏 我们在Github上的贡献者和提交者之中检查了用Python语 ...
随机推荐
- Highly Efficient Analysis of Glycoprotein Sialylation in Human Serum by Simultaneous Quantification of Glycosites and Site-Specific Glycoforms (通过同时定量糖基化位点和位点特异性糖型来高效分析人血清中的糖蛋白唾液酸化)-阅读人:陈秋实
期刊名:Journal of Proteome Research 发表时间:(2019年9月) IF:3.78 单位: 中国科学院大连化学物理研究所 中国科学院大学 大连医科大学第二附属医院 物种:人 ...
- springboot结合mybatis使用pageHelper插件进行分页查询
1.pom相关依赖引入 <dependencies> <dependency> <groupId>org.springframework.boot</grou ...
- MySQL 中间件汇总比较
360 Atlas 较为活跃,Atlas 是由 360 Web平台部基础架构团队开发维护的一个基于 MySQL 协议的数据中间层项目.它是在mysql-proxy 0.8.2版本的基础上,对其进行了优 ...
- 使用 .NET Core 3.0 的 AssemblyLoadContext 实现插件热加载
一般情况下,一个 .NET 程序集加载到程序中以后,它的类型信息以及原生代码等数据会一直保留在内存中,.NET 运行时无法回收它们,如果我们要实现插件热加载 (例如 Razor 或 Aspx 模版的热 ...
- 实现一个图片轮播-3d播放效果
前言:最近在做一个音乐播放器,首页要做一个图片轮播,看了bootstrap的carousel插件以及移动端的swipe.js库,都是平面图片轮播的效果,所以自己想着实现类似网易云app里那种3d图片轮 ...
- 【Spring Boot源码分析】@EnableAutoConfiguration注解(一)@AutoConfigurationImportSelector注解的处理
Java及Spring Boot新手,首次尝试源码分析,欢迎指正! 一.概述 @EnableAutoConfiguration注解是Spring Boot中配置自动装载的总开关.本文将从@Enable ...
- Scala 学习笔记之implicit
implicit 分为隐式转换和隐式参数,下面例子展现了两种方式的用法: package com.citi.scala class Man(val name: String) { def talkWi ...
- gorilla/mux类库解析
golang自带的http.SeverMux路由实现简单,本质是一个map[string]Handler,是请求路径与该路径对应的处理函数的映射关系.实现简单功能也比较单一: 不支持正则路由, 这个是 ...
- display值的作用分别是什么?relative和absolute分别是相对谁定位的?
display值的作用分别是什么? none:元素隐藏,不占据位置 block:该元素显示为块级元素 inline:默认,该元素会被显示为内联元素 inline-block:行内块元素 list-it ...
- java动手动脑和动手实验
动手动脑一: EnumTest.java: 程序代码: public class EnumTest { public static void main(String[] args) { Size s= ...