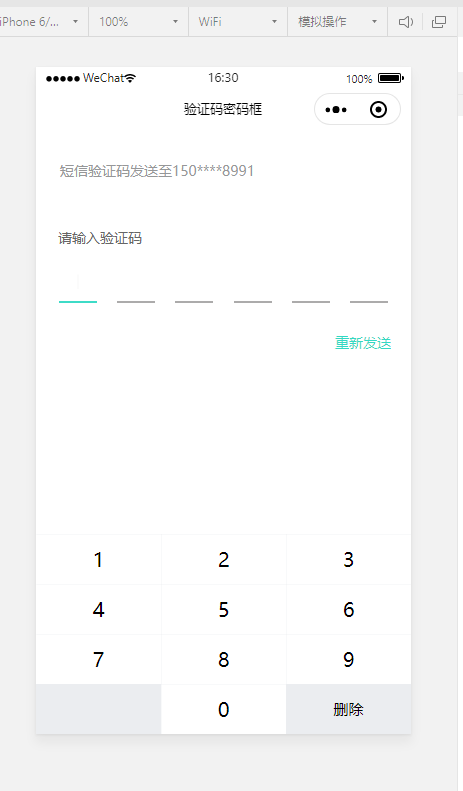
小程序wepy2 模拟vant PasswordInput, NumberKeyboard 密码输入框控件
vant weapp小程序端控件目前是没有PasswordInput,NumberKeyboard的。实现效果:
数字键盘组件代码(keyboard.wpy):
<template>

  <div class="keyboard">

    <div class="number-keyboard number-keyboard--default number-keyboard--safe-area-inset-bottom">

      <div class="number-keyboard__body">

        <i v-for="(item,index) of keys" :key="index" @click="keyTap(item)" class="hairline key" :class="{'key--gray':item.moreClass}">{{item.txt}}</i>

      </div>

    </div>

  </div>

</template>

<script>

import wepy from '@wepy/core';

wepy.component({

    data: {

        keys: [

            { txt: 1, key: 1},

            { txt: 2, key: 2},

            { txt: 3, key: 3},

            { txt: 4, key: 4},

            { txt: 5, key: 5},

            { txt: 6, key: 6},

            { txt: 7, key: 7},

            { txt: 8, key: 8},

            { txt: 9, key: 9},

            { txt: '', key: '', moreClass: 'key--gray key--extra' },

            { txt: 0, key: 0},

            { txt: '删除', key: 'del', moreClass: 'key--gray key--delete' }

        ]

    },

    methods: {

      keyTap(item){

        if(item.key=='del'){

          this.$emit('del',item);

        }else if(/\d/.test(item.key)){

          this.$emit('keyinput',item);

        }

      }

    },

    created() {}

});

</script>

<style lang="less" scoped>

.keyboard {

    position: fixed;

    bottom: 0;

    width: 100%;

    left: 0;

}

.number-keyboard__body {

    position: relative;

    box-sizing: border-box;

    .key {

        display: inline-block;

        width: 33.33333333%;

        height: 100rpx;

        font-size: 40rpx;

        font-style: normal;

        line-height: 100rpx;

        text-align: center;

        vertical-align: middle;

        // cursor: pointer;

        position: relative;

        // color:#777;

        outline: none;

        &.key--gray {

            background-color: #ebedf0;

            font-size: 30rpx;

        }

        &.key--active {

            background-color: #f2f3f5;

        }

    }

    .key::after {

        position: absolute;

        box-sizing: border-box;

        content: ' ';

        pointer-events: none;

        top: -50%;

        right: -50%;

        bottom: -50%;

        left: -50%;

        border: 0 solid #ebedf0;

        -webkit-transform: scale(0.5);

        transform: scale(0.5);

        border-width: 0.02667rem 0.02667rem 0 0;

    }

}

</style>
密码提示框组件代码(pswInput.wpy):
<template>

  <div class="inputRow">

    <div class="pwdItem" v-for="(item,index) of length" :key="index" :class="{'active':index==arrPsw.length}">

      <text class="txt">{{arrPsw[index]||""}}</text>

      <div class="pcursor" v-if="index==arrPsw.length"></div>

    </div>

  </div>

</template>

<script>

import wepy from '@wepy/core';

wepy.component({

    data: {

        arrPsw: []

    },

    props: {

        length: Number,

        val: String

    },

    methods: {},

    created() {},

    computed: {

        arrPsw() {

            return (this.val && this.val.length && this.val.split('')) || [];

        }

    }

});

</script>

<style lang="less" scoped>

@keyframes cflicker {

    0%{

        opacity: 0;

        height: 38%;

    }

    100%{

        opacity: 1;

        height: 40%;

    }

}

.inputRow {

    display: flex;

    justify-content: space-between;

    padding: 22rpx 46rpx 0 46rpx;

    .pwdItem {

        width: 76rpx;

        height: 76rpx;

        line-height: 66rpx;

        border-bottom: 4rpx solid #acabab;

        position: relative;

        &.active {

            border-bottom: 4rpx solid #3ddbc7;

        }

        .txt {

            font-size: 68rpx;

            color: #4b5161;

            vertical-align: top;

        }

        .pcursor {

            position: absolute;

            top: 50%;

            left: 50%;

            width: 2rpx;

            height: 40%;

            background-color: #323233;

            -webkit-transform: translate(-50%, -50%);

            transform: translate(-50%, -50%);

            animation: 1s cflicker infinite ease-in-out;

        }

    }

}

</style>
父组件调用:
<template>

  <div class="register-sms">

    <div class="header-tip">短信验证码发送至150****8991</div>

    <p class="input-title">请输入验证码</p>

    <div class="pswInput">

      <pswInput length="{{6}}" :val="params.smsCode"></pswInput>

    </div>

    <p class="regTip re-send" v-if="!codeLoading">

      <span @click="sendSMS">重新发送</span>

    </p>

    <p class="regTip timeNum" v-if="codeLoading">{{codeTime}}S</p>

    <keyboard @keyinput="onKeysInput" @del="onKeysDel"></keyboard>

  </div>

</template>

<script>

import wepy from '@wepy/core';

wepy.page({

    data: {

        params: {

            smsCode: '',

        },

        codeLoading: false, //验证码倒计时显示

        codeTime: 60, //验证码倒计时

        time1: null //清除定时器

    },

    methods: {

      onKeysInput(item){

        if(this.params.smsCode.length>5) return false;

        this.params.smsCode = this.params.smsCode + item.key;

        console.log(this.params.smsCode);

        if(this.params.smsCode.length===6){

          this.register();

        }

      },

      register(){

        console.log("register",this.params)

      },

      onKeysDel(item){

        let temp = this.params.smsCode.split('')||[];

        temp.pop();

        this.params.smsCode = temp.join("");

      }

    },

    created() {}

});

</script>

<config>

{

    navigationBarTitleText: '验证码密码框',

    usingComponents: {

      "pswInput":"../components/pswInput",

      "keyboard":"../components/keyboard",

    }

}

</config>

<style scoped lang="less">

input::-webkit-input-placeholder {

    color: #c2c2c2;

}

.register-sms {

    text-align: center;

    padding-top: 30px;

}

.header-tip {

    font-size: 28rpx;

    text-align: left;

    margin-left: 48rpx;

    color: #969798;

}

.input-title {

    font-size: 28rpx;

    color: #666;

    margin-top: 96rpx;

    margin-left: 44rpx;

    margin-bottom: 10rpx;

    text-align: left;

}

.van-password-input__security {

    .li {

        border-bottom: 4rpx solid #acbbab;

        color: #4b5161;

        font-size: 68rpx;

    }

}

.regTip {

    font-size: 28rpx;

    text-align: right;

    margin-top: 60rpx;

    margin-right: 40rpx;

    &.re-send {

        color: #32d9c3;

    }

    &.timeNum {

        color: #969798;

    }

}

.pswInput {

}

</style>
小程序wepy2 模拟vant PasswordInput, NumberKeyboard 密码输入框控件的更多相关文章
- 微信小程序实战:表单与选择控件的结合
先上代码. login.wxml <mp-toptips msg="{{error}}" type="error" show="{{error} ...
- 微信小程序搭建mpvue+vant+flyio
导语 上一篇文章微信小程序搭建mpvue+vant已经介绍了如何搭起mpvue项目及引入vant,本篇文章继续在它的基础上,引入flyio,并做一些封装,目的是为了在小程序发起请求. 这时读者会有些疑 ...
- 微信小程序搭建mpvue+vant
第一步:查看是否已经装了node.js $ node -v $ npm -v 正确姿势 没有装的话前往Node.js官网安装 第二步:安装cnpm $ npm install -g cnpm -- ...
- delphi 一个自动控制机的硅控板检测程序,用多线程和API,没有用控件,少做改动就能用 用485开发
一个自动控制机的硅控板检测程序,用多线程和API,没有用控件,少做改动就能用Unit CommThread; Interface Uses Windows, Classes, SysUtils, G ...
- SNF快速开发平台MVC-各种级联绑定方式,演示样例程序(包含表单和表格控件)
做了这么多项目,经常会使用到级联.联动的情况. 如:省.市.县.区.一级分类.二级分类.三级分类.仓库.货位. 方式:有表单需要做级联的,还是表格行上需要做级联操作的. 实现:实现方法也有很多种方式. ...
- WPF 从程序集中检索图片资源stream给Image控件使用
原文:WPF 从程序集中检索图片资源stream给Image控件使用 版权声明:本文为博主原创文章,未经博主允许不得转载. https://blog.csdn.net/nihang1234/artic ...
- WPF 程序如何跨窗口/跨进程设置控件焦点
原文:WPF 程序如何跨窗口/跨进程设置控件焦点 WPF 程序提供了 Focus 方法和 TraversalRequest 来在 WPF 焦点范围内转移焦点.但如果 WPF 窗口中嵌入了其他框架的 U ...
- 【小程序】模拟数据支持(mockjs配置模拟服务器接口数据)
utils目录 ①下载mockjs(地址)放置utils目录中 ②新建api.js :配置模拟数据以及后台接口,通过DEBUG=ture; //切换数据接口 配置如下: let API_HOST = ...
- wepy-cli 开发小程序如何使用vant组件
同样使用wepy-cli快速生成的小程序,目前可以使用组件: 直接通过 git 下载 Vant Weapp 源代码,并将dist目录拷贝到自己的项目中 git clone https://github ...
随机推荐
- Natas0 Writeup(前端源码、敏感信息)
Natas0: 提示密码就在本页,右键查看源码,注释中发现flag. flag:gtVrDuiDfck831PqWsLEZy5gyDz1clto 总结:客户端代码注释中切勿保存敏感信息.
- 信号与系统实验序章0——MATLAB基础命令入门
本次开启新的系列,关于用Matlab实现常见信号和函数的生成和变换. 同时如果没有MATLAB基础,那么可以跟着本文一步一步学习Matlab的相关操作,本文旨在记录在信号与系统课程中MATLAB的学习 ...
- 渗透测试-http协议简介
HTTP协议 超文本传输协议(HTTP,HyperText Transfer Protocol)是互联网上应用最为广泛的一种网络协议.所有的WWW文件都 必须遵守这个标准.设计HTTP最初的目的是为了 ...
- CBV和APIView源码分析
CBV源码分析 查看源码的方式,先查看自身,没有去找父类,父类没有就去找父父类... 自己定义的类 class Author(View): def get(self,request): back_di ...
- 解决在linux下的eclipse syso Alt+/无法使用
1.绑定快捷键 2.配置proposal
- OSPF与ACL的综合应用
在企业中OSPF和ACL应用特别广泛,本实验介绍OSPF和ACL具体配置过程 实验拓扑: 实验要求: 1.企业内网运行OSPF路由协议,区域规划如图所示:2.财务和研发所在的区域不受其他区域链路不稳定 ...
- python plt 色卡
https://blog.csdn.net/Strive_For_Future/article/details/100151261 plt 绘图时通常需要各种颜色,还需要去介绍文档找,很麻烦,这里把p ...
- 近期 github 机器学习热门项目top5
磐创智能-专注机器学习深度学习的教程网站 http://panchuang.net/ 磐创AI-智能客服,聊天机器人,推荐系统 http://panchuangai.com/ [导读]:Github是 ...
- LightOj 1197 Help Hanzo 区间素数筛
题意: 给定一个区间a,b,a-b>=100000,1<=a<=b<=231,求出给定a,b区间内的素数的个数 区间素数筛 (a+i-1)/ ii向上取整,当a为 i 的整数倍 ...
- Redis数据结构——quicklist
之前的文章我们曾总结到了Redis数据结构--链表和Redis数据结构--压缩列表这两种数据结构,他们是Redis List(列表)对象的底层实现方式.但是考虑到链表的附加空间相对太高,prev 和 ...