
Springboot:整合Mybaits和Druid【监控】(十一)
MyBatis默认提供了一个数据库连接池PooledDataSource,在此我们使用阿里提供的Druid数据库连接池
项目下载:https://files.cnblogs.com/files/applesnt/springboot-db.zip
1:建表sql语句
CREATE TABLE `bank_card` (

  `user_id` int(11) NOT NULL AUTO_INCREMENT,

  `user_name` varchar(255) DEFAULT NULL,

  `money` int(11) DEFAULT NULL,

  PRIMARY KEY (`user_id`)

) ENGINE=InnoDB AUTO_INCREMENT=3 DEFAULT CHARSET=utf8;

INSERT INTO `bank_card` VALUES ('1', '张三', '1000');

INSERT INTO `bank_card` VALUES ('2', '李红', '1000');
2:pom引入相关依赖
<dependency>

 <groupId>org.springframework.boot</groupId>

    <artifactId>spring-boot-starter-web</artifactId>

</dependency>

<dependency>

    <groupId>org.projectlombok</groupId>

    <artifactId>lombok</artifactId>

</dependency>

<dependency>

    <groupId>com.alibaba</groupId>

    <artifactId>druid-spring-boot-starter</artifactId>

    <version>1.1.22</version>

</dependency>

<dependency>

    <groupId>org.mybatis.spring.boot</groupId>

    <artifactId>mybatis-spring-boot-starter</artifactId>

    <version>2.1.2</version>

</dependency>

<dependency>

    <groupId>mysql</groupId>

    <artifactId>mysql-connector-java</artifactId>

</dependency>
3:构建mybatis配置文件
resources\mybatis\config\mybatis-config.xml
<?xml version="1.0" encoding="UTF-8" ?>

<!DOCTYPE configuration

        PUBLIC "-//mybatis.org//DTD Config 3.0//EN"

        "http://mybatis.org/dtd/mybatis-3-config.dtd">

<configuration>

    <settings>

        <setting name="logImpl" value="STDOUT_LOGGING" /> <!--打印sql语句-->

        <setting name="lazyLoadingEnabled" value="true"/> <!-- 全局性设置懒加载 -->

        <setting name="aggressiveLazyLoading" value="false"/> <!-- 每个属性都按需加载 -->

        <setting name="mapUnderscoreToCamelCase" value="true" /><!-- 开启驼峰命名 -->

    </settings>

</configuration>
4:构建javaBean
com\applesnt\springbootdb\vo\AccountVo.java
package com.applesnt.springbootdb.vo;

import lombok.Data;

@Data

public class AccountVo {

    /*编号*/

    private Integer userId;

    /*用户*/

    private String  userName;

    /*存款*/

    private Integer money;

}
5:构建mapper接口
package com.applesnt.springbootdb.mapper;

import com.applesnt.springbootdb.vo.AccountVo;

import org.apache.ibatis.annotations.Mapper;

import org.springframework.stereotype.Component;

import java.util.List;

//mapper接口要使用@Mapper注解 如果不加 可以再启动类上加上@MapperScan注解

@Mapper

//防止自动注入的时候出红线

@Component

public interface BankAccountMapper {

    /*添加银行账户*/

    public void addBankAccount(AccountVo accountVo);

    /*查询所有银行账户*/

    public List<AccountVo> getAllBankAccount();

    /*查询指定的银行账户*/

    public AccountVo getByIdBankAccount(Integer id);

    /*删除指定的银行账户*/

    public void deleteBankAccount(Integer id);

    /*银行账户转入*/

    public void updateInBankAccount(AccountVo accountVo);

    /*银行账户转出*/

    public void updateOutBankAccount(AccountVo accountVo);

}
6:构建mapper配置文件
resources\mybatis\mapper\BankAccountMapper.xml
<?xml version="1.0" encoding="UTF-8" ?>

<!DOCTYPE mapper

        PUBLIC "-//mybatis.org//DTD Mapper 3.0//EN"

        "http://mybatis.org/dtd/mybatis-3-mapper.dtd">

<!--mapper接口的全路径-->

<mapper namespace="com.applesnt.springbootdb.mapper.BankAccountMapper">

    <!--

		useGeneratedKeys:开启获取自增长主键

		keyProperty:把获取的自增长主键的值给哪个属性

		parameterType="AccountVo":别名

	-->

    <!--添加-->

    <insert id="addBankAccount" useGeneratedKeys="true" keyProperty="userId" parameterType="AccountVo">

        insert into bank_card(user_name, money) values (#{userName},#{money})

    </insert>

    <!--查询所有-->

    <select id="getAllBankAccount" resultType="AccountVo">

        select * from bank_card

    </select>

    <!--查询指定-->

    <select id="getByIdBankAccount" resultType="AccountVo" parameterType="int">

        select * from bank_card where user_id = #{userId}

    </select>

    <!--删除指定-->

    <delete id="deleteBankAccount" parameterType="int">

        delete from bank_card where user_id = #{userId}

    </delete>

    <!--修改-->

    <update id="updateInBankAccount" parameterType="AccountVo">

        update bank_card

        <set>

            money = money+#{money}

        </set>

        where user_id = #{userId}

    </update>

    <!--修改-->

    <update id="updateOutBankAccount" parameterType="AccountVo">

        update bank_card

        <set>

            money = money-#{money}

        </set>

        where user_id = #{userId}

    </update>

</mapper>
7:application.yml相关配置
server:

  port: 80 #访问端口

spring:

  datasource:

    username: root #数据库的用户名

    password: 123456 #数据库的用户密码

    url: jdbc:mysql://127.0.0.1:3306/my_test?useUnicode=true&characterEncoding=utf8 # 数据库连接地址

    driver-class-name: com.mysql.cj.jdbc.Driver # 数据库驱动

    type: com.alibaba.druid.pool.DruidDataSource # 数据库类型 使用druid

    druid:

      initial-size: 5 #初始化时建立物理连接的个数(缺省值:0)

      max-active: 200 # 最大连接池数量(缺省值:8)

      min-idle: 1 # 最小链接池数量

      max-wait: 6000 #获取连接时最大等待时间,单位毫秒

      time-between-eviction-runs-millis: 6000

      min-evictable-idle-time-millis: 30000 # 配置一个连接在池中最小生存的时间,单位是毫秒

      validation-query: select 'x' from dual #用来检测连接是否有效的sql,要求是一个查询语

      pool-prepared-statements: false #是否缓存preparedStatement mysql 建议关闭

      test-on-borrow: false #申请连接时执行validationQuery检测连接是否有效,做了这个配置会降低性能

      test-on-return: false # 归还连接时执行validationQuery检测连接是否有效,做了这个配置会降低性能

      test-while-idle: true # 建议配置为true,不影响性能,并且保证安全性

      connection-init-sqls: select 1 from dual # 物理连接初始化的时候执行的sql

      #监控统计用的filter:stat  日志用的filter:log4j  防御sql注入的filter:wall

      filters: stat,wall,log4j2

      filter:

        stat: # 监控统计

          db-type: mysql

          log-slow-sql: true

          slow-sql-millis: 2000

        wall: #防御sql

          enabled: true

          db-type: mysql

          config:

            delete-allow: true #运行执行删除语句

            drop-table-allow: false #不运行执行删除表语句

        log4j2:

          enabled: true

      stat-view-servlet: #statViewServlet配置

        enabled: true #开启状态

        url-pattern: "/druid/*" #监控页面访问路径

        reset-enable: false # 禁止手动重置监控数据

        login-username: admin # 用户名

        login-password: admin # 密码

      web-stat-filter: #WebStatFilter配置

        enabled: true  #开启状态

        url-pattern: "/*" #拦截请求

        exclusions: "*.js,*.gif,*.jpg,*.bmp,*.png,*.css,*.ico,/druid/*" #排除请求

        session-stat-max-count: 1000 # 监控最大session数,默认是1000

        session-stat-enable: true # 是否启用session的统计功能

        profile-enable: true # 是否启用监控单个Url调用的sql列表

        principal-session-name: session_user_key #使druid当前session的用户是谁

        principal-cookie-name: cookie_user_key #使druid当前user的用户是谁

mybatis:

  config-location: classpath:mybatis/config/mybatis-config.xml

  mapper-locations: classpath:mybatis/mapper/*.xml

  type-aliases-package: com.applesnt.springbootdb.vo
8:构建service接口
com\applesnt\springbootdb\service\BankAccountService.java
package com.applesnt.springbootdb.service;

import com.applesnt.springbootdb.vo.AccountVo;

import java.util.List;

public interface BankAccountService {

    /*添加银行账户*/

    public void addBankAccount(AccountVo accountVo);

    /*查询所有银行账户*/

    public List<AccountVo> getAllBankAccount();

    /*查询指定的银行账户*/

    public AccountVo getByIdBankAccount(Integer id);

    /*删除指定的银行账户*/

    public void deleteBankAccount(Integer id);

    /*银行账户转账*/

    public void zzBankAccount(AccountVo inAccountVo,AccountVo outAccountVo);

}
9:构建service接口实现类
com\applesnt\springbootdb\service\impl\BankAccountServiceImpl.java
package com.applesnt.springbootdb.service.impl;

import com.applesnt.springbootdb.mapper.BankAccountMapper;

import com.applesnt.springbootdb.service.BankAccountService;

import com.applesnt.springbootdb.vo.AccountVo;

import org.springframework.beans.factory.annotation.Autowired;

import org.springframework.stereotype.Service;

import org.springframework.transaction.annotation.Transactional;

import java.util.List;

@Service

public class BankAccountServiceImpl implements BankAccountService {

    @Autowired

    private BankAccountMapper bankAccountMapper;

    /*添加银行账户*/

    @Override

    public void addBankAccount(AccountVo accountVo) {

        this.bankAccountMapper.addBankAccount(accountVo);

    }

    /*查询所有银行账户*/

    @Override

    public List<AccountVo> getAllBankAccount() {

        return bankAccountMapper.getAllBankAccount();

    }

    /*查询指定的银行账户*/

    @Override

    public AccountVo getByIdBankAccount(Integer id) {

        return bankAccountMapper.getByIdBankAccount(id);

    }

    /*删除指定的银行账户*/

    @Override

    public void deleteBankAccount(Integer id) {

        bankAccountMapper.deleteBankAccount(id);

    }

    /*银行账户转账*/

    @Override

    @Transactional //事务管理注解 同时还要在启动类中开启

    public void zzBankAccount(AccountVo inAccountVo, AccountVo outAccountVo) {

        bankAccountMapper.updateInBankAccount(inAccountVo);

        //模拟转账出错 开启事务

        if(1==1){

            throw new RuntimeException("转账失败");

        }

        bankAccountMapper.updateOutBankAccount(outAccountVo);

    }

}
10:构建controller请求
com\applesnt\springbootdb\controller\BankAccountController.java
package com.applesnt.springbootdb.controller;

import com.applesnt.springbootdb.service.BankAccountService;

import com.applesnt.springbootdb.vo.AccountVo;

import org.springframework.beans.factory.annotation.Autowired;

import org.springframework.web.bind.annotation.RequestMapping;

import org.springframework.web.bind.annotation.RestController;

import java.util.List;

@RestController

public class BankAccountController {

    @Autowired

    private BankAccountService bankAccountService;

    /*添加银行账户*/

    @RequestMapping("/add")

    public String addBankAccount() {

        AccountVo accountVo = new AccountVo();

        accountVo.setUserName("赵晗");

        accountVo.setMoney(1000);

        bankAccountService.addBankAccount(accountVo);

        return "success";

    }

    /*查询所有银行账户*/

    @RequestMapping("/all")

    public String getAllBankAccount(){

        List<AccountVo> list = bankAccountService.getAllBankAccount();

        for (AccountVo accountVo : list) {

            System.out.println(accountVo.toString());

        }

        return "success";

    }

    /*查询指定的银行账户*/

    @RequestMapping("/get")

    public String getByIdBankAccount(){

        AccountVo byIdBankAccount = bankAccountService.getByIdBankAccount(6);

        System.out.println(byIdBankAccount.toString());

        return "success";

    }

    /*删除指定的银行账户*/

    @RequestMapping("/delete")

    public String deleteBankAccount(){

        bankAccountService.deleteBankAccount(6);

        return "success";

    }

    /*银行账户转账*/

    @RequestMapping("/zz")

    public String zzBankAccount(){

        //转入账户

        AccountVo inAccountVo = new AccountVo();

        inAccountVo.setUserId(1);

        inAccountVo.setMoney(200);

        //转出账户

        AccountVo outAccountVo = new AccountVo();

        outAccountVo.setUserId(2);

        outAccountVo.setMoney(200);

        bankAccountService.zzBankAccount(inAccountVo,outAccountVo);

        return "success";

    }

}
11:主配置文件
package com.applesnt.springbootdb;

import org.springframework.boot.SpringApplication;

import org.springframework.boot.autoconfigure.SpringBootApplication;

import org.springframework.transaction.annotation.EnableTransactionManagement;

@SpringBootApplication

//开启事务管理

@EnableTransactionManagement

//@MapperScan({"com.applesnt.springboot.mapper","com.kfit.user"}) 多路径

//@MapperScan("com.applesnt.springboot.mapper")

public class SpringbootDbApplication {

    public static void main(String[] args) {

        SpringApplication.run(SpringbootDbApplication.class, args);

    }

}
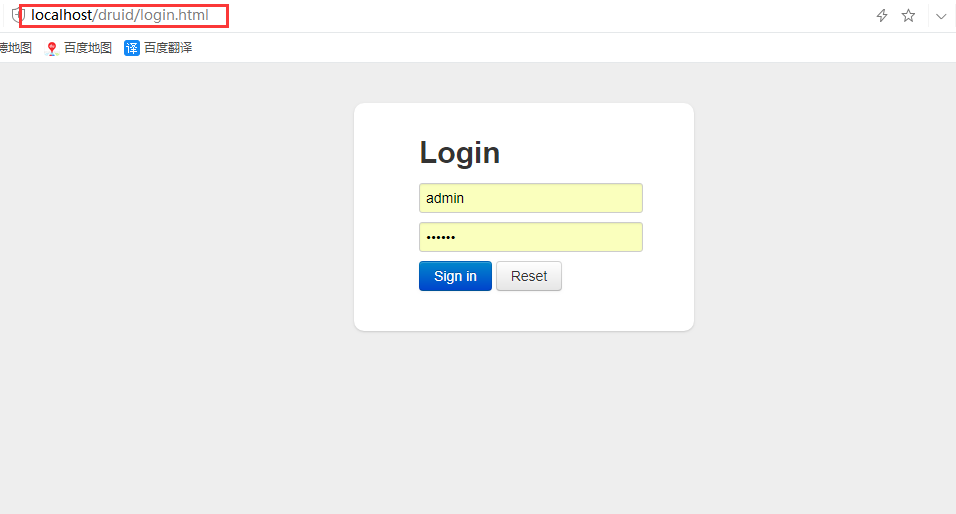
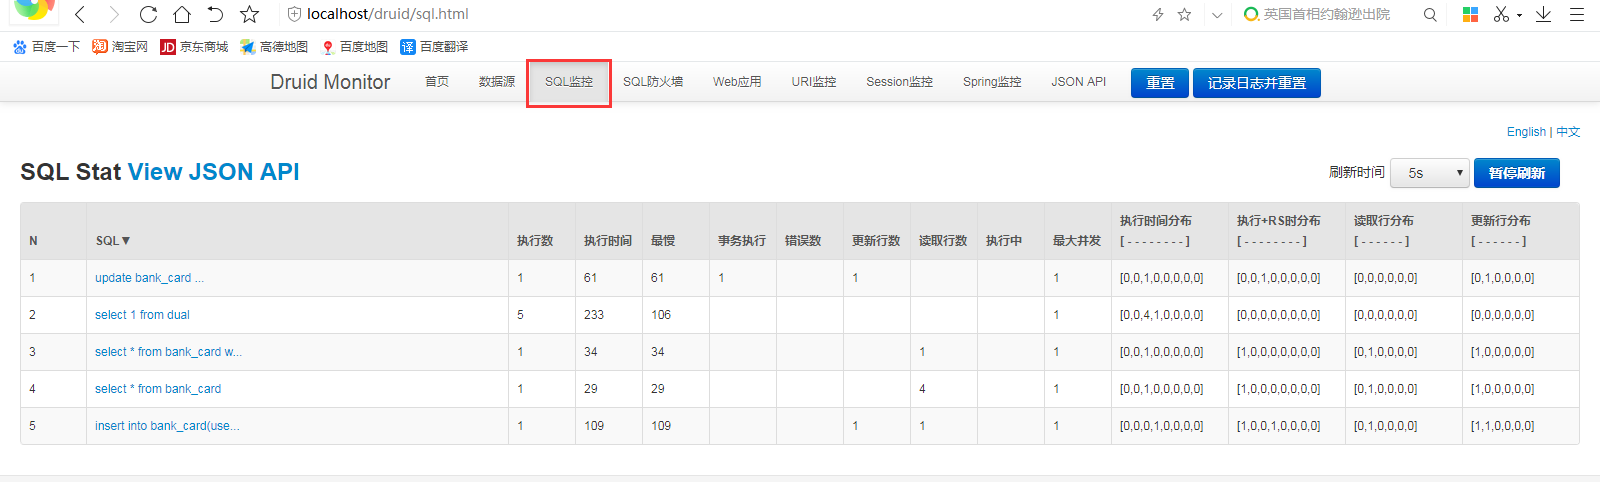
12:Druid监控页面访问
可以在druid监控页面看到所有的request请求和SQL语句
Springboot:整合Mybaits和Druid【监控】(十一)的更多相关文章
- Springboot整合shardingsphere和druid进行读写分离
最近在使用springboot整合shardingsphere和druid实现mysql数据库读写分离时遇到了一些问题,特此记录一下. 依赖版本 Springboot 2.1.6.RElEASE sh ...
- springboot整合mybaits注解开发
springboot整合mybaits注解开发时,返回json或者map对象时,如果一个字段的value为空,需要更改springboot的配置文件 mybatis: configuration: c ...
- 9 — springboot整合jdbc、druid、druid实现日志监控 — 更新完毕
1.整合jdbc.druid 1).导入依赖 <dependency> <groupId>org.springframework.boot</groupId> &l ...
- (二)SpringBoot整合常用框架Druid连接池
一,在Pom.xml文件加入依赖 找到<dependencies></dependencies>标签,在标签中添加Druid依赖 <dependency> < ...
- SpringBoot整合Actuator进行健康监控
一.Actuator介绍 SpringBoot自带监控功能Actuator,通过 restful api 请求来监管.审计.收集应用的运行情况,可以帮助实现对程序内部运行情况监控,比如监控状况.Bea ...
- springboot~集成DataSource 与 Druid监控配置
介绍 Druid首先是一个数据库连接池.Druid是目前最好的数据库连接池,在功能.性能.扩展性方面,都超过其他数据库连接池,Druid已经在阿里巴巴部署了超过600个应用,经过一年多生产环境大规模部 ...
- springBoot 整合mybaits 逆向工程
pom.xml文件中增加配置项 <build> <plugins> <plugin> <groupId>org.springframework.boot ...
- spring-boot整合mybaits多数据源动态切换案例
1.运行环境 开发工具:intellij idea JDK版本:1.8 项目管理工具:Maven 4.0.0 2.GITHUB地址 https://github.com/nbfujx/springBo ...
- SpringBoot整合SpringAdmin搭建监控平台
在SpringBoot整合Actuator进行健康监控中,胜金讲述了通过Actuator进行健康监控,但是学习API并根据API开发前端需要花费相当大的精力,本次胜金就写一下通过SpringAdmin ...
随机推荐
- 我的Keras使用总结(4)——Application中五款预训练模型学习及其应用
本节主要学习Keras的应用模块 Application提供的带有预训练权重的模型,这些模型可以用来进行预测,特征提取和 finetune,上一篇文章我们使用了VGG16进行特征提取和微调,下面尝试一 ...
- Scala环境及IDEA配置
Scala环境及IDEA配置 1 语言介绍 他已经出生15年了,就像明星一样,谁都不可能一开始就人气爆棚粉丝无数,得慢慢混. 成功原因:完全兼容java代码. 身世介绍 Scala在2004年正式问世 ...
- 树莓派中Docker部署.Net Core 3.1 (一)
一.背景 受疫情影响,已经在家强制事假一个月了,除了刷简历外就是在家学习,闲来无事,最近买了几个树莓派4B的板子回来,准备用树莓派搭建个自动部署的平台和微服务示例,长话短说,节约时间,直接进入正题吧 ...
- 1272: 【基础】求P进制数的最大公因子与最小公倍数
1272: [基础]求P进制数的最大公因子与最小公倍数 时间限制: 1 Sec 内存限制: 16 MB 提交: 684 解决: 415 [提交] [状态] [讨论版] [命题人:外部导入] 题目描述 ...
- Golang入门(2):一天学完GO的基本语法
摘要 在配置好环境之后,要研究的就是这个语言的语法了.在这篇文章中,作者希望可以简单的介绍一下Golang的各种语法,并与C和Java作一些简单的对比以加深记忆.因为这篇文章只是入门Golang的第二 ...
- 分治算法(C++版)
#include<iostream>using namespace std; void printArray(int array[],int length) { for (i ...
- java第九天,接口是什么?如何实现接口
接口 很多人纳闷Java为什么会有接口这个知识点呢?其实很大程度上是为了间接实现多继承.但是因为C++的多继承实在是一个难点,Java为了吸取C++的教训,就推出了接口这个概念.接口是一种公共规范标准 ...
- 基础类封装-pymysql库操作mysql封装
import pymysql from lib.logger import logger from warnings import filterwarnings filterwarnings(&quo ...
- Python 0(安装及初步使用+学习资源推荐)
不足之处,还请见谅,请指出不足.本人发布过的文章,会不断更改,力求减少错误信息. Python安装请借鉴网址https://www.runoob.com/python/python-install.h ...
- 33 File 文件及目录操作
/* * File:文件和目录路径名的抽象表示形式,File 类的实例是不可变的 * * 构造方法: * File(String pathname) 将指定的路径名转换成一个File对象 * File ...