OAuth2.0系列之简化模式实践教程(三)
@
OAuth2.0系列博客:
- OAuth2.0系列之基本概念和运作流程(一)
- OAuth2.0系列之授权码模式实践教程(二)
- OAuth2.0系列之简化模式实践教程(三)
- OAuth2.0系列之密码模式实践教程(四)
- OAuth2.0系列之客户端模式实践教程(五)
- OAuth2.0系列之集成JWT实现单点登录
1、简化模式简介
1.1 前言简介
在上一篇文章中我们学习了OAuth2的一些基本概念,对OAuth2有了基本的认识,接着学习OAuth2.0授权模式中的简化模式
ps:OAuth2.0的授权模式可以分为:
- 授权码模式(authorization code)
- 简化模式(implicit)
- 密码模式(resource owner password credentials)
- 客户端模式(client credentials)
简化模式(implicit grant type)不通过第三方应用程序的服务器,直接在浏览器中向认证服务器申请令牌,跳过了"授权码"这个步骤,因此称简化模式。简化模式是相对于授权码模式而言的
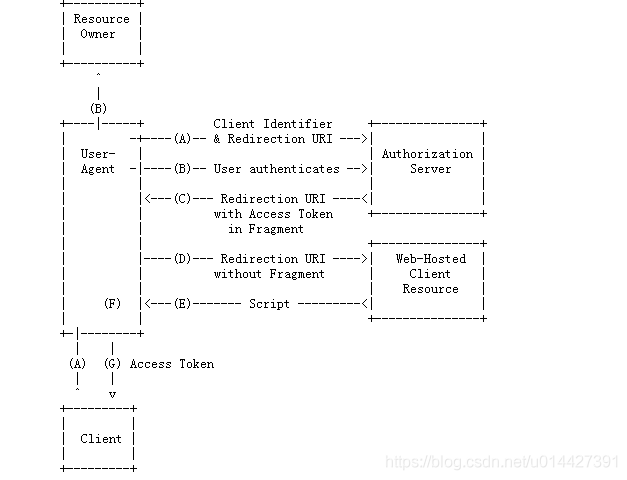
1.2 授权流程图
官网图片:
http://localhost:8084/api/userinfo?access_token=${accept_token}
- (A):客户端携带client_id、redirect_uri,中间通过代理者访问授权服务器,如果已经登录过会直接返回redirect_uri,没有登录过就跳转到登录页面
- (B)授权服务器对客户端进行身份验证(通过用户代理,让用户输入用户名和密码)
- (C)授权通过,会重定向到redirect_uri并携带授权码token作为uri参数
- (D)客户端携带授权码访问资源服务器
- (E)验证token通过,返回资源
从调接口方面,简单来说:
- 第一步:访问授权,要传client_id:客户端id,redirect_uri:重定向uri,response_type为token,scope是授权范围,state是其它自定义参数
- 第二步:授权通过,会重定向到redirect_uri,access_token码会作为它的参数
- 第三步:拿到acceptToken之后,就可以直接访问资源
2、例子实践
2.1 实验环境准备
- IntelliJ IDEA
- Maven3.+版本
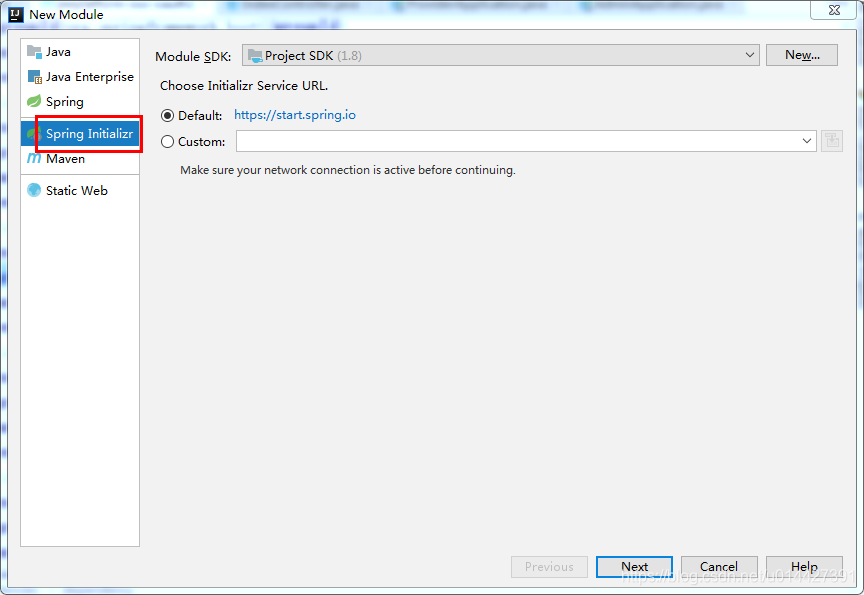
新建SpringBoot Initializer项目,可以命名implicit

主要是想引入:
 <dependency>

            <groupId>org.springframework.boot</groupId>

            <artifactId>spring-boot-starter-web</artifactId>

        </dependency>

 <!-- Spring Cloud Oauth2-->

        <dependency>

            <groupId>org.springframework.cloud</groupId>

            <artifactId>spring-cloud-starter-oauth2</artifactId>

        </dependency>

        <!-- Spring Cloud Security-->

        <dependency>

            <groupId>org.springframework.cloud</groupId>

            <artifactId>spring-cloud-starter-security</artifactId>

        </dependency>
2.2 OAuth2.0角色
前面的学习,我们知道了OAuth2.0主要包括如下角色,下面通过代码例子加深对理论的理解
- 资源所有者(Resource Owner)
- 用户代理(User Agent)
- 客户端(Client)
- 授权服务器(Authorization Server)
- 资源服务器(Resource Server)
生产环境、资源服务器和授权服务器一般是分开的,不过学习的可以放在一起
定义资源服务器,用注解@EnableResourceServer;
定义授权服务器,用注解@EnableAuthorizationServer;
2.3 OAuth2.0配置类
package com.example.oauth2.implicit.config;

import org.springframework.beans.factory.annotation.Autowired;

import org.springframework.context.annotation.Bean;

import org.springframework.context.annotation.Configuration;

import org.springframework.security.authentication.AuthenticationManager;

import org.springframework.security.oauth2.config.annotation.configurers.ClientDetailsServiceConfigurer;

import org.springframework.security.oauth2.config.annotation.web.configuration.AuthorizationServerConfigurerAdapter;

import org.springframework.security.oauth2.config.annotation.web.configuration.EnableAuthorizationServer;

import org.springframework.security.oauth2.config.annotation.web.configurers.AuthorizationServerEndpointsConfigurer;

import org.springframework.security.oauth2.config.annotation.web.configurers.AuthorizationServerSecurityConfigurer;

import org.springframework.security.oauth2.provider.token.TokenStore;

import org.springframework.security.oauth2.provider.token.store.InMemoryTokenStore;

/**

 * <pre>

 *     OAuth2.0配置类

 * </pre>

 *

 * <pre>

 * @author mazq

 * 修改记录

 *    修改后版本:     修改人:  修改日期: 2020/06/11 11:00  修改内容:

 * </pre>

 */

@Configuration

//开启授权服务

@EnableAuthorizationServer

public class OAuth2Config extends AuthorizationServerConfigurerAdapter {

    @Autowired

    private AuthenticationManager authenticationManager;

    private static final String CLIENT_ID = "cms";

    private static final String SECRET_CHAR_SEQUENCE = "{noop}secret";

    private static final String SCOPE_READ = "read";

    private static final String SCOPE_WRITE = "write";

    private static final String TRUST = "trust";

    private static final String USER ="user";

    private static final String ALL = "all";

    private static final int ACCESS_TOKEN_VALIDITY_SECONDS = 2*60;

    private static final int FREFRESH_TOKEN_VALIDITY_SECONDS = 2*60;

    // 密码模式授权模式

    private static final String GRANT_TYPE_PASSWORD = "password";

    //授权码模式

    private static final String AUTHORIZATION_CODE = "authorization_code";

    //refresh token模式

    private static final String REFRESH_TOKEN = "refresh_token";

    //简化授权模式

    private static final String IMPLICIT = "implicit";

    //指定哪些资源是需要授权验证的

    private static final String RESOURCE_ID = "resource_id";

    @Override

    public void configure(ClientDetailsServiceConfigurer clients) throws Exception {

        clients

                // 使用内存存储

                .inMemory()

                //标记客户端id

                .withClient(CLIENT_ID)

                //客户端安全码

                .secret(SECRET_CHAR_SEQUENCE)

                //为true 直接自动授权成功返回code

                .autoApprove(true)

                .redirectUris("http://127.0.0.1:8084/cms/login") //重定向uri

                //允许授权范围

                .scopes(ALL)

                //token 时间秒

                .accessTokenValiditySeconds(ACCESS_TOKEN_VALIDITY_SECONDS)

                //刷新token 时间 秒

                .refreshTokenValiditySeconds(FREFRESH_TOKEN_VALIDITY_SECONDS)

                //允许授权类型

                .authorizedGrantTypes(IMPLICIT );

    }

    @Override

    public void configure(AuthorizationServerEndpointsConfigurer endpoints) throws Exception {

        // 使用内存保存生成的token

        endpoints.authenticationManager(authenticationManager).tokenStore(memoryTokenStore());

    }

    /**

     * 认证服务器的安全配置

     *

     * @param security

     * @throws Exception

     */

    @Override

    public void configure(AuthorizationServerSecurityConfigurer security) throws Exception {

        security

                //.realm(RESOURCE_ID)

                // 开启/oauth/token_key验证端口认证权限访问

                .tokenKeyAccess("isAuthenticated()")

                //  开启/oauth/check_token验证端口认证权限访问

                .checkTokenAccess("isAuthenticated()")

                //允许表单认证

                .allowFormAuthenticationForClients();

    }

    @Bean

    public TokenStore memoryTokenStore() {

        // 最基本的InMemoryTokenStore生成token

        return new InMemoryTokenStore();

    }

}
2.4 Security配置类
为了测试,可以进行简单的SpringSecurity
package com.example.oauth2.implicit.config;

import org.springframework.context.annotation.Bean;

import org.springframework.context.annotation.Configuration;

import org.springframework.core.annotation.Order;

import org.springframework.security.authentication.AuthenticationManager;

import org.springframework.security.config.annotation.authentication.builders.AuthenticationManagerBuilder;

import org.springframework.security.config.annotation.web.builders.HttpSecurity;

import org.springframework.security.config.annotation.web.builders.WebSecurity;

import org.springframework.security.config.annotation.web.configuration.EnableWebSecurity;

import org.springframework.security.config.annotation.web.configuration.WebSecurityConfigurerAdapter;

/**

 * <pre>

 *  SpringSecurity配置类

 * </pre>

 *

 * <pre>

 * @author mazq

 * 修改记录

 *    修改后版本:     修改人:  修改日期: 2020/06/11 11:23  修改内容:

 * </pre>

 */

@Configuration

@EnableWebSecurity

@Order(1)

public class SecurityConfig extends WebSecurityConfigurerAdapter {

    @Bean

    @Override

    public AuthenticationManager authenticationManagerBean() throws Exception {

        return super.authenticationManagerBean();

    }

    @Override

    protected void configure(AuthenticationManagerBuilder auth) throws Exception {    //auth.inMemoryAuthentication()

        auth.inMemoryAuthentication()

                .withUser("nicky")

                .password("{noop}123")

                .roles("admin");

    }

    @Override

    public void configure(WebSecurity web) throws Exception {

        //解决静态资源被拦截的问题

        web.ignoring().antMatchers("/asserts/**");

        web.ignoring().antMatchers("/favicon.ico");

    }

    @Override

    protected void configure(HttpSecurity http) throws Exception {

        http   // 配置登录页并允许访问

                .formLogin().permitAll()

                // 配置Basic登录

                //.and().httpBasic()

                // 配置登出页面

                .and().logout().logoutUrl("/logout").logoutSuccessUrl("/")

                .and().authorizeRequests().antMatchers("/oauth/**", "/login/**", "/logout/**").permitAll()

                // 其余所有请求全部需要鉴权认证

                .anyRequest().authenticated()

                // 关闭跨域保护;

                .and().csrf().disable();

    }

}
写个测试接口:
package com.example.oauth2.implicit.web.controller;

import org.springframework.web.bind.annotation.GetMapping;

import org.springframework.web.bind.annotation.RequestMapping;

import org.springframework.web.bind.annotation.RestController;

import java.security.Principal;

/**

 * <pre>

 *  用户信息控制类

 * </pre>

 *

 * <pre>

 * @author mazq

 * 修改记录

 *    修改后版本:     修改人:  修改日期: 2020/06/11 14:09  修改内容:

 * </pre>

 */

@RestController

@RequestMapping("/api")

public class UserController {

    @GetMapping("/userinfo")

    public Principal getCurrentUser(Principal principal) {

        return principal;

    }

}
2.5 功能简单测试
访问授权链接,在浏览器访问就可以,简化模式response_type参数传token:
因为没登录,所以会返回SpringSecurity的默认登录页面,具体代码是 http .formLogin().permitAll();,如果要弹窗登录的,可以配置http.httpBasic();,这种配置是没有登录页面的,自定义登录页面可以这样配置http.formLogin().loginPage("/login").permitAll()
如图,输入SpringSecurity配置的静态账号密码:nicky/123

登录成功,返回redirect_uri,拿到token
http://127.0.0.1:8084/cms/login#access_token=9b021755-7df3-48a4-bf58-40815a4dcc9b&token_type=bearer&expires_in=119
拿到token直接去调业务接口:
http://localhost:8888/api/userinfo?access_token=9b021755-7df3-48a4-bf58-40815a4dcc9b
{

    "authorities":[

        {

            "authority":"ROLE_admin"

        }

    ],

    "details":{

        "remoteAddress":"0:0:0:0:0:0:0:1",

        "sessionId":null

    },

    "authenticated":true,

    "principal":{

        "password":null,

        "username":"nicky",

        "authorities":[

            {

                "authority":"ROLE_admin"

            }

        ],

        "accountNonExpired":true,

        "accountNonLocked":true,

        "credentialsNonExpired":true,

        "enabled":true

    },

    "credentials":null,

    "name":"nicky"

}
例子代码下载:code download
OAuth2.0系列之简化模式实践教程(三)的更多相关文章
- OAuth2.0系列之基本概念和运作流程(一)
@ 目录 一.OAuth2.0是什么? 1.1 OAuth2.0简介 1.2 OAuth2.0官方文档 二.OAuth2.0原理 2.1 OAuth2.0流程图 三. OAuth2.0的角色 四.OA ...
- SpringBoot系列之自定义starter实践教程
SpringBoot系列之自定义starter实践教程 Springboot是有提供了很多starter的,starter翻译过来可以理解为场景启动器,所谓场景启动器配置了自动配置等等对应业务模块的一 ...
- OAuth2.0 四种授权模式
OAuth2.0简单笔记(四种授权模式) 金天:坚持写东西,不是一件容易的事,换句话说其实坚持本身都不是一件容易的事.如果学习有捷径,那就是不断实践,不断积累.写笔记,其实是给自己看的,是体现积累的一 ...
- Oauth2.0认证---授权码模式
目录: 1.功能描述 2.客户端的授权模式 3.授权模式认证流程 4.代码实现 1.功能描述 OAuth在"客户端"与"服务提供商"之间,设置了一个授权层(au ...
- 入门教程:.NET开源OpenID Connect 和OAuth解决方案IdentityServer v3 创建简单的OAuth2.0服务器,客户端和API(三)
本教程的目的在于创造尽可能简单的identityserver安装作为一个oauth2授权服务器.这应该能够让你了解一些基本功能和配置选项(完整的源代码可以发现在这里).在后面的文档中会介绍更多的高级功 ...
- SpringCloud2.0 Eureka Client 服务注册 基础教程(三)
1.创建[服务提供者],即 Eureka Client 1.1.新建 Spring Boot 工程,工程名称:springcloud-eureka-client 1.2.工程 pom.xml 文件添加 ...
- IdentityServer4实现Oauth2.0四种模式之隐藏模式
接上一篇:IdentityServer4实现OAuth2.0四种模式之密码模式,密码模式将用户的密码暴露给了客户端,这无疑是不安全的,隐藏模式可以解决这个问题,由用户自己在IdentityServ ...
- 妹子始终没搞懂OAuth2.0,今天整合Spring Cloud Security 一次说明白!
大家好,我是不才陈某~ 周二发了Spring Security 系列第一篇文章,有妹子留言说看了很多文章,始终没明白OAuth2.0,这次陈某花了两天时间,整理了OAuth2.0相关的知识,结合认证授 ...
- 使用微服务架构思想,设计部署OAuth2.0授权认证框架
1,授权认证与微服务架构 1.1,由不同团队合作引发的授权认证问题 去年的时候,公司开发一款新产品,但人手不够,将B/S系统的Web开发外包,外包团队使用Vue.js框架,调用我们的WebAPI,但是 ...
- API代理网关和OAuth2.0授权认证框架
API代理网关和OAuth2.0授权认证框架 https://www.cnblogs.com/bluedoctor/p/8967951.html 1,授权认证与微服务架构 1.1,由不同团队合作引发的 ...
随机推荐
- 物联网之使用Vertx实现TCP最佳实践【响应式】
小伙伴们,你们好呀,我是老寇,跟我一起学习使用Vertx实现TCP-Server 实现TCP-Server[响应式] Vertx-Core地址 实现过程 查看源码 代码比较简单,懒得讲解啦 代码比较简 ...
- 【公众号搬运】React-Native开发鸿蒙NEXT(6)
.markdown-body { line-height: 1.75; font-weight: 400; font-size: 16px; overflow-x: hidden; color: rg ...
- ODOO路由里面的auth="user" 的使用
一.controller介绍:Controller层在odoo里面可以认为是控制器,根据url地址来控制后端的业务和前端的内容展示,我们一般偏向于叫路由控制, 它相当于内网和外网之间的防火墙,外网的请 ...
- 2024杭电钉耙2-1003 HDOJ7447 绝对不模拟的简单魔方
欢迎您来我的网站看这篇题解! Problem 有一个魔方可能被拧了不超过三次,同时还弄丢了一个角块上的两个贴纸.现在把这两个贴纸贴回去,请问有没有贴错? 只可能拧侧面,不会拧中间层,且每次只能拧 \( ...
- 机器学习中的"食材挑选术":特征选择方法
想象你要做一道美食,面对琳琅满目的食材,优秀的厨师不会把所有原料都扔进锅里,而是会选择最适合的几种. 在机器学习中,特征选择就是这个挑选过程,从原始数据中选择对预测目标最有用的特征(列),就像挑选优质 ...
- Springboot笔记<2>IOC容器与组件注入
IOC容器就是具有依赖注入功能的容器,IOC容器负责实例化.定位.配置应用程序中的对象及建立这些对象间的依赖.应用程序无需直接在代码中new相关的对象,应用程序由IOC容器进行组装. 查看ioc容器中 ...
- AI赋能文档创作:智能生成+云端下载,解锁高效办公新姿势
一.写在前面 本文重点介绍如何将AI智能生成文字直接转换为word文档,支持下载提升大家学习和职场办公的效率. 二.Pandoc-api 服务 Pandoc是一个功能强大的文档转换工具,支持多种文档格 ...
- MySQL 情节:SQL 语句的表演
本文由 ChatMoney团队出品 第一幕:解析与优化 - "翻译官与谋士" SQL 解析器是第一个上场的角色,任务就是把 SQL 请求翻译成 MySQL 能听懂的语言.就像你点餐 ...
- Apache Hudi 在袋鼠云数据湖平台的设计与实践
在大数据处理中,实时数据分析是一个重要的需求.随着数据量的不断增长,对于实时分析的挑战也在不断加大,传统的批处理方式已经不能满足实时数据处理的需求,需要一种更加高效的技术来解决这个问题.Apache ...
- Cloud Run Job(google作业) 处理耗时任务
最近使用google cloud的一些服务处理一些事,使用了Cloud Scheduler定时发送http请求大Cloud Function,让Cloud Function定时处理我的事.这个时候会有 ...