
ESXI 迁移至KVM (V2V迁移)
1.1.1 ESXI将虚拟机导出

导出ova模板
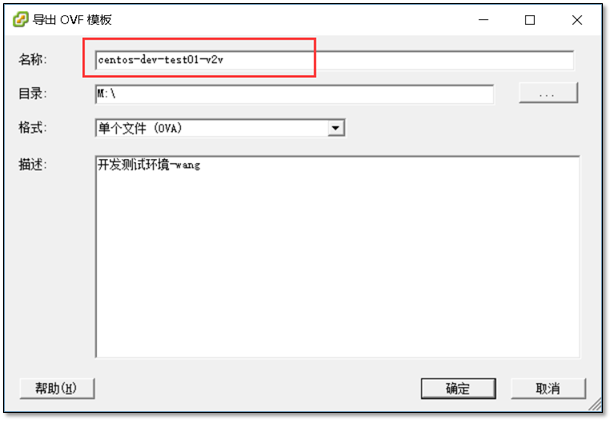
将导出的ova模板导入到KVM环境中。
1.1.2 配置KVM环境
详情参考:http://www.cnblogs.com/clsn/p/8366251.html
安装所需要的组件
[root@clsn7 ~]# yum install libvirt* virt-* qemu-kvm* -y
配置桥接网卡
[root@clsn7 ~]# virsh iface-bridge eth1 br1

使用附加设备 br1 生成桥接 eth1 失败

已启动桥接接口 br1
1.1.3 导入虚拟机
启动kvm管理程序,并设置开机自启动
[root@clsn7 ~]# systemctl start libvirtd.service

[root@clsn7 ~]# systemctl enable libvirtd.service
创建虚拟机存放目录
[root@clsn7 ~]# virt-v2v -i ova centos-dev-test01-v2v.ova -o local -os /vmhost/dev/dev-test01  -of qcow2

[   0.0] Opening the source -i ova centos-dev-test01-v2v.ova

virt-v2v: warning: making OVA directory public readable to work around

libvirt bug https://bugzilla.redhat.com/1045069

[  23.1] Creating an overlay to protect the source from being modified

[  23.4] Initializing the target -o local -os /vmhost/dev/dev-test01

[  23.4] Opening the overlay

[  41.4] Inspecting the overlay

[  57.5] Checking for sufficient free disk space in the guest

[  57.5] Estimating space required on target for each disk

[  57.5] Converting CentOS release 6.9 (Final) to run on KVM

virt-v2v: This guest has virtio drivers installed.

[ 178.6] Mapping filesystem data to avoid copying unused and blank areas

[ 178.9] Closing the overlay

[ 179.4] Checking if the guest needs BIOS or UEFI to boot

[ 179.4] Assigning disks to buses

[ 179.4] Copying disk 1/1 to /vmhost/dev/dev-test01/centos-dev-test01-v2v-sda (qcow2)

    (100.00/100%)

[ 216.1] Creating output metadata

[ 216.1] Finishing off
导入完成后在 /vmhost/dev/dev-test01 目录下会生成文件
[root@clsn7 dev-test01]# pwd

/vmhost/dev/dev-test01

[root@clsn7 dev-test01]# ls

centos-dev-test01-v2v-sda  centos-dev-test01-v2v.xml
修改网卡配置
修改网卡source network 为桥接
修改网卡使用virtio
[root@clsn7 dev-test01]# cat centos-dev-test01-v2v.xml

<?xml version='1.0' encoding='utf-8'?>

<domain type='kvm'>

  <!-- generated by virt-v2v 1.36.3rhel=7,release=6.el7_4.3,libvirt -->

  <name>centos-dev-test01-v2v</name>

  <memory unit='KiB'>524288</memory>

  <currentMemory unit='KiB'>524288</currentMemory>

  <vcpu>1</vcpu>

  <features>

    <acpi/>

    <apic/>

  </features>

  <os>

    <type arch='x86_64'>hvm</type>

  </os>

  <on_poweroff>destroy</on_poweroff>

  <on_reboot>restart</on_reboot>

  <on_crash>restart</on_crash>

  <devices>

    <disk type='file' device='disk'>

      <driver name='qemu' type='qcow2' cache='none'/>

      <source file='/vmhost/dev/dev-test01/centos-dev-test01-v2v-sda'/>

      <target dev='vda' bus='virtio'/>

    </disk>

    <disk device='cdrom' type='file'>

      <driver name='qemu' type='raw'/>

      <target dev='hda' bus='ide'/>

    </disk>

    <disk device='floppy' type='file'>

      <driver name='qemu' type='raw'/>

      <target dev='fda'/>

    </disk>

    <interface type='bridge'>

      <source bridge='br1'/>

      <model type='virtio'/>

      <address type='pci' domain='0x0000' bus='0x00' slot='0x03' function='0x0'/>

    </interface>

    <video>

      <model type='qxl' ram='65536' heads='1'/>

    </video>

    <graphics type='vnc' autoport='yes' port='-1'/>

    <input type='tablet' bus='usb'/>

    <input type='mouse' bus='ps2'/>

    <console type='pty'/>

  </devices>

</domain>
1.1.4 启动虚拟机
导入主机
[root@clsn7 dev-test01]# virsh  define centos-dev-test01-v2v.xml

定义域 centos-dev-test01-v2v(从 centos-dev-test01-v2v.xml)
查看主机列表
[root@clsn7 dev-test01]#  virsh list --all

 Id    名称                         状态

----------------------------------------------------

 -     centos-dev-test01-v2v          关闭
启动主机
[root@clsn7 dev-test01]#  virsh start centos-dev-test01-v2v

域 centos-dev-test01-v2v 已开始
1.1.5 测试可用性
登陆迁移后的虚拟机测试
[root@clsn7 ~]# ssh root@192.168.19.123

The authenticity of host '192.168.19.123 (192.168.19.123)' can't be established.

RSA key fingerprint is SHA256:iRmghFzgRIJy5+v8p4lqi8DyUG8F0hXR/qNdDZ2J6RY.

RSA key fingerprint is MD5:37:b8:56:3b:b7:85:fa:cb:d9:55:a7:44:d5:de:f8:d9.

Are you sure you want to continue connecting (yes/no)? yes

Warning: Permanently added '192.168.19.123' (RSA) to the list of known hosts.

root@192.168.19.123's password:

Last login: Mon Mar  5 10:30:02 2018 from 192.168.19.9

[root@dev-test01 ~]# hostname  -I

192.168.19.123
设置虚拟机开机自启动。
[root@clsn7 ~]# virsh autostart centos-dev-test01-v2v

域 centos-dev-test01-v2v标记为自动开始
至此一台机器的迁移完成,后续按照相同的方式将其他的虚拟机进行迁移即可。
ESXI 迁移至KVM (V2V迁移)的更多相关文章
- ESXi到KVM之v2v迁移
1.ESXi到KVM之v2v情况说明 (1).配置任务列表: 1)VMwareESXi虚拟平台下linux系统迁移到KVM虚拟平台.2)VMwareESXi虚拟平台下windows系统迁移到KVM虚拟 ...
- KVM到KVM之v2v迁移
1.源KVM虚拟主机node1 (1).查看源KVM虚拟主机上的虚拟机列表,本文计划将oeltest01虚拟机迁移到其它KVM虚拟主机中. (2).查看oeltest01虚拟机磁盘文件位置/data/ ...
- kvm虚拟机迁移
一.迁移简介 迁移: 系统的迁移是指把源主机上的操作系统和应用程序移动到目的主机,并且能够在目的主机上正常运行.在没有虚拟机的时代,物理机之间的迁移依靠的是系统备份和恢复技术.在源主机上实时备份操作系 ...
- kvm虚拟迁移
1. 虚拟迁移 迁移: 系统的迁移是指把源主机上的操作系统和应用程序移动到目的主机,并且能够在目的主机上正常运行.在没有虚拟机的时代,物理机之间的迁移依靠的是系统备份和恢复技术.在源主机上实时备份操作 ...
- kvm热迁移(4)
一.迁移简介 迁移分为热迁移和冷迁移,冷迁移是在机器关机的状态下进行迁移,具体操作在之前的博客有体现.热迁移是在机器处于开机状态进行迁移,本次博客主要讲解热迁移. 系统的迁移是指把源主机上的操作系统和 ...
- KVM虚拟迁移(5)
一.迁移简介 迁移: 系统的迁移是指把源主机上的操作系统和应用程序移动到目的主机,并且能够在目的主机上正常运行.在没有虚拟机的时代,物理机之间的迁移依靠的是系统备份和恢复技术.在源主机上实时 ...
- kvm虚拟机迁移(6)
一.迁移简介 迁移: 系统的迁移是指把源主机上的操作系统和应用程序移动到目的主机,并且能够在目的主机上正常运行. 在没有虚拟机的时代,物理机之间的迁移依靠的是系统备份和恢复技术.在源主机上实 ...
- KVM 介绍(8):使用 libvirt 迁移 QEMU/KVM 虚机和 Nova 虚机 [Nova Libvirt QEMU/KVM Live Migration]
学习 KVM 的系列文章: (1)介绍和安装 (2)CPU 和 内存虚拟化 (3)I/O QEMU 全虚拟化和准虚拟化(Para-virtulizaiton) (4)I/O PCI/PCIe设备直接分 ...
- 笔记:Xen虚拟机如何迁移到KVM上?
众所周知如果是在Linux上使用虚拟化技术的话,就会有基于Xen Hypervisor部署一个系统的机会.因为基于内核的虚拟机(KVM:Kernel-Based Virtual Machine)已经逐 ...
随机推荐
- 双线程 线性dp 传纸条
/* 两种做法:一是暴力dp[i][j][k][l] 二是以走的步数k作为阶段, dp[k][i][j]表示走到第k步,第一个人横坐标走到i,第二个人横坐标走到j 可以以此推出第第一个人的坐标为[i, ...
- 《剑指offer》-斐波那契数列
大家都知道斐波那契数列,现在要求输入一个整数n,请你输出斐波那契数列的第n项. n<=39 这么直接的问fibonacci,显然是迭代计算.递归的问题在于重复计算,而迭代则避免了这一点:递归是自 ...
- 支持删除的并查集 hdu2473
题解: 代码: #include<bits/stdc++.h> using namespace std; #define ll long long ; int fa[maxn],id,vi ...
- [ZJOI2006]书架
链接:https://www.luogu.org/problemnew/show/P2596 题解: 写了两天的平衡树终于大概弄好了所有模板(模板不熟写错debug真是要死) 对于放在头尾,只需要删除 ...
- day--16页面布局
后台页面布局 一.fixed布局 <!DOCTYPE html> <html lang="en"> <head> <meta ch ...
- 012 Spark在IDEA中打jar包,并在集群上运行(包括local模式,standalone模式,yarn模式的集群运行)
一:打包成jar 1.修改代码 2.使用maven打包 但是目录中有中文,会出现打包错误 3.第二种方式 4.下一步 5.下一步 6.下一步 7.下一步 8.下一步 9.完成 二:在集群上运行(loc ...
- Python 导入requests报错No module named requests
刚开始是在Pycharm里面,发现就是不对,导入老提示No module named requests这个错误.后面发现是指向的python.exe路径不对,到setting里面设置换一下路径就好.
- macos 下安装virtualenv,virtualenvwrapper,然后在pycharm中正常配置方法日志
1.安装virtualenv或virtualenvwrapper pip install virtualenv pip install virtualenvwraper 注意pip的版本号(查看 pi ...
- 在 Windows 10 中使用 OpenAI Spinning Up
前段时间,openAI 发布了 Spinning Up ,本篇博客将介绍如何在 Windows 系统中使用 Spinning Up. 什么是 Spinning Up 先来说说 Spinning Up, ...
- AngularJS之双向数据绑定,class绑定
之前一直都是用vue来完成一些日常开发,初入AngularJS,记录一些日常开发遇到的问题. 1.双向数据绑定 AngularJS与vue的区别在于,vue采用的是虚拟DOM,模板文件上绑定的一大堆指 ...