
Spring Boot系列——Spring Boot如何启动
Spring Boot启动过程
上篇《Spring Boot系列——5分钟构建一个应用》介绍了如何快速创建一个Spring Boot项目并运行。虽然步骤少流程简单,为开发者省去了很多重复性的配置工作,但是其底层实现并没有这么简单。
这篇,我们就通过入口类TutorialApplication看看Spring Boot是如何启动的。
注解
写过Spring Boot都知道需要有一个入口类,就是本例子中的TutorialApplication,而这个类上面必不可上的需要有一个@SpringBootApplication注解。
点击进入该注解,我们可以发现其是一个复合注解,包括@SpringBootConfiguration、@EnableAutoConfiguration和@ComponentScan。
/**

 * Indicates a {@link Configuration configuration} class that declares one or more

 * {@link Bean @Bean} methods and also triggers {@link EnableAutoConfiguration

 * auto-configuration} and {@link ComponentScan component scanning}. This is a convenience

 * annotation that is equivalent to declaring {@code @Configuration},

 * {@code @EnableAutoConfiguration} and {@code @ComponentScan}.

 *

 * @author Phillip Webb

 * @author Stephane Nicoll

 * @since 1.2.0

 */

@Target(ElementType.TYPE)

@Retention(RetentionPolicy.RUNTIME)

@Documented

@Inherited

@SpringBootConfiguration

@EnableAutoConfiguration

@ComponentScan(excludeFilters = {

      @Filter(type = FilterType.CUSTOM, classes = TypeExcludeFilter.class),

      @Filter(type = FilterType.CUSTOM, classes = AutoConfigurationExcludeFilter.class) })

public @interface SpringBootApplication {

   /**

    * Exclude specific auto-configuration classes such that they will never be applied.

    * @return the classes to exclude

    */

   @AliasFor(annotation = EnableAutoConfiguration.class)

   Class<?>[] exclude() default {};

   /**

    * Exclude specific auto-configuration class names such that they will never be

    * applied.

    * @return the class names to exclude

    * @since 1.3.0

    */

   @AliasFor(annotation = EnableAutoConfiguration.class)

   String[] excludeName() default {};

   /**

    * Base packages to scan for annotated components. Use {@link #scanBasePackageClasses}

    * for a type-safe alternative to String-based package names.

    * @return base packages to scan

    * @since 1.3.0

    */

   @AliasFor(annotation = ComponentScan.class, attribute = "basePackages")

   String[] scanBasePackages() default {};

   /**

    * Type-safe alternative to {@link #scanBasePackages} for specifying the packages to

    * scan for annotated components. The package of each class specified will be scanned.

    * <p>

    * Consider creating a special no-op marker class or interface in each package that

    * serves no purpose other than being referenced by this attribute.

    * @return base packages to scan

    * @since 1.3.0

    */

   @AliasFor(annotation = ComponentScan.class, attribute = "basePackageClasses")

   Class<?>[] scanBasePackageClasses() default {};

}
@SpringBootConfiguration
该注解底层其实就是@Configuration注解。熟悉Spring的发展里程碑就知道这是Java Config的配置形式。
通过该注解修饰,表示该类是一个配置类。
@EnableAutoConfiguration
该注解其实也是一个复合注解。
/**

 * Enable auto-configuration of the Spring Application Context, attempting to guess and

 * configure beans that you are likely to need. Auto-configuration classes are usually

 * applied based on your classpath and what beans you have defined. For example, if you

 * have {@code tomcat-embedded.jar} on your classpath you are likely to want a

 * {@link TomcatServletWebServerFactory} (unless you have defined your own

 * {@link ServletWebServerFactory} bean).

 * <p>

 * When using {@link SpringBootApplication}, the auto-configuration of the context is

 * automatically enabled and adding this annotation has therefore no additional effect.

 * <p>

 * Auto-configuration tries to be as intelligent as possible and will back-away as you

 * define more of your own configuration. You can always manually {@link #exclude()} any

 * configuration that you never want to apply (use {@link #excludeName()} if you don't

 * have access to them). You can also exclude them via the

 * {@code spring.autoconfigure.exclude} property. Auto-configuration is always applied

 * after user-defined beans have been registered.

 * <p>

 * The package of the class that is annotated with {@code @EnableAutoConfiguration},

 * usually via {@code @SpringBootApplication}, has specific significance and is often used

 * as a 'default'. For example, it will be used when scanning for {@code @Entity} classes.

 * It is generally recommended that you place {@code @EnableAutoConfiguration} (if you're

 * not using {@code @SpringBootApplication}) in a root package so that all sub-packages

 * and classes can be searched.

 * <p>

 * Auto-configuration classes are regular Spring {@link Configuration} beans. They are

 * located using the {@link SpringFactoriesLoader} mechanism (keyed against this class).

 * Generally auto-configuration beans are {@link Conditional @Conditional} beans (most

 * often using {@link ConditionalOnClass @ConditionalOnClass} and

 * {@link ConditionalOnMissingBean @ConditionalOnMissingBean} annotations).

 *

 * @author Phillip Webb

 * @author Stephane Nicoll

 * @see ConditionalOnBean

 * @see ConditionalOnMissingBean

 * @see ConditionalOnClass

 * @see AutoConfigureAfter

 * @see SpringBootApplication

 */

@Target(ElementType.TYPE)

@Retention(RetentionPolicy.RUNTIME)

@Documented

@Inherited

@AutoConfigurationPackage

@Import(AutoConfigurationImportSelector.class)

public @interface EnableAutoConfiguration {

   String ENABLED_OVERRIDE_PROPERTY = "spring.boot.enableautoconfiguration";

   /**

    * Exclude specific auto-configuration classes such that they will never be applied.

    * @return the classes to exclude

    */

   Class<?>[] exclude() default {};

   /**

    * Exclude specific auto-configuration class names such that they will never be

    * applied.

    * @return the class names to exclude

    * @since 1.3.0

    */

   String[] excludeName() default {};

}
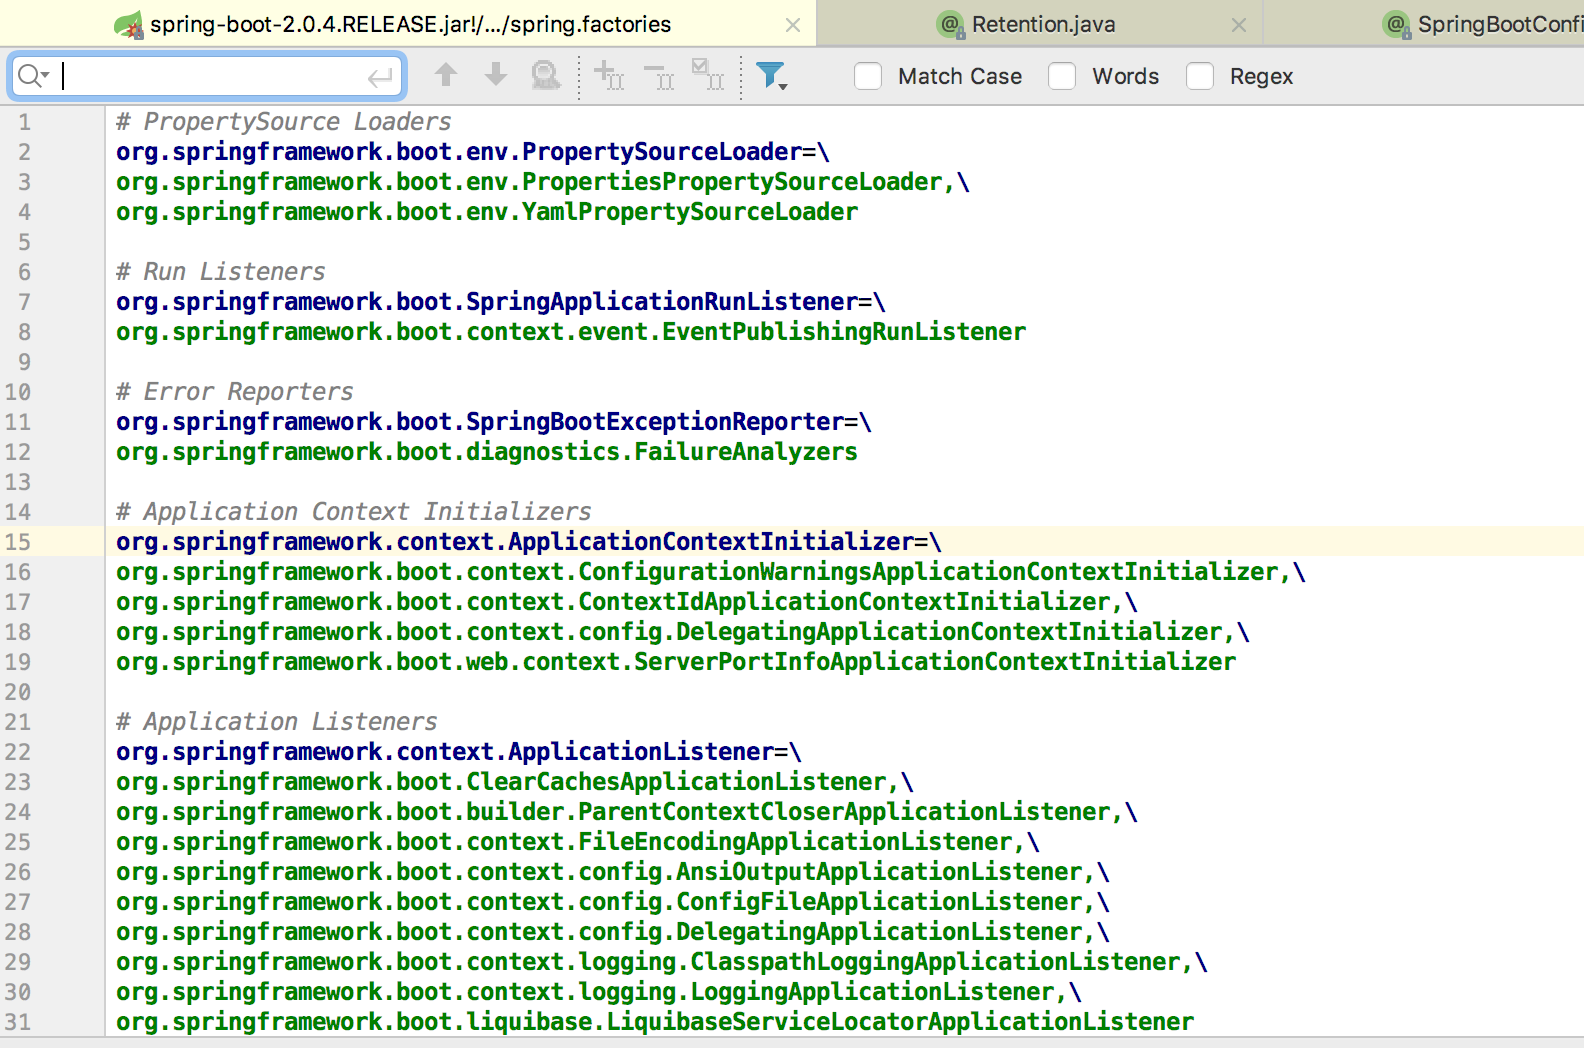
其实现也是通过类似@Import的方式注入AutoConfigurationImportSelector类,并借助该类将所有符合条件的Configuration注解修饰的配置类加载到Spring Boot容器中。从classpath中搜索所有的META-INF/spring.factories配置文件,将其中org.springframework.boot.autoconfigure.EnableAutoConfiguration对应配置项通过反射的形式实例化为标注了@Configuration和javaconfig形式的IOC容器配置类,然后汇总为一个并加载到ioc容器中。
@ComponentScan
这个注解就不需要多介绍了吧,其作用自动扫描加载符合条件的bean。
SpringApplication
从项目的入口第一个碰到的就是SpringApplication类。
@SpringBootApplication

public class TutorialApplication {

    public static void main(String[] args) {

        SpringApplication.run(TutorialApplication.class, args);

    }

}
进入该类的静态方法run,可以看到其在构造SpringApplication对象
public static ConfigurableApplicationContext run(Class<?>[] primarySources,

      String[] args) {

   return new SpringApplication(primarySources).run(args);

}
进入SpringApplication构造方法,可以看到
public SpringApplication(ResourceLoader resourceLoader, Class<?>... primarySources) {

   this.resourceLoader = resourceLoader;

   Assert.notNull(primarySources, "PrimarySources must not be null");

   this.primarySources = new LinkedHashSet<>(Arrays.asList(primarySources));

   this.webApplicationType = deduceWebApplicationType();

   setInitializers((Collection) getSpringFactoriesInstances(

         ApplicationContextInitializer.class));

   setListeners((Collection) getSpringFactoriesInstances(ApplicationListener.class));

   this.mainApplicationClass = deduceMainApplicationClass();

}
主要做了如下几件事:
- 加载Source,这里只有只有Application
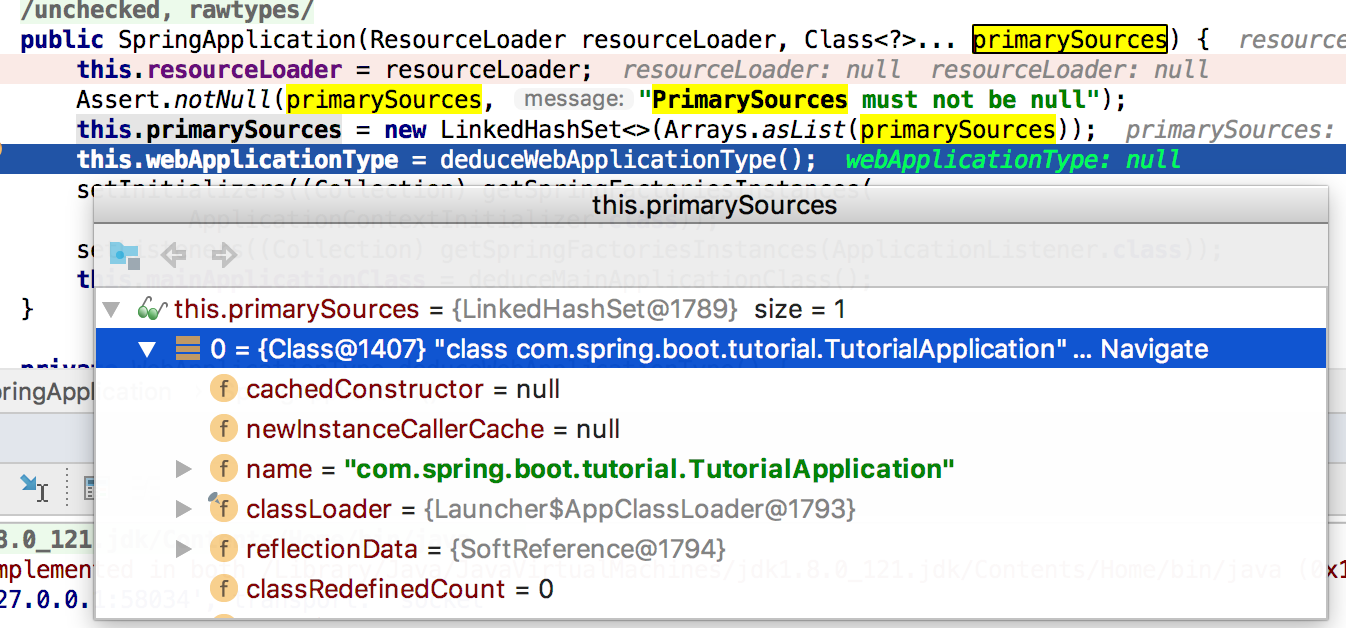
推断WebApplicationType,该枚举有三种类型NONE、SERVLET、REACTIVE。
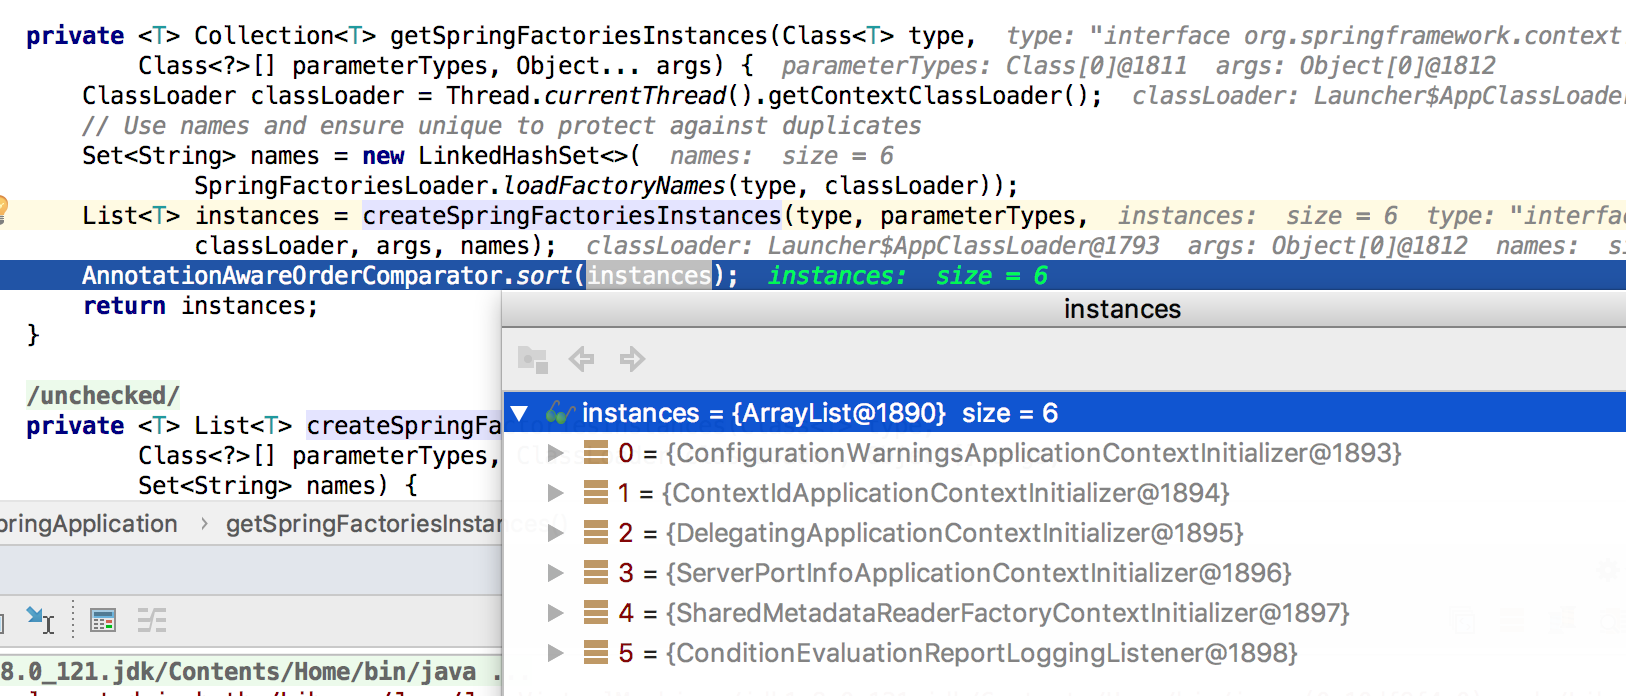
设置初始化器变量setInitializers,初始化后得到6个初始化变量,这些类在上面提到的spring.factories中可以找到
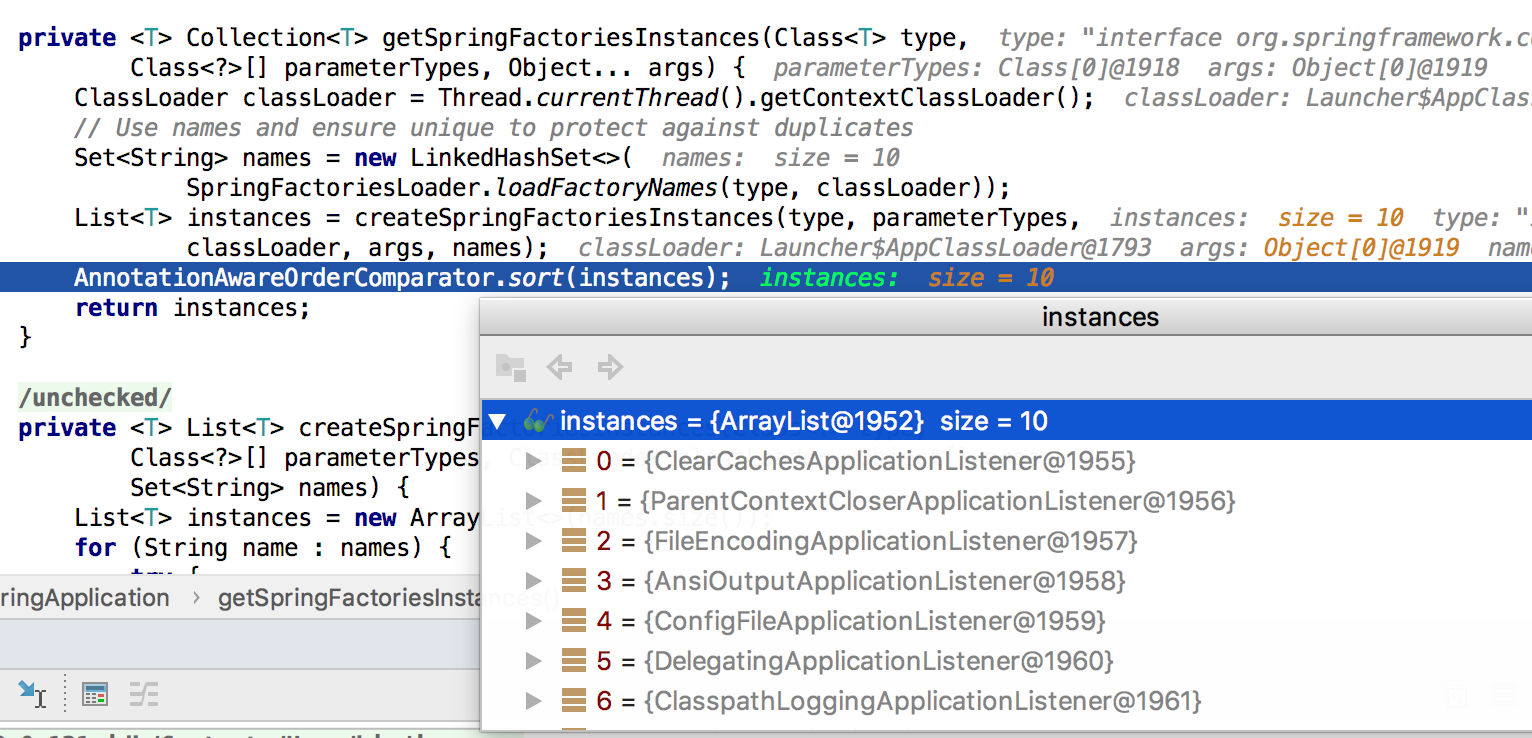
- 设置监听器,与上面setInitializers实现类似,最终得到如下10个listeners
- 最后推断带有main函数的所在类,即入口类,这里就是TutorialApplication
private Class<?> deduceMainApplicationClass() {

   try {

      StackTraceElement[] stackTrace = new RuntimeException().getStackTrace();

      for (StackTraceElement stackTraceElement : stackTrace) {

         if ("main".equals(stackTraceElement.getMethodName())) {

            return Class.forName(stackTraceElement.getClassName());

         }

      }

   }

   catch (ClassNotFoundException ex) {

      // Swallow and continue

   }

   return null;

}
run方法
看完SpringApplication是如何初始化后,我们来看下这个后面的run方法具体做了哪些事。
public ConfigurableApplicationContext run(String... args) {

   StopWatch stopWatch = new StopWatch();

   stopWatch.start();

   ConfigurableApplicationContext context = null;

   Collection<SpringBootExceptionReporter> exceptionReporters = new ArrayList<>();

   configureHeadlessProperty();

   SpringApplicationRunListeners listeners = getRunListeners(args);

   listeners.starting();

   try {

      ApplicationArguments applicationArguments = new DefaultApplicationArguments(

            args);

      ConfigurableEnvironment environment = prepareEnvironment(listeners,

            applicationArguments);

      configureIgnoreBeanInfo(environment);

      Banner printedBanner = printBanner(environment);

      context = createApplicationContext();

      exceptionReporters = getSpringFactoriesInstances(

            SpringBootExceptionReporter.class,

            new Class[] { ConfigurableApplicationContext.class }, context);

      prepareContext(context, environment, listeners, applicationArguments,

            printedBanner);

      refreshContext(context);

      afterRefresh(context, applicationArguments);

      stopWatch.stop();

      if (this.logStartupInfo) {

         new StartupInfoLogger(this.mainApplicationClass)

               .logStarted(getApplicationLog(), stopWatch);

      }

      listeners.started(context);

      callRunners(context, applicationArguments);

   }

   catch (Throwable ex) {

      handleRunFailure(context, ex, exceptionReporters, listeners);

      throw new IllegalStateException(ex);

   }

   try {

      listeners.running(context);

   }

   catch (Throwable ex) {

      handleRunFailure(context, ex, exceptionReporters, null);

      throw new IllegalStateException(ex);

   }

   return context;

}
StopWatch,这是一个spring-core中的工具类,用来给程序运行计时(对于经常遇到需要计算某方法或接口耗时的场景,这个比System.currentTimeMillis好用)
configureHeadlessProperty配置,设置系统属性 java.awt.headless,这里设置为 true,表示运行在服务器端,在没有显示器和鼠标键盘的模式下工作,模拟输入输出设备功能。
遍历listeners并启动
封装入参args为AppliationArguments对象
打印banner(就是我们启动时看到的spring标识)
后面就是初始化上下文并加载上下文,具体实现就不进去看了
如果您觉得阅读本文对您有帮助,请点一下“推荐”按钮,您的“推荐”将是我最大的写作动力!如果您想持续关注我的文章,请扫描二维码,关注JackieZheng的微信公众号,我会将我的文章推送给您,并和您一起分享我日常阅读过的优质文章。

Spring Boot系列——Spring Boot如何启动的更多相关文章
- Spring基础系列-Spring事务不生效的问题与循环依赖问题
原创作品,可以转载,但是请标注出处地址:https://www.cnblogs.com/V1haoge/p/9476550.html 一.提出问题 不知道你是否遇到过这样的情况,在ssm框架中开发we ...
- spring boot系列--spring security (基于数据库)登录和权限控制
先说一下AuthConfig.java Spring Security的主要配置文件之一 AuthConfig 1 @Configuration 2 @EnableWebSecurity 3 publ ...
- Spring Boot 系列教程16-数据国际化
internationalization(i18n) 国际化(internationalization)是设计和制造容易适应不同区域要求的产品的一种方式. 它要求从产品中抽离所有地域语言,国家/地区和 ...
- Spring Boot 系列教程15-页面国际化
internationalization(i18n) 国际化(internationalization)是设计和制造容易适应不同区域要求的产品的一种方式. 它要求从产品中抽离所有地域语言,国家/地区和 ...
- Spring Boot 系列教程7-EasyUI-datagrid
jQueryEasyUI jQuery EasyUI是一组基于jQuery的UI插件集合体,而jQuery EasyUI的目标就是帮助web开发者更轻松的打造出功能丰富并且美观的UI界面.开发者不需要 ...
- spring boot系列01--快速构建spring boot项目
最近的项目用spring boot 框架 借此学习了一下 这里做一下总结记录 非常便利的一个框架 它的优缺点我就不在这背书了 想了解的可以自行度娘谷歌 说一下要写什么吧 其实还真不是很清楚,只是想记录 ...
- Spring Boot系列(一) Spring Boot准备知识
本文是学习 Spring Boot 的一些准备知识. Spring Web MVC Spring Web MVC 的两个Context 如下图所示, 基于 Servlet 的 Spring Web M ...
- Spring Boot系列——如何集成Log4j2
上篇<Spring Boot系列--日志配置>介绍了Spring Boot如何进行日志配置,日志系统用的是Spring Boot默认的LogBack. 事实上,除了使用默认的LogBack ...
- Spring Boot系列(三):Spring Boot整合Mybatis源码解析
一.Mybatis回顾 1.MyBatis介绍 Mybatis是一个半ORM框架,它使用简单的 XML 或注解用于配置和原始映射,将接口和Java的POJOs(普通的Java 对象)映射成数据库中的记 ...
随机推荐
- UVA 10976 分数拆分【暴力】
题目链接:https://vjudge.net/contest/210334#problem/C 题目大意: It is easy to see that for every fraction in ...
- java中的instanceof用法详解
instanceof是Java的一个二元操作符(运算符),也是Java的保留关键字.它的作用是判断其左边对象是否为其右边类的实例,返回的是boolean类型的数据.用它来判断某个对象是否是某个Clas ...
- 使用SQL逆向生成PDM文件
首先导出表结构,可以使用Navicat 或者DataGrip 生成SQL文件后使用PowerDesigner 指定数据库类型,选择SQL文件即可
- 谁记录了mysql error log中的超长信息(记pt-stalk一个bug的定位过程)
[问题] 最近查看MySQL的error log文件时,发现有很多服务器的文件中有大量的如下日志,内容很长(大小在200K左右),从记录的内容看,并没有明显的异常信息. 有一台测试服务器也有类似的问题 ...
- python 列表返回重复数据的下标
class Solution(object): def searchRange(self, nums, target): """ :type nums: List[int ...
- MySql md5加密 sqlserver md5加密 C# md5加密 java md5加密
便民md5加密: 百度md5加密: MySQL 加密语法: MD5(加密字符串) -- 中文加密 SELECT MD5('你好') -- 中文加密匹配查询 SELECT * FROM 表名 WHERE ...
- DBProxy
DBProxy/USER_GUIDE.md at master · Meituan-Dianping/DBProxy https://github.com/Meituan-Dianping/DBP ...
- sqlite 一条记录判断一个字段是否like另一个字段
sql: select * from test where col2 like '%'||col1||'%';
- Linux ./configure --prefix命令
源码的安装一般由3个步骤组成:配置(configure).编译(make).安装(make install),具体的安装方法一般作者都会给出文档,这里主要讨论配置(configure).Configu ...
- 安装NVIDIA驱动时禁用自带nouveau驱动
安装英伟达驱动时,一般需要禁用自带nouveau驱动,按如下命令操作: sudo vim /etc/modprobe.d/blacklist-nouveau.conf 添加如下内容: blacklis ...