
用Partimage创建或恢复分区备份
1 Preliminary Note
Partimage is part of the system rescue CD found on http://www.sysresccd.org which is a multi-functional rescue CD useful for both Linux and Windows operating systems. It boots into a live environment with a lot of tools for partitioning, editing, etc. Download the SystemRescueCD here: http://sourceforge.net/projects/systemrescuecd/files/sysresccd-x86/2.6.0/systemrescuecd-x86-2.6.0.iso/download and burn it.
Partimage does not work on ext4 file systems and is experimental for ntfs file systems. The complete list of supported file systems can be found onhttp://www.partimage.org/Supported-Filesystems.
In this tutorial, I will use a hard disk partitioned into three parts: sda1 which is my swap partition, sda2 that I have Ubuntu Linux 12.04 installed on, and sda3 that has nothing on it but enough space to carry an image of sda2.
2 Boot SystemRescueCd
Insert your burnt CD into your CD tray and boot into the start screen. This is what it looks like:
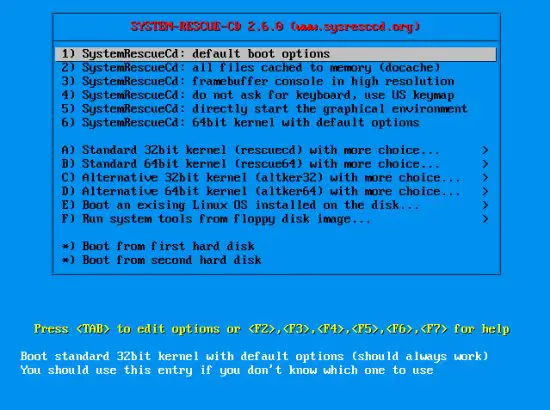
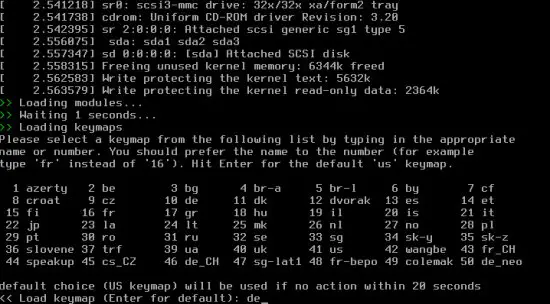
Since I like graphical environments and this one loads really fast, I go down to 5) and start the graphical environment. While loading, the system will ask you for your keymap. Within 20 seconds, type in the name or the appropriate number from the table above:
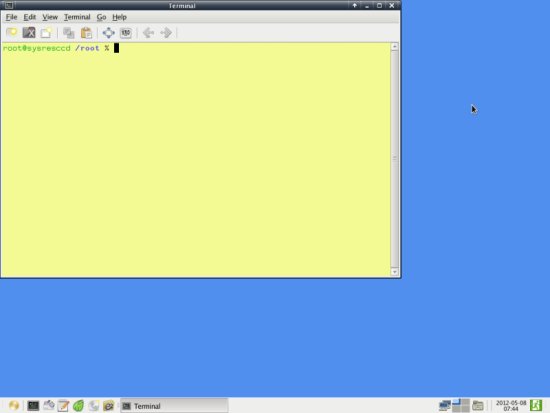
The environment looks as follows. A root terminal will be opened by default:
3 Create A Partition Image
I will create an image of my Linux partition, sda2, on my empty partition sda3. If you don't know what partitions you have, go to the terminal and enter:
fdisk -l
The output will look like this (the bottom three rows are my partitions):
root@sysresccd /root % fdisk -l
Disk /dev/sda: 34.5 GB, 34527510528 bytes
255 heads, 63 sectors/track, 4197 cylinders, total 67436544 sectors
Units = sectors of 1 * 512 = 512 bytes
Sector size (logical/physical): 512 bytes / 512 bytes
I/O size (minimum/optimal): 512 bytes / 512 bytes
Disk identifier: 0x0001b9b7
Device Boot Start End Blocks Id System
/dev/sda1 2048 7999487 3998720 82 Linux swap / Solaris
/dev/sda2 * 7999488 28565503 10283008 83 Linux
/dev/sda3 28565504 67436543 19435520 83 Linux
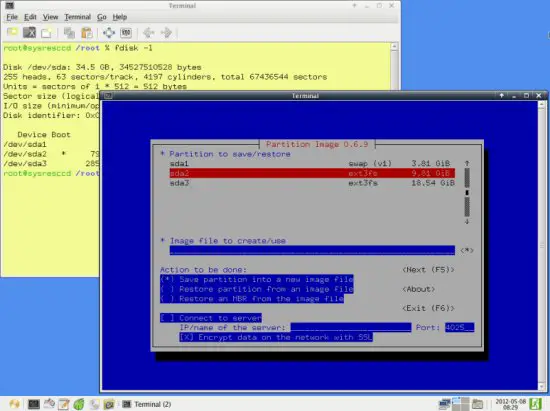
To start Partimage, open the main menu on the bottom left of the desktop and go to System > Partimage. It will open in a new terminal window:
But before we can begin to back up, we first have to mount the partition we want to save the backup on. Create a folder within /mnt and mount the partition on that point. I will use sda3 for saving, replace it with the appropriate partition on your system:
mkdir /mnt/save
mount /dev/sda3 /mnt/save
Now go to the Partimage terminal again. Navigate through it using the TAB, ENTER, SPACE and arrow keys. First select the partition to back up and go to the next field with TAB. In the next line, enter the full path of the backup, including the name. You can select the path by using the asterisk on the next field. I will save my backup as /mnt/save/Ubuntu.gz (I will choose gzip as compression level which is why the file extension is gz. You can also choose bz2):
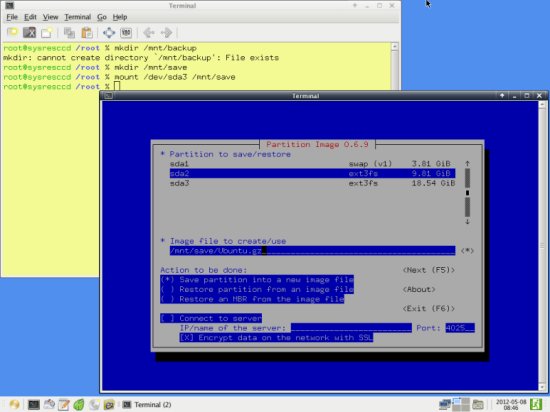
All settings on this page should now be complete if you want a usual backup, so press F5 to go to the next page. The predefined settings on that page should also be okay, but take a look on all of them:
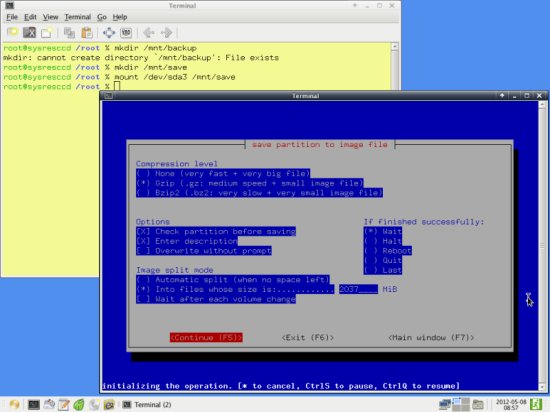
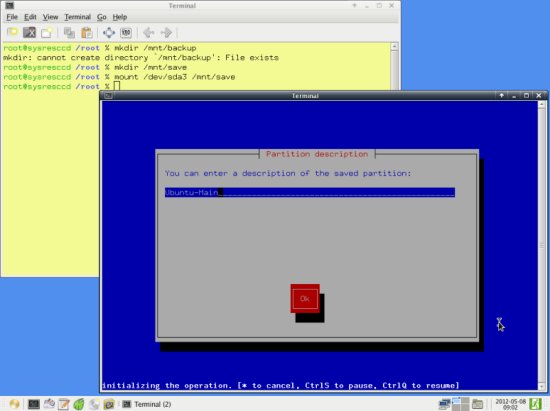
Again, continue with F5. Enter a description for the backup. This description will be shown upon restoring it, to make sure that you picked the right one. To be on the safe side, enter some representable name and the date the backup was made. For demonstrational purposes I'll use a simple one:
Upon going to the next page, Partimage will prepare the backup. For some reason you may now get an error - this may be caused by choosing a partition for backup that does not have a supported file system or some other strange reason - with the message Can't read bitmap block 0 from image. If you are certain that you have a supported file system, try remounting your destination partition, then creating a new mount directory and mounting your partition to back up and unmounting that again. In my case, the steps would be following:
umount /mnt/save
mount /dev/sda3 /mnt/save
mkdir /mnt/tmp
mount /dev/sda2 /mnt/tmp
umount /mnt/tmp
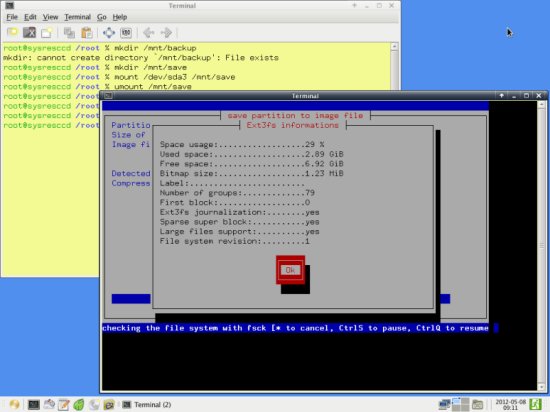
For some reason, that worked for me. If everything worked, you will see the following window:
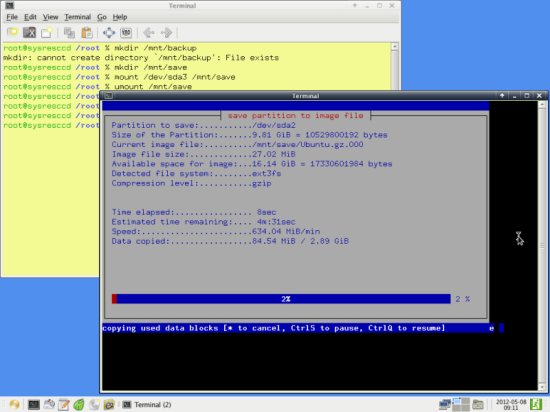
Partimage will then create a backup of your partition in the specified location:
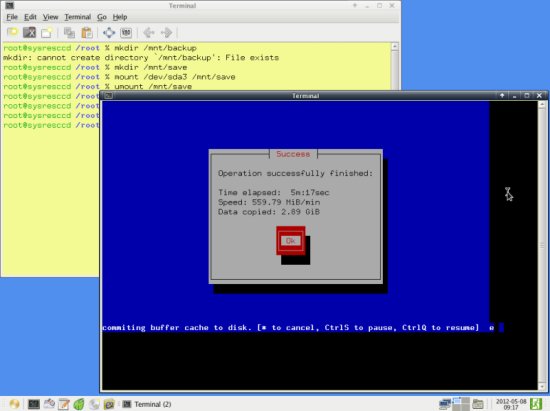
If everything went well, you will see this message. Partimage will close itself after confirming:
4 Restore A Partition Image
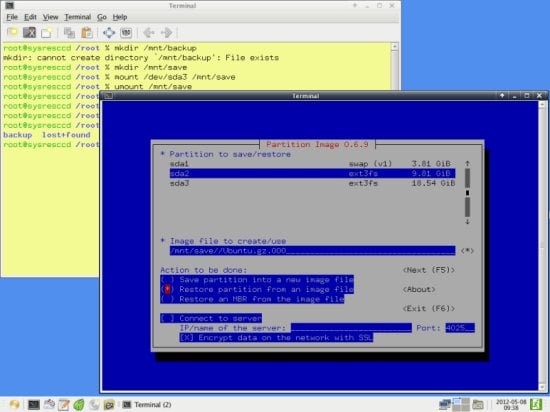
To restore an image you basically do the same as before but choose the appropriate options in Partimage. Open it up again and select the partition to restore on the first field (chose the partition that will be overwritten by the image here, not the one where the image is located), the location of the image file on the second field (notice the name extension - .000 was appended to the name. If you are not sure what your backup image is called use the next asterisk field to browse for the correct one. The partition where your image is located has to be mounted. Just like for creating an image, this can be done with:
mount /dev/sda3 /mnt/save
Replace my partition identifier with yours and choose an existing folder.) and use the SPACE bar to select Restore partition from an image file on the next field. Press F5 to move on:
You will now be shown the description of the image file, if you entered one while creating the backup:
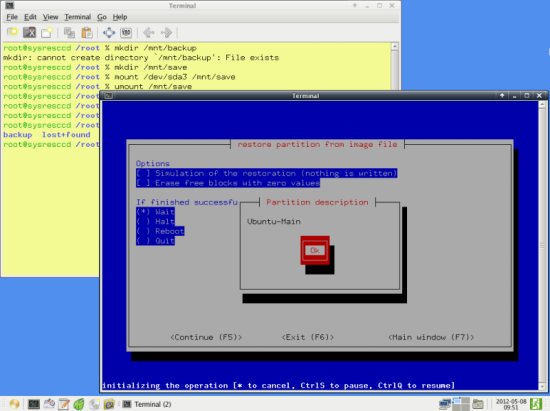
If you want to make sure nothing goes wrong, you can do a simulation of the restoration process first. Erasing blocks will only wear out your hard drive and is no necessity. Continue with F5:
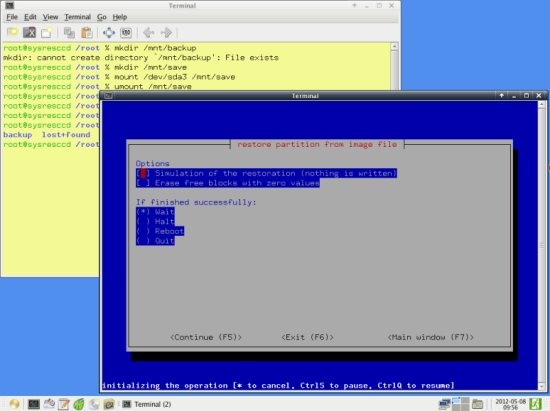
The general information is then shown once more...
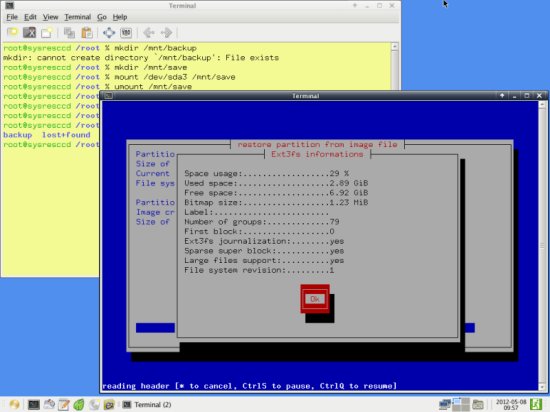
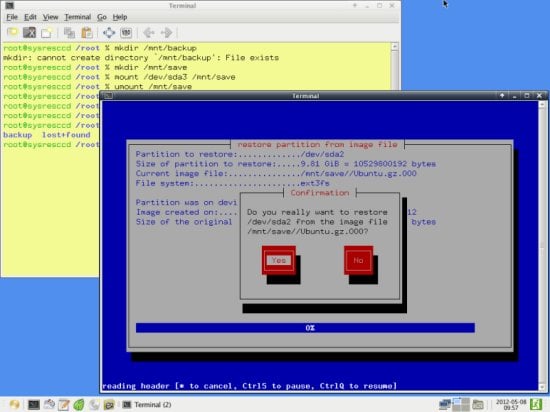
... and you are asked to confirm your choice to restore your backup image. Keep in mind that data on the destination partition will be overwritten by the image:
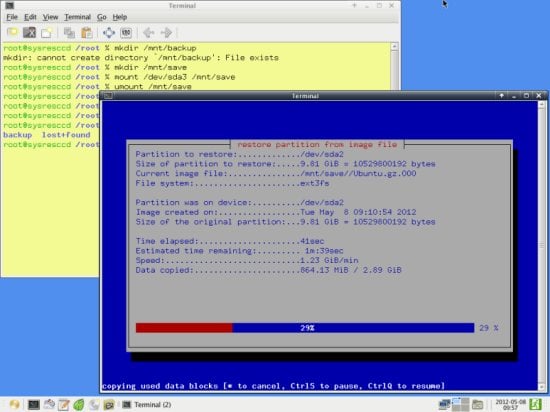
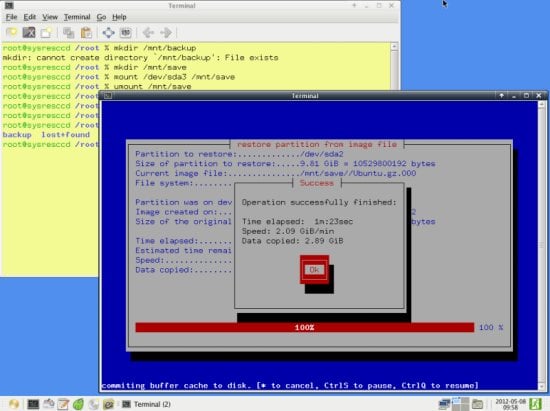
The image is then restored to the specified partition:
Following message is shown on success:
用Partimage创建或恢复分区备份的更多相关文章
- GitLab备份的创建与恢复
使用Gitlab一键安装包安装Gitlab非常简单, 同样的备份恢复与迁移也非常简单. 使用一条命令即可创建完整的Gitlab备份: gitlab-rake gitlab:backup:create使 ...
- linux centos 恢复 还原 备份 Snapper 快照说明
为什么要使用Snapper快照? 我们可以想像以下场景: 1. 场景一:系统发生意外宕机,工程师无法快速定位问题,业务受到中断,客户十分不满意. 2. 场景二:项目会议上,就是否升级某软件到最新版本, ...
- 如何让阿三 Windows 10、11 的恢复分区(Recovery Partition)恢复到 “盖茨” 模式
如何将 Windows Server 2022 的恢复分区(Recovery Partition)移动到 C 盘之前,恢复 C 盘容量调整功能. 请访问原文链接:https://sysin.org/b ...
- SQL Server 批量主分区备份(Multiple Jobs)
一.本文所涉及的内容(Contents) 本文所涉及的内容(Contents) 背景(Contexts) 案例分析(Case) 方案一(Solution One) 方案二(Solution Two) ...
- SQL Server 批量主分区备份(One Job)
一.本文所涉及的内容(Contents) 本文所涉及的内容(Contents) 背景(Contexts) 案例分析(Case) 实现代码(SQL Codes) 主分区完整.差异还原(Primary B ...
- 烂泥:通过binlog恢复mysql备份之前的数据
本文由秀依林枫提供友情赞助,首发于烂泥行天下. 上一篇文章,我们讲解了如何通过mysql的binlog日志恢复mysql数据库,文章连接为<烂泥:通过binlog恢复mysql数据库>.其 ...
- Kafka 分区备份实战
1.概述 在 Kafka 集群中,我们可以对每个 Topic 进行一个或是多个分区,并为该 Topic 指定备份数.这部分元数据信息都是存放在 Zookeeper 上,我们可以使用 zkCli 客户端 ...
- Oracle数据库文件恢复与备份思路
怎样才能对Oracle数据库进行备份?如何才能对删除的数据再进行恢复?这是困扰着很多人的问题.大家都知道,任何数据库在长期使用过程中,都会存在一定的安全隐患.对于数据库管理员来说不能仅寄希望于计算机操 ...
- win10安装提示“我们无法创建新的分区”
今日于笔记本安装win10时突然出现提示:我们无法创建新的分区.网上搜了不少建议,尝试了都无果. 由于我的笔记本是固态硬盘与机械硬盘混合,所以情况可能更加特殊. 最后成功的方法是: 1. 先将Win1 ...
随机推荐
- Windows 10 Install rabbitmq-server-3.6.9
rabbitmq下载 http://www.rabbitmq.com/releases/rabbitmq-server/v3.6.9/rabbitmq-server-3.6.9.exe otp插件下载 ...
- windous----常用命令集合
Windous常用命令 winver---------检查Windows版本 wmimgmt.msc----打开windows管理体系结构(WMI) wupdmgr--------windows更新程 ...
- HDU 6228 - Tree - [DFS]
题目链接:http://acm.hdu.edu.cn/showproblem.php?pid=6228 Time Limit: 2000/1000 MS (Java/Others) Memory Li ...
- [No0000B2]ReSharper操作指南3/16-配置ReSharper与代码校错
配置ReSharper ReSharper功能具有默认配置,这些配置基于.NET世界中的约定和最佳实践.但是,每个功能都可以根据您的需求和喜好灵活调整. ReSharper首选项可以在以下位置进行配置 ...
- 使用graalvm.js调用promise
前提 1.JDK1.8 2.引入jar包 <!--graalvm.js --> <dependency> <groupId>org.graalvm.js</g ...
- linux进程状态D
运行在KVM虚拟机里的一些进程突然出了问题,这些出了问题的进程无法用kill杀掉,使用ps可以看到这些进程处于D状态: [build@kbuild-john ~]$ ps -a -ubuild -o ...
- Server:www121 Server:www120 Server:NWS_SP
Request URL:http://www.biyao.com/minisite/bzzx Request Method:GET Status Code:200 OK Remote Address: ...
- [troubleshoot][archliunx][chromium][flash] chrome提示flash不是最新
最近chrome总是在提示flash不是最新要求更新. 原来以前用的flash包 chromium-pepper-flash 不见了,改名变成了pepper-flash. /home/tong [to ...
- Flink - StreamJob
先看最简单的例子, final StreamExecutionEnvironment env = StreamExecutionEnvironment.getExecutionEnvironmen ...
- 转:eval(data)和eval("("+data+")")
http://www.w3school.com.cn/jsref/jsref_eval.asp JavaScript eval() 函数:eval() 函数可计算某个字符串,并执行其中的的 JavaS ...