Shiro笔记(二)身份验证
Shiro笔记(二)身份验证
一、核心代码
 @Test

     public void helloWorldTest(){

         IniSecurityManagerFactory factory =

                 new IniSecurityManagerFactory("classpath:shiro-jdbc-realm.ini");

         SecurityManager manager = factory.getInstance();

        //全局设置,一次即可

         SecurityUtils.setSecurityManager(manager);

         Subject subject = SecurityUtils.getSubject();

         UsernamePasswordToken token =

                 new UsernamePasswordToken("Peter", "123");

         try{

                subject.login(token);

             }catch (AuthenticationException e){

                 e.printStackTrace();

             }

         Assert.assertEquals(true,subject.isAuthenticated());

         //退出登录

         subject.logout();
shiro.ini文件:
[users]

Peter=

Tom=
二、身份认证流程:
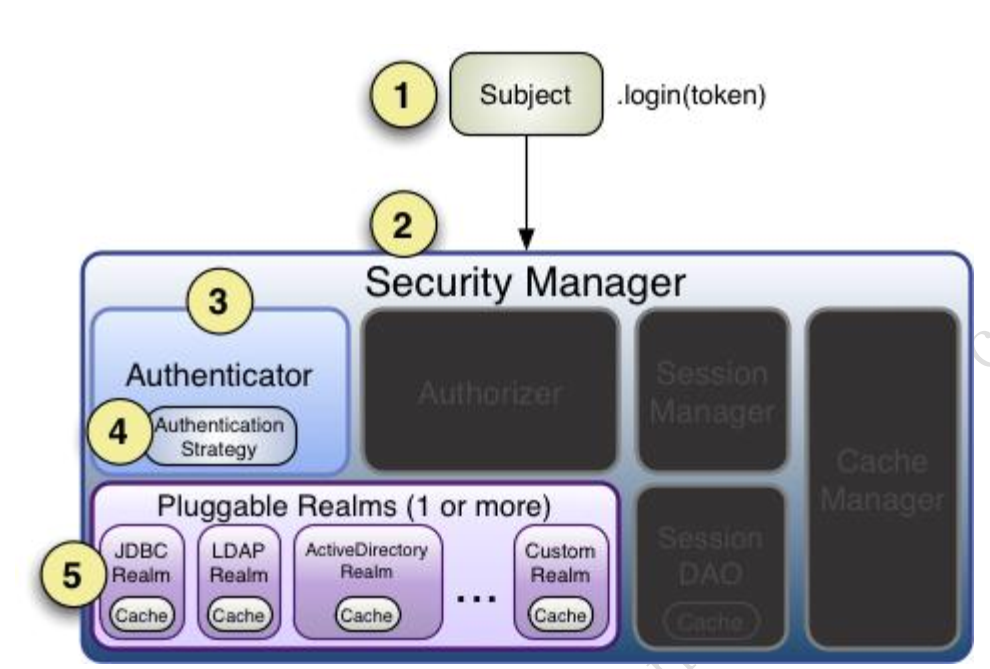
Authenticator 可能会委托给相应的 AuthenticationStrategy 进行多 Realm 身份验证,默认
ModularRealmAuthenticator 会调用 AuthenticationStrategy 进行多 Realm 身份验证;
Authenticator 会把相应的 token 传入 Realm,从 Realm 获取身份验证信息
三、Realm
Shiro 从从 Realm 获取安全数据(如用户、角色、权限)
Reaml接口:
 public interface Realm {

     //获得唯一的名字

     String getName();

     //判断此realm是否支持此token

     boolean supports(AuthenticationToken token);

     //获取token认证信息

     AuthenticationInfo getAuthenticationInfo(AuthenticationToken token) throws AuthenticationException;

 }
一)单Realm配置
 public class MyRealm implements Realm{

     public String getName() {

         return "myRealm";

     }

     public boolean supports(AuthenticationToken authenticationToken) {

         //仅支持UsernamePasswordToken类型

         return authenticationToken instanceof UsernamePasswordToken;

     }

     public AuthenticationInfo getAuthenticationInfo(AuthenticationToken token) throws AuthenticationException {

         //获取用户名

         String username= (String) token.getPrincipal();

         //获取密码

         String password=new String((char[]) token.getCredentials());

         if(!"Peter".equals(username)){

             throw new UnknownAccountException();

         }

         if(!"123".equals(password)){

             throw new IncorrectCredentialsException();

         }

         return new SimpleAuthenticationInfo(username,password,getName());

     }

 }
ini文件指定:
 myRealm=com.tang.shirotest.LoginLogoutTest

 securityManager.realms=$myRealm
二)JDBC Realm的使用
 [main]

 jdbcRealm=org.apache.shiro.realm.jdbc.JdbcRealm

 dataSource=com.alibaba.druid.pool.DruidDataSource

 dataSource.driverClassName=com.mysql.jdbc.Driver

 dataSource.url=jdbc:mysql://localhost:3306/shiro

 dataSource.username=root

 dataSource.password=jiapi1990

 jdbcRealm.dataSource=$dataSource

 securityManager.realms=$jdbcRealm
三)Authenticator及AuthenticationStrategy
Authenticator的职责是验证用户账号,接口为:
public interface Authenticator {

    AuthenticationInfo authenticate(AuthenticationToken var1) throws AuthenticationException;

}
SecurityManager 接口继承了 Authenticator,另外还有一个 ModularRealmAuthenticator 实现,
其委托给多个 Realm 进行验证,验证规则通过 AuthenticationStrategy 接口指定,默认提供
的实现:
FirstSuccessfulStrategy:只要有一个 Realm 验证成功即可,只返回第一个 Realm 身份验证
成功的认证信息,其他的忽略;
AtLeastOneSuccessfulStrategy:只要有一个 Realm 验证成功即可,和 FirstSuccessfulStrategy
不同,返回所有 Realm 身份验证成功的认证信息;
AllSuccessfulStrategy:所有 Realm 验证成功才算成功,且返回所有 Realm 身份验证成功的
认证信息,如果有一个失败就失败了
ModularRealmAuthenticator 默认使用 AtLeastOneSuccessfulStrategy 策略。
ini文件:
 #指定 securityManager 的 authenticator 实现

 authenticator=org.apache.shiro.authc.pam.ModularRealmAuthenticator

 securityManager.authenticator=$authenticator

 #指定 securityManager.authenticator 的 authenticationStrategy

 allSuccessfulStrategy=org.apache.shiro.authc.pam.AllSuccessfulStrategy

 securityManager.authenticator.authenticationStrategy=$allSuccessfulStrategy

 myRealm1=com.github.zhangkaitao.shiro.chapter2.realm.MyRealm1

 myRealm2=com.github.zhangkaitao.shiro.chapter2.realm.MyRealm2

 myRealm3=com.github.zhangkaitao.shiro.chapter2.realm.MyRealm3

 securityManager.realms=$myRealm1,$myRealm3
AuthenticationStrategy接口:
 public interface AuthenticationStrategy {

     //在所有 Realm 验证之前调用

     AuthenticationInfo beforeAllAttempts(Collection<? extends Realm> realms, AuthenticationToken token) throws AuthenticationException;

     //在每个 Realm 之前调用

     AuthenticationInfo beforeAttempt(Realm realm, AuthenticationToken token, AuthenticationInfo aggregate) throws AuthenticationException;

     //在每个 Realm 之后调用

     AuthenticationInfo afterAttempt(Realm realm, AuthenticationToken token, AuthenticationInfo singleRealmInfo, AuthenticationInfo aggregateInfo, Throwable t)

             throws AuthenticationException;

     ////在所有 Realm 之后调用

     AuthenticationInfo afterAllAttempts(AuthenticationToken token, AuthenticationInfo aggregate) throws AuthenticationException;

 }
自定义实现:
 public class AtLeastTwoAuthenticatorStrategy extends AbstractAuthenticationStrategy {

     @Override

     public AuthenticationInfo beforeAllAttempts(Collection<? extends Realm> realms, AuthenticationToken token) throws AuthenticationException {

         return new SimpleAuthenticationInfo();//返回一个权限的认证信息

     }

     @Override

     public AuthenticationInfo beforeAttempt(Realm realm, AuthenticationToken token, AuthenticationInfo aggregate) throws AuthenticationException {

         return aggregate;//返回之前合并的

     }

     @Override

     public AuthenticationInfo afterAttempt(Realm realm, AuthenticationToken token, AuthenticationInfo singleRealmInfo, AuthenticationInfo aggregateInfo, Throwable t) throws AuthenticationException {

         AuthenticationInfo info;

         if (singleRealmInfo == null) {

             info = aggregateInfo;

         } else {

             if (aggregateInfo == null) {

                 info = singleRealmInfo;

             } else {

                 info = merge(singleRealmInfo, aggregateInfo);

             }

         }

         return info;

     }

     @Override

     public AuthenticationInfo afterAllAttempts(AuthenticationToken token, AuthenticationInfo aggregate) throws AuthenticationException {

         if (aggregate == null || CollectionUtils.isEmpty(aggregate.getPrincipals()) || aggregate.getPrincipals().getRealmNames().size() < 2) {

             throw new AuthenticationException("Authentication token of type [" + token.getClass() + "] " +

                     "could not be authenticated by any configured realms.  Please ensure that at least two realm can " +

                     "authenticate these tokens.");

         }

         return aggregate;

     }

 }
Shiro笔记(二)身份验证的更多相关文章
- Shiro学习之身份验证
身份验证,即在应用中谁能证明他就是他本人.一般提供如他们的身份ID一些标识信息来表明他就是他本人,如提供身份证,用户名/密码来证明. 在shiro中,用户需要提供principals (身份)和cre ...
- Shiro:学习笔记(1)——身份验证
Shiro——学习笔记(1) 1.核心概念 1.Shiro不会自己去维护用户.维护权限:这些需要我们自己去设计/提供:然后通过相应的接口注入给Shiro.2.应用代码直接交互的对象是Subject,也 ...
- 【二】shiro入门 之 身份验证
大体步骤如下: 1.首先通过new IniSecurityManagerFactory 并指定一个ini 配置文件来创建一个SecurityManager工厂: 2.接着获取SecurityManag ...
- Shiro -- (二) 身份验证基本流程
简介: 在 shiro 中,用户需要提供 principals (身份)和 credentials(证明)给 shiro,从而应用能验证用户身份: principals:身份,即主体的标识属性,可以是 ...
- shiro 简单的身份验证 案例
Apache Shiro是Java的一个安全框架,Shiro可以帮助我们完成:认证.授权.加密.会话管理.与Web集成.缓存等. 简单的身份验证 项目目录: 首先,在shiro.ini里配置了用户名和 ...
- shiro系列二、身份验证和授权
一.身份验证 先来看看身份验证的流程 流程如下: 1.首先调用Subject.login(token)进行登录,其会自动委托给Security Manager,调用之前必须通过SecurityUtil ...
- 跟开涛老师学shiro -- 身份验证
身份验证,即在应用中谁能证明他就是他本人.一般提供如他们的身份ID一些标识信息来表明他就是他本人,如提供身份证,用户名/密码来证明. 在shiro中,用户需要提供principals (身份)和cre ...
- 第二章:shiro身份验证
身份验证,即在应用中谁能证明他就是他本人.一般提供如他们的身份ID一些标识信息来表明他就是他本人,如提供身份证,用户名/密码来证明. 在shiro中,用户需要提供principals (身份)和cre ...
- shiro身份验证
身份验证,即在应用中谁能证明他就是他本人.一般提供如他们的身份ID一些标识信息来表明他就是他本人,如提供身份证,用户名/密码来证明. 在shiro中,用户需要提供principals (身份)和cre ...
- 第二章 身份验证——《跟我学Shiro》
转发:https://www.iteye.com/blog/jinnianshilongnian-2019547 目录贴:跟我学Shiro目录贴 身份验证,即在应用中谁能证明他就是他本人.一般提供如他 ...
随机推荐
- 【Shell】获取当前路径
bathpath=$(cd dirname $0 ; pwd)
- STM32F103X datasheet学习笔记---DMA
1.前言 直接存储器存取(DMA)用来提供在外设和存储器之间或者存储器和存储器之间的高速数据传输. 无须CPU干预,数据可以通过DMA快速地移动,这就节省了CPU的资源来做其他操作. 两个DMA控制器 ...
- linux内核驱动中对字符串的操作【转】
转自:http://www.360doc.com/content/12/1224/10/3478092_255969530.shtml Linux内核中关于字符串的相关操作,首先包含头文件: #inc ...
- 028_rync和inotify实现实时备份
一.服务节点安装inotify-tools. 确保系统后以下输出=> [root@xxxx]# ll /proc/sys/fs/inotify/ total 0 -rw-r--r-- 1 roo ...
- QQ空间说说如何批量删除
事件背景: 今天突发奇想,想把自己之前发的说说都删除了,结果就有了下面的代码 1.按F12 2.点击 Console,进入Console项 3.使用以下代码: var delay = 1000; fu ...
- jquery之data()
$("#test").data("myProp","123") alert($("#test").data(" ...
- Python源码学习(一)
考虑到性能的要求,我在工作中用的最多的是c/c++,然而,工作中又经常会有一些验证性的工作,这些工作对性能的要求并不高,反而对完成的效率要求更高,对于这样的工作,用一种开发效率高的语言是合理的想法,鉴 ...
- UVA101 【The Blocks Problem】
一个大模拟!!! 总的来说就是碰到move就要把a上面的全部放回原处. 如果碰到onto就要把b上面的全部放到原处. 因为move是只移动a一个,所以a上面的要归位,而pile是移一堆,所以不用. o ...
- python的开发环境配置-Eclipse-PyDev插件安装
安装PyDev插件的两种安装方法: 1.百度搜索PyDev 2.4.0.zip,下载后解压,得到Plugins和Feature文件夹,复制两文件夹到Eclipse目录,覆盖即可. 插件的版本要对应py ...
- hdu5178 尺取
会爆int /* 给定数轴上一些点对,问有多少点对之间的距离差不超过k 点对排序后尺取法:枚举每个左边界,找到一个右边界使得 */ #include<bits/stdc++.h> #def ...