ActiveMQ整合spring、同步索引库
1. Activemq整合spring
1.1. 使用方法
第一步:引用相关的jar包。
|
<dependency> <groupId>org.springframework</groupId> <artifactId>spring-jms</artifactId> </dependency> <dependency> <groupId>org.springframework</groupId> <artifactId>spring-context-support</artifactId> </dependency> |
第二步:配置Activemq整合spring。配置ConnectionFactory
|
<?xml version="1.0" encoding="UTF-8"?> <beans xmlns="http://www.springframework.org/schema/beans" xmlns:context="http://www.springframework.org/schema/context" xmlns:p="http://www.springframework.org/schema/p" xmlns:aop="http://www.springframework.org/schema/aop" xmlns:tx="http://www.springframework.org/schema/tx" xmlns:xsi="http://www.w3.org/2001/XMLSchema-instance" xsi:schemaLocation="http://www.springframework.org/schema/beans http://www.springframework.org/schema/beans/spring-beans-4.2.xsd http://www.springframework.org/schema/context http://www.springframework.org/schema/context/spring-context-4.2.xsd http://www.springframework.org/schema/aop http://www.springframework.org/schema/aop/spring-aop-4.2.xsd http://www.springframework.org/schema/tx http://www.springframework.org/schema/tx/spring-tx-4.2.xsd http://www.springframework.org/schema/util http://www.springframework.org/schema/util/spring-util-4.2.xsd"> <!-- 真正可以产生Connection的ConnectionFactory,由对应的 JMS服务厂商提供 --> <bean id="targetConnectionFactory" class="org.apache.activemq.ActiveMQConnectionFactory"> <property name="brokerURL" value="tcp://192.168.25.168:61616" /> </bean> <!-- Spring用于管理真正的ConnectionFactory的ConnectionFactory --> <bean id="connectionFactory" class="org.springframework.jms.connection.SingleConnectionFactory"> <!-- 目标ConnectionFactory对应真实的可以产生JMS Connection的ConnectionFactory --> <property name="targetConnectionFactory" ref="targetConnectionFactory" /> </bean> </beans> |
第三步:配置生产者。
使用JMSTemplate对象。发送消息。
第四步:在spring容器中配置Destination。
|
<?xml version="1.0" encoding="UTF-8"?> <beans xmlns="http://www.springframework.org/schema/beans" xmlns:context="http://www.springframework.org/schema/context" xmlns:p="http://www.springframework.org/schema/p" xmlns:aop="http://www.springframework.org/schema/aop" xmlns:tx="http://www.springframework.org/schema/tx" xmlns:xsi="http://www.w3.org/2001/XMLSchema-instance" xsi:schemaLocation="http://www.springframework.org/schema/beans http://www.springframework.org/schema/beans/spring-beans-4.2.xsd http://www.springframework.org/schema/context http://www.springframework.org/schema/context/spring-context-4.2.xsd http://www.springframework.org/schema/aop http://www.springframework.org/schema/aop/spring-aop-4.2.xsd http://www.springframework.org/schema/tx http://www.springframework.org/schema/tx/spring-tx-4.2.xsd http://www.springframework.org/schema/util http://www.springframework.org/schema/util/spring-util-4.2.xsd"> <!-- 真正可以产生Connection的ConnectionFactory,由对应的 JMS服务厂商提供 --> <bean id="targetConnectionFactory" class="org.apache.activemq.ActiveMQConnectionFactory"> <property name="brokerURL" value="tcp://192.168.25.168:61616" /> </bean> <!-- Spring用于管理真正的ConnectionFactory的ConnectionFactory --> <bean id="connectionFactory" class="org.springframework.jms.connection.SingleConnectionFactory"> <!-- 目标ConnectionFactory对应真实的可以产生JMS Connection的ConnectionFactory --> <property name="targetConnectionFactory" ref="targetConnectionFactory" /> </bean> <!-- 配置生产者 --> <!-- Spring提供的JMS工具类,它可以进行消息发送、接收等 --> <bean id="jmsTemplate" class="org.springframework.jms.core.JmsTemplate"> <!-- 这个connectionFactory对应的是我们定义的Spring提供的那个ConnectionFactory对象 --> <property name="connectionFactory" ref="connectionFactory" /> </bean> <!--这个是队列目的地,点对点的 --> <bean id="queueDestination" class="org.apache.activemq.command.ActiveMQQueue"> <constructor-arg> <value>spring-queue</value> </constructor-arg> </bean> <!--这个是主题目的地,一对多的 --> <bean id="topicDestination" class="org.apache.activemq.command.ActiveMQTopic"> <constructor-arg value="topic" /> </bean> </beans> |
第五步:代码测试
|
@Test public void testSpringActiveMq() throws Exception { //初始化spring容器 ApplicationContext applicationContext = new ClassPathXmlApplicationContext("classpath:spring/applicationContext-activemq.xml"); //从spring容器中获得JmsTemplate对象 JmsTemplate jmsTemplate = applicationContext.getBean(JmsTemplate.class); //从spring容器中取Destination对象 Destination destination = (Destination) applicationContext.getBean("queueDestination"); //使用JmsTemplate对象发送消息。 jmsTemplate.send(destination, new MessageCreator() { @Override public Message createMessage(Session session) throws JMSException { //创建一个消息对象并返回 TextMessage textMessage = session.createTextMessage("spring activemq queue message"); return textMessage; } }); } |
1.2. 代码测试
1.2.1. 发送消息
第一步:初始化一个spring容器
第二步:从容器中获得JMSTemplate对象。
第三步:从容器中获得一个Destination对象
第四步:使用JMSTemplate对象发送消息,需要知道Destination
|
@Test public void testQueueProducer() throws Exception { // 第一步:初始化一个spring容器 ApplicationContext applicationContext = new ClassPathXmlApplicationContext("classpath:spring/applicationContext-activemq.xml"); // 第二步:从容器中获得JMSTemplate对象。 JmsTemplate jmsTemplate = applicationContext.getBean(JmsTemplate.class); // 第三步:从容器中获得一个Destination对象 Queue queue = (Queue) applicationContext.getBean("queueDestination"); // 第四步:使用JMSTemplate对象发送消息,需要知道Destination jmsTemplate.send(queue, new MessageCreator() { @Override public Message createMessage(Session session) throws JMSException { TextMessage textMessage = session.createTextMessage("spring activemq test"); return textMessage; } }); } |
1.2.2. 接收消息
e3-search-Service中接收消息。
第一步:把Activemq相关的jar包添加到工程中
第二步:创建一个MessageListener的实现类。
|
public class MyMessageListener implements MessageListener { @Override public void onMessage(Message message) { try { TextMessage textMessage = (TextMessage) message; //取消息内容 String text = textMessage.getText(); System.out.println(text); } catch (JMSException e) { e.printStackTrace(); } } } |
第三步:配置spring和Activemq整合。
|
<?xml version="1.0" encoding="UTF-8"?> <beans xmlns="http://www.springframework.org/schema/beans" xmlns:context="http://www.springframework.org/schema/context" xmlns:p="http://www.springframework.org/schema/p" xmlns:aop="http://www.springframework.org/schema/aop" xmlns:tx="http://www.springframework.org/schema/tx" xmlns:xsi="http://www.w3.org/2001/XMLSchema-instance" xsi:schemaLocation="http://www.springframework.org/schema/beans http://www.springframework.org/schema/beans/spring-beans-4.2.xsd http://www.springframework.org/schema/context http://www.springframework.org/schema/context/spring-context-4.2.xsd http://www.springframework.org/schema/aop http://www.springframework.org/schema/aop/spring-aop-4.2.xsd http://www.springframework.org/schema/tx http://www.springframework.org/schema/tx/spring-tx-4.2.xsd http://www.springframework.org/schema/util http://www.springframework.org/schema/util/spring-util-4.2.xsd"> <!-- 真正可以产生Connection的ConnectionFactory,由对应的 JMS服务厂商提供 --> <bean id="targetConnectionFactory" class="org.apache.activemq.ActiveMQConnectionFactory"> <property name="brokerURL" value="tcp://192.168.25.168:61616" /> </bean> <!-- Spring用于管理真正的ConnectionFactory的ConnectionFactory --> <bean id="connectionFactory" class="org.springframework.jms.connection.SingleConnectionFactory"> <!-- 目标ConnectionFactory对应真实的可以产生JMS Connection的ConnectionFactory --> <property name="targetConnectionFactory" ref="targetConnectionFactory" /> </bean> <!--这个是队列目的地,点对点的 --> <bean id="queueDestination" class="org.apache.activemq.command.ActiveMQQueue"> <constructor-arg> <value>spring-queue</value> </constructor-arg> </bean> <!--这个是主题目的地,一对多的 --> <bean id="topicDestination" class="org.apache.activemq.command.ActiveMQTopic"> <constructor-arg value="topic" /> </bean> <!-- 接收消息 --> <!-- 配置监听器 --> <bean id="myMessageListener" class="cn.e3mall.search.listener.MyMessageListener" /> <!-- 消息监听容器 --> <bean class="org.springframework.jms.listener.DefaultMessageListenerContainer"> <property name="connectionFactory" ref="connectionFactory" /> <property name="destination" ref="queueDestination" /> <property name="messageListener" ref="myMessageListener" /> </bean> </beans> |
第四步:测试代码。
|
@Test public void testQueueConsumer() throws Exception { //初始化spring容器 ApplicationContext applicationContext = new ClassPathXmlApplicationContext("classpath:spring/applicationContext-activemq.xml"); //等待 System.in.read(); } |
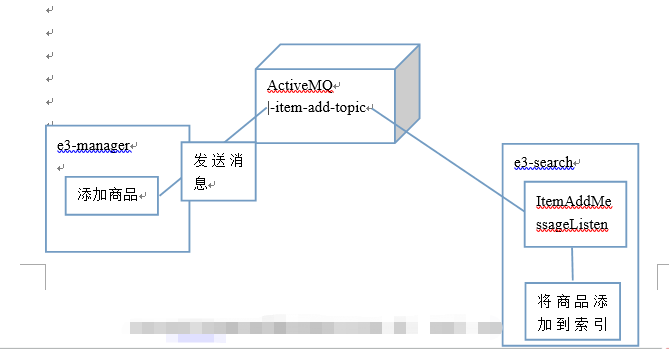
2. 添加商品同步索引库
2.1. Producer
e3-manager-server工程中发送消息。
当商品添加完成后发送一个TextMessage,包含一个商品id。
|
@Override public e3Result addItem(TbItem item, String desc) { // 1、生成商品id final long itemId = IDUtils.genItemId(); // 2、补全TbItem对象的属性 item.setId(itemId); //商品状态,1-正常,2-下架,3-删除 item.setStatus((byte) 1); Date date = new Date(); item.setCreated(date); item.setUpdated(date); // 3、向商品表插入数据 itemMapper.insert(item); // 4、创建一个TbItemDesc对象 TbItemDesc itemDesc = new TbItemDesc(); // 5、补全TbItemDesc的属性 itemDesc.setItemId(itemId); itemDesc.setItemDesc(desc); itemDesc.setCreated(date); itemDesc.setUpdated(date); // 6、向商品描述表插入数据 itemDescMapper.insert(itemDesc); //发送一个商品添加消息 jmsTemplate.send(topicDestination, new MessageCreator() { @Override public Message createMessage(Session session) throws JMSException { TextMessage textMessage = session.createTextMessage(itemId + ""); return textMessage; } }); // 7、e3Result.ok() return e3Result.ok(); } |
2.2. Consumer
2.2.1. 功能分析
1、接收消息。需要创建MessageListener接口的实现类。
2、取消息,取商品id。
3、根据商品id查询数据库。
4、创建一SolrInputDocument对象。
5、使用SolrServer对象写入索引库。
6、返回成功,返回e3Result。
2.2.2. Dao层
根据商品id查询商品信息。
映射文件:
|
<select id="getItemById" parameterType="long" resultType="cn.e3mall.common.pojo.SearchItem"> SELECT a.id, a.title, a.sell_point, a.price, a.image, b. NAME category_name, c.item_desc FROM tb_item a JOIN tb_item_cat b ON a.cid = b.id JOIN tb_item_desc c ON a.id = c.item_id WHERE a.status = 1 AND a.id=#{itemId} </select> |
2.2.3. Service层
参数:商品ID
业务逻辑:
1、根据商品id查询商品信息。
2、创建一SolrInputDocument对象。
3、使用SolrServer对象写入索引库。
4、返回成功,返回e3Result。
返回值:e3Result
|
public e3Result addDocument(long itemId) throws Exception { // 1、根据商品id查询商品信息。 SearchItem searchItem = searchItemMapper.getItemById(itemId); // 2、创建一SolrInputDocument对象。 SolrInputDocument document = new SolrInputDocument(); // 3、使用SolrServer对象写入索引库。 document.addField("id", searchItem.getId()); document.addField("item_title", searchItem.getTitle()); document.addField("item_sell_point", searchItem.getSell_point()); document.addField("item_price", searchItem.getPrice()); document.addField("item_image", searchItem.getImage()); document.addField("item_category_name", searchItem.getCategory_name()); document.addField("item_desc", searchItem.getItem_desc()); // 5、向索引库中添加文档。 solrServer.add(document); solrServer.commit(); // 4、返回成功,返回e3Result。 return e3Result.ok(); } |
2.2.4. Listener
|
public class ItemChangeListener implements MessageListener { @Autowired private SearchItemServiceImpl searchItemServiceImpl; @Override public void onMessage(Message message) { try { TextMessage textMessage = null; Long itemId = null; //取商品id if (message instanceof TextMessage) { textMessage = (TextMessage) message; itemId = Long.parseLong(textMessage.getText()); } //向索引库添加文档 searchItemServiceImpl.addDocument(itemId); } catch (Exception e) { e.printStackTrace(); } } } |
2.2.5. Spring配置监听

2.2.6. 实现流程
ActiveMQ整合spring、同步索引库的更多相关文章
- JAVAEE——宜立方商城09:Activemq整合spring的应用场景、添加商品同步索引库、商品详情页面动态展示与使用缓存
1. 学习计划 1.Activemq整合spring的应用场景 2.添加商品同步索引库 3.商品详情页面动态展示 4.展示详情页面使用缓存 2. Activemq整合spring 2.1. 使用方法 ...
- 淘淘商城项目_同步索引库问题分析 + ActiveMQ介绍/安装/使用 + ActiveMQ整合spring + 使用ActiveMQ实现添加商品后同步索引库_匠心笔记
文章目录 1.同步索引库问题分析 2.ActiveM的介绍 2.1.什么是ActiveMQ 2.2.ActiveMQ的消息形式 3.ActiveMQ的安装 3.1.安装环境 3.2.安装步骤 4.Ac ...
- 商城08——activeMQ 使用消息队列同步索引库
1. 课程计划 1.什么是MQ 2.MQ的应用场景 3.ActiveMQ的使用方法. 4.使用消息队列实现商品同步. 2. 同步索引库分析 方案一:在taotao-manager中,添加商品的业务 ...
- e3mall商城的归纳总结9之activemq整合spring、redis的缓存
敬给读者 本节主要给大家说一下activemq整合spring,该如何进行配置,上一节我们说了activemq的搭建和测试(单独测试),想看的可以点击时空隧道前去查看.讲完了之后我们还说一说在项目中使 ...
- 应用activeMQ消息中间件同步索引库
mq是一个消息服务器: 安装包内置了tomcat,直接登录访问,登录:http://ip:8161/admin/ (相当于dubbo的moniter监控中心) admin admin传统串行化, ...
- ActiveMQ学习笔记(6)----ActiveMQ整合Spring开发
1. 添加依赖 spring 提供了对JMS的支持,需要添加Spring支持jms的包和Spring的核心包,如下: <dependency> <groupId>org.apa ...
- ActiveMQ整合spring结合项目开发流程(生产者和消费者)总结
一:生产者代码编写: 1.配置pom.xml引入相关坐标 <dependencies> <!-- spring开发测试 --> <dependency> <g ...
- ActiveMQ 整合 spring
一.添加 jar 包 <dependency> <groupId>org.apache.activemq</groupId> <artifactId>a ...
- activemq整合spring
随机推荐
- Java知多少(53)使用Java创建自己的异常子类
尽管Java的内置异常处理大多数常见错误,你也许希望建立你自己的异常类型来处理你所应用的特殊情况.这是非常简单的:只要定义Exception的一个子类就可以了(Exception当然是Throwabl ...
- 大数据基础篇----jvm的知识点归纳-5个区和垃圾回收机制
一直对jvm看了又忘,忘了又看的.今天做一个笔记整理存放在这里. 我们先看一下JVM的内存模型图: 上面有5个区,这5个区干嘛用的呢? 我们想象一个场景: 我们有一个class文件,里面有很多的类的定 ...
- C# winform写入和读取TXT文件
C# winform写入和读取TXT文件 string str; str=this.textBox1.Text; StreamWriter sw = new ...
- [Full-stack] 异步即时通信 - Async
故事背景 socket.io, node.js, koa为首的一些通信框架和后端技术点. 之后有必要过一遍<NodeJS 设计模式>. 基础概念 一.短轮询.长轮询(comet).长连接( ...
- iOS Xcode, 解决“Could not insert new outlet connection”的问题。
在Xcode中,我们能够在StoryBoard编辑界面或者是xib编辑界面中通过"Control键+拖拽"的方式将某个界面元素和相应的代码文件连接起来,在代码文件里创建outlet ...
- C语言的标准库和系统调用
http://blog.csdn.net/yusiguyuan/article/details/23181327 Linux系统调用这部分经常出现两个词:libc库和封装函数,不知道你是否清楚它们的含 ...
- Matlab 瑞利信道仿真
转眼间三月都已经过去一半,一直找不到有什么可以写的,一直想等自己把LTE仿真平台搭好后,再以连载的形式记录下来.但是,后来一想,我必须先做好充分的铺垫,在这过程中也遇到了很多问题,及时留下点什么,也是 ...
- nginx关闭目录浏览功能
nginx图片服务器,因为图片的敏感度,不允许直接访问图片的目录: 需要修改配置文件,去掉 autoindex on; 重启nginx即可 location /soft { #autoindex on ...
- chrome调试创建sq设备进行调试
工作中开发基于手机qq的webapp页面时,通常开发会对页面进行限制让用户通过手机qq访问,进行引导,如下图所示. 很多时候我们开发只是在手机展示,而在pc端进行调试,当开发加了这一层限制之后,就会导 ...
- java连接数据库的基本操作
ResultSet保存查询的table数据,就像mysql的客户端显示的查询类容,但这中间还是藏有很多信息.