NoSQL(三)
redis集群介绍

1.官方叫cluster,redis3.0才直接的一个架构,如果数据量很大,单台机器已经无法满足存储,查询的瓶颈,所以我们需要多台机器构成一个大集群,用来解决存储空间,查询速度,负载高瓶颈问题,redis cluster是一个分布式的集群,支持横向扩展
redis集群搭建配置
1.redis cluster需要ruby2.2版本的支持,我们系统默认带的ruby是2.0的不能用,需要自己安装2.2的
[root@centos-02 ~]# yum list|grep ruby

ruby.x86_64                               2.0.0.648-33.el7_4           updates
2.安装开发工具包
[root@centos-02 ~]# yum groupinstall -y "development tools"
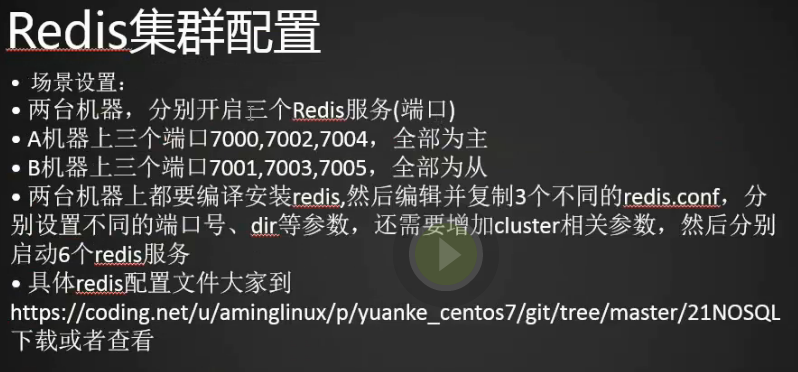
3.准备两台机器分别开启三个redis服务(端口),A机器上三个端口7000,7002,7004全部为主,B机器上三个端口7001,7003,7005全部为从,两个机器上都要编译安装redis,然后编辑并复制3个不同的redis.conf,分别设置不同的端口号,dir等参数,还需要增加cluster相关参数,然后分别启动6个redis服务。https://coding.net/u/aminglinux/p/yuanke_centos7/git/tree/master/21NOSQL
4.centos02我们作为A机器,centos03我们作为B机器
[root@centos-02 ~]# vim /etc/redis_7000.conf

[root@centos-02 ~]#

port 7000

bind 192.168.133.88

daemonize yes

pidfile /var/run/redis_7000.pid

dir /data/redis_data/7000

cluster-enabled yes

cluster-config-file nodes_7000.conf

cluster-node-timeout 10100

appendonly yes
5.创建redis_7002.conf并编辑配置文件
[root@centos-02 ~]# cp /etc/redis_7000.conf /etc/redis_7002.conf

port 7002

bind 192.168.133.88

daemonize yes

pidfile /var/run/redis_7002.pid

dir /data/redis_data/7002

cluster-enabled yes

cluster-config-file nodes_7002.conf (这个配置文件可以自动生成)

cluster-node-timeout 10100

appendonly yes
6.同理创建redis_7004.conf并编辑配置文件
[root@centos-02 ~]# cp /etc/redis_7000.conf /etc/redis_7004.conf

[root@centos-02 ~]# vim /etc/redis_7004.conf

port 7004

bind 192.168.133.88

daemonize yes

pidfile /var/run/redis_7004.pid

dir /data/redis_data/7004

cluster-enabled yes

cluster-config-file nodes_7004.conf

cluster-node-timeout 10100

appendonly yes

~

:1,$s/7000/7004/g
7.B机器同样建立redis_7001,redis_7003,redis_7005
[root@centos-03 ~]# vim /etc/redis_7001.conf

[root@centos-03 ~]#

port 7001

bind 192.168.133.66

daemonize yes

pidfile /var/run/redis_7001.pid

dir /data/redis_data/7001

cluster-enabled yes

cluster-config-file nodes_7001.conf

cluster-node-timeout 10100

appendonly yes

[root@centos-03 ~]# cp /etc/redis_7001.conf /etc/redis_7003.conf

[root@centos-03 ~]# vim /etc/redis_7003.conf

[root@centos-03 ~]#

port 7003

bind 192.168.133.66

daemonize yes

pidfile /var/run/redis_7003.pid

dir /data/redis_data/7003

cluster-enabled yes

cluster-config-file nodes_7003.conf

cluster-node-timeout 10100

appendonly yes

[root@centos-03 ~]# cp /etc/redis_7001.conf /etc/redis_7005.conf

[root@centos-03 ~]# vim /etc/redis_7005.conf

port 7005

bind 192.168.133.66

daemonize yes

pidfile /var/run/redis_7005.pid

dir /data/redis_data/7005

cluster-enabled yes

cluster-config-file nodes_7005.conf

cluster-node-timeout 10100

appendonly yes
8.创建redis_data目录并创建
[root@centos-02 ~]# mkdir /data/redis_data

[root@centos-02 ~]# mkdir /data/redis_data/{7000,7002,7004} (同时创建三个目录)

[root@centos-02 ~]# ls /data/redis_data/700

7000/ 7002/ 7004/
9.同样我们在从服务器上也创建下7001,7003,7005
[root@centos-03 ~]# mkdir /data/redis_data

[root@centos-03 ~]# mkdir /data/redis_data/{7001,7003,7005}

[root@centos-03 ~]#
10.启动主上的redis
[root@centos-02 ~]# redis-server /etc/redis_7000.conf

24824:C 31 Mar 23:13:06.217 # oO0OoO0OoO0Oo Redis is starting oO0OoO0OoO0Oo

24824:C 31 Mar 23:13:06.221 # Redis version=4.0.8, bits=64, commit=00000000, modified=0, pid=24824, just started

24824:C 31 Mar 23:13:06.222 # Configuration loaded

[root@centos-02 ~]# redis-server /etc/redis_7002.conf

24829:C 31 Mar 23:13:20.722 # oO0OoO0OoO0Oo Redis is starting oO0OoO0OoO0Oo

24829:C 31 Mar 23:13:20.722 # Redis version=4.0.8, bits=64, commit=00000000, modified=0, pid=24829, just started

24829:C 31 Mar 23:13:20.723 # Configuration loaded

[root@centos-02 ~]# redis-server /etc/redis_7004.conf

24834:C 31 Mar 23:13:25.233 # oO0OoO0OoO0Oo Redis is starting oO0OoO0OoO0Oo

24834:C 31 Mar 23:13:25.239 # Redis version=4.0.8, bits=64, commit=00000000, modified=0, pid=24834, just started

24834:C 31 Mar 23:13:25.240 # Configuration loaded

[root@centos-02 ~]# ps aux|grep redis

root      12180  1.0  0.2 147312  2472 ?        Ssl  17:01   3:47 redis-server 127.0.0.1:6379

root      12704  0.9  0.2 147312  2456 ?        Ssl  17:51   3:05 redis-server 127.0.0.1:6380

root      24825  2.5  0.2 145268  2572 ?        Ssl  23:13   0:00 redis-server 192.168.133.88:7000 [cluster]

root      24830  3.7  0.2 145268  2572 ?        Ssl  23:13   0:00 redis-server 192.168.133.88:7002 [cluster]

root      24835  7.1  0.2 145268  2576 ?        Ssl  23:13   0:00 redis-server 192.168.133.88:7004 [cluster]

root      24840  6.0  0.0 112680   948 pts/2    R+   23:13   0:00 grep --color=auto redi

[root@centos-02 ~]#
11.从上安装redis,将主上的redis安装文件拷贝到从上
[root@centos-02 src]# scp -r redis-4.0.8 192.168.133.66:/usr/local/src/
12.我们把编译(在主上已经编译过了,编译过程其实就是生成这些二进制的文件,我们直接放到对应的位置上就可以了,也就是执行 make install)过的源码包拷贝过来直接执行make install
[root@centos-03 ~]# cd /usr/local/src/redis-4.0.8/

[root@centos-03 redis-4.0.8]# make install

cd src && make install

make[1]: 进入目录“/usr/local/src/redis-4.0.8/src”

Hint: It's a good idea to run 'make test' ;)

    INSTALL install

    INSTALL install

    INSTALL install

    INSTALL install

    INSTALL install

make[1]: 离开目录“/usr/local/src/redis-4.0.8/src”

[root@centos-03 redis-4.0.8]#
13.启动从上的redis
[root@centos-03 redis-4.0.8]# redis-server /etc/redis_7001.conf

2363:C 31 Mar 23:26:10.536 # oO0OoO0OoO0Oo Redis is starting oO0OoO0OoO0Oo

2363:C 31 Mar 23:26:10.537 # Redis version=4.0.8, bits=64, commit=00000000, modified=0, pid=2363, just started

2363:C 31 Mar 23:26:10.537 # Configuration loaded

[root@centos-03 redis-4.0.8]# redis-server /etc/redis_7003.conf

2368:C 31 Mar 23:26:25.299 # oO0OoO0OoO0Oo Redis is starting oO0OoO0OoO0Oo

2368:C 31 Mar 23:26:25.300 # Redis version=4.0.8, bits=64, commit=00000000, modified=0, pid=2368, just started

2368:C 31 Mar 23:26:25.300 # Configuration loaded

[root@centos-03 redis-4.0.8]# redis-server /etc/redis_7005.conf

2373:C 31 Mar 23:26:29.081 # oO0OoO0OoO0Oo Redis is starting oO0OoO0OoO0Oo

2373:C 31 Mar 23:26:29.081 # Redis version=4.0.8, bits=64, commit=00000000, modified=0, pid=2373, just started

2373:C 31 Mar 23:26:29.081 # Configuration loaded

[root@centos-03 redis-4.0.8]# ps aux|grep redis

root       2364  1.3  0.7 145256  7524 ?        Ssl  23:26   0:00 redis-server 192.168.133.66:7001 [cluster]

root       2369  1.3  0.7 145256  7528 ?        Ssl  23:26   0:00 redis-server 192.168.133.66:7003 [cluster]

root       2374  1.8  0.7 145256  7524 ?        Ssl  23:26   0:00 redis-server 192.168.133.66:7005 [cluster]

root       2379  0.0  0.0 112664   932 pts/0    R+   23:27   0:00 grep --color=auto redi

[root@centos-03 redis-4.0.8]#
14.查看下监听的端口
[root@centos-03 redis-4.0.8]# netstat -lntp

Active Internet connections (only servers)

Proto Recv-Q Send-Q Local Address           Foreign Address         State       PID/Program name

tcp        0      0 192.168.133.66:17003    0.0.0.0:*               LISTEN      2369/redis-server 1

tcp        0      0 192.168.133.66:17005    0.0.0.0:*               LISTEN      2374/redis-server 1

tcp        0      0 0.0.0.0:22              0.0.0.0:*               LISTEN      927/sshd

tcp        0      0 192.168.133.66:7001     0.0.0.0:*               LISTEN      2364/redis-server 1

tcp        0      0 127.0.0.1:25            0.0.0.0:*               LISTEN      1581/master

tcp        0      0 192.168.133.66:7003     0.0.0.0:*               LISTEN      2369/redis-server 1

tcp        0      0 192.168.133.66:7005     0.0.0.0:*               LISTEN      2374/redis-server 1

tcp        0      0 0.0.0.0:10050           0.0.0.0:*               LISTEN      905/zabbix_agentd

tcp        0      0 192.168.133.66:17001    0.0.0.0:*               LISTEN      2364/redis-server 1

tcp6       0      0 :::3306                 :::*                    LISTEN      1330/mysqld

tcp6       0      0 :::22                   :::*                    LISTEN      927/sshd

tcp6       0      0 ::1:25                  :::*                    LISTEN      1581/master

tcp6       0      0 :::10050                :::*                    LISTEN      905/zabbix_agentd

[root@centos-03 redis-4.0.8]#
15.记得关闭iptables和selinux
[root@centos-02 src]# iptables -nvL (查看iptables状态)

[root@centos-02 src]# getenforce  (查看selinux状态)

Disabled

[root@centos-02 src]#

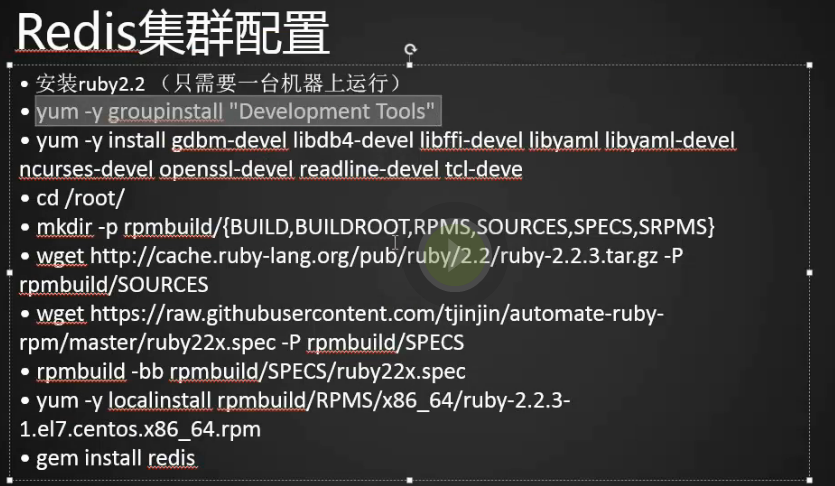
1.为了安装更高版本的ruby我们需要一下操作,yum是不带rpm包的,只能下载源码包,要么编译安装,要么把源码包搞成rpm包,现在我们把源码包搞成rpm包
[root@centos-02 src]# yum -y install gdbm-devel libdb4-devel libffi-devel libyaml libyaml-devel ncurses-devel openssl-devel readline-devel tcl-deve
2.创建将源码包搞成rpm包的几个目录
[root@centos-02 src]# cd /root/

[root@centos-02 ~]# mkdir -p rpmbuild/{BUILD,BUILDROOT,RPMS,SOURCES,SPECS,SRPMS}

[root@centos-02 ~]#
3.下载ruby的源码包
wget http://cache.ruby-lang.org/pub/ruby/2.2/ruby-2.2.3.tar.gz -P rpmbuild/SOURCES
4.下载spec的文件,没有它我们就没办法将它做成(rpmbuild)rpm包了
wget https://raw.githubusercontent.com/tjinjin/automate-ruby-rpm/master/ruby22x.spec -P rpmbuild/SPECS
5.编译并建rpm包
rpmbuild -bb rpmbuild/SPECS/ruby22x.spec
6.用rpm -ivh命令安装rpm包,如果想安装包的过程中将依赖包也装上用yum命令
[root@centos-02 ~]# rpm -ivh rpmbuild/RPMS/x86_64/ruby-2.2.3-1.el7.centos.x86_64.rpm
7.安装ruby和redis相关联的东西gem文件
[root@centos-02 ~]# ruby -v

ruby 2.2.3p173 (2015-08-18 revision 51636) [x86_64-linux]

[root@centos-02 ~]# gem install redis

Fetching: redis-4.0.1.gem (100%)

Successfully installed redis-4.0.1

Parsing documentation for redis-4.0.1

Installing ri documentation for redis-4.0.1

Done installing documentation for redis after 4 seconds

1 gem installed

[root@centos-02 ~]#
1.为了能直接运行redis-trib.rb命令我们将redis中的这个文件拷贝到/usr/bin/下
[root@centos-02 ~]# cp /usr/local/src/redis-4.0.8/src/redis-trib.rb /usr/bin/

[root@centos-02 ~]#
2.创建主存,我x成功了
[root@centos-02 ~]# redis-trib.rb create --replicas 1 192.168.133.88:7000 192.168.133.88:7002 192.168.133.88:7004 192.168.133.66:7001 192.168.133.66:7003 192.168.133.66:7005

>>> Creating cluster

>>> Performing hash slots allocation on 6 nodes...

Using 3 masters:

192.168.133.88:7000

192.168.133.66:7001

192.168.133.88:7002

Adding replica 192.168.133.66:7005 to 192.168.133.88:7000

Adding replica 192.168.133.88:7004 to 192.168.133.66:7001

Adding replica 192.168.133.66:7003 to 192.168.133.88:7002

M: 0af414244dc3a19031fa9e46e7a2fc0182427299 192.168.133.88:7000

   slots:0-5460 (5461 slots) master

M: ce0614a31fb607fb0d77132ae483499b91e23f12 192.168.133.88:7002

   slots:10923-16383 (5461 slots) master

S: 6d49712ec41f561a1e9e9b0d10821754745d814e 192.168.133.88:7004

   replicates 286c87c43e3f48c161c46f051e54fafaf288977e

M: 286c87c43e3f48c161c46f051e54fafaf288977e 192.168.133.66:7001

   slots:5461-10922 (5462 slots) master

S: 29164b1a5a53031f5f1bb73f39200cbb1e933adb 192.168.133.66:7003

   replicates ce0614a31fb607fb0d77132ae483499b91e23f12

S: 6d09687b05b8f07cab64803049884bf7384b4de9 192.168.133.66:7005

   replicates 0af414244dc3a19031fa9e46e7a2fc0182427299

Can I set the above configuration? (type 'yes' to accept): yes

>>> Nodes configuration updated

>>> Assign a different config epoch to each node

>>> Sending CLUSTER MEET messages to join the cluster

Waiting for the cluster to join........

>>> Performing Cluster Check (using node 192.168.133.88:7000)

M: 0af414244dc3a19031fa9e46e7a2fc0182427299 192.168.133.88:7000

   slots:0-5460 (5461 slots) master

   1 additional replica(s)

M: 286c87c43e3f48c161c46f051e54fafaf288977e 192.168.133.66:7001

   slots:5461-10922 (5462 slots) master

   1 additional replica(s)

S: 29164b1a5a53031f5f1bb73f39200cbb1e933adb 192.168.133.66:7003

   slots: (0 slots) slave

   replicates ce0614a31fb607fb0d77132ae483499b91e23f12

S: 6d49712ec41f561a1e9e9b0d10821754745d814e 192.168.133.88:7004

   slots: (0 slots) slave

   replicates 286c87c43e3f48c161c46f051e54fafaf288977e

M: ce0614a31fb607fb0d77132ae483499b91e23f12 192.168.133.88:7002

   slots:10923-16383 (5461 slots) master

   1 additional replica(s)

S: 6d09687b05b8f07cab64803049884bf7384b4de9 192.168.133.66:7005

   slots: (0 slots) slave

   replicates 0af414244dc3a19031fa9e46e7a2fc0182427299

[OK] All nodes agree about slots configuration.

>>> Check for open slots...

>>> Check slots coverage...

[OK] All 16384 slots covered.
redis集群操作
1.因为我们使用的集群,所以我们可以链接任意的端口(-c表示我们用集群的方式连)
[root@centos-02 ~]# redis-cli -c -h 192.168.133.88 -p 7000

192.168.133.88:7000>
2.创建一个key,我们发现它会将这个key重定向到7001端口上
192.168.133.88:7000> set key1 123

-> Redirected to slot [9189] located at 192.168.133.66:7001

OK

192.168.133.66:7001>
3.再创建一个key,它有到了7000端口上
192.168.133.66:7001> set key2 abc

-> Redirected to slot [4998] located at 192.168.133.88:7000

OK

192.168.133.88:7000>
4.这个没有提示,说明在本机创建了
192.168.133.88:7000> set key3 333

OK

192.168.133.88:7000>
5.又到了7002端口
192.168.133.88:7000> set key4 444

-> Redirected to slot [13120] located at 192.168.133.88:7002

OK

192.168.133.88:7002>
6.获取的方法是一样的
192.168.133.88:7002> get key3

-> Redirected to slot [935] located at 192.168.133.88:7000

"333"

192.168.133.88:7000> get key4

-> Redirected to slot [13120] located at 192.168.133.88:7002

"444"

192.168.133.88:7002>
7.查看集群状态
[root@centos-02 ~]# redis-trib.rb check 192.168.133.88:7000
8.列出节点
[root@centos-02 ~]# redis-cli -c -h 192.168.133.88 -p 7000

192.168.133.88:7000> CLUSTER NODES

286c87c43e3f48c161c46f051e54fafaf288977e 192.168.133.66:7001@17001 master - 0 1522515979900 4 connected 5461-10922

0af414244dc3a19031fa9e46e7a2fc0182427299 192.168.133.88:7000@17000 myself,master - 0 1522515979000 1 connected 0-5460

29164b1a5a53031f5f1bb73f39200cbb1e933adb 192.168.133.66:7003@17003 slave ce0614a31fb607fb0d77132ae483499b91e23f12 0 1522515978000 5 connected

6d49712ec41f561a1e9e9b0d10821754745d814e 192.168.133.88:7004@17004 slave 286c87c43e3f48c161c46f051e54fafaf288977e 0 1522515978000 4 connected

ce0614a31fb607fb0d77132ae483499b91e23f12 192.168.133.88:7002@17002 master - 0 1522515980000 2 connected 10923-16383

6d09687b05b8f07cab64803049884bf7384b4de9 192.168.133.66:7005@17005 slave 0af414244dc3a19031fa9e46e7a2fc0182427299 0 1522515980919 6 connected

192.168.133.88:7000>
9.查看集群信息
192.168.133.88:7000> CLUSTER INFO

cluster_state:ok

cluster_slots_assigned:16384

cluster_slots_ok:16384

cluster_slots_pfail:0

cluster_slots_fail:0

cluster_known_nodes:6

cluster_size:3

cluster_current_epoch:6

cluster_my_epoch:1

cluster_stats_messages_ping_sent:1163

cluster_stats_messages_pong_sent:1221

cluster_stats_messages_sent:2384

cluster_stats_messages_ping_received:1216

cluster_stats_messages_pong_received:1160

cluster_stats_messages_meet_received:5

cluster_stats_messages_received:2381

192.168.133.88:7000>
10.添加新节点会是主还是从呢?答案是主
[root@centos-03 etc]# cd /etc/

[root@centos-03 etc]# cp redis_7001.conf redis_7007.conf

[root@centos-03 etc]# vim redis_7007.conf

[root@centos-03 etc]#

port 7007

bind 192.168.133.66

daemonize yes

pidfile /var/run/redis_7007.pid

dir /data/redis_data/7007

cluster-enabled yes

cluster-config-file nodes_7007.conf

cluster-node-timeout 10100

appendonly yes

~

~

~

~

~

~

~

~

:1,$s/7001/7007/g
11.创建dir目录并启动7007端口的redis
[root@centos-03 etc]# mkdir /data/redis_data/7007

[root@centos-03 etc]# redis-server /etc/redis_7007.conf

4182:C 01 Apr 01:21:23.417 # oO0OoO0OoO0Oo Redis is starting oO0OoO0OoO0Oo

4182:C 01 Apr 01:21:23.418 # Redis version=4.0.8, bits=64, commit=00000000, modified=0, pid=4182, just started

4182:C 01 Apr 01:21:23.418 # Configuration loaded

[root@centos-03 etc]#
12.看看7007端口的redis是否加入
[root@centos-03 etc]# ps aux|grep redis

root       2364  1.0  0.9 147304  9784 ?        Ssl  3月31   1:13 redis-server 192.168.133.66:7001 [cluster]

root       2369  1.0  0.9 147304  9812 ?        Ssl  3月31   1:13 redis-server 192.168.133.66:7003 [cluster]

root       2374  1.0  0.9 147304  9808 ?        Ssl  3月31   1:13 redis-server 192.168.133.66:7005 [cluster]

root       4183  1.0  0.7 145256  7528 ?        Ssl  01:21   0:00 redis-server 192.168.133.66: [cluster]

root       4204  0.0  0.0 112668   928 pts/0    S+   01:22   0:00 grep --color=auto redi

[root@centos-03 etc]#
13.主上执行添加节点命令
192.168.133.88:7000> CLUSTER MEET 192.168.133.66 7007

OK

192.168.133.88:7000>
14.用cluster nodes查看结果,7007为主
192.168.133.88:7000> CLUSTER NODES

286c87c43e3f48c161c46f051e54fafaf288977e 192.168.133.66:7001@17001 master - 0 1522517161215 4 connected 5461-10922

0af414244dc3a19031fa9e46e7a2fc0182427299 192.168.133.88:7000@17000 myself,master - 0 1522517159000 1 connected 0-5460

29164b1a5a53031f5f1bb73f39200cbb1e933adb 192.168.133.66:7003@17003 slave ce0614a31fb607fb0d77132ae483499b91e23f12 0 1522517162234 5 connected

eada670e3fa1dac7f766571b91e9b68cb10d4659 192.168.133.66:7007@17007 master - 0 1522517160000 0 connected

6d49712ec41f561a1e9e9b0d10821754745d814e 192.168.133.88:7004@17004 slave 286c87c43e3f48c161c46f051e54fafaf288977e 0 1522517162132 4 connected

ce0614a31fb607fb0d77132ae483499b91e23f12 192.168.133.88:7002@17002 master - 0 1522517159000 2 connected 10923-16383

6d09687b05b8f07cab64803049884bf7384b4de9 192.168.133.66:7005@17005 slave 0af414244dc3a19031fa9e46e7a2fc0182427299 0 1522517161000 6 connected

192.168.133.88:7000>
15.在主上再弄一个7006看看是主还是从
[root@centos-02 ~]# cd /etc/

[root@centos-02 etc]# cp redis_7000.conf redis_7006.conf

[root@centos-02 etc]# vim redis_7006.conf

[root@centos-02 etc]#

port 7006

bind 192.168.133.88

daemonize yes

pidfile /var/run/redis_7006.pid

dir /data/redis_data/7006

cluster-enabled yes

cluster-config-file nodes_7006.conf

cluster-node-timeout 10100

appendonly yes
16.创建dir目录并启动7006
[root@centos-02 etc]# mkdir /data/redis_data/7006

[root@centos-02 etc]# redis-server /etc/redis_7006.conf

39950:C 01 Apr 01:31:47.131 # oO0OoO0OoO0Oo Redis is starting oO0OoO0OoO0Oo

39950:C 01 Apr 01:31:47.135 # Redis version=4.0.8, bits=64, commit=00000000, modified=0, pid=39950, just started

39950:C 01 Apr 01:31:47.135 # Configuration loaded

[root@centos-02 etc]#
17.将7006加入集群并查看节点信息,7006也是主,发现只要添加节点就是master,这样好像不太合理。
[root@centos-02 etc]# redis-cli -c -h 192.168.133.88 -p 7000

192.168.133.88:7000> CLUSTER MEET 192.168.133.88 7006

OK

192.168.133.88:7000> CLUSTER NODES

286c87c43e3f48c161c46f051e54fafaf288977e 192.168.133.66:7001@17001 master - 0 1522517604000 4 connected 5461-10922

0af414244dc3a19031fa9e46e7a2fc0182427299 192.168.133.88:7000@17000 myself,master - 0 1522517602000 1 connected 0-5460

c932ce9d4f8a4719734a5213e971c30bd8e3c3ed 192.168.133.88:7006@17006 master - 0 1522517603117 7 connected

29164b1a5a53031f5f1bb73f39200cbb1e933adb 192.168.133.66:7003@17003 slave ce0614a31fb607fb0d77132ae483499b91e23f12 0 1522517602097 5 connected

eada670e3fa1dac7f766571b91e9b68cb10d4659 192.168.133.66:7007@17007 master - 0 1522517603117 0 connected

6d49712ec41f561a1e9e9b0d10821754745d814e 192.168.133.88:7004@17004 slave 286c87c43e3f48c161c46f051e54fafaf288977e 0 1522517605137 4 connected

ce0614a31fb607fb0d77132ae483499b91e23f12 192.168.133.88:7002@17002 master - 0 1522517603000 2 connected 10923-16383

6d09687b05b8f07cab64803049884bf7384b4de9 192.168.133.66:7005@17005 slave 0af414244dc3a19031fa9e46e7a2fc0182427299 0 1522517604128 6 connected

192.168.133.88:7000>
18.将当前节点设置为指定节点的从,我们这里将刚加入的7006节点设置为7007的从
[root@centos-02 etc]# redis-cli -c -h 192.168.133.88 -p 7006

192.168.133.88:7006> CLUSTER REPLICATE eada670e3fa1dac7f766571b91e9b68cb10d4659 (对应7007节点的id)

OK

192.168.133.88:7006>
19.发现7006 为7007的从了
192.168.133.88:7006> CLUSTER NODES

c932ce9d4f8a4719734a5213e971c30bd8e3c3ed 192.168.133.88:7006@17006 myself,slave eada670e3fa1dac7f766571b91e9b68cb10d4659 0 1522518141000 7 connected

6d09687b05b8f07cab64803049884bf7384b4de9 192.168.133.66:7005@17005 slave 0af414244dc3a19031fa9e46e7a2fc0182427299 0 1522518141000 1 connected

0af414244dc3a19031fa9e46e7a2fc0182427299 192.168.133.88:7000@17000 master - 0 1522518143288 1 connected 0-5460

286c87c43e3f48c161c46f051e54fafaf288977e 192.168.133.66:7001@17001 master - 0 1522518142245 4 connected 5461-10922

ce0614a31fb607fb0d77132ae483499b91e23f12 192.168.133.88:7002@17002 master - 0 1522518141232 2 connected 10923-16383

6d49712ec41f561a1e9e9b0d10821754745d814e 192.168.133.88:7004@17004 slave 286c87c43e3f48c161c46f051e54fafaf288977e 0 1522518142145 4 connected

eada670e3fa1dac7f766571b91e9b68cb10d4659 192.168.133.66:7007@17007 master - 0 1522518142000 0 connected

29164b1a5a53031f5f1bb73f39200cbb1e933adb 192.168.133.66:7003@17003 slave ce0614a31fb607fb0d77132ae483499b91e23f12 0 1522518139000 2 connected

192.168.133.88:7006>
20.移除节点,我们移除7007发现不能移除,这个命令只能移除从节点,如果想移除主节点需要将主节点先设置为某个节点的从节点,然后再移除。
192.168.133.88:7006> CLUSTER FORGET eada670e3fa1dac7f766571b91e9b68cb10d4659

(error) ERR Can't forget my master!

192.168.133.88:7006>
21,.进到7000将7006移除,发现没有7006了
[root@centos-02 etc]# redis-cli -c -h 192.168.133.88 -p 7000

192.168.133.88:7000> CLUSTER FORGET c932ce9d4f8a4719734a5213e971c30bd8e3c3ed

OK

192.168.133.88:7000>
192.168.133.88:7000> CLUSTER NODES

286c87c43e3f48c161c46f051e54fafaf288977e 192.168.133.66:7001@17001 master - 0 1522519238000 4 connected 5461-10922

0af414244dc3a19031fa9e46e7a2fc0182427299 192.168.133.88:7000@17000 myself,master - 0 1522519237000 1 connected 0-5460

29164b1a5a53031f5f1bb73f39200cbb1e933adb 192.168.133.66:7003@17003 slave ce0614a31fb607fb0d77132ae483499b91e23f12 0 1522519239293 5 connected

eada670e3fa1dac7f766571b91e9b68cb10d4659 192.168.133.66:7007@17007 master - 0 1522519238000 0 connected

6d49712ec41f561a1e9e9b0d10821754745d814e 192.168.133.88:7004@17004 slave 286c87c43e3f48c161c46f051e54fafaf288977e 0 1522519239188 4 connected

ce0614a31fb607fb0d77132ae483499b91e23f12 192.168.133.88:7002@17002 master - 0 1522519238237 2 connected 10923-16383

6d09687b05b8f07cab64803049884bf7384b4de9 192.168.133.66:7005@17005 slave 0af414244dc3a19031fa9e46e7a2fc0182427299 0 1522519238000 6 connected

192.168.133.88:7000>
22.将当前的操作保存到配置文件中,每一个节点上都会有
192.168.133.88:7000> CLUSTER SAVECONFIG

OK

192.168.133.88:7000>
23.保存成功
[root@centos-03 etc]# cat /data/redis_data/7001/nodes_7001.conf

c932ce9d4f8a4719734a5213e971c30bd8e3c3ed 192.168.133.88:7006@17006 slave eada670e3fa1dac7f766571b91e9b68cb10d4659 0 1522518059000 7 connected

6d09687b05b8f07cab64803049884bf7384b4de9 192.168.133.66:7005@17005 slave 0af414244dc3a19031fa9e46e7a2fc0182427299 0 1522518060000 6 connected

6d49712ec41f561a1e9e9b0d10821754745d814e 192.168.133.88:7004@17004 slave 286c87c43e3f48c161c46f051e54fafaf288977e 0 1522518060717 4 connected

eada670e3fa1dac7f766571b91e9b68cb10d4659 192.168.133.66:7007@17007 master - 0 1522518059707 0 connected

29164b1a5a53031f5f1bb73f39200cbb1e933adb 192.168.133.66:7003@17003 slave ce0614a31fb607fb0d77132ae483499b91e23f12 0 1522518059000 5 connected

ce0614a31fb607fb0d77132ae483499b91e23f12 192.168.133.88:7002@17002 master - 0 1522518059000 2 connected 10923-16383

286c87c43e3f48c161c46f051e54fafaf288977e 192.168.133.66:7001@17001 myself,master - 0 1522518058000 4 connected 5461-10922

0af414244dc3a19031fa9e46e7a2fc0182427299 192.168.133.88:7000@17000 master - 0 1522518057000 1 connected 0-5460

vars currentEpoch 7 lastVoteEpoch 0

[root@centos-03 etc]#
NoSQL(三)的更多相关文章
- 【redis】01Redis的介绍与安装部署
单元目标: 1.NoSQL介绍 2.Redis的介绍 3.Redis适用场合 4.Redis的安装与部署 5.Redis的数据类型 6.Redis的常用命令 7.Redis的高级应用 通过 ...
- mongoDB的安装及基本使用
1.mongoDB简介 1.1 NoSQL数据库 数据库:进行高效的.有规则的进行数据持久化存储的软件 NoSQL数据库:Not only sql,指代非关系型数据库 优点:高可扩展性.分布式计算.低 ...
- TOP100summit:【分享实录-华为】微服务场景下的性能提升最佳实践
本篇文章内容来自2016年TOP100summit华为架构部资深架构师王启军的案例分享.编辑:Cynthia 王启军:华为架构部资深架构师.负责华为的云化.微服务架构推进落地,前后参与了华为手机祥云4 ...
- Hadoop高级培训课程大纲-管理员版
一.课程概述 本次培训课程主要面向大数据系统管理人员和开发设计人员,基于开源社区大数据应用最活跃的Hadoop和HBase技术框架.围绕分布式文件存储(HDFS).分布式并行计算(Map/Recue) ...
- Hadoop高级培训课程大纲-开发者版
一.课程概述 本次培训课程主要面向大数据系统管理人员和开发设计人员,基于开源社区大数据应用最活跃的Hadoop和HBase技术框架,围绕分布式文件存储(HDFS).分布式并行计算(Map/Recue) ...
- 分布式数据库中CAP原理(CAP+BASE)
分布式数据库中CAP原理(CAP+BASE) 传统的ACID 1)原子性(Atomicity): 事务里的所有操作要么全部做完,要么都不做,事务成功的条件是事务里的所有操作都成功. 2)一致性(Con ...
- 【转帖】GBase 数据库
产品介绍 分析型数据管理系统 GBase 8a GBase 8a能够实现大数据的全数据(结构化数据.半结构化数据和非结构化数据)存储管理和高效分析,为行业大数据应用提供完整的数据库解决方案.GBase ...
- 【巨杉数据库SequoiaDB】巨杉Tech | 四步走,快速诊断数据库集群状态
1.背景 SequoiaDB 巨杉数据库是一款金融级分布式数据库,包括了分布式 NewSQL.分布式文件系统与对象存储.与高性能 NoSQL 三种存储模式,分别对应分布式在线交易.非结构化数据和内容管 ...
- NoSql非关系型数据库之MongoDB应用(三):MongoDB在项目中的初步应用
业精于勤,荒于嬉:行成于思,毁于随. 我们可以结合相关的IDE做一个简单的增删改查了,实现MongoDB在项目中的初步应用. 前提是安装了MongoDB服务和MongoDB可视化工具,没有安装的可以点 ...
- NoSQL之【MongoDB】学习(三):配置文件说明
摘要: 继上一篇NoSQL之[MongoDB]学习(一):安装说明 之后,知道了如何安装和启动MongoDB,现在对启动时指定的配置文件(mongodb.conf)进行说明,详情请见官方. 启动Mon ...
随机推荐
- [JZOJ3484]密码
题目大意: 给你一个很长的字符串a(|a|<=300000),一个比较短的字符串b(|b|<=200),请你搞一些破坏. 你可以从a的两边去掉一些字符使得b仍是a的一个字串,问有多少种方案 ...
- 随机数选择器 Exercise07_13
import java.util.Scanner; /** * @author 冰樱梦 *时间:2018年下半年 *题目:随机数选择器 */ public class Exercise07_13 { ...
- MATLAB/Octave中implicit conversion from real matrix to real scalar错误原因与解决
写程序时提示 implicit conversion from real matrix to real scalar的一个warning,主要问题在于将一个矩阵当成一个标量在使用.我的程序出现这个wa ...
- ApplicationDelegate里的方法
// 程序第一次加载完毕 - (BOOL)application:(UIApplication*)application didFinishLaunchingWithOptions:(NSDictio ...
- 诡异的 "密码取回" 邮件问题
国内私募机构九鼎控股打造APP,来就送 20元现金领取地址:http://jdb.jiudingcapital.com/phone.html内部邀请码:C8E245J (不写邀请码,没有现金送)国内私 ...
- 简化js--函数返回
<script type="text/javascript"> function a(){ return false; } function b(){ return t ...
- jQuery:validate内置验证的使用
(1)required:true 必输字段(2)remote:"check.php" 使用ajax方法调用check.php验证输入值(3)email:true 必须输入正确格式的 ...
- 统一D3D与OpenGL坐标系统
作者:游蓝海(http://blog.csdn.net/you_lan_hai) DirectX 3D与OpenGL坐标系统的差异性,给我们带来非常大的麻烦.让跨平台编程的新手非常困惑.近期在做一个跨 ...
- HDU 4886 TIANKENG’s restaurant(Ⅱ) hash+dfs
题意: 1.找一个字符串s使得 s不是给定母串的子串 2.且s要最短 3.s在最短情况下字典序最小 hash.,,结果t掉了...加了个姿势怪异的hash值剪枝才过.. #include <cs ...
- [转]SSIS: Execute Package via Stored Procedure
本文转自:http://sqlblog.de/blog/2009/09/ssis-execute-package-via-stored-procedure/ There are two options ...