
GitHub教程(一) 使用指南


You’ll learn how to:
- Create and use a repository // 创建并使用仓库(版本库)
- Start and manage a new branch // 启动并管理一个新分支
- Make changes to a file and push them to GitHub as commits // 修改一个文件并将这些变更作为 commit push到GitHub上
- Open and merge a pull request // 打开并merge一个pull request
译者注:有些GitHub的专有名词没有翻译,不是因为我懒得翻。以本人愚见,这些专有名词就算翻译过来也没有多大意思,原汁原味儿的比较好,实在不清楚可以去金山词霸查查具体含义。
This tutorial teaches you GitHub essentials like repositories, branches, commits, and Pull Requests. You’ll create your own Hello World repository and learn GitHub’s Pull Request workflow(工作流), a popular way to create and review code.
No coding necessary
To complete this tutorial, you need a GitHub.com account and Internet access. You don’t need to know how to code, use the command line, or install Git (the version control software GitHub is built on). // 虽然教程说学习GitHub不必安装Git,使用命令行操作,但是还是建议读者稍微熟悉一下Git命令
Tip: Open this guide in a separate browser window (or tab) so you can see it while you complete the steps in the tutorial.
Your hello-world repository can be a place where you store ideas, resources, or even share and discuss things with others.
To create a new repository
- In the upper right corner(右上角), next to your avatar or identicon, click and then select New repository.
- Name your repository
hello-world. - Write a short description.
- Select Initialize this repository with a README.
.png)
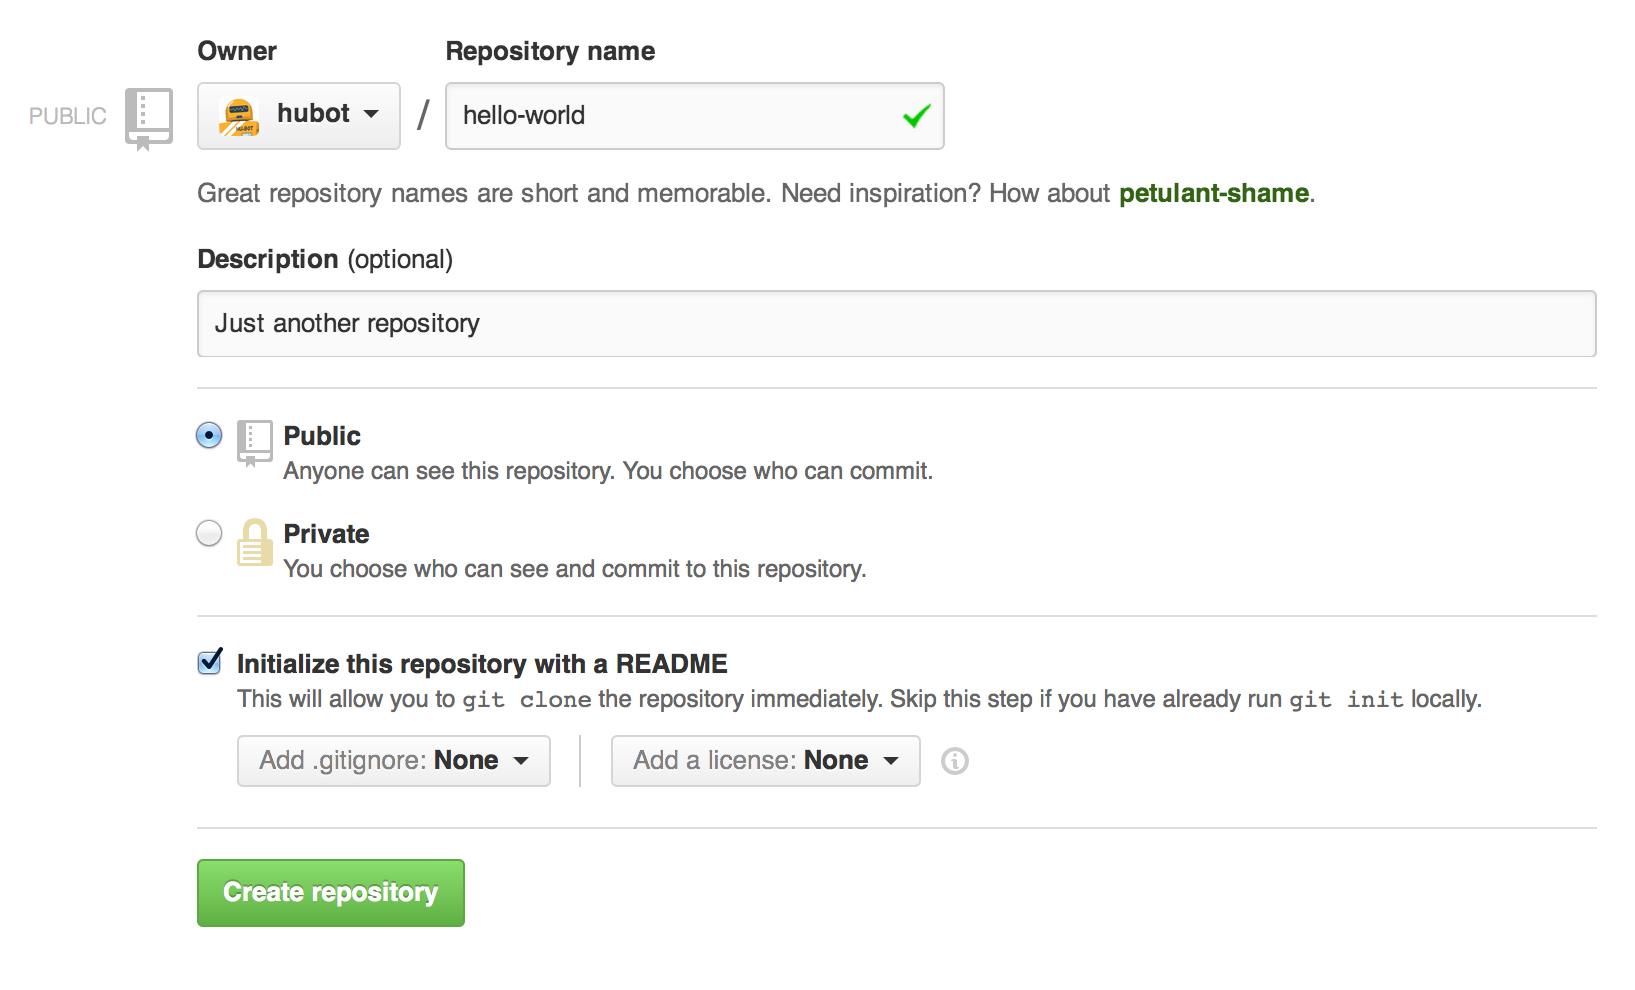
Click Create repository. .png)

译者注:分支和快照是类似的概念,快照指的是在某一时间点的数据状态集合,相当于一种特殊的镜像文件
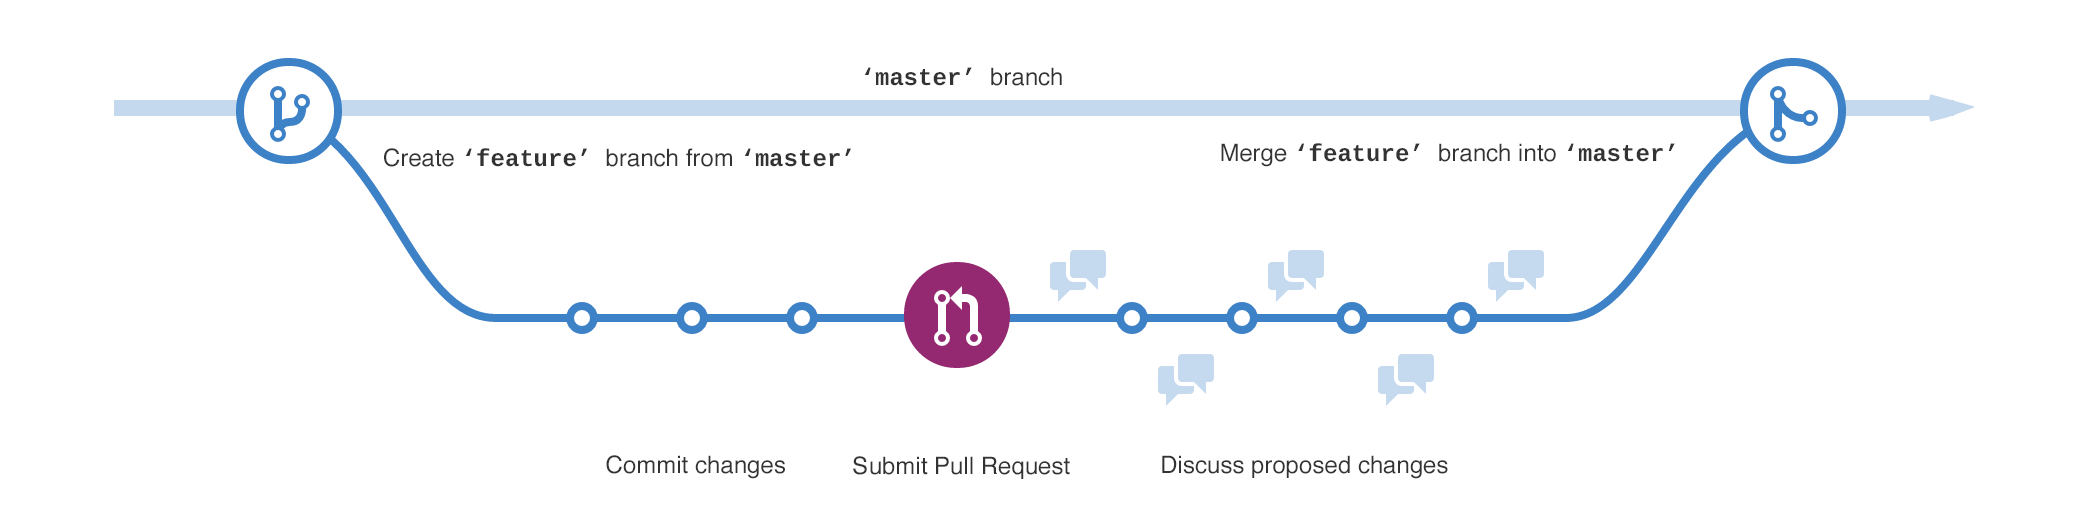
By default your repository has one branch named master which is considered to be the definitive branch. We use branches to experiment and make edits before committing them to master.
master branch, you’re making a copy, or snapshot, of master as(与此同时) it was at that point in time. If someone else made changes to the master branch while you were working on your branch, you could pull in(吸收) those updates.This diagram shows:
- The master branch // 主分支
- A new branch called feature (because we’re doing ‘feature work’ on this branch) // 功能分支
- The journey that feature takes before it’s merged into master
// 从master分支脱离出来到被merge到master分支之前,feature分支会有一段单独历程.png)
Have you ever saved different versions of a file? Something like:
- story.txt
- story-joe-edit.txt
- story-joe-edit-reviewed.txt
Branches accomplish similar goals in GitHub repositories. // Branches在GitHub仓库中完成相似的目标---储存一个文件的不同版本
Here at GitHub, our developers, writers, and designers use branches for keeping bug fixes and feature work separate from our master (production) branch. When a change is ready, they merge their branch into master. 译者注:master分支保存就是日后要做出来的真正production
To create a new branch
- Go to your new repository hello-world .
- Click the drop down at the top of the file list that says branch: master.
- Type a branch name, readme-edits , into the new branch text box.
- Select the blue Create branch box or hit “Enter” on your keyboard.

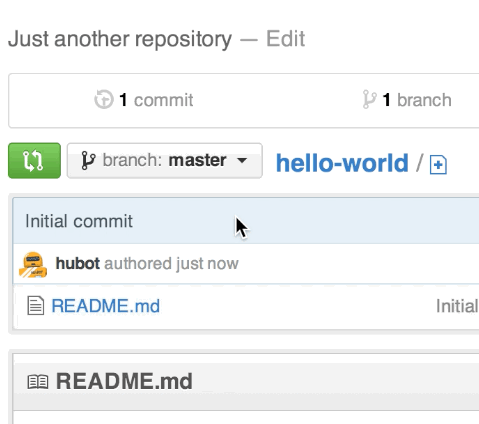
译者注:这里的readme-edits分支就是上文中提到的feature分支,属于功能分支,用于增加某个模块功能
Make and commit changes
- Click the README.md file.
- Click the pencil icon in the upper right corner of the file view to edit.
- In the editor, write a bit about yourself.
- Write a commit message that describes your changes.
- Click Commit changes button.
.png)

These changes will be made to just the README file on your readme-edits branch, so now this branch contains content that’s different from master.
Pull Requests are the heart of collaboration(协同工作的核心) on GitHub. When you open a pull request, you’re proposing your changes and requesting that someone review and pull in your contribution and merge them into their branch. Pull requests sho diffs, or differences, of the content from both branches. The changes, additions, and subtractions are shown in green and red. // pull requests后master分支变化会用不同颜色显示,增加内容用绿色标识,删除内容用红色表示
As soon as you make a commit, you can open a pull request and start a discussion, even before the code is finished. // commit后就会discussion模块出现
By using GitHub’s @mention system in your pull request message, you can ask for feedback from specific people or teams, whether they’re down the hall or 10 time zones away.
You can even open pull requests in your own repository and merge them yourself. It’s a great way to learn the GitHub Flow before working on larger projects.
Open a Pull Request for changes to the README
Click on the image for a larger version
| Step | Screenshot |
|---|---|
| Click the Pull Request tab, then from the Pull Request page, click the green New pull request button. | 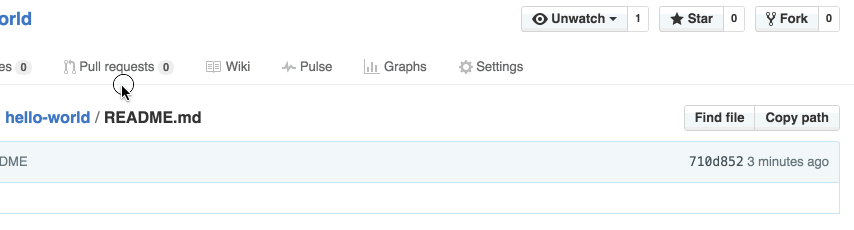
|
| Select the branch you made, readme-edits, to compare with master (the original). | 
|
| Look over your changes in the diffs on the Compare page, make sure they’re what you want to submit. |  |
| When you’re satisfied that these are the changes you want to submit, click the big green Create Pull Requestbutton. | 
|
| Give your pull request a title and write a brief description of your changes. | .png) 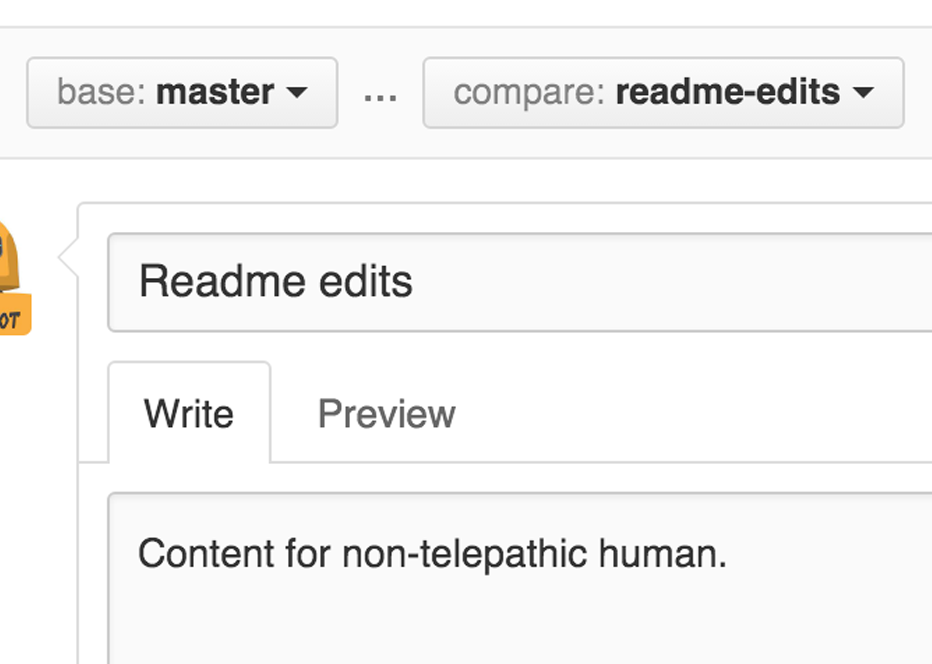
|
.gif)
When you’re done with your message, click Create pull request!
Tip: You can use emoji and drag and drop images and gifs onto comments and Pull Requests.
Step 5. Merge your Pull Request
In this final step, it’s time to bring your changes together – merging your readme-edits branch into the master branch.
- Click the green Merge pull request button to merge the changes into
master. - Click Confirm merge.
- Go ahead and delete the branch, since its changes have been incorporated, with the Delete branch button in the purple box.
.png)
.png)


Celebrate!
By completing this tutorial, you’ve learned to create a project and make a pull request on GitHub! .png)
.png)
Here’s what you accomplished in this tutorial:
- Created an open source repository
- Started and managed a new branch
- Changed a file and committed those changes to GitHub
- Opened and merged a Pull Request
Take a look at your GitHub profile and you’ll see your new contribution squares!
If you want to learn more about the power of Pull Requests, we recommend reading the GitHub Flow Guide. You might also visit GitHub Explore and get involved in an Open Source project 
Tip: Check out our other Guides and YouTube Channel for more GitHub how-tos.
到此为止,官网上面GitHub入门教程已经介绍完了,相信通过您不屑的努力一定已经学会这些GitHub基础操作。如果想要进一步得学习,推荐GitHub Flow Guide(GitHub流程指南,交互式得操作使得读者更容易理解如何脱离分支、合并分支等概念)。
作为Git系列教程中远程仓库篇---GitHub系列教程的第一篇文章,本文就系统地介绍了GitHub使用者该掌握的基础内容。对系列教程感兴趣的同学,可以选择订阅我博客,我会在工作之余持续更新,与大伙共同提高(技术层面和英文层面),嘻嘻。
GitHub教程(一) 使用指南的更多相关文章
- GitHub教程(三) 本地仓库托管到GitHub
本文开头先特别声明一下:由于GitHub教程属于Git系列教程的GitHub子篇章,因此GitHub教程中将不再详细介绍Git操作命令及其用法,我会根据实际需要穿插着回顾Git操作命令.如果读者需要学 ...
- mxGraph进阶(一)mxGraph教程-开发入门指南
mxGraph教程-开发入门指南 概述 mxGraph是一个JS绘图组件适用于需要在网页中设计/编辑Workflow/BPM流程图.图表.网络图和普通图形的Web应用程序.mxgraph下载包中包括用 ...
- 史上最简单的 GitHub 教程
史上最简单的 GitHub 教程 温馨提示:本系列博文已经同步到 GitHub,如有需要的话,欢迎大家到「github-tutorial」进行Star和Fork操作! 1 简介 GitHub 是一个面 ...
- 24个很赞的 Node.js 免费教程和在线指南
JavaScript 最初是用来创建动态网站效果的的前端语言.而如今,这门脚本语言也可以用作后端开发,用于搭建 Web 服务器,开发接口,甚至创建博客.在下面这个列表中包括24个 Node.js 教程 ...
- 上传本地代码及更新代码到GitHub教程
上传本地代码及更新代码到GitHub教程 上传本地代码 第一步:去github上创建自己的Repository,创建页面如下图所示: 红框为新建的仓库的https地址 第二步: echo " ...
- 一篇文章了解Github和Git教程-AndroidStudio上传Github教程
前言 为了方便保存自己的代码,下班后可以回家继续进行,自己的码农工作,介绍一下Github. 什么是Github呢? 作为一个编程人员,我觉得得了解一下Github吧! 当然,如果你放弃了码农或者技术 ...
- git 入门教程之github 教程
github 教程 github 是一个基于 git 的代码托管平台,是平时工作学习的好帮手,学会如何用好 github 网站能够帮助我们更好分享代码或者与其他开发人员合作. 注册 github 账号 ...
- 【转】mxGraph教程-开发入门指南
原文:https://blog.csdn.net/sunhuaqiang1/article/details/51289580 mxGraph教程-开发入门指南 概述 mxGraph是一个JS绘图组件适 ...
- GitHub教程(二) 删除已有仓库
通过GitHub教程(一)的阅读,我相信您对GitHub体系框架已经有了模模糊糊的了解.本节教程将继续介绍GitHub的操作---删除仓库. 作为GitHub的入门使用者,我们可能会建一些简单的仓库来 ...
随机推荐
- stm32cubemx 固件安装
STM32CubeMX 可以在线安装固件库,也可以离线安装 1 在线安装 安装好之后,选项框显示为绿色 2 离线安装 先下载固件包 F1 : https://www.st.com/en/embed ...
- JAVA学习3:Eclipse中集成Tomcat
问题: 很多时候在Eclipse中启动Tmocat后,不能访问本机的localhost:8080主页,并且其他项目也不能访问. 原因: 打开Tomcat下的webapp后也找补到项目目录,这是因为Ec ...
- 我的Python升级打怪之路【五】:Python模块
模块,是一些代码实现了某个功能的集合 模块的分类: 自定义模块 第三方模块 内置模块 导入模块 import module from module.xx.xx import xx from modul ...
- Unity GL画折线
新建一个脚本,这个物体得挂在有摄像机组件的物体上才能生效 OnPostRender() 这个函数才会被自动调用(类似生命周期自动调用) 然后就可以代码画线了,原理是openGL的画线 using Un ...
- [PY3]——创建多值映射字典?/defaultdict默认字典/setdefault()
Defaultdict 默认字典 collections 模块中的 defaultdict(默认字典),可以用来构造“一个键映射多个值”这样的字典 如果你想保持元素的插入顺序就应该使用list, 如果 ...
- Centos 从零开始 (三)
8:连接阿里云. 需要用到 ssh指令进行远程登陆 [root@localhost ~]# service sshd start #如果没开启服务的话,需要开启服务. [root@localhost ...
- access 2010,数学
access 2010(窗体控制和创建窗体) 窗体向导:选择表格---创建---窗体---窗体向导---选择表/查询---全选可用字段---选择布局---设置标题---完成. 其他窗体:选择表格--- ...
- ASP.NET MVC4 新手入门教程之五 ---5.用控制器访问模型数据
在本节中,将创建一个新的MoviesController类并编写代码来检索电影数据并将其显示在浏览器中使用一个视图模板. 才走出下一步生成应用程序. 用鼠标右键单击控制器文件夹中并创建一个新的 Mov ...
- jmeter简单使用示例
1.下载后解压,运行bin目录下的jmeter.bat 2.add ThreadGroup 3.add request 4.add listener
- OkHttp完全解析之整体调用流程
前言:阅读好的代码如同观赏美景一样的美妙 OkHttp是一个Square公司在github开源的Java网络请求框架,非常流行.OkHttp 的代码并不是特别庞大,代码很多巧妙的实现,非常值得学习. ...