Vue3源码分析之 Ref 与 ReactiveEffect
Vue3中的响应式实现原理
完整 js版本简易源码 在最底部
ref 与 reactive 是Vue3中的两个定义响应式对象的API,其中reactive是通过 Proxy 来实现的,它返回对象的响应式副本,而Ref则是返回一个可变的ref对象,只有一个 .value属性指向他内部的值,本文则重点来分析一下 Ref 的实现原理
ref:接受一个内部值并返回一个响应式且可变的 ref 对象。ref 对象仅有一个
.valueproperty,指向该内部值。
Ref依赖收集
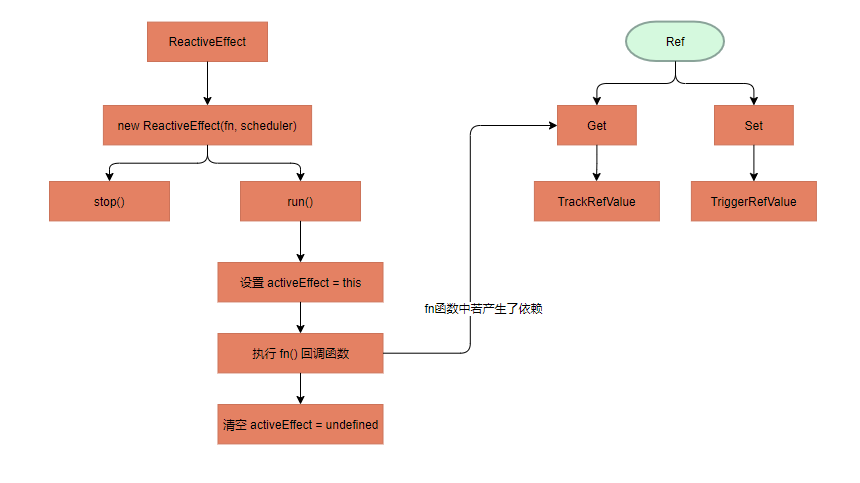
首先我们需要了解 ReactiveEffect 类,创建这个类需要传入一个 副作用函数 和 scheduler,在这个类中有 active、deps 两个重要的属性:
active:是否为激活状态,默认为:true
deps:所有依赖这个 effect 的响应式对象
ReactiveEffect 简易 js 版本源代码:
// 记录当前活跃的对象

let activeEffect

// 标记是否追踪

let shouldTrack = false

class ReactiveEffect{

  active = true // 是否为激活状态

  deps = [] // 所有依赖这个 effect 的响应式对象

  onStop = null // function

  constructor(fn, scheduler) {

    this.fn = fn // 回调函数,如: computed(/* fn */() => { return testRef.value ++ })

    // function类型,不为空那么在 TriggerRefValue 函数中会执行 effect.scheduler,否则会执行 effect.run

    this.scheduler = scheduler

  }

  run() {

    // 如果这个 effect 不需要被响应式对象收集

    if(!this.active) {

      return this.fn()

    }

    // 源码这里用了两个工具函数:pauseTracking 和 enableTracking 来改变 shouldTrack的状态

    shouldTrack = true

    activeEffect = this

    // 在设置完 activeEffect 后执行,在方法中能够对当前活跃的 activeEffect 进行依赖收集

    const result = this.fn()

    shouldTrack = false

    // 执行完副作用函数后要清空当前活跃的 effect

    activeEffect = undefined

    return result

  }

  // 暂停追踪

  stop() {

    if (this.active) {

      // 找到所有依赖这个 effect 的响应式对象

      // 从这些响应式对象里面把 effect 给删除掉

      cleanupEffect(this)

      // 执行onStop回调函数

      if (this.onStop) {

        this.onStop();

      }

      this.active = false;

    }

  }

}
了解了 ReactiveEffect 类,再来分析 Ref
ref 简易JS版本源代码
class RefImpl{

  // Set格式,存储 effect

  dep

  // 存储原始值

  _rawValue

  // 标记这是一个 Ref 对象,isRef API就可以直接通过判断这个内部属性即可

  __v_isRef = true

  // _shallow:这个值是为了实现 shallowRef API 而存在

  // 目前这里没有使用到

  constructor(value, _shallow) {

    this._value = value

    // 存储原始值,用来与新值做对比

    this._rawValue = _shallow ? value : toRaw(value)

    // _value 内部值

    // toReactive => isObject(value) ? reactive(value) : value

    // 对 value 进行包装

    this._value = _shallow ? value : toReactive(value)

  }

  get value() {

    // 在获取这个 Ref 内部值时 进行依赖收集

    // trackRefValue() 依赖收集

    trackRefValue(this)

    return this._value

  }

}
trackRefValue方法实现
/**

* activeEffect 当前活跃的 effect 对象

* shouldTrack 是否允许追踪

* const isTracking = () => activeEffect && shouldTrack

*/

function trackRefValue(ref) {

  // 若没有活跃的 effect 对象或 不需要进行追踪

  if(!isTracking()) {

    return

  }

  // 如果这个 Ref 对象还没有对 dep 进行初始化(Ref 中 dep 属性默认为 undefined)

  if(!ref.dep) {

    ref.dep = new Set()

  }

  trackEffects(ref.dep)

}

function trackEffects(dep) {

  // 若改 effect 对象已经收集,跳过

  if(!dep.has(activeEffect)) {

    // 将 effect 对象添加到 Ref 对象的 dep 中

    dep.add(activeEffect)

    // 将这个Ref的dep存放到这个 effect 的 deps 中

    // 目的是为了在停止追踪时,从 响应式对象将 effect 移除掉

    activeEffect.deps.push(dep)

  }

}
写个 testComputed 函数来回顾 和 测试一下上面的流程
const testRef = new RefImpl(1)

const testComputed = (fn) => {

  // 创建一个 effect 对象

  const testEffect = new ReactiveEffect(fn)

  // 默认执行 effect.run() 函数(设置 activeEffect=this -> 执行 fn(依赖收集) -> 清空 activeEffect=undefined)

  return testEffect.run()

  // 此时,依赖情况:

  // testRef.dep = [ testEffect:effect ]

  // testEffect.deps = [ testRef.dep ]

}

const fn = () => {  console.log('textComputed', testRef.value) }

testComputed(fn)
Ref 触发更新
在 RefImpl 类中增加 set value 方法
class RefImpl{

    // ......

    // 增加 set value () 方法

    set value(newVal) {

        newVal = this._shallow ? newVal : toRaw(newVal)

        // 对比 新老值 是否相等,这里不能简单的使用 == 或 ===

        // Object.is() 方法判断两个值是否为同一个值。

        if (!Object.is(newVal, this._rawValue)) {

          this._rawValue = newVal

          this._value = this._shallow ? newVal : toReactive(newVal)

          // 在内部值被改变的时候会触发依赖更新

          triggerRefValue(this) // ,newValue) 在dev环境下使用了 newValue,这里忽略

        }

      }

    // ......

}
triggerRefValue 方法实现
function triggerRefValue(ref) {

  triggerEffects(ref.dep);

}

function triggerEffects(dep) {

  // 执行 Ref.dep 中收集的所有 effect

  for (const effect of dep) {

    // 这里做个判断,执行的 effect 不是 当前活跃的 effect

    if(effect !== activeEffect) {

      if(effect.scheduler) {

        // effect.scheduler 文章前面有讲过

        /** Vue3中模板更新,就是通过创建了一个 scheduler,然后推入 微任务队列 中去执行的

           const effect = new ReactiveEffect(componentUpdateFn,() => queueJob(instance.update))

           const update = (instance.update = effect.run.bind(effect) as SchedulerJob)

         */

        effect.scheduler()

      } else {

        effect.run()

      }

    }

  }

}
修改 testComputed 函数进行测试
const testRef = new RefImpl(1)

const testComputedWatch = (fn) => {

  // 创建一个 effect 对象

  const testEffect = new ReactiveEffect(fn)

  // 默认执行 effect.run() 函数(设置 activeEffect=this -> 执行 fn(依赖收集) -> 清空 activeEffect=undefined)

  return testEffect.run()

  // 此时,依赖情况:

  // testRef.dep = [ testEffect:effect ]

  // testEffect.deps = [ testRef.dep ]

}

const fn = () => {  console.log('textComputed', testRef.value) }

testComputed(fn)

testRef.value ++ // -> 'textComputed', 2

testRef.value ++ // -> 'textComputed', 3
源代码:
effect.js
// 记录当前活跃的对象

let activeEffect

// 标记是否追踪

let shouldTrack = false

// 存储已经收集的依赖

// const targetMap  = new WeakMap()

const isTracking = () => activeEffect && shouldTrack

function trackEffects(dep) {

  if(!dep.has(activeEffect)) {

    dep.add(activeEffect)

    activeEffect.deps.push(dep)

  }

}

function triggerEffects(dep) {

  for (const effect of dep) {

    // 这里做个判断,执行的 effect 不是 当前活跃的 effect

    if(effect !== activeEffect) {

      if(effect.scheduler) {

        effect.scheduler()

      } else {

        effect.run()

      }

    }

  }

}

class ReactiveEffect{

  active = true

  deps = []

  onStop = null

  constructor(fn, scheduler) {

    this.fn = fn

    this.scheduler = scheduler

  }

  run() {

    if(!this.active) {

      return this.fn()

    }

    // 源码这里用了两个工具函数:pauseTracking 和 enableTracking 来改变 shouldTrack的状态

    shouldTrack = true

    activeEffect = this

    // 在设置完 activeEffect 后执行,在方法中能够对当前活跃的 activeEffect 进行依赖收集

    const result = this.fn()

    shouldTrack = false

    // 执行完副作用函数后要清空当前活跃的 effect

    activeEffect = undefined

    return result

  }

  // 暂停追踪

  stop() {

    if (this.active) {

      // 找到所有依赖这个 effect 的响应式对象

      // 从这些响应式对象里面把 effect 给删除掉

      cleanupEffect(this)

      // 执行onStop回调函数

      if (this.onStop) {

        this.onStop();

      }

      this.active = false;

    }

  }

}

function cleanupEffect(effect) {

  const { deps } = effect

  if (deps.length) {

    for (let i = 0; i < deps.length; i++) {

      deps[i].delete(effect)

    }

    deps.length = 0

  }

}

module.exports = {

  ReactiveEffect,

  isTracking,

  trackEffects,

  triggerEffects

}
ref.js
// const { toReactive, toRaw } = require('./reactive.js')

// start reactive.js 模块

const isObject = (val) => val !== null && typeof val === 'object'

const toReactive = val =>

  isObject(val) ? reactive(val) : val

function toRaw(observed) {

  // __v_raw 是一个标志位,表示这个是一个 reactive

  const raw = observed && observed['__v_raw']

  return raw ? toRaw(raw) : observed

}

// end reactive.js

const { ReactiveEffect, isTracking, trackEffects, triggerEffects } = require('./effect.js')

function trackRefValue(ref) {

  if(!isTracking()) {

    return

  }

  if(!ref.dep) {

    ref.dep = new Set()

  }

  trackEffects(ref.dep)

}

function triggerRefValue(ref) {

  triggerEffects(ref.dep);

}

class RefImpl{

  dep

  _rawValue

  __v_isRef = true

  constructor(value, _shallow) {

    this._value = value

    // 存储原始值,用来与新值做对比

    this._rawValue = _shallow ? value : toRaw(value)

    this._value = _shallow ? value : toReactive(value)

  }

  get value() {

    // 收集依赖

    trackRefValue(this)

    return this._value

  }

  set value(newVal) {

    newVal = this._shallow ? newVal : toRaw(newVal)

    // Object.is() 方法判断两个值是否为同一个值。

    if (!Object.is(newVal, this._rawValue)) {

      this._rawValue = newVal

      this._value = this._shallow ? newVal : toReactive(newVal)

      triggerRefValue(this) // ,newValue) 在dev环境下使用了 newValue,这里忽略

    }

  }

}

function isRef(r) {

  return Boolean(r && r.__v_isRef === true)

}

function createRef(rawValue, _shallow) {

  if (isRef(rawValue)) {

    return rawValue

  }

  return new RefImpl(rawValue, _shallow)

}

function ref(val) {

  return createRef(val, false)

}

module.exports = {

  isRef,

  ref

}
测试代码
/** ** 测试代码 ***/

const testRef = ref(1)

const textComputed = () => {

  const testEffect = new ReactiveEffect(() => {

    console.log('textComputed', testRef.value)

  })

  testEffect.run()

  console.log('testEffect.deps', testEffect.deps)

}

const textComputed1 = () => {

  const fn = () => {  console.log('textComputed', testRef.value) }

  const testEffect = new ReactiveEffect(fn)

  testEffect.run()

}

textComputed1()

textComputed()

console.log('testRef', testRef)

// testRef.value ++
Vue3源码分析之 Ref 与 ReactiveEffect的更多相关文章
- Vue3源码分析之Diff算法
Diff 算法源码(结合源码写的简易版本) 备注:文章后面有详细解析,先简单浏览一遍整体代码,更容易阅读 // Vue3 中的 diff 算法 // 模拟节点 const { oldVirtualDo ...
- Vue3源码分析之微任务队列
参考资料:https://zh.javascript.info/microtask-queue#wei-ren-wu-dui-lie-microtaskqueue 简化版 Vue3 中的 微任务队列实 ...
- Vue3中的响应式对象Reactive源码分析
Vue3中的响应式对象Reactive源码分析 ReactiveEffect.js 中的 trackEffects函数 及 ReactiveEffect类 在Ref随笔中已经介绍,在本文中不做赘述 本 ...
- Vue.js 源码分析(十) 基础篇 ref属性详解
ref 被用来给元素或子组件注册引用信息.引用信息将会注册在父组件的 $refs 对象上.如果在普通的 DOM 元素上使用,引用指向的就是 DOM 元素:如果用在子组件上,引用就指向组件实例,例如: ...
- 【JUC】JDK1.8源码分析之SynchronousQueue(九)
一.前言 本篇是在分析Executors源码时,发现JUC集合框架中的一个重要类没有分析,SynchronousQueue,该类在线程池中的作用是非常明显的,所以很有必要单独拿出来分析一番,这对于之后 ...
- .net源码分析 - ConcurrentDictionary<TKey, TValue>
List源码分析 Dictionary源码分析 ConcurrentDictionary源码分析 继上篇Dictionary源码分析,上篇讲过的在这里不会再重复 ConcurrentDictionar ...
- docker 源码分析 四(基于1.8.2版本),Docker镜像的获取和存储
前段时间一直忙些其他事情,docker源码分析的事情耽搁了,今天接着写,上一章了解了docker client 和 docker daemon(会启动一个http server)是C/S的结构,cli ...
- 【Cocos2d-x 3.x】内存管理机制与源码分析
侯捷先生说过这么一句话 : 源码之前,了无秘密. 要了解Cocos2d-x的内存管理机制,就得阅读源码. 接触Cocos2d-x时, Cocos2d-x的最新版本已经到了3.2的时代,在学习Coco ...
- spring源码分析(二)Aop
创建日期:2016.08.19 修改日期:2016.08.20-2016.08.21 交流QQ:992591601 参考资料:<spring源码深度解析>.<spring技术内幕&g ...
随机推荐
- 【剑指Offer】链表中倒数第k个节点 解题报告(Python)
[剑指Offer]链表中倒数第k个节点 解题报告(Python) 标签(空格分隔): LeetCode 题目地址:https://www.nowcoder.com/ta/coding-intervie ...
- python学习第五天:python基础(string、list、tuple)
首先,什么是sequence(序列)操作? 字符串的特性被称为sequence(序列) H o w a r e y o u ? 就好像存储在一个个连续的单元格里面,每个单元格存储一个字符,每个字符就是 ...
- HDU 1052:Tian Ji -- The Horse Racing(贪心)
Tian Ji -- The Horse Racing Time Limit: 2000/1000 MS (Java/Others) Memory Limit: 65536/32768 K (Jav ...
- 1.SpringCloud与Dubbo的区别
1.SpringCloud与Dubbo的区别 初始定位不同: SpringCloud定位为微服务架构下的一站式解决方案:Dubbo 是 SOA 时代的产物,它的关注点主要在于服务的调用和治理 生态环境 ...
- BUUCTF [极客大挑战 2019]Not Bad
总的来说这是一个64位orw的题 开头先在主函数里分配了一个很大的空间 1 __int64 __fastcall main(int a1, char **a2, char **a3) 2 { 3 mm ...
- 数据可视化 gojs 简单使用介绍
目录 1. gojs 简介 2. gojs 应用场景 3. 为什么选用 gojs: 4. gojs 上手指南 5. 小技巧(非常实用哦) 6. 实践:实现节点分组关系可视化交互图 最后 本文是关于如何 ...
- Java网络编程Demo,使用TCP 实现简单群聊功能Groupchat,创建一个服务端,使多个客户端都能收到消息
效果图: 开启服务端 客户端一 客户端二 客户端三 实现代码: 客户端类 import java.io.IOException; import java.net.ServerSocket; impor ...
- Unity——基于ShaderLab实现光照系统
这篇主要总结Unity中ShaderLab的着色器代码实现总结,需要有一定图形学基础和ShaderLab基础: 一.着色器 1.顶点片元着色器 分顶点着色器和片元着色器,对应渲染管线的顶点变换和片元着 ...
- SpringBoot+神通数据库+JPA
先上原文 https://blog.csdn.net/Helloworld_pang/article/details/114266130 一.SpringBoot + 神通数据库 基本上按照上面的参考 ...
- 关于ActiveMQ+Zookeeper做集群时,解决启动报错:java.io.IOException: com/google/common/util/concurrent/internal/InternalFutureFailureAccess
这个问题我也是无意间碰到的,之前一直是使用单机的ActiveMQ,所以也没这个问题,但是做集群时碰到这个问题,问题是这样子出现的: 首先,我准备了三台虚拟机,然后使用 Replicated Level ...