
centos7 配置ftp服务器搭建(匿名访问,以及本地登录)
大家好,今天来给大家分享一个基于centos 7的ftp服务器搭建
实现功能:匿名访问,本地登录
查看系统版本:
[root@localhost ~]# cat /etc/redhat-release
CentOS Linux release 7.5.1804 (Core)
查看本地ip地址
[root@localhost ~]# ifconfig ens33
ens33: flags=4163<UP,BROADCAST,RUNNING,MULTICAST> mtu 1500
inet 192.168.1.5 netmask 255.255.255.0 broadcast 192.168.1.255
inet6 240e:3a2:743:df40:bb08:8c86:f745:edd4 prefixlen 64 scopeid 0x0<global>
inet6 fe80::617f:ef93:80d4:e14e prefixlen 64 scopeid 0x20<link>
ether 00:0c:29:87:af:a6 txqueuelen 1000 (Ethernet)
RX packets 50282 bytes 3247879 (3.0 MiB)
RX errors 0 dropped 922 overruns 0 frame 0
TX packets 6542 bytes 8519343 (8.1 MiB)
TX errors 0 dropped 0 overruns 0 carrier 0 collisions 0
我们连一下xshell (远程控制终端)
[C:\~]$ ssh 192.168.1.5
Connecting to 192.168.1.5:22...
Connection established.
To escape to local shell, press 'Ctrl+Alt+]'.
Last login: Sat Oct 23 11:15:44 2021 from 192.168.1.2
[root@localhost ~]#
测试网络:
[root@localhost ~]# ping www.baidu.com
PING www.a.shifen.com (180.101.49.11) 56(84) bytes of data.
64 bytes from 180.101.49.11 (180.101.49.11): icmp_seq=1 ttl=54 time=10.0 ms
64 bytes from 180.101.49.11 (180.101.49.11): icmp_seq=2 ttl=54 time=9.79 ms
64 bytes from 180.101.49.11 (180.101.49.11): icmp_seq=3 ttl=54 time=7.52 ms
64 bytes from 180.101.49.11 (180.101.49.11): icmp_seq=4 ttl=54 time=8.06 ms
^C
--- www.a.shifen.com ping statistics ---
4 packets transmitted, 4 received, 0% packet loss, time 22033ms
rtt min/avg/max/mdev = 7.523/8.862/10.065/1.094 ms
这样的话,我们的服务器就可以上网了 (可使用网络yum源)
接下来我们安装vsftpd服务程序
[root@localhost ~]# yum install vsftpd.x86_64 -y
进入vsftpd主目录
[root@localhost ~]# cd /etc/vsftpd/
[root@localhost vsftpd]# ls
ftpusers user_list vsftpd.conf vsftpd_conf_migrate.sh
[root@localhost vsftpd]#
将主配置文件内容当中#全部去掉
[root@localhost vsftpd]# cat vsftpd.conf |grep -v "#"
anonymous_enable=YES
local_enable=YES
write_enable=YES
local_umask=022
dirmessage_enable=YES
xferlog_enable=YES
connect_from_port_20=YES
xferlog_std_format=YES
listen=NO
listen_ipv6=YES
pam_service_name=vsftpd
userlist_enable=YES
tcp_wrappers=YES
这些是有效地配置文件,我们需要对它进行改动
对主配置文件改名为vsftpd.conf.bak
[root@localhost vsftpd]# mv vsftpd.conf vsftpd.conf.bak
查看
[root@localhost vsftpd]# ls
ftpusers user_list vsftpd.conf.bak vsftpd_conf_migrate.sh
将vsftpd.conf.bak的#号过滤掉,将这个结果过滤到vsftp.conf
[root@localhost vsftpd]# cat vsftpd.conf.bak |grep -v "#" >vsftpd.conf
编辑vsftpd 主配置文件
[root@localhost vsftpd]# vim vsftpd.conf
anon_umask=022
anon_update_enable=YES
anon_nkdir_write_enable=YES
anon_other_write_enable=YES //将这四行的配置文件加入vsftpd.conf,(实现匿名访问)
如下
anonymous_enable=YES
anon_umask=022
anon_upload_enable=YES
anon_mkdir_write_enable=YES
anon_other_write_enable=YES
local_enable=YES
write_enable=YES
local_umask=022
dirmessage_enable=YES
xferlog_enable=YES
connect_from_port_20=YES
xferlog_std_format=YES
listen=NO
listen_ipv6=YES
pam_service_name=vsftpd
userlist_enable=YES
tcp_wrappers=YES
:wq
保存退出
重启ftp服务器:
[root@localhost vsftpd]# systemctl restart vsftpd
[root@localhost vsftpd]# systemctl enable vsftpd.service //设置开机自启动
Created symlink from /etc/systemd/system/multi-user.target.wants/vsftpd.service to /usr/lib/systemd/system/vsftpd.service.
[root@localhost vsftpd]#
[root@localhost vsftpd]# systemctl stop firewalld //关闭防火墙
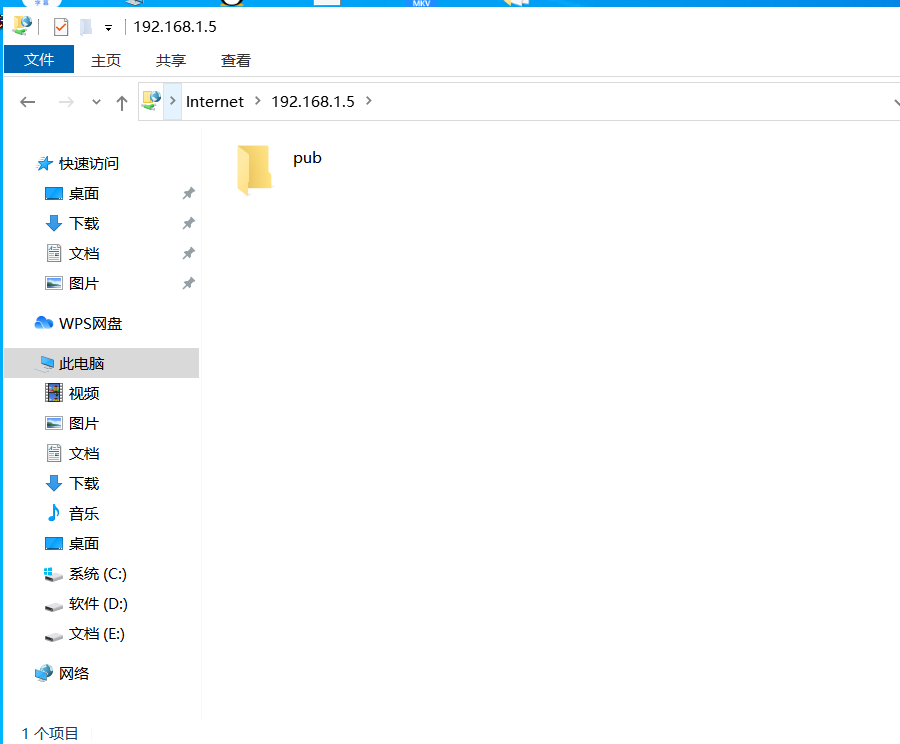
本地测试,显示vsftpd服务器正常
[root@localhost vsftpd]# cd /var/ftp/
[root@localhost ftp]# ls
pub(本来就有的文件)
[root@localhost ftp]#
[root@localhost ftp]# touch 123.txt //创建文件123.txt
[root@localhost ftp]#
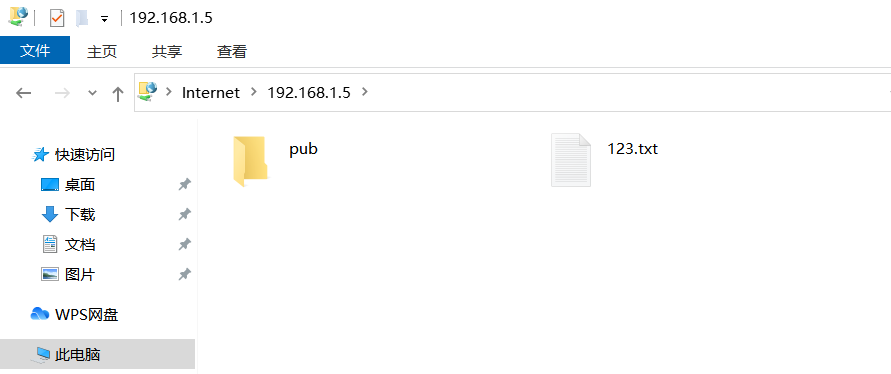
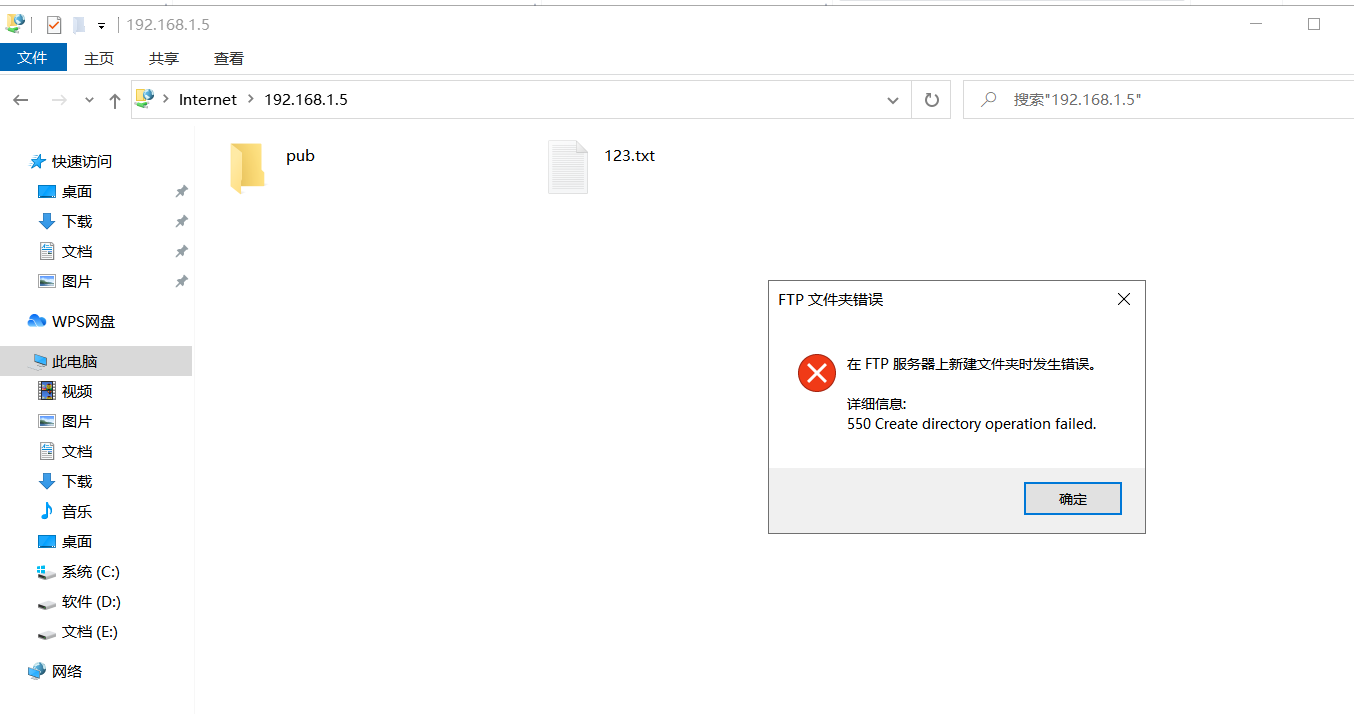
创建文件报错,(权限不够)
[root@localhost ftp]# chmod 777 pub/ //加权限
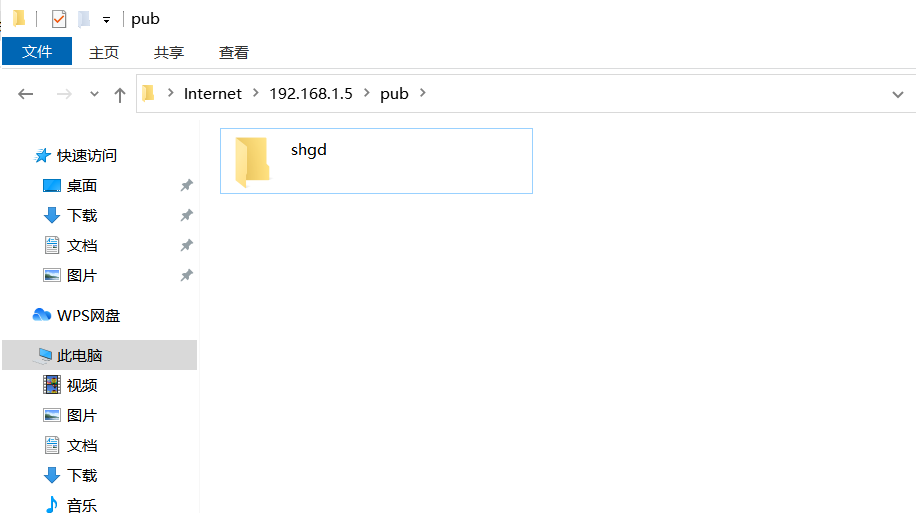
匿名用户访问成功
开始做本地用户
[root@localhost ~]# vim /etc/vsftpd/vsftpd.conf //编辑配置文件
anonymous_enable=YES
anon_umask=022
anon_upload_enable=YES
anon_mkdir_write_enable=YES
anon_other_write_enable=YES
local_enable=YES
write_enable=YES
local_umask=022
dirmessage_enable=YES
xferlog_enable=YES
connect_from_port_20=YES
xferlog_std_format=YES
listen=NO
listen_ipv6=YES
pam_service_name=vsftpd
userlist_enable=YES
tcp_wrappers=YES //这是我们刚刚编辑的配置文件
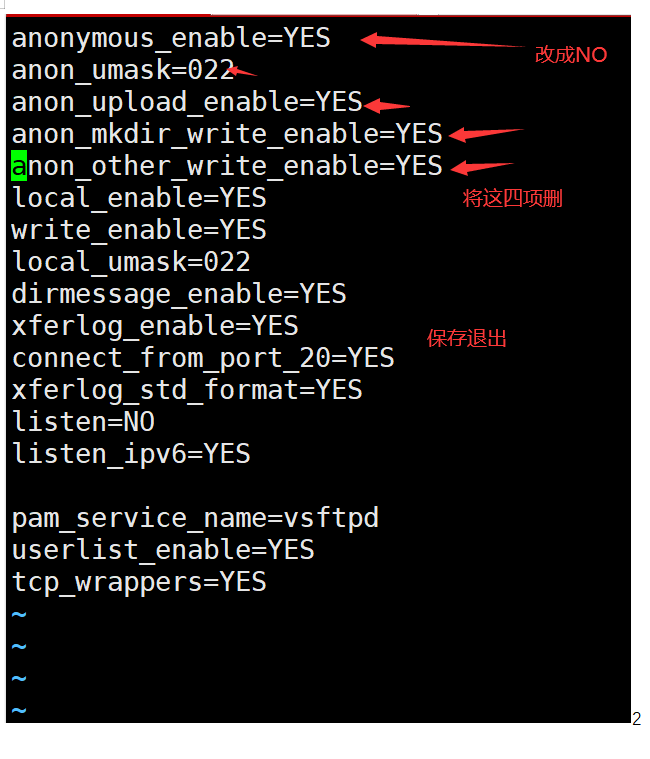
按箭头去修改
改成:
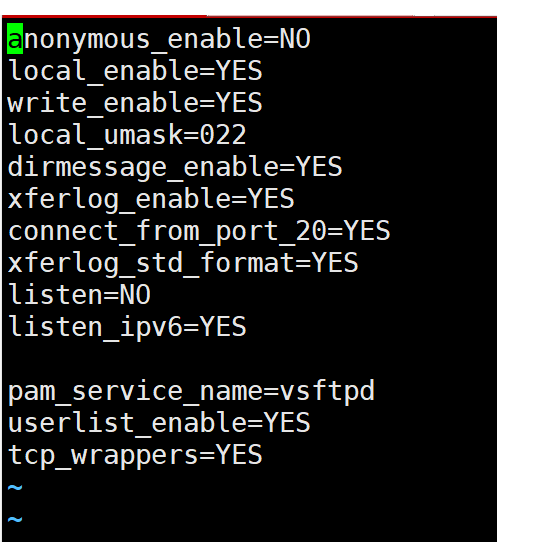
或者注释掉这四行也是一样的效果:
anonymous_enable=NO
#anon_umask=022
#anon_upload_enable=YES
#anon_mkdir_write_enable=YES
#anon_other_write_enable=YES
local_enable=YES
write_enable=YES
local_umask=022
dirmessage_enable=YES
xferlog_enable=YES
connect_from_port_20=YES
xferlog_std_format=YES
listen=NO
listen_ipv6=YES
pam_service_name=vsftpd
userlist_enable=YES
tcp_wrappers=YES
编辑这个文件
[root@localhost vsftpd]# vim ftpusers
# Users that are not allowed to login via ftp
root
bin
daemon
adm
lp
sync
shutdown
halt
mail
news
uucp
operator
games
nobody
根据具体要求,删掉你想登录FTP服务的本地用户。
例如,删掉root。
# Users that are not allowed to login via ftp
bin
daemon
adm
lp
sync
shutdown
halt
mail
news
uucp
operator
games
nobody
~
[root@localhost vsftpd]# systemctl restart vsftpd //重启vsftpd 服务
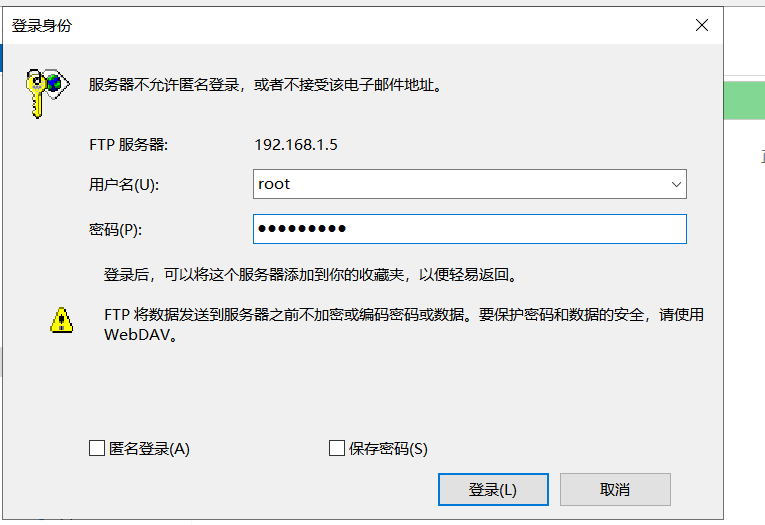
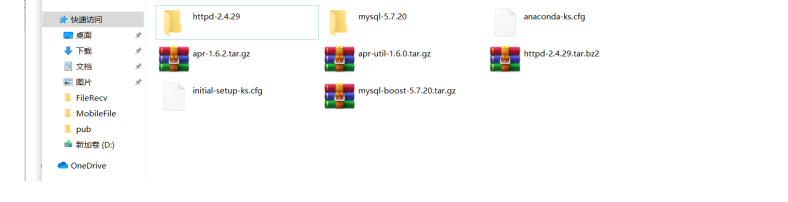
实验成功。测试的时候,既可以用windows的文件搜索,也可以用第三方工具
centos7 配置ftp服务器搭建(匿名访问,以及本地登录)的更多相关文章
- CentOS7 配置FTP服务器
1.安装vsftpd yum -y install vsftpd 2.在firewalld中添加规则 为确保成功 先启动firewalld服务 systemctl enable firewalld s ...
- centos7 配置 ftp 服务器(本地用户)
2021-09-02 1. 安装 # 安装 vsftpd yum -y install vsftpd 2. 启动服务并添加到开机自启 # 启动 vsftpd systemctl start vsftp ...
- FTP服务器搭建与访问的相关问题
近期想搭建在云服务器上搭建一个项目,每次远程登陆服务器实在比较繁琐,故而想到使用FTP上传下载方式来进行相应的操作:在网络上搭建FTP服务器的文档还是很丰富的,按照操作一步步来还算方便,楼主就不在这边 ...
- 腾讯云下的CentOS7 配置 FTP 服务器
第一步安装vsftp * yum -y install vsftpd 第二步配置ftp文件 要实现用户不仅可以下载ftp上的内容 还可以删改增加文件到ftp服务器 需要给ftp的目录赋予写入权限 1. ...
- Linux Centos7配置ftp服务器
一.安装 1.安装 yum install -y vsftpd 2.设置开机启动 systemctl enable vsftpd.service 3.启动 systemctl start vsftp ...
- CentOS7配置FTP服务器增强版~(零基础学会FTP配置)
ps:原文不知出处,但是原文也不能正常启动,这里做了一些修改!如果能正常配置请在下方留言让更多的人看到,因为之前我本人照着网上的教程安装卸载了十多次也无法正常使用,不希望后面的兄弟继续浪费时间,如果不 ...
- FTP服务器搭建(Centos7)
1.1.1 查看是否安装vsftp rpm -qa | grep vsftpd 1.1.2 如果没有安装: yum -y install vsftpd 1.2.3 vsftpd.conf 配置文件 匿 ...
- win10用filezilla server搭建ftp服务器一直无法访问
win10用filezilla server搭建ftp服务器一直无法访问?? 是防火墙导致的,防火墙中允许filezilla server程序的
- Linux之匿名FTP服务器搭建
FTP(File Transfer Protocol)是在服务器与客户端进行文件传输的一种传输协议.本次介绍的是vsftpd的软件体验ftp服务. FTP服务器默认情况下依据用户登录情况分为三种不同的 ...
随机推荐
- 关于 antd tree 组件的推拽操作
最近项目中使用到 tree 组件的推拽操作, 按常理来说应该主要用到其中的 onDrop 事件,但其中的参数又没有详细的说明,只是在官网给了个例子,网上搜索后又没有发现到位的总结. 因此经过N次的测试 ...
- ELK数据迁移,ES快照备份迁移
通过curl命令或者kibana快照备份,恢复的方式进行数据迁移 环境介绍 之前创建的ELK 因为VPC环境的问题,需要对ELK从新部署,但是还需要保留现有的数据,于是便有了这篇文档. 10.0.20 ...
- noip模拟19/20
这两场考试大部分的题都考过,然鹅有的 \(trick\) 忘了,有的当时咕了(虽然现在还咕着) 首先是 \(v\) 这道题需要加一个小优化,对于较小的状态应该直接用数组记录,较大的再用 map 记 然 ...
- CSS导航菜单(一级菜单)
index.html <div class="nav"> <ul> <li><a href="#">Java&l ...
- 关于FeignClient上的RequestMapping不能生效的问题
问题 我有两个FeignClient共同继承了一个接口,两个Client有各自不同的url实现,其中一个需要加上类似于@RequestMapping作用在类上的效果,因为@RequestMapping ...
- Windows Phone 页面之间参数传递方法
目前对WP7开发正在研究,对页面之间参数传递进行了一个小总结,有不正确的地方,欢迎大家指正.. WP7编程采用的技术是Silverlight,页面之间参数传递的方式主要有 通过NavigationCo ...
- Java大数操作
Java的Math包中提供了两个类用于对大数进行操作: BigInteger类,用于大整数的操作 BigDecimal类,用于大的小数操作 BigInteger类 Java中的基本类型中,表示整数的有 ...
- PHP中的一些杂项函数学习
今天来学习的这些杂项函数在官方文档中都是放在一个杂项扩展中的,其实这些函数都并不是什么什么特别的扩展,也不需要安装什么东西就可以使用,它们就是一些简单的功能函数而已.当然,其中不少内容也是我们经常会使 ...
- 【PHP数据结构】队列的相关逻辑操作
在逻辑结构中,我们已经学习了一个非常经典的结构类型:栈.今天,我们就来学习另外一个也是非常经典的逻辑结构类型:队列.相信不少同学已经使用过 redis . rabbitmq 之类的缓存队列工具.其实, ...
- TP5多条件搜索,同时有必要条件
$model = $this->model; // 查询是否有搜索参数 $search = input('?get.search') ? trim(input('get.search')) : ...