
netty 处理客户端连接
Netty如何处理连接事件
上文讲了Netty如何绑定端口,现在我们来阅读下netty如何处理connect事件。上文我们说了NioEventLoop启动后不断去调用select的事件,当客户端连接时候,回触发processSelectedKeys方法,然后调用
processSelectedKey方法
| SelectKey | 说明 |
|---|---|
| OP_READ | 读 1 |
| OP_WRITE | 写 4 |
| OP_CONNECT | 客户端connect 8 |
| OP_ACCEPT | 连接 16 |
    private void processSelectedKey(SelectionKey k, AbstractNioChannel ch) {
        // 省略。。。
        try {
            // 16 是连接事件
            int readyOps = k.readyOps();
            // We first need to call finishConnect() before try to trigger a read(...) or write(...) as otherwise
            // the NIO JDK channel implementation may throw a NotYetConnectedException.
            if ((readyOps & SelectionKey.OP_CONNECT) != 0) {
                // remove OP_CONNECT as otherwise Selector.select(..) will always return without blocking
                // See https://github.com/netty/netty/issues/924
                int ops = k.interestOps();
                ops &= ~SelectionKey.OP_CONNECT;
                k.interestOps(ops);

                unsafe.finishConnect();
            }

            // Process OP_WRITE first as we may be able to write some queued buffers and so free memory.
            if ((readyOps & SelectionKey.OP_WRITE) != 0) {
                // Call forceFlush which will also take care of clear the OP_WRITE once there is nothing left to write
                ch.unsafe().forceFlush();
            }

            // Also check for readOps of 0 to workaround possible JDK bug which may otherwise lead
            if ((readyOps & (SelectionKey.OP_READ | SelectionKey.OP_ACCEPT)) != 0 || readyOps == 0) {
               // 调用NioMessageUnsafe的read方法
                unsafe.read();
            }
        } catch (CancelledKeyException ignored) {
            unsafe.close(unsafe.voidPromise());
        }
    }
通过代码我们知道调用的是NioMessageUnsafe的read方法,进入方法我们源码,我门发现其调用了NioServerSocketChannel的doReadMessages方法,
      try {
                    do {
                        // 调用NioServerSocketChannel的doReadMessages方法
                        int localRead = doReadMessages(readBuf);
                        if (localRead == 0) {
                            break;
                        }
                        if (localRead < 0) {
                            closed = true;
                            break;
                        }

                        allocHandle.incMessagesRead(localRead);
                    } while (continueReading(allocHandle));
                } catch (Throwable t) {
                    exception = t;
                }
                int size = readBuf.size();
                for (int i = 0; i < size; i ++) {
                    readPending = false;
                    // 触发fireChannelRead事件
                    pipeline.fireChannelRead(readBuf.get(i));
                }
    @Override
    protected int doReadMessages(List<Object> buf) throws Exception {
       //这里处理java的accpet事件
        SocketChannel ch = SocketUtils.accept(javaChannel());

        try {
            if (ch != null) {
                // 丢到buf里 然后触发channelRead事件
                buf.add(new NioSocketChannel(this, ch));
                return 1;
            }
        } catch (Throwable t) {
            logger.warn("Failed to create a new channel from an accepted socket.", t);

            try {
                ch.close();
            } catch (Throwable t2) {
                logger.warn("Failed to close a socket.", t2);
            }
        }

        return 0;
    }
之前文章我门在绑定端口时候,pipiline中添加了一个ServerBootstrapAcceptor类,我门看下其channelRead方法的实现
      @Override
        @SuppressWarnings("unchecked")
        public void channelRead(ChannelHandlerContext ctx, Object msg) {
            // 这个其实就是上面的NioSocketChannel
            final Channel child = (Channel) msg;
            // 我们启动设置的ChannelInitializer
            child.pipeline().addLast(childHandler);
            //设置 options
            setChannelOptions(child, childOptions, logger);       //设置 attributes
            setAttributes(child, childAttrs);

            try {
                // 注册child?
                childGroup.register(child).addListener(new ChannelFutureListener() {
                    @Override
                    public void operationComplete(ChannelFuture future) throws Exception {
                        if (!future.isSuccess()) {
                            forceClose(child, future.cause());
                        }
                    }
                });
            } catch (Throwable t) {
                forceClose(child, t);
            }
        }
接下来我们继续看下childGroup.register(child)如何注册channel的。逻辑就是调用EveentLoopGrpoup的next方法分配SingleThreadEventLoop,调用其register方法
    @Override
    public ChannelFuture register(Channel channel) {
        return register(new DefaultChannelPromise(channel, this));
    }

    @Override
    public ChannelFuture register(final ChannelPromise promise) {
        ObjectUtil.checkNotNull(promise, "promise");
        // 最终走到NioSocketChannel的unsafe对象,registry这个方法在Abstract&AbstractUnsafe对象里实现
        promise.channel().unsafe().register(this, promise);
        return promise;
    }
我们看下register方法实现,我们发现这个其实跟NioServerSocketChannel的注册是一样的,绑定EventLoop,并且开启EventLoop,然后调用其
       @Override
        public final void register(EventLoop eventLoop, final ChannelPromise promise) {
            ObjectUtil.checkNotNull(eventLoop, "eventLoop");
            if (isRegistered()) {
                promise.setFailure(new IllegalStateException("registered to an event loop already"));
                return;
            }
            if (!isCompatible(eventLoop)) {
                promise.setFailure(
                        new IllegalStateException("incompatible event loop type: " + eventLoop.getClass().getName()));
                return;
            }
            // 绑定当前的EventLoop
            AbstractChannel.this.eventLoop = eventLoop;

            if (eventLoop.inEventLoop()) {
                register0(promise);
            } else {
                try {
                  // 第一次提交Runnable会启动EventLoop线程去启动事件,具体之前Netty绑定端口文章我写过。如何去启动的
                    eventLoop.execute(new Runnable() {
                        @Override
                        public void run() {
                            register0(promise);
                        }
                    });
                } catch (Throwable t) {
                    logger.warn(
                            "Force-closing a channel whose registration task was not accepted by an event loop: {}",
                            AbstractChannel.this, t);
                    closeForcibly();
                    closeFuture.setClosed();
                    safeSetFailure(promise, t);
                }
            }
        }
继续看下register0方法
 private void register0(ChannelPromise promise) {
            try {
                // check if the channel is still open as it could be closed in the mean time when the register
                // call was outside of the eventLoop
                if (!promise.setUncancellable() || !ensureOpen(promise)) {
                    return;
                }
                boolean firstRegistration = neverRegistered;
                // 开始注册绑定selectKey
                doRegister();
                neverRegistered = false;
                registered = true;

                // Ensure we call handlerAdded(...) before we actually notify the promise. This is needed as the
                // user may already fire events through the pipeline in the ChannelFutureListener.
                pipeline.invokeHandlerAddedIfNeeded();

                safeSetSuccess(promise);
                pipeline.fireChannelRegistered();
                // Only fire a channelActive if the channel has never been registered. This prevents firing
                // multiple channel actives if the channel is deregistered and re-registered.
                if (isActive()) {
                    //第一次注册时候会调用HeadContext的channelActive完成读事件的注册
                    if (firstRegistration) {
                        pipeline.fireChannelActive();
                    } else if (config().isAutoRead()) {
                        // This channel was registered before and autoRead() is set. This means we need to begin read
                        // again so that we process inbound data.
                        //
                        // See https://github.com/netty/netty/issues/4805
                        beginRead();
                    }
                }
            } catch (Throwable t) {
                // Close the channel directly to avoid FD leak.
                closeForcibly();
                closeFuture.setClosed();
                safeSetFailure(promise, t);
            }
        }
这边如何调用链路比较长 我这边以断点形式给大家展示一下
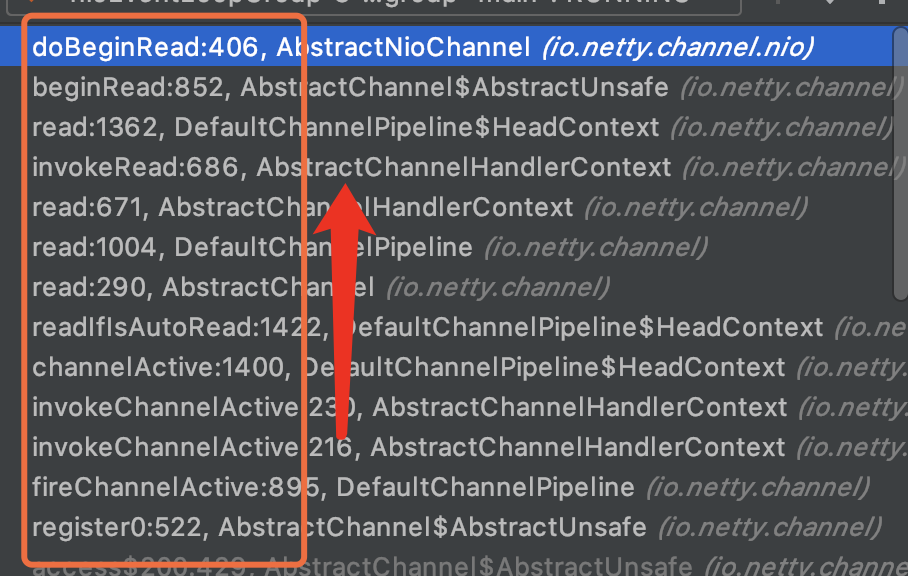
至此netty完成了处理客户端的连接,绑定EventLoop,并且开启EventLoop,完成读事件的注册,
结束
❝
识别下方二维码!回复: 「
入群」 ,扫码加入我们交流群!
❞


netty 处理客户端连接的更多相关文章
- netty(二)---客户端连接
概述 先了解一下 netty 大概框架图 ,可以看到客户端的创建和服务端最大的区别 - 服务端传入两个 EventLoopGroup,客户端传入一个 EventLoopGroup - channel ...
- Netty 多客户端连接与通信
实现场景: 聊天 服务端,客户端A,客户端B,客户端C.当客户端发送消息给服务端后,服务端在将这条消息广播个所有客户端户端A,客户端B,客户端C. 需求1: 客户端上线后,会通知所有客户端上线. 如客 ...
- Netty源码分析 (六)----- 客户端连接接入accept过程
通读本文,你会了解到1.netty如何接受新的请求2.netty如何给新请求分配reactor线程3.netty如何给每个新连接增加ChannelHandler netty中的reactor线程 ne ...
- 一个I/O线程可以并发处理N个客户端连接和读写操作 I/O复用模型 基于Buf操作NIO可以读取任意位置的数据 Channel中读取数据到Buffer中或将数据 Buffer 中写入到 Channel 事件驱动消息通知观察者模式
Tomcat那些事儿 https://mp.weixin.qq.com/s?__biz=MzI3MTEwODc5Ng==&mid=2650860016&idx=2&sn=549 ...
- 高版本->低版本迁移,低版本客户端连接高版本数据库EXP导出报错EXP-00008,ORA-01455,EXP-00000
生产环境: 源数据库:RHEL + Oracle 11.2.0.3 目标数据库:HP-UX + Oracle 10.2.0.4 需求:迁移部分表 11.2.0.3-->10.2.0.4,若 ...
- Redis客户端连接池
使用场景 对于一些大对象,或者初始化过程较长的可复用的对象,我们如果每次都new对象出来,那么意味着会耗费大量的时间. 我们可以将这些对象缓存起来,当接口调用完毕后,不是销毁对象,当下次使用的时候,直 ...
- 【RabbitMQ】CentOS安装RabbitMQ,及简单的Java客户端连接
在CentOS安装 因Rabbit MQ使用Erlang,所以需要先安装Erlang,安装过程中可能会遇到种种问题,可参考CentOS 6.5安装Erlang/OTP 17.0.然后就可以安装MQ了. ...
- redis客户端连接异常
本文参考:http://mdba.cn/2015/04/02/redistwemproxy-%e5%ae%a2%e6%88%b7%e7%ab%af%e8%bf%9e%e6%8e%a5%e5%bc%82 ...
- Mysql从客户端连接服务器连不上的问题
Mysql从客户端连接服务器连不上的问题 公司要用Mysql做一个测试,开始在自己的本地建一个Mysql数据库自己本地的程序再连上去,没有遇到过连接不上的问题.这次数据库在服务器上,从本地客户端连 ...
随机推荐
- Java学习之 多态 Polymorphism
转自:http://www.cnblogs.com/mengdd/archive/2012/12/25/2832288.html 多态的概念 多态==晚绑定. 不要把函数重载理解为多态. 因为多态是一 ...
- vue组件里不用的css还在搜索过滤来删除?试一下vue-clearcss吧!
这篇文章其实是推广介绍我个人的npm工具库,但你不会后悔点进来的(应该吧...)vue-clearcss 为什么要用它? 一个vue文件在长期迭代中css会越来越冗余,它不像html和js那么好删除, ...
- pgsql学习
--求所有人的薪水的总和,平均值,最大值,最小值 select sum(sal) , avg(sal), max(sal) , min(sal) from emp; --求总的行数 select co ...
- go语言初始化结构体指针
go语言初始化结构体指针 head:=&ListNode{} 或者 head:=new(ListNode)
- APMserv 5.2.6 安装教程
1.下载APMServ5.2.6.rar压缩包后解压,得到文件APMServ5.1.2.exe,其余两个没什么大用,APMServ解压缩说明.txt可以看一下,里面详细介绍了APMServ的功能和注意 ...
- Servlet学习笔记(三)之HttpServletRequest
HttpServletRequest(HttpServletRequest 想比 ServletRequest 添加与协议相关 API)对象代表客户端的请求,当客户端通过HTTP协议访问服务器时,HT ...
- 从kratos分析breaker熔断器源码实现
为什么要用熔断 前面我们讲过限流保证服务的可用性,不被突如其来的流量打爆.但是两种情况是限流解决不了的. 如果我们服务只能处理1000QPS,但是有10wQPS打过来,服务还是会炸.因为拒绝请求也需要 ...
- Kubernetes的安装部署
前言:简述kubernetes(k8s)集群 k8s集群基本功能组件由master和node组成. master节点上主要有kube-apiserver.kube-scheduler.kube-con ...
- Linux下查看哪个网口插了网线
场景: 一台服务器有多个网卡,一个网卡有多个网口,当插了一根网线的时候,不知道网线是插在哪一个网口. 1.查看网口信息 2.查看网口是否插了网线(命令ethtool) 命令:ethtool + 网口名 ...
- epoll经典代码示例
1. epoll原理 原理性的知识不再另做说明,我在这里附上收藏整理的两篇经典文章: select与epoll的本质关系. select.poll.epoll之间的区别. 2. epoll服务器端经典 ...