EasyTest-接口自动化测试平台部署上线问题记录
平台url: http://easytest.xyz
花巨资搞了个阿里云服务器,哈哈,有想体验指导的大佬私聊我~~~
部署环境
云服务器:Ubuntu Server 16.04.1 LTS 64位
python 主要包版本:
python 3.5.2

Django 2.0.3

BeautifulReport 0.0.9

celery 3.1.25

celery-with-redis 3.0

colorlog 4.0.2

crypto 1.4.1

ddt 1.2.1

django-celery 3.2.2

django-redis 4.0.0

gevent 1.4.0

greenlet 0.4.15

gunicorn 19.9.0

ipython 7.5.0

matplotlib 3.0.0

Pillow 6.0.0

pip 19.1.1

pycrypto 2.6.1

PyMySQL 0.9.3

qrcode 6.1

redis 2.10.6

requests 2.22.0
问题
1.为什么使用python3.5?
ubuntu使用python3.6在安装uwsgi的时候,老是报错,然后还么有找到原因...
2.定时任务运行报错:
1>.TypeError: can only concatenate tuple (not "NoneType") to tuple;
版本问题 需要 django-celery 3.1.17 celery 3.1.25 celery-with-redis 3.0; https://github.com/stanleylst/ansibleUI/issues/2
2>.TypeError: __init__() missing 1 required positional argument: 'on_delete';
django2.0 on_delete 是必须的 ; https://blog.csdn.net/qq_38038143/article/details/80286187
3>.AttributeError: type object 'BaseCommand' has no attribute 'option_list';
升级django-celery 到3.2.2 解决 ; https://chowyi.com/Django-1-10-celery-worker-%E5%90%AF%E5%8A%A8%E6%8A%A5%E9%94%99/
3.django2.2/mysql ImproperlyConfigured: mysqlclient 1.3.13 or newer is required; you have 0.9.3;
django版本问题,降级到diango 2.2 往下就可以了;
4. You need tcl 8.5 or newer in order to run the Redis test.
安装redis时报的错,升级tcl即可; https://www.cnblogs.com/Security-Darren/p/4381932.html
5.nginx负载均衡设置时,命名不能用下划线;
upstream myApp {
server 127.0.0.1:9000;
}
6.BeautifulReport模块;
result.report(filename=now + 'report.html', description=readConfig.title, log_path=report_path);
log_path 参数需要替换成 report_dir 参数
7.redis.exceptions.ResponseError: MISCONF Redis is configured to save RDB snapshots, but is currently not able to persist on disk. Commands that may modify the data set are disabled. Please check Redis logs for details about the error;
redis-cli 输入 config set stop-writes-on-bgsave-error no https://www.jianshu.com/p/3aaf21dd34d6
8.locust 守护进程; 要带小括号 (locust -f base/performance.py --master &) https://www.cnblogs.com/maoxianfei/p/7987217.html
启动slave 运行性能测试 locust -f base/performance.py --slave --master-host=129.28.187.64
9.定时任务守护进程 django-celery supervisor http://yshblog.com/blog/165
supervisord.conf
[program:celery.worker]

;指定运行目录

directory=/home/ubuntu/EasyTest/

;运行目录下执行命令

command=python manage.py celery worker --loglevel=info --logfile /home/ubuntu/EasyTest/celery_logs/celery_worker.log

;启动设置

numprocs=1          ;进程数

autostart=true      ;当supervisor启动时,程序将会自动启动

autorestart=true    ;自动重启

;停止信号,默认TERM

;中断:INT (类似于Ctrl+C)(kill -INT pid),退出后会将写文件或日志(推荐)

;终止:TERM (kill -TERM pid)

;挂起:HUP (kill -HUP pid),注意与Ctrl+Z/kill -stop pid不同

;从容停止:QUIT (kill -QUIT pid)

stopsignal=INT

;输出日志

stdout_logfile=/home/ubuntu/EasyTest/celery_logs/celery_worker.log

stdout_logfile_maxbytes=10MB  ;默认最大50M

stdout_logfile_backups=10     ;日志文件备份数,默认为10

;错误日志

redirect_stderr=false         ;为true表示禁止监听错误

stderr_logfile=/home/ubuntu/EasyTest/celery_logs/celery_worker_err.log

stderr_logfile_maxbytes=10MB

stderr_logfile_backups=10

[program:celery.beat]

;指定运行目录

directory=/home/ubuntu/EasyTest/

;运行目录下执行命令

command=celery -A EasyTest beat -l info --loglevel info --logfile /home/ubuntu/EasyTest/celery_logs/celery_beat.log

;启动设置

numprocs=1          ;进程数

autostart=true      ;当supervisor启动时,程序将会自动启动

autorestart=true    ;自动重启

;停止信号

stopsignal=INT
启动和关闭supervisor
启动supervisor输入如下命令,使用具体的配置文件执行:
supervisord -c supervisord.conf
关闭supervisord需要通过supervisor的控制器:
supervisorctl -c supervisord.conf shutdown
重启supervisord也是通过supervisor的控制器:
supervisorctl -c supervisord.conf reload
10.django 匿名用户限制;
装饰器 @login_required
11.异常页面配置 400 403 404 500 https://zhuanlan.zhihu.com/p/38006919
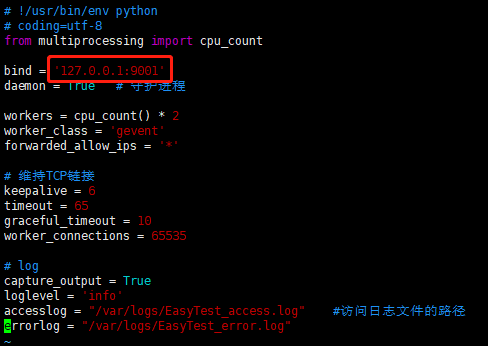
12.gunicorn配置;
启动命令:gunicorn -c gunicorn-config.py EasyTest.wsgi:application
gunicorn-config.py
# !/usr/bin/env python

# coding=utf-8

from multiprocessing import cpu_count

bind = '127.0.0.1:9000'

daemon = True   # 守护进程

workers = cpu_count() * 2

worker_class = 'gevent'

forwarded_allow_ips = '*'

# 维持TCP链接

keepalive = 6

timeout = 65

graceful_timeout = 10

worker_connections = 65535

# log

capture_output = True

loglevel = 'info'

accesslog = "/tmp/EasyTest_access.log"    #访问日志文件的路径

errorlog = "/tmp/EasyTest_error.log"
13.nginx配置;
nginx启动命令:sudo /usr/local/nginx/sbin/nginx
nginx.conf
#user  nobody;

worker_processes  4;

#error_log  logs/error.log;

#error_log  logs/error.log  notice;

#error_log  logs/error.log  info;

pid        logs/nginx.pid;

worker_rlimit_nofile 65535;

events {

    use epoll;

    multi_accept on;

    worker_connections  10240;

    }

http {

    sendfile on;

    tcp_nopush on;

    tcp_nodelay on;

    keepalive_timeout 65;

    types_hash_max_size 2048;

    include       mime.types;

    default_type  application/octet-stream;

    server_names_hash_bucket_size 128;

    client_header_buffer_size 128k;

    log_format  main  '$remote_addr - $remote_user [$time_local] "$request" '

                      '$status $body_bytes_sent "$http_referer" '

                     '"$http_user_agent" "$http_x_forwarded_for"';

    #access_log  logs/access.log  main;

    # keepalive_timeout  0;

    gzip  on;

    gzip_disable "msie6";

    gzip_vary on;

    gzip_proxied any;

    gzip_comp_level 6;

    gzip_buffers 16 8k;

    gzip_http_version 1.1;

    gzip_types text/plain text/css application/json application/x-javascript text/xml application/xml application/xml+rss text/javascript;

    upstream myApp {

        server 127.0.0.1:9000;

    }

    server {

        listen       80 ;

        server_name  129.28.187.64;

        #charset koi8-r;

        charset utf-8;

        access_log  /home/ubuntu/EasyTest/logs/access.log  main;

	error_log   /home/ubuntu/EasyTest/logs/error.log;

	location = /favicon.ico  {

            empty_gif;

            access_log off;

        }

        location /media/ {

            root   /home/ubuntu/EasyTest/;

            expires 30d;

            access_log off;

        }

        location /static/ {

            alias    /var/static/static/;

        }

        location / {

  	    root html;

	    index index.html index.htm;

            proxy_set_header X-Forwarded-For $proxy_add_x_forwarded_for;

            proxy_connect_timeout 300s;

            proxy_send_timeout 300s;

            proxy_read_timeout 300s;

            proxy_redirect off;

            proxy_pass http://myApp;

        }

    }

}
14.supervisord启动报错; Error: Another program is already listening on a port that one of our HTTP servers is configured to use. Shut this program down first before starting supervisord.
ps -ef | grep supervisord 杀掉进程,重新启动;
15.ubuntu--matplotlib显示中文; https://blog.csdn.net/jeff_liu_sky_/article/details/54023745
下载simhei.ttf中文字体,放入 .virtualenvs/env/lib/python3.5/site-packages/matplotlib/mpl-data/fonts/ttf 中;
代码中设置
import matplotlib as mpl

from matplotlib import pyplot as plt

mpl.rcParams[u'font.sans-serif'] = ['simhei']

mpl.rcParams['axes.unicode_minus'] = False

plt.title(u'测试用例运行结果')
16.mysql数据库保存时报错:django.db.utils.InternalError: (1153, "Got a packet bigger than 'max_allowed_packet' bytes")
插入数据库数据过大导致; https://stackoverflow.com/questions/93128/mysql-error-1153-got-a-packet-bigger-than-max-allowed-packet-bytes
在mysql中执行:set global net_buffer_length=1000000; set global max_allowed_packet=1000000000;
17.安装jenkins;
sudo apt-get install openjdk-8-jdkwget -q -O - https://pkg.jenkins.io/debian/jenkins.io.key | sudo apt-key add -
sudo sh -c 'echo deb https://pkg.jenkins.io/debian-stable binary/ > /etc/apt/sources.list.d/jenkins.list'
sudo apt-get update
sudo apt-get install jenkins
执行 sudo apt-get install jenkins 时,可能会遇到各种小问题,可能是python2和python3不兼容,按照提示,修改py源码内容即可;
jenkins 密码:/var/lib/jenkins/secrets/initialAdminPassword
  service jenkins start 开始

  service jenkins restart 重启

  service jenkins stop 停止

  service jenkins status 查看状态
18.jenkins 重启 django + gunicorn 项目:
  shell重启项目脚本
# !/bin/sh
sudo cp -Rf /var/lib/jenkins/workspace/django-EasyTest/* /home/ubuntu/project/
source /home/ubuntu/.virtualenvs/env/bin/activate
PROCESS=`ps -e | grep gunicorn | awk '{printf "%d\n", $1}'`
echo $PROCESS
for i in $PROCESS
do
echo "Kill the gunicorn process [ $i ]"
sudo kill -9 $i
done
cd /home/ubuntu/
echo 'stop server finish!'
sleep 2s
cd /home/ubuntu/project/
gunicorn -c /home/ubuntu/project/gunicorn-config.py EasyTest.wsgi:application
echo 'start server success!!!'
exit 0
  issues:
  shell 中启动python虚拟环境:
    source /home/ubuntu/.virtualenvs/env/bin/activate
  source: not found
原因: ls -l `which sh` 提示/bin/sh -> dash
这说明是用dash来进行解析的。
改回方法:
命令行执行:sudo dpkg-reconfigure dash
在界面中选择no
再ls -l `which sh` 提示/bin/sh -> bash
19.防火墙
https://www.cnblogs.com/sweet521/p/5733466.html
sudo apt-get install ufw
sudo ufw enable
sudo ufw default deny sudo ufw enable|disable
sudo ufw allow 端口 运行访问端口
指定用户组操作文件
sudo chown ubuntu:ubuntu -R EasyTest/logs/
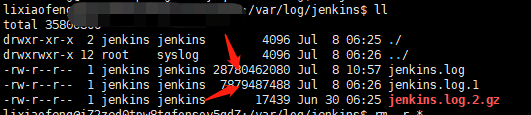
20. OSError: [Errno 28] No space left on device
df -h

inode耗尽导致No space left on device;
解决:删除 var的一个子目录下一些没用的临时文件和日志文件;通过删除大量的小文件得以解决
删除jenkins日志文件,然后正常了呢!
21.修改admin和flower返回平台路径
admin:/home/lixiaofeng/.virtualenvs/env/lib/python3.5/site-packages/simpleui/templates/admin/index.html
flower:/home/lixiaofeng/.virtualenvs/env/lib/python3.5/site-packages/flower/templates/navbar.html
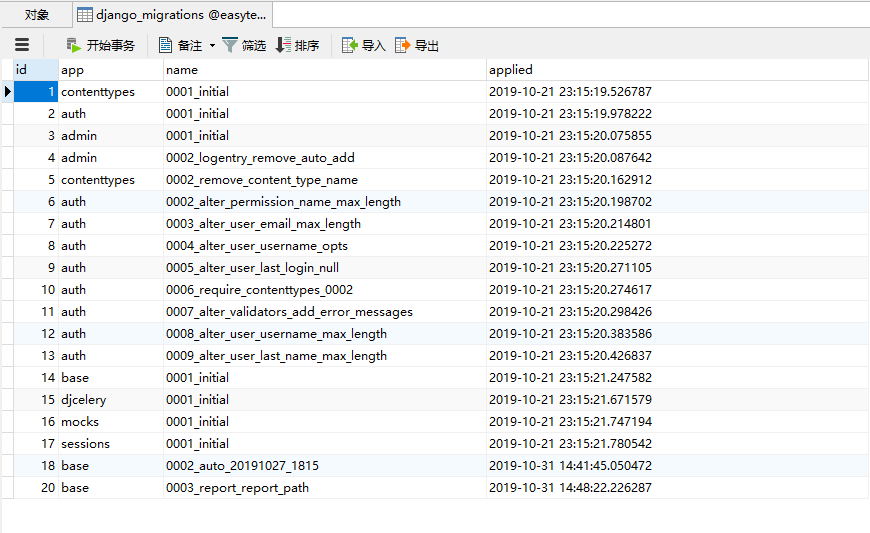
22.数据库迁移,提示 django.db.utils.InternalError: (1054, "Unknown column 'base_report.report_path' in 'field list'")
django_migrations 表中会有每次执行的记录,可以通过修改这些记录解决;
23. 一台服务器实现负载均衡
复制一份代码到别目录,修改 gunicorn-config.py,修改bind 参数 端口为9001;
修改nginx.conf;
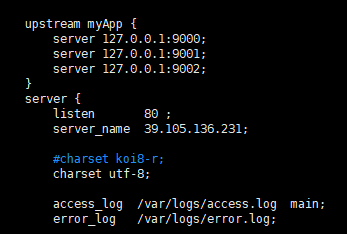
然后重启nginx和gunicorn;
EasyTest-接口自动化测试平台部署上线问题记录的更多相关文章
- 基于HttpRunner的接口自动化测试平台HttpRunnerManager(二)
https://github.com/HttpRunner/HttpRunnerManager HttpRunnerManager Design Philosophy 基于HttpRunner的接口自 ...
- Jmeter+ant+jenkins接口自动化测试 平台搭建(一)
平台简介 一个完整的接口自动化测试平台需要支持接口的自动执行,自动生成测试报告,以及持续集成.Jmeter 支持接口的测试,Ant 支持自动构建,而 Jenkins 支持持续集成,所以三者组合在一起可 ...
- 接口自动化测试平台 http://120.79.232.23
接口自动化测试平台 http://120.79.232.23 T Name Latest commit message Commit time .idea 修改自动化用例修改接口时,其他接口信息被删的 ...
- 接口自动化测试平台-接入持续集成jenkins
开篇提到,自动化测试最终期望还是能接入持续集成系统jenkins,下面记录下Go接口自动化测试平台是如何设计接入jenkins的. 回到Go接口自动化测试平台,在web系统中触发测试任务执行的入口为: ...
- Django 接口自动化测试平台
本项目工程 github 地址:https://github.com/juno3550/InterfaceAutoTestPlatform 0. 引言 1. 登录功能 2. 项目 3. 模块 4. 测 ...
- Linux下搭建接口自动化测试平台
前言 我们今天来学习一下在Linux下如何搭建基于HttpRunner开发的接口自动化测试平台吧! 需要在Linux上提前准备的环境(下面是本人搭建时的环境): 1,Python 3.6.8 (可参考 ...
- Apifox(1)比postman更优秀的接口自动化测试平台
Apifox介绍 Apifox 是 API 文档.API 调试.API Mock.API 自动化测试一体化协作平台,定位 Postman + Swagger + Mock + JMeter.通过一套系 ...
- Jmeter+Ant+Jenkins构建接口自动化测试平台(Windows)
一.首先先介绍下我的环境: 1. win10系统 2. ant版本:apache-ant-1.10.1(作用:执行脚本,便于后期的持续集成,下载地址:http://ant.apache.org/bin ...
- HttpRunner Manager接口自动化测试平台实践(Windows)
1. 源码下载 github: https://github.com/HttpRunner/HttpRunnerManager 下载后放入项目目录,结构如下: 2.依赖环境 根据根目录require ...
随机推荐
- jquery 动态增加table行,动态删除table行
在html中我们大量的用到了局部刷新,局部刷新就是使用js来动态的修改html局部的数据.下面来介绍下使用jquery来动态的增加table的行,当然这种方式可以适用到任何的html组件中去. < ...
- 各种框架实现了经典的 todo 应用
http://todomvc.com/ 版权声明:本文为博主原创文章,未经博主允许不得转载.
- leetcode-easy-listnode-19 remove nth node from end of list
mycode 88.29% 关键是一定要head前新建一个节点,否则要分类讨论很多次来避免slow或者fast出现None.next的错误 # Definition for singly-linke ...
- SpringBoot上传文件临时失效问题
线上的系统中不能上传文件了,出现如下错误: org.springframework.web.multipart.MultipartException: Could not parse multipar ...
- 全面解读php-网络协议
一.OSI七层模型 1.物理层 作用:建立,维护,断开物理连接 2.数据链路层 作用:建立逻辑连接,进行硬件地址寻址,差错校验等功能. 3.网络层 作用:进行逻辑地址寻址,实现不同网络之间的路径选择. ...
- Jmeter(九)集合点
性能测试需要模拟大量用户并发,集合点能够尽量让虚拟用户同一时刻发送请求, 在Jmeter中集合点是通过定时器-同步定时器来完成的.
- ControlTemplate in WPF —— ListBox
<ResourceDictionary xmlns="http://schemas.microsoft.com/winfx/2006/xaml/presentation" x ...
- zabbix_server调优
调整zabbix_server参数 /usr/local/zabbix/etc/zabbix_server.conf StartPollers=160 StartPollersUnreachea ...
- sql server 2014安装后用sa登录问题
在使用的sql server的数据的情况下,安装数据过程,未指定使用sa的登录,只能使用windows的账户登录,那要怎么设置账户来使用sa账户登录账号呢? 首先先打开的是sql server man ...
- linux进阶命令
1.输出重定向:一般命令的输出都会显示在终端中,有些时候需要将一些命令的执行结果想要保存到文件中进行后续的分析/统计,则这时候需要使用到的输出重定向技术. >:覆盖输出,会覆盖掉原先的文件内容 ...