linux安装mysql(tar.gz)
1. 查看卸载自带的mysql
# rpm -qa|grep MySQL
MySQL-X.X.X
#rpm -e MySQL-X.X.X
# rpm -qa|grep mariadb #有些版本还得查看卸载这个玩意,貌似mysql开源的一个数据库
2. 下载安装包
https://dev.mysql.com/downloads/mysql/5.5.html#downloads(官方下载地址)
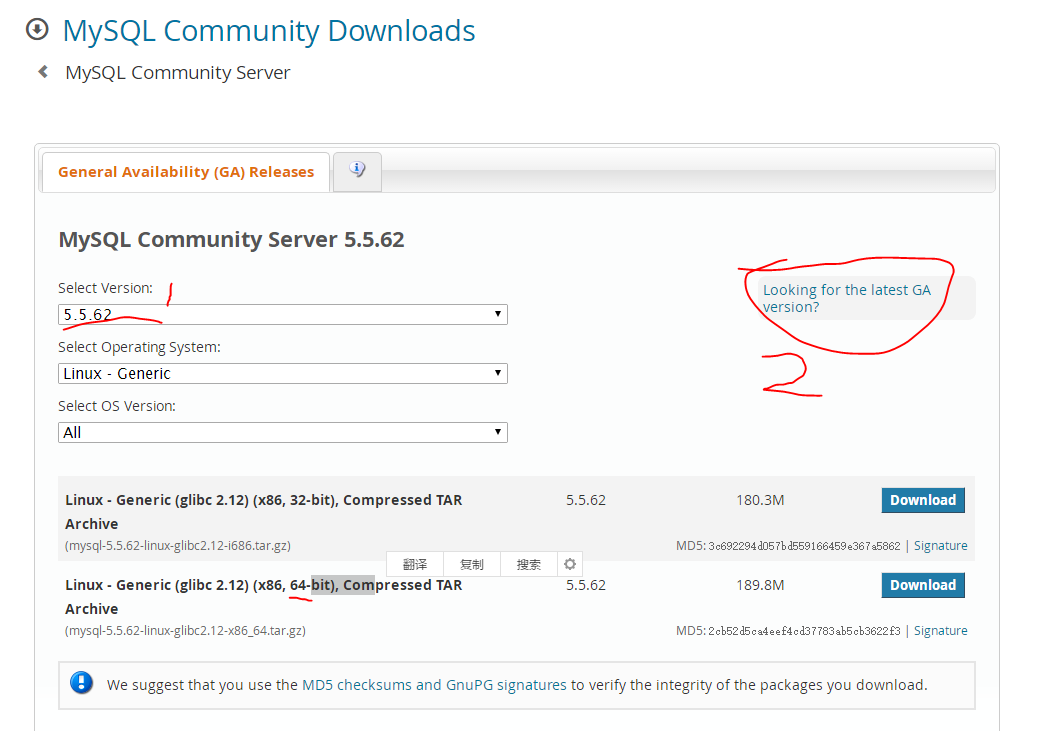
位置1:选择对应的版本
位置2:更多版本的链接
备注:下载之后,确定有script目录和bin目录。
3.安装包上传到linux机器上
4. 解压到安装目录
# tar -zxvf mysql-5.5.62-linux-glibc2.12-x86_64.tar.gz -C /opt/module/
# mv mysql-5.5.62-linux-glibc2.12-x86_64 mysql-5.5.62 #重命名一下
5. 修改mysql的配置文件
# vim /etc/my.cnf
[mysql]
# 设置mysql客户端默认字符集
default-character-set=utf8
socket=/var/lib/mysql/mysql.sock
[mysqld]
skip-name-resolve
#设置3306端口
port = 3306
socket=/var/lib/mysql/mysql.sock
# 设置mysql的安装目录,(注意,目录写自己的)
basedir=/opt/module/mysql-5.5.62
# 设置mysql数据库的数据的存放目录, (注意,目录写自己的)
datadir=/opt/module/mysql-5.5.62/data
# 允许最大连接数
max_connections=200
# 服务端使用的字符集默认为8比特编码的latin1字符集
character-set-server=utf8
# 创建新表时将使用的默认存储引擎
default-storage-engine=INNODB
lower_case_table_name=1
max_allowed_packet=16M
6. 添加mysql用户和用户组
# cd /opt/module/mysql-5.5.62/ #到mysql安装目录
# groupadd mysql
# useradd -g mysql mysql
# chown -R mysql:mysql ./
7. 安装mysql
[root@slave1 mysql-5.5.62]# ./scripts/mysql_install_db --user=mysql --basedir=/opt/module/mysql-5.5.62/ --datadir=/opt/module/mysql-5.5.62/data/
Installing MySQL system tables...
191215 21:20:18 [Warning] Using unique option prefix lower_case_table_name instead of lower_case_table_names is deprecated and will be removed in a future release. Please use the full name instead.
191215 21:20:18 [Note] Ignoring --secure-file-priv value as server is running with --bootstrap.
191215 21:20:18 [Note] /opt/module/mysql-5.5.62//bin/mysqld (mysqld 5.5.62) starting as process 101287 ...
OK
Filling help tables...
191215 21:20:18 [Warning] Using unique option prefix lower_case_table_name instead of lower_case_table_names is deprecated and will be removed in a future release. Please use the full name instead.
191215 21:20:18 [Note] Ignoring --secure-file-priv value as server is running with --bootstrap.
191215 21:20:18 [Note] /opt/module/mysql-5.5.62//bin/mysqld (mysqld 5.5.62) starting as process 101294 ...
OK
To start mysqld at boot time you have to copy
support-files/mysql.server to the right place for your system
PLEASE REMEMBER TO SET A PASSWORD FOR THE MySQL root USER !
To do so, start the server, then issue the following commands:
/opt/module/mysql-5.5.62//bin/mysqladmin -u root password 'new-password'
/opt/module/mysql-5.5.62//bin/mysqladmin -u root -h 192.168.222.101 password 'new-password'
Alternatively you can run:
/opt/module/mysql-5.5.62//bin/mysql_secure_installation
which will also give you the option of removing the test
databases and anonymous user created by default. This is
strongly recommended for production servers.
See the manual for more instructions.
You can start the MySQL daemon with:
cd /opt/module/mysql-5.5.62/ ; /opt/module/mysql-5.5.62//bin/mysqld_safe &
You can test the MySQL daemon with mysql-test-run.pl
cd /opt/module/mysql-5.5.62//mysql-test ; perl mysql-test-run.pl
Please report any problems at http://bugs.mysql.com/
8. 配置mysql(能通过service start mysql这种命令来启动停止mysql)
# chown -R mysql:mysql data
# chown 777 /etc.my.cnf
# cp ./support-files/mysql.server /etc/rc.d/init.d/mysqld
# chmod +x /etc/rc.d/init.d/mysqld
# chkconfig --add mysqld
# chkconfig --list mysqld
# mkdir /var/lib/mysql
# chmod 777 /var/lib/mysql
9. 配置PATH
# vim /etc/profile
export PATH=$PATH:/opt/module/mysql-5.5.62/bin
# source /etc/profile
10. 启动mysql
[root@slave1 mysql-5.5.62]# service mysqld start
Starting MySQL.Logging to '/opt/module/mysql-5.5.62/data/slave1.err'.
. SUCCESS!
11. 登录mysql
[root@slave1 mysql-5.5.62]# mysql -uroot -p
Enter password: #直接回车就行,第一次登录没有密码
Welcome to the MySQL monitor. Commands end with ; or \g.
Your MySQL connection id is 2
Server version: 5.5.62 MySQL Community Server (GPL)
Copyright (c) 2000, 2018, Oracle and/or its affiliates. All rights reserved.
Oracle is a registered trademark of Oracle Corporation and/or its
affiliates. Other names may be trademarks of their respective
owners.
Type 'help;' or '\h' for help. Type '\c' to clear the current input statement.
mysql> set passport=passport("000000");
ERROR 1193 (HY000): Unknown system variable 'passport'
mysql> set password=password("000000"); #更改一下密码,以后用 000000 登录mysql
Query OK, 0 rows affected (0.02 sec)
mysql> exit
Bye
linux安装mysql(tar.gz)的更多相关文章
- linux 安装jdk-7u45-linux-x64.tar.gz
1.官网下载jdk-7u45-linux-x64.tar.gz 载地址:http://www.oracle.com/technetwork/java/javase/downloads/jdk8-dow ...
- mac 安装 mysql.tar.gz
解压目录到 MySQL 默认安装路径 /usr/local/mysql 下, /usr/local路径不存在时, 先 sudo mkdir /usr/local 创建. # 移动解压后的二进制包到安装 ...
- Centos 安装 mysql tar.gz
http://www.cnblogs.com/coderls/p/6848873.html
- linux安装mysql(shell一键安装)
1. 相关文件(install_mysql.sh.my.cnf.mysqld相关内容在文中最后面) 2. 将上面的文件上传到linux服务器某一目录下 3.给install_mysql.sh赋执行权限 ...
- linux安装mysql服务分两种安装方法:
linux安装mysql服务分两种安装方法: ①源码安装,优点是安装包比较小,只有十多M,缺点是安装依赖的库多,安装编译时间长,安装步骤复杂容易出错: ②使用官方编译好的二进制文件安装,优点是安装速度 ...
- 怎样从Mysql官网下载mysql.tar.gz版本的安装包
今天学习在Linux上部署项目,用到了Mysql,因此想要下载适用于Linux的安装版本,在Mysql官网找了半天,终于找到怎样下载了,这里写出来,以后大家找的时候就好找了. 第一步:在百度输入My ...
- 没有外网情况下linux安装mysql
首先linux要使用局域网 环境要求:局域网, windows系统, linux系统, mysql安装包mysql.tar.gz 注意:32位操作系统用32位安装包,64位系统用64位安装包,不 ...
- linux 安装mysql两种方式
yum -y install gcc gcc-c++ ncurses-devel cmake bison zlib zlib-devel libxml openssl dtrace ...
- linux安装mysql全纪录[包括yum和rpm安装,编码,远程连接以及大小写问题]
linux安装mysql全纪录[包括yum和rpm安装,编码,远程连接以及大小写问题] 一.查看mysql是否已经安装 使用“whereis mysql”命令来查看mysql安装路径: [root@h ...
- kali linux 安装 Mysql Can't read from messagefile 报错解决方案
1.下载安装包 下载地点:https://dev.mysql.com/downloads/mysql/ 或者 wget http://dev.mysql.com/get/Downloads/MySQL ...
随机推荐
- C++HeartCode
#include <iostream> int main() { int A=43,B=A/2, C=B/2,x,y,i=B,j=-C;for(y=0;y<B;j=(++y)-(C+ ...
- 配置apache密码认证
配置apache密码认证 apache提供了一系列的认证,授权,访问控制模块,我们这里选用最方便的mod_auth_basic,mod_authn_file,mod_authz_user这三个 ...
- MVC模式 和 MVVM模式
MVC模式 模型 - 视图 - 控制器或MVC,MVC是普遍的叫法,是一种软件设计模式,用于开发Web应用程序.模型- 视图 - 控制器模式是由以下三部分组成: 模型/Model - 一个负责维护数据 ...
- django orm(2)
目录 聚合函数 分组查询 F与Q查询 F查询 Q查询 事务 Django中的事务 orm字段及参数 自定义char字段 聚合函数 这里的聚合函数和SQL里的聚合函数对应,在使用前需要先进行模块的导入: ...
- 《转》tensorflow学习笔记
from http://m.blog.csdn.net/shengshengwang/article/details/75235860 1. RNN结构 解析: (1)one to one表示单输入单 ...
- 【leetcode】802. Find Eventual Safe States
题目如下: 解题思路:本题大多数人采用DFS的方法,这里我用的是另一种方法.我的思路是建立一次初始值为空的safe数组,然后遍历graph,找到graph[i]中所有元素都在safe中的元素,把i加入 ...
- python-获取类名和方法名,动态创建类和方法及属性
获取类名和方法名1.在函数外部获取函数名称,用.__name__获取2.在函数内部获取当前函数名称,用sys._getframe().f_code.co_name方法获取3.使用inspect模块动态 ...
- 虚拟机安装Windows系统,再安装orcale
本文出自:http://www.cnblogs.com/2186009311CFF/p/8724441.html 1.创建新虚拟机 2.选择自定义 3.选择workstation 5.x(据安装的系统 ...
- 3D世界变换
一直弄不清3D场景中scaleOrientation的作用,还有scale.orientation(roation).translation的顺序问题,以往都是试图查一下,关于前者网上几乎找不到什么清 ...
- Apache主要配置文件http.conf
1.基本概念 Define SRVROOT "/Apache24" ServerRoot "${SRVROOT}" #Apache安装的根路径 #Listen ...