Springboot+CAS单点登录
一:安装CAS
下载cas:https://github.com/apereo/cas
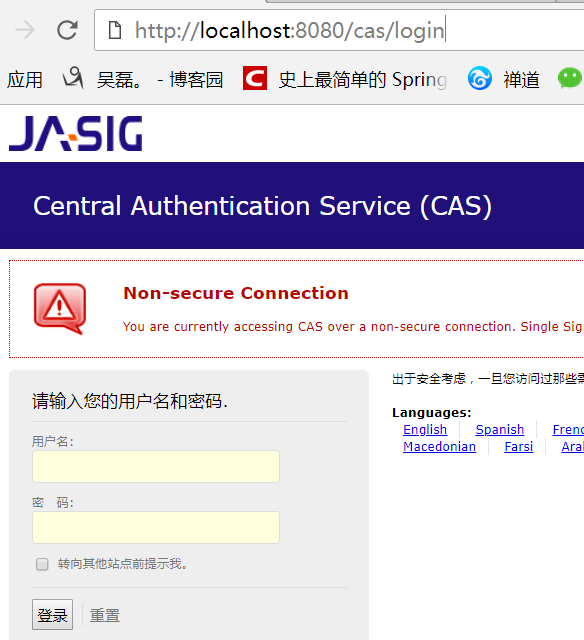
1.1 将cas并打成war包。放入一个干净的tomcat中,启动tomcat测试: http://localhost:8080/cas/login
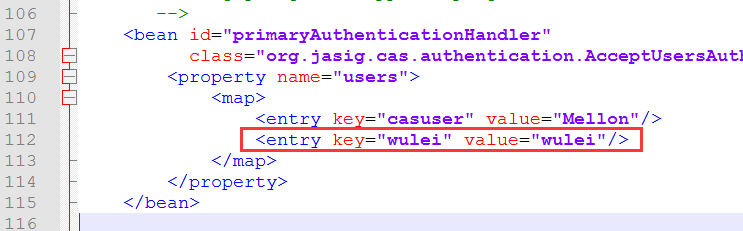
1.2 默认账号密码:casuser Mellon 我们可以在tomcat\webapps\cas\WEB-INF\deployerConfigContext.xml文件添加一个账号密码
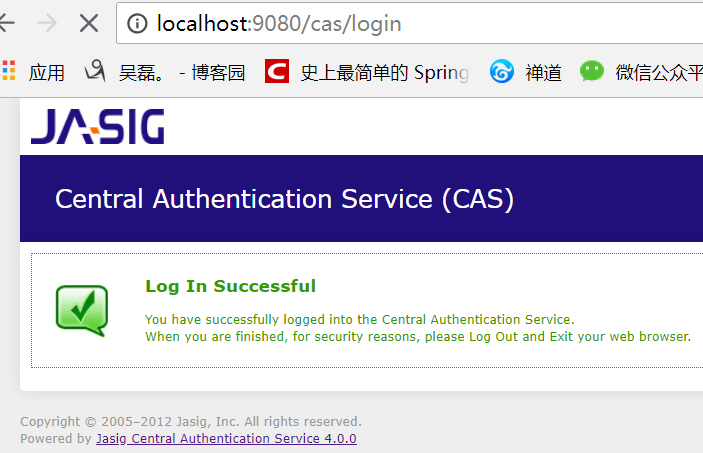
1.3 修改tomcat端口为9080, 并将tomcat\webapps\cas\WEB-INF\cas.properties的server.name改为http://localhost:9080
1.4 去除https认证:
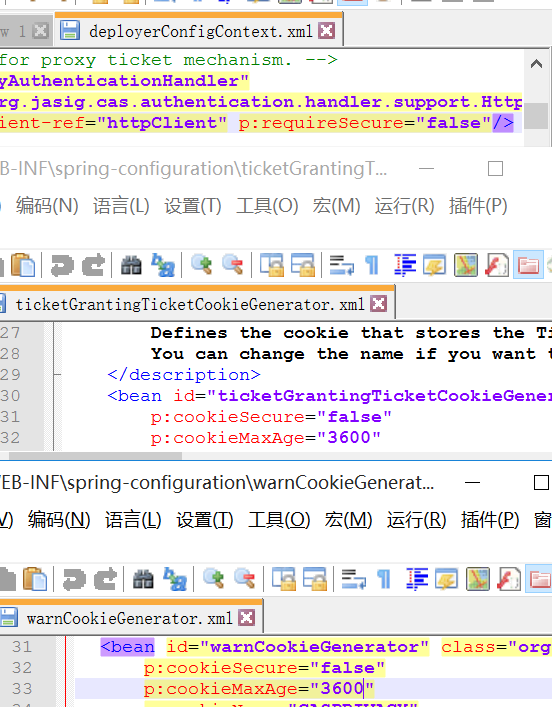
1.4.1 在tomcat\webapps\cas\WEB-INF\deployerConfigContext.xml文件

      的p:httpClient-ref="httpClient"后面添加p:requireSecure="false"

1.4.2 把tomcat\webapps\cas\WEB-INF\spring-configuration的

      ticketGrantingTicketCookieGenerator.xml文件里面把p:cookieSecure="true"改为false;

      p:cookieMaxAge="-1"改为3600(-1是不保存cookie,3600秒是一个小时,保存登录信息)

1.4.3 把tomcat\webapps\cas\WEB-INF\spring-configuration的

      warnCookieGenerator.xml的p:cookieSecure="true"改为false

      p:cookieMaxAge="-1"改为3600
1.5 配置单点登出: 将tomcat\webapps\cas\WEB-INF\cas-servlet.xml中${cas.logout.followServiceRedirects:false}括号里的值改为true
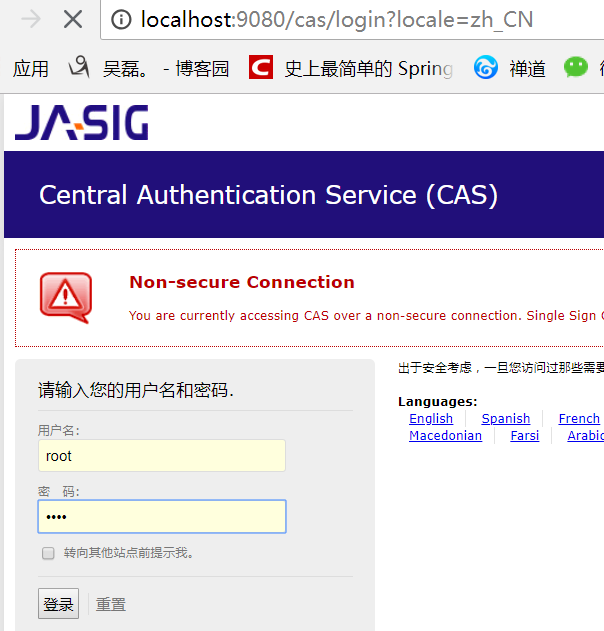
1.6 启动测试: 输入刚才配置的账号密码 wulei / wulei
二:配置数据源(CAS对接数据库)
2.1 在tomcat\webapps\cas\WEB-INF\lib里添加 c3p0连接池 mysql驱动 cas的jdbc支持包
2.2 修改tomcat\webapps\cas\WEB-INF\deployerConfigContext.xml文件
2.2.1 注释掉<entry key-ref="primaryAuthenticationHandler" value-ref="primaryPrincipalResolver" />;添加<entry key-ref="dbAuthHandler" value-ref="primaryPrincipalResolver"/>

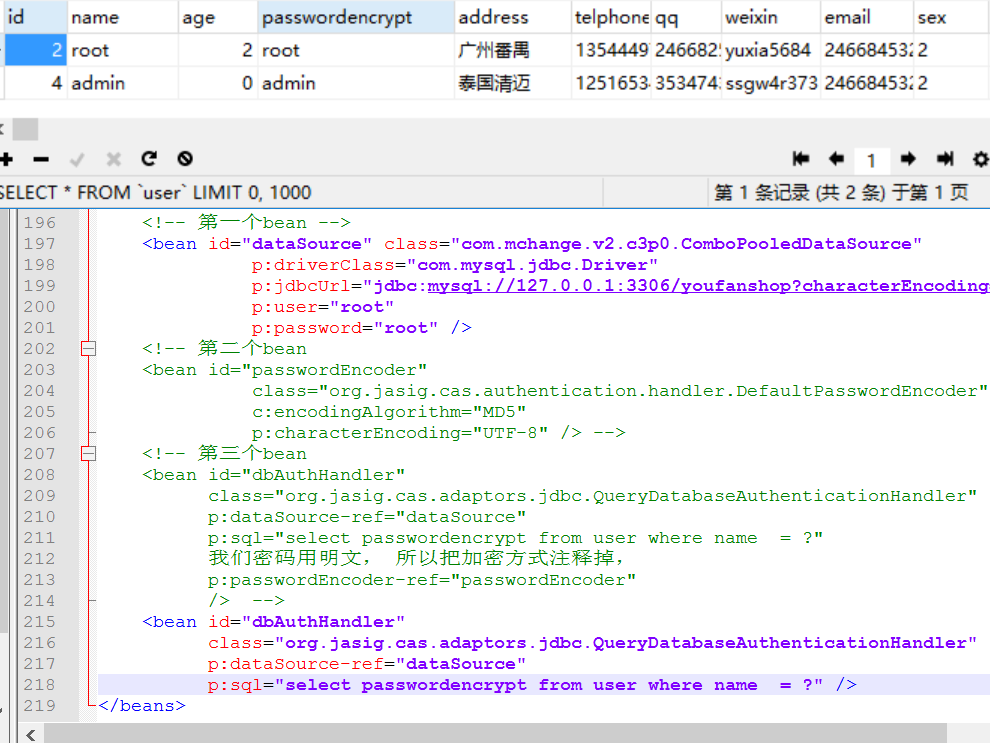
2.2.2 添加数据源 <bean id="dataSource" 添加加密方式 <bean id="passwordEncoder" 添加sql语句 <bean id="dbAuthHandler"
    <!-- 第一个bean -->

    <bean id="dataSource" class="com.mchange.v2.c3p0.ComboPooledDataSource"

              p:driverClass="com.mysql.jdbc.Driver"

              p:jdbcUrl="jdbc:mysql://127.0.0.1:3306/youfanshop?characterEncoding=utf8"

              p:user="root"

              p:password="root" />

    <!-- 第二个bean

    <bean id="passwordEncoder"

              class="org.jasig.cas.authentication.handler.DefaultPasswordEncoder"

              c:encodingAlgorithm="MD5"

              p:characterEncoding="UTF-8" /> -->

    <!-- 第三个bean

    <bean id="dbAuthHandler"

          class="org.jasig.cas.adaptors.jdbc.QueryDatabaseAuthenticationHandler"

          p:dataSource-ref="dataSource"

          p:sql="select passwordencrypt from user where name  = ?"

          我们密码用明文, 所以把加密方式注释掉,

          p:passwordEncoder-ref="passwordEncoder"

          />  -->

    <bean id="dbAuthHandler"

          class="org.jasig.cas.adaptors.jdbc.QueryDatabaseAuthenticationHandler"

          p:dataSource-ref="dataSource"

          p:sql="select passwordencrypt from user where name  = ?" />
2.3 重启测试(此时就能用数据库的账号密码登录了)
三:springBoot客户端
3.1 导包
    <parent>

        <groupId>org.springframework.boot</groupId>

        <artifactId>spring-boot-starter-parent</artifactId>

        <version>1.5.13.RELEASE</version>

        <relativePath/> <!-- lookup parent from repository -->

    </parent>

    <properties>

        <project.build.sourceEncoding>UTF-8</project.build.sourceEncoding>

        <project.reporting.outputEncoding>UTF-8</project.reporting.outputEncoding>

        <java.version>1.8</java.version>

    </properties>

    <dependencies>

        <!--web场景启动器,包含 Tomcat 和 spring-mvc restful  aop jackjson支持。 -->

        <dependency>

            <groupId>org.springframework.boot</groupId>

            <artifactId>spring-boot-starter-web</artifactId>

        </dependency>

        <!-- CAS依赖包 -->

        <dependency>

            <groupId>net.unicon.cas</groupId>

            <artifactId>cas-client-autoconfig-support</artifactId>

            <version>1.5.0-GA</version>

        </dependency>

    </dependencies>
3.2 application.properties
server.port=8081

cas.server-url-prefix=http\://127.0.0.1\:9080/cas

cas.server-login-url=http\://127.0.0.1\:9080/cas/login

cas.client-host-url=http\://127.0.0.1\:8081

cas.validation-type=CAS
3.3 配置类
import net.unicon.cas.client.configuration.CasClientConfigurerAdapter;

import net.unicon.cas.client.configuration.EnableCasClient;

import org.springframework.boot.web.servlet.FilterRegistrationBean;

import org.springframework.context.annotation.Configuration;

@Configuration

@EnableCasClient

public class CasConfigure extends CasClientConfigurerAdapter {

@Override

public void configureAuthenticationFilter(FilterRegistrationBean authenticationFilter) {

    super.configureAuthenticationFilter(authenticationFilter);

        authenticationFilter.getInitParameters().put("authenticationRedirectStrategyClass","com.patterncat.CustomAuthRedirectStrategy");

    }

}
3.4 控制器
@RestController

public class IndexController {

    @RequestMapping("/login")

    public String auth() {

        return "login success";

    }

}
3.5 主函数
@SpringBootApplication

public class Application {

     private static Logger log = Logger.getLogger(Application.class);

     public static void main(String[] args) {

            SpringApplication.run(Application.class, args);

            log.info("SpringBoot Start Success");

        }

}
测试: 浏览器输入 127.0.0.1:8081/login之前会先跳转到CAS的登陆页面,登录成功之后才会进入Controller。
Springboot+CAS单点登录的更多相关文章
- CAS单点登录原理简单介绍
1. SSO简介 1.1 单点登录定义 单点登录(Single sign on),英文名称缩写SSO,SSO的意思就是在多系统的环境中,登录单方系统,就可以在不用再次登录的情况下访问相关受信任的系统. ...
- Spring boot security权限管理集成cas单点登录
挣扎了两周,Spring security的cas终于搞出来了,废话不多说,开篇! Spring boot集成Spring security本篇是使用spring security集成cas,因此,先 ...
- CAS单点登录系列之极速入门于实战教程(4.2.7)
@ 目录 一. SSO简介 1.1 单点登录定义 1.2 单点登录角色 1.3 单点登录分类 二. CAS简介 2.1 CAS简单定义 2.2 CAS体系结构 2.3 CAS原理 三.CAS服务端搭建 ...
- SSO之CAS单点登录实例演示
本文目录: 一.概述 二.演示环境 三.JDK安装配置 四.安全证书配置 五.部署CAS-Server相关的Tomcat 六.部署CAS-Client相关的Tomcat 七. 测试验证SSO 一.概述 ...
- cas 单点登录出现org.jasig.cas.client.util.CommonUtils.getResponseFromServer - 拒绝连接 Connection refused
cas 单点登录出现org.jasig.cas.client.util.CommonUtils.getResponseFromServer - 拒绝连接 Connection refused 环境: ...
- CAS单点登录中文用户名乱码问题
CAS单点登录中文用户名乱码问题,有两种情况 1. CAS server乱码 即在向server端提交用户名和密码时,发生了乱码,解决方法是: 打开WEB-INF/web.xml,在其它的Filter ...
- CAS单点登录系统整合——注册的问题
最近一段时间在搞CAS单点登录系统,涉及到几个子系统的整合问题.对于注册,这里遇到了一个选择: 在子系统内完成注册,然后把信息同步到CAS系统: 在CAS系统中完成基本信息的注册,比如:用户名.邮箱. ...
- Asp.net Mvc4 使用Cas单点登录
因项目需要,使用了耶鲁大学的Cas单点登录方案,在java中使用一直正常,但是在.Net中碰到了循环重定向的问题,反复测试后,总算解决了,最终的配置如下: <?xml version=" ...
- CAS单点登录之mysql数据库用户验证及常见问题
前面已经介绍了CAS服务器的搭建,详情见:搭建CAS单点登录服务器.然而前面只是简单地介绍了服务器的搭建,其验证方式是原始的配置文件的方式,这显然不能满足日常的需求.下面介绍下通过mysql数据库认证 ...
随机推荐
- 创建ThreadFactory实例的多种方式
spring的CustomizableThreadFactory guava的MoreExecutors.platformThreadFactory()静态方法 guava的ThreadFactory ...
- Codeforces 960D Full Binary Tree Queries ( 思维 && 模拟 )
题意 : 给出一颗无限层的满二叉树,然后每个值为 X (根的 X 等于 1 ) 左孩子的值是 2*X,右孩子的值是 2*X+1 ,现在有两种操作,(1, x,k) 表示将 x 所在层的所有节点整体向右 ...
- css使用2
一.盒子模型 盒子模型 margin:用来调节盒子与盒子之间的距离(标签与标签之间距离) border:盒子的包装厚度(边框) padding:内部物体与盒子之间距离(文本与边框之间的距离) cont ...
- idea使用 git 撤销commit 原
填写commit的id 就可以取消这一次的commit
- Vue v-if以及 v-else 的使用
<!DOCTYPE html> <html> <head> <meta charset="utf-8"> <title> ...
- socket通信(TCP和UDP)
1.TCP 2.UDP
- from sklearn import datasets运行错误:ImportError: DLL load failed: 找不到指定的程序------解决办法
在运行集成学习的多数投票分类代码时,出现错误 from sklearn import datasets from sklearn.model_selection import cross_val_sc ...
- 通过同步上下文方式更新winform中的控件信息
SynchronizationContext 类是一个基类,可提供不带同步的自由线程上下文. 此类实现的同步模型的目的是使公共语言运行库内部的异步/同步操作能够针对不同的异步模型采取正确的行为.此模型 ...
- kafka 通信报文格式
1. 序列化一条消息 消息有 key 和 value kafka 提供了基础数据类型的序列化工具,对于业务的自定义类需要自行实现序列化 ProducerRecord 是对象,含 KV 和 header ...
- Openstack 实现技术分解 (3) 开发工具 — VIM & dotfiles
目录 目录 前文列表 扩展阅读 前言 插件管理 Vundle 主题 Solarized 浏览项目目录结构 Nerdtree Symbol 窗口 Tagbar 文件模糊查询 CtrlP 代码补全 You ...