
[iOS微博项目 - 1.7] - 版本新特性
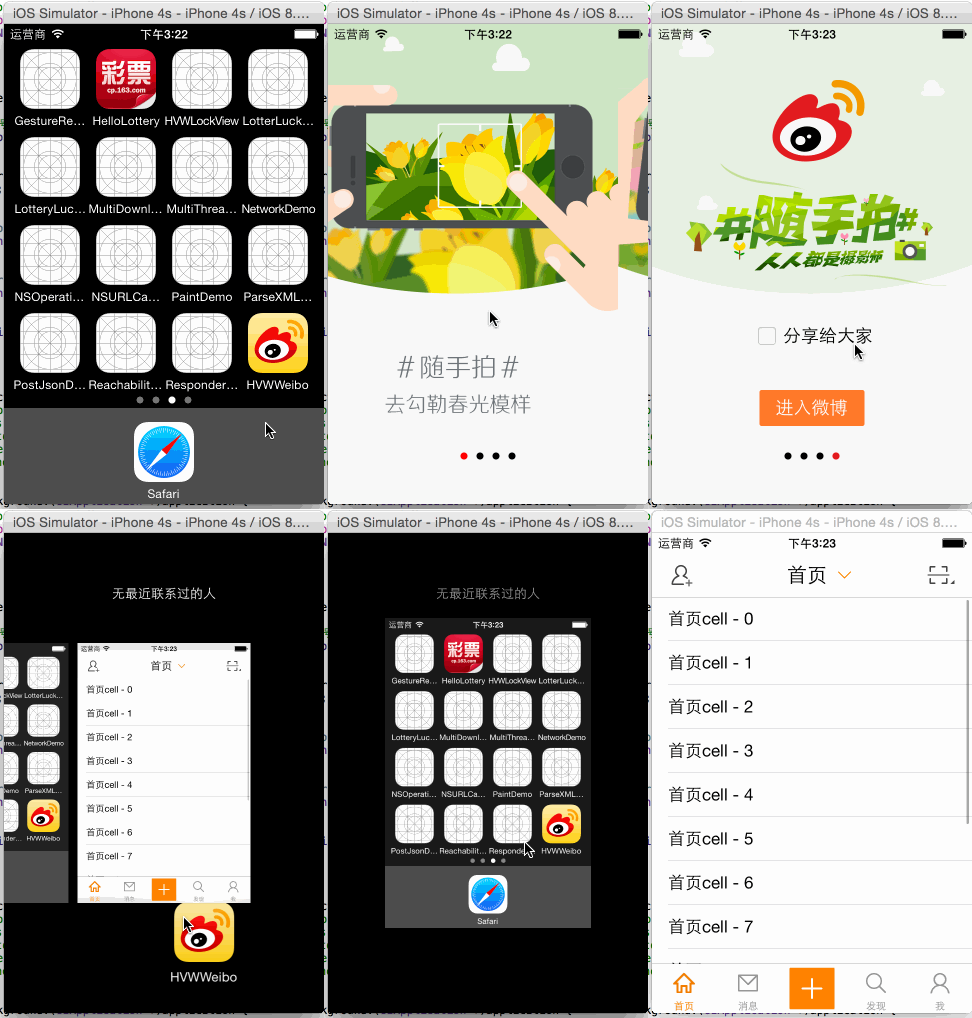
- 第一次使用新版本的时候,不直接进入app,而是展示新特性界面
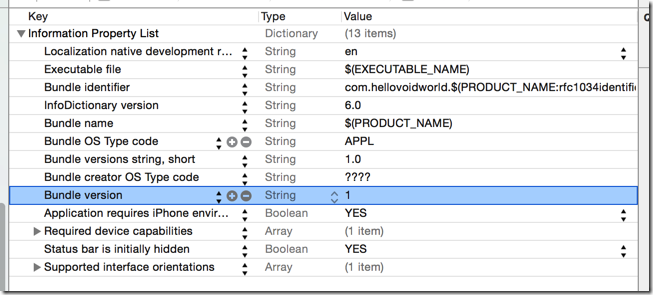
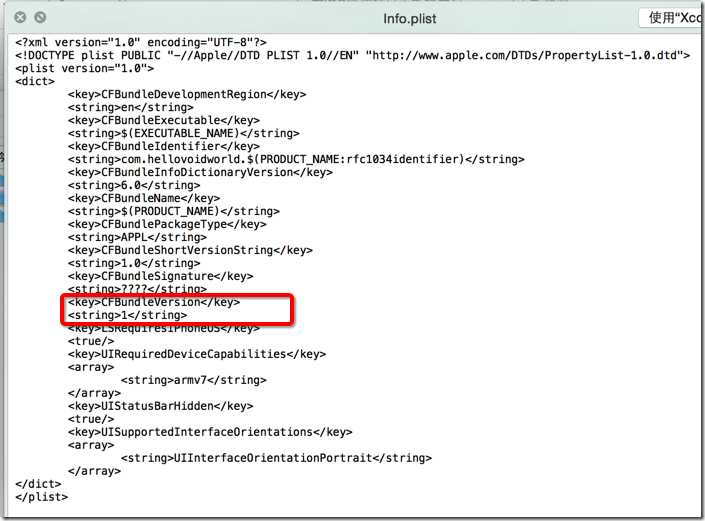
- [[NSBundle mainBundle] infoDictionary]取得当前版本号(最新版本),版本号存储在了info.plist中
- 从preference取得上一次使用的版本号
- 将讲个版本号进行对比,如果相同就是当前是最新版本,直接进入app;如果不相同,就进入新特性界面并保存最新版本号到preference
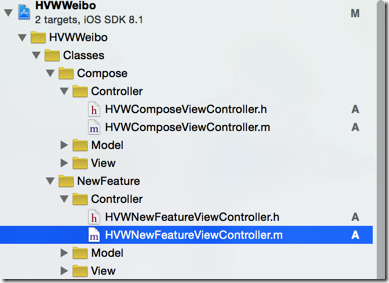
 - (BOOL)application:(UIApplication *)application didFinishLaunchingWithOptions:(NSDictionary *)launchOptions {

     // Override point for customization after application launch.

     // 启动后显示状态栏

     UIApplication *app = [UIApplication sharedApplication];

     app.statusBarHidden = NO;

     // 设置window

     self.window = [[UIWindow alloc] init];

     self.window.frame = [UIScreen mainScreen].bounds;

     /** 新版本特性 */

     // app现在的版本

     // 由于使用的时Core Foundation的东西,需要桥接

     NSString *versionKey = (__bridge NSString*) kCFBundleVersionKey;

     NSDictionary *infoDic = [[NSBundle mainBundle] infoDictionary];

     NSString *currentVersion = [infoDic objectForKey:versionKey];

     // 上次使用的版本

     NSUserDefaults *defaults = [NSUserDefaults standardUserDefaults];

     NSString *lastVersion = [defaults stringForKey:versionKey];

     // 如果版本变动了,存储新的版本号并启动新版本特性图

     if (![lastVersion isEqualToString:currentVersion]) {

         // 存储

         [defaults setObject:currentVersion forKey:versionKey];

         [defaults synchronize];

         // 开启app显示新特性

         HVWNewFeatureViewController *newFeatureVC = [[HVWNewFeatureViewController alloc] init];

         self.window.rootViewController = newFeatureVC;

     } else {

         // 创建根控制器

         HVWTabBarViewController *tabVC = [[HVWTabBarViewController alloc] init];

         self.window.rootViewController = tabVC;

     }

     [self.window makeKeyAndVisible];

     return YES;

 }
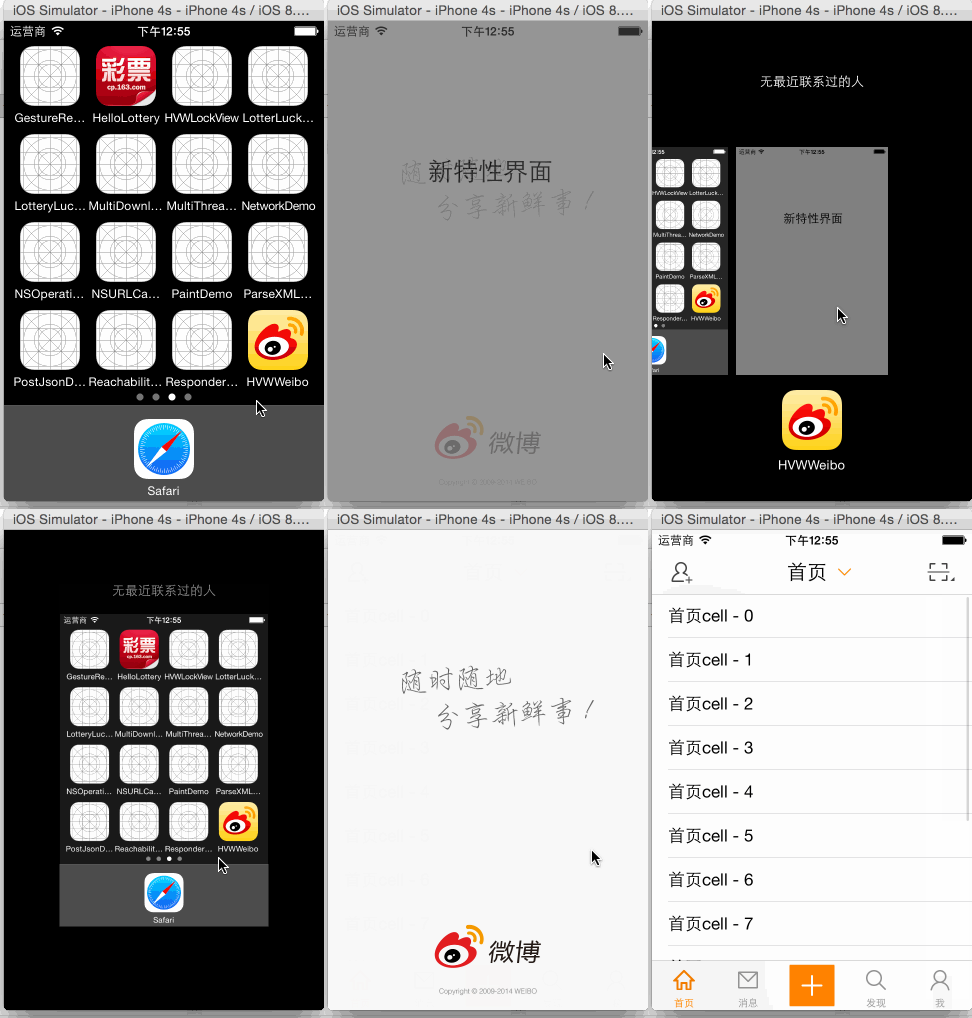
- 在特特性界面使用轮播方式显示若干个界面
- 最后一个界面提供一个分享功能和进入app功能
- 在新特性控制器的view上加入一个全屏的scrollView
 //

 //  HVWNewFeatureViewController.m

 //  HVWWeibo

 //

 //  Created by hellovoidworld on 15/2/3.

 //  Copyright (c) 2015年 hellovoidworld. All rights reserved.

 //

 #import "HVWNewFeatureViewController.h"

 #import "HVWTabBarViewController.h"

 #define NewFeatureCount 4

 @interface HVWNewFeatureViewController () <UIScrollViewDelegate>

 @property(nonatomic, strong) UIPageControl *pageControl;

 @end

 @implementation HVWNewFeatureViewController

 - (void)viewDidLoad {

     [super viewDidLoad];

     // Do any additional setup after loading the view.

     // 添加scrollView

     [self setupScrollView];

     // 添加pageControl

     [self setupPageControl];

 }

 /** 添加scrollView */

 - (void) setupScrollView {

     // 创建一个scrollView

     UIScrollView *scrollView = [[UIScrollView alloc] init];

     scrollView.frame = self.view.bounds;

     // 添加图片

     for (int i=; i<NewFeatureCount; i++) {

         // 获取图片

         NSString *featureImageName = [NSString stringWithFormat:@"new_feature_%d", i+];

         UIImageView *featureImageView = [[UIImageView alloc] initWithImage:[UIImage imageWithNamed:featureImageName]];

         // 设置图片尺寸位置

         CGFloat featureWidth = self.view.width;

         CGFloat featureHeight = self.view.height;

         CGFloat featureX = featureImageView.width * i;

         CGFloat featureY = ;

         featureImageView.frame = CGRectMake(featureX, featureY, featureWidth, featureHeight);

         // 如果是最后一页,加上功能按钮

         if (i == (NewFeatureCount - )) {

             // 为了让最后一页的的功能按钮能够生效,必须激活交互功能

             featureImageView.userInteractionEnabled = YES;

             [self addFunctionButton:featureImageView];

         }

         // 添加图片到scrollView

         [scrollView addSubview:featureImageView];

     }

     // 设置scrollView功能属性

     scrollView.userInteractionEnabled = YES;

     scrollView.scrollEnabled = YES; // 支持滚动

     scrollView.contentSize = CGSizeMake(self.view.width * NewFeatureCount, ); // 只需要水平滚动

     scrollView.pagingEnabled = YES; // 支持分页

     scrollView.showsHorizontalScrollIndicator = NO; // 隐藏水平滚动条

     // 设置背景色

     scrollView.backgroundColor = [UIColor colorWithRed:/255.0 green:/255.0 blue:/255.0 alpha:1.0];

     // 设置代理

     scrollView.delegate = self;

     // 添加

     [self.view addSubview:scrollView];

 }

 /** 添加pageControl */

 - (void) setupPageControl {

     // pageControl不能加在scrollView上,不然会随着内容一起滚动

     UIPageControl *pageControl = [[UIPageControl alloc] init];

     pageControl.pageIndicatorTintColor = [UIColor blackColor];

     pageControl.currentPageIndicatorTintColor = [UIColor redColor];

     pageControl.numberOfPages = NewFeatureCount;

     // 设置位置

     pageControl.centerX = self.view.width * 0.5;

     pageControl.centerY = self.view.height * 0.9;

     self.pageControl = pageControl;

     [self.view addSubview:pageControl];

 }

 #pragma mark - UIScrollViewDelegate

 /** scrollView滚动代理方法,在这里控制页码指示器 */

 - (void)scrollViewDidScroll:(UIScrollView *)scrollView {

     // 四舍五入,让图片滚动超过中线的时候改变页码

     self.pageControl.currentPage = scrollView.contentOffset.x / scrollView.width + 0.5;

 }

 #pragma mark - 最后一页的功能

 /** 添加功能按钮 */

 - (void) addFunctionButton:(UIImageView *) imageView {

     // 添加"分享"选项按钮

     [self addShareButton:imageView];

     // 添加"进入微博"按钮

     [self addEnterWeiboButton:imageView];

 }

 /** 分享选项按钮 */

 - (void) addShareButton:(UIImageView *) imageView  {

     // 创建按钮

     UIButton *shareButton = [UIButton buttonWithType:UIButtonTypeCustom];

     [shareButton setTitle:@"分享给大家" forState:UIControlStateNormal];

     [shareButton setImage:[UIImage imageWithNamed:@"new_feature_share_false"] forState:UIControlStateNormal];

     [shareButton setImage:[UIImage imageWithNamed:@"new_feature_share_true"] forState:UIControlStateSelected];

     [shareButton addTarget:self action:@selector(shareButtonClicked:) forControlEvents:UIControlEventTouchUpInside];

     [shareButton setTitleColor:[UIColor blackColor] forState:UIControlStateNormal];

     // 位置尺寸

     shareButton.size = CGSizeMake(, );

     // 必须先设置了size,center才真的在中心,不然就是从左上角开始!!!

     shareButton.centerX = self.view.width * 0.5;

     shareButton.centerY = self.view.height * 0.65;

     // 设置内间距

     shareButton.titleEdgeInsets = UIEdgeInsetsMake(, 10.0, , );

     // 添加

     [imageView addSubview:shareButton];

 }

 /** 分享选项点击事件方法 */

 - (void) shareButtonClicked:(UIButton *) button {

     button.selected = !button.selected;

 }

 /** “进入微博"按钮 */

 - (void) addEnterWeiboButton:(UIImageView *) imageView  {

     // 创建按钮

     UIButton *enterButton = [UIButton buttonWithType:UIButtonTypeCustom];

     enterButton.userInteractionEnabled = YES;

     [enterButton setBackgroundImage:[UIImage imageWithNamed:@"new_feature_finish_button"] forState:UIControlStateNormal];

     [enterButton setBackgroundImage:[UIImage imageWithNamed:@"new_feature_finish_button_highlighted"] forState:UIControlStateHighlighted];

     [enterButton setTitleColor:[UIColor whiteColor] forState:UIControlStateNormal];

     [enterButton setTitle:@"进入微博" forState:UIControlStateNormal];

     // 位置尺寸

     enterButton.size = enterButton.currentBackgroundImage.size;

     enterButton.centerX = self.view.width * 0.5;

     enterButton.centerY = self.view.height * 0.8;

     // 监听点击

     [enterButton addTarget:self action:@selector(enterWeiboButtonClicked) forControlEvents:UIControlEventTouchUpInside];

     // 添加

     [imageView addSubview:enterButton];

 }

 /** “进入微博” 按钮点击 */

 - (void) enterWeiboButtonClicked {

     UIWindow *window = [UIApplication sharedApplication].keyWindow;

     window.rootViewController = [[HVWTabBarViewController alloc] init];

 }

 @end

[iOS微博项目 - 1.7] - 版本新特性的更多相关文章
- IOS第三天-新浪微博 - 版本新特性,OAuth授权认证
*********版本新特性 #import "HWNewfeatureViewController.h" #import "HWTabBarViewController ...
- [iOS微博项目 - 2.1] - 获得新浪授权接口
A.如何获得新浪的授权接口 登陆新浪的开放平台 注册新浪账号 创建应用 获得应用id和请求地址 查阅相关API 关联需要进行测试的账号 1.登陆开放平台 http://open.weibo.com ...
- IOS 制作版本新特性
创建版本新特性 页面(存放图片) HMNewfeatureViewController.m #define HMNewfeatureImageCount 4 #import "HMNewfe ...
- Atitit opencv版本新特性attilax总结
Atitit opencv版本新特性attilax总结 1.1. :OpenCV 3.0 发布,史上功能最全,速度最快的版1 1.2. 应用领域2 1.3. OPENCV2.4.3改进 2.4.2就有 ...
- Atitit mac os 版本 新特性 attilax大总结
Atitit mac os 版本 新特性 attilax大总结 1. Macos概述1 2. 早期2 2.1. Macintosh OS (系统 1.0) 1984年2 2.2. Mac OS 7. ...
- 【开源】OSharp3.3框架解说系列:重新开源及3.3版本新特性
OSharp是什么? OSharp是个快速开发框架,但不是一个大而全的包罗万象的框架,严格的说,OSharp中什么都没有实现.与其他大而全的框架最大的不同点,就是OSharp只做抽象封装,不做实现.依 ...
- framework各版本新特性(为面试准备)
菜鸟D估计描述这些新特性的文章都是烂大街的货色,之所以拿出来分(e)享(xin)一下,有两个原因:1.当年面试的时候有人问到,我不知道该怎么回答:2.项目需要发布了,但是考虑到framework的版本 ...
- Atitit.jquery 版本新特性attilax总结
Atitit.jquery 版本新特性attilax总结 1. Jq1.4 1 2. 1.5 1 3. 1.6 3 4. Jq1.7 3 ⒉提升了事件委派时的性能有了大幅度的提升,尤其是在ie7下: ...
- Atitit..jdk java 各版本新特性 1.0 1.1 1.2 1.3 1.4 1.5(5.0) 1.6(6.0) 7.0 8.0 9.0 attilax 大总结
Atitit..jdk java 各版本新特性 1.0 1.1 1.2 1.3 1.4 1.5(5.0) 1.6(6.0) 7.0 8.0 9.0 attilax 大总结 1.1. Java的编年史2 ...
随机推荐
- 抽象工厂在ADO.Net中的应用
https://msdn.microsoft.com/zh-cn/library/ms971499.aspx http://www.c-sharpcorner.com/UploadFile/moses ...
- poj 1195 Mobile phones(二维树状数组)
树状数组支持两种操作: Add(x, d)操作: 让a[x]增加d. Query(L,R): 计算 a[L]+a[L+1]……a[R]. 当要频繁的对数组元素进行修改,同时又要频繁的查询数组内任一 ...
- 最大流 Dinic + Sap 模板
不说别的,直接上模板. Dinic+当前弧优化: struct Edge{ int x,y,c,ne; }e[M*]; int be[N],all; int d[N],q[N]; int stack[ ...
- ha_innobase::rnd_next
/*****************************************************************//** Reads the next row in a table ...
- 域名服务器--DNS
.域名 .DNS.DNS 端口号 .DNS服务器 .域名解析过程及原理 .动态域名解析(DDNS)服务的原理 域名 域名是与主机名称一一对应的一个名字.使得人们可以通过ip的名字来访问ip,域名就是为 ...
- poj1088
这题是dp还是dfs+记忆化?(其实好像没什么区别?) 用f[i,j]表示滑到(i,j)时之后最多能滑多远,依次穷举每一个起点(i,j)则 f[i,j]=max{f[i,j-1],f[i-1,j],f ...
- POJ 1276 (多重背包) Cash Machine
题意: 有n种纸币,已知每种纸币的面值和数量,求所能凑成的不超过cash的最大总面值. 分析: 这道题自己写了一下TLE了,好可耻.. 找了份比较简洁的代码抄过来了..poj1276 #include ...
- UVa 11178 (简单练习) Morley's Theorem
题意: Morley定理:任意三角形中,每个角的三等分线,相交出来的三个点构成一个正三角形. 不过这和题目关系不大,题目所求是正三角形的三个点的坐标,保留6位小数. 分析: 由于对称性,求出D点,EF ...
- jQuery的datatable怎么才能给某一列添加超链接?
aocolumeDef.这个里面去定义.return返回的字符串会代替原来cell里面的内容 e.g: datatable=$('#dt_basic').dataTable({ "bAuto ...
- git - 搭建git仓库
1. 更新git版本: http://codelife.me/blog/2013/06/25/upgrade-git-on-centos-6-4/ 2. 建立git仓库: git init --bar ...